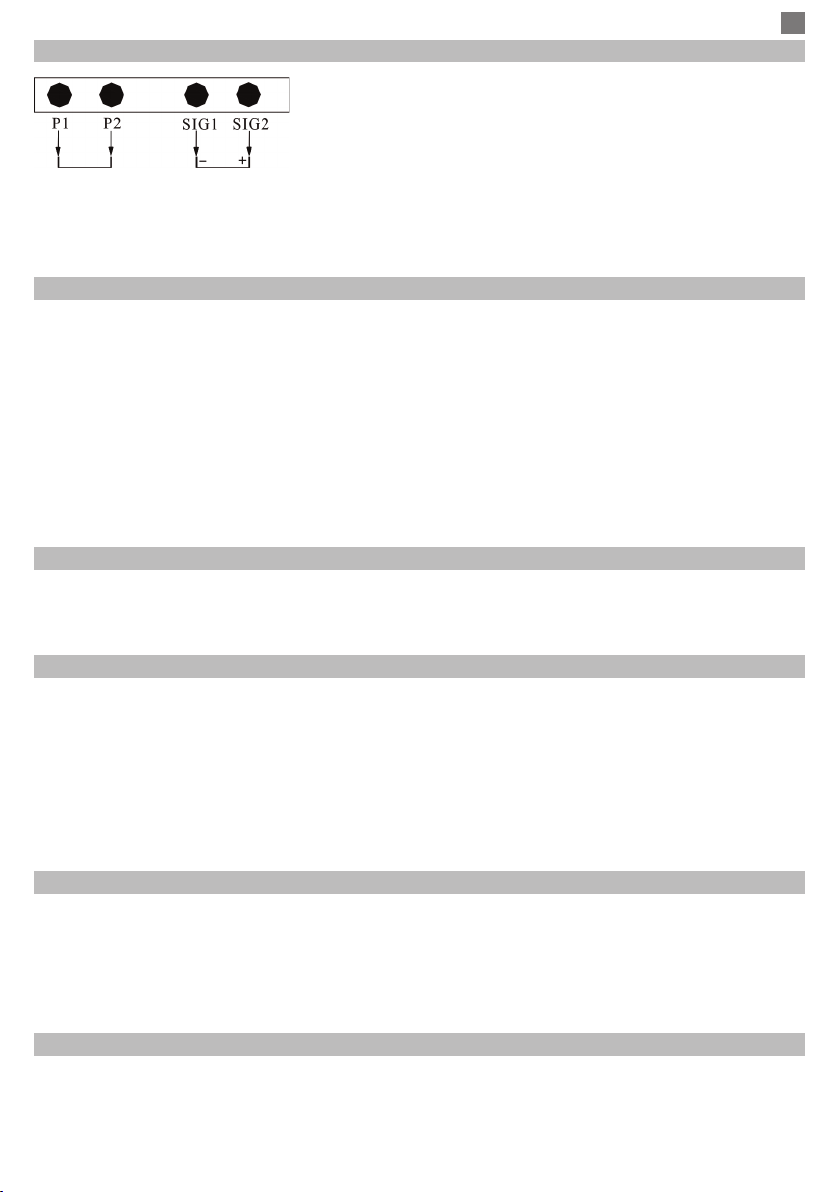
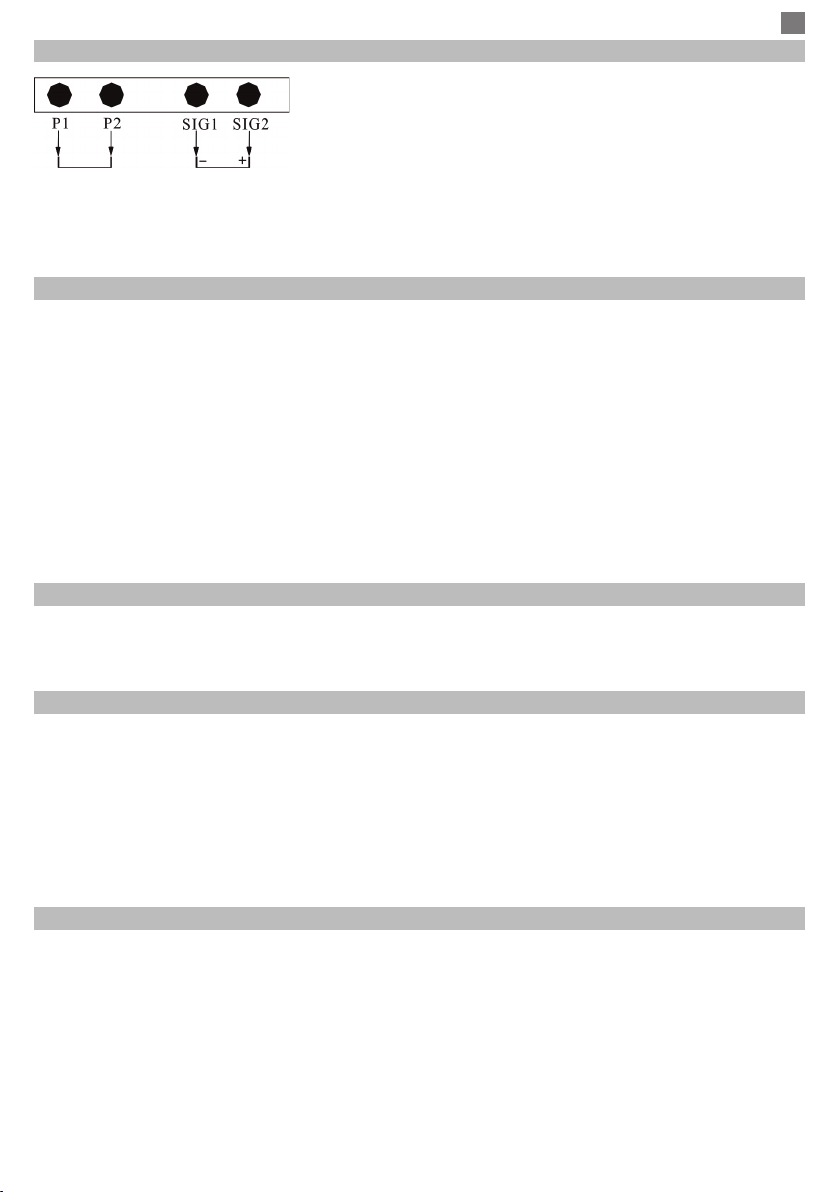
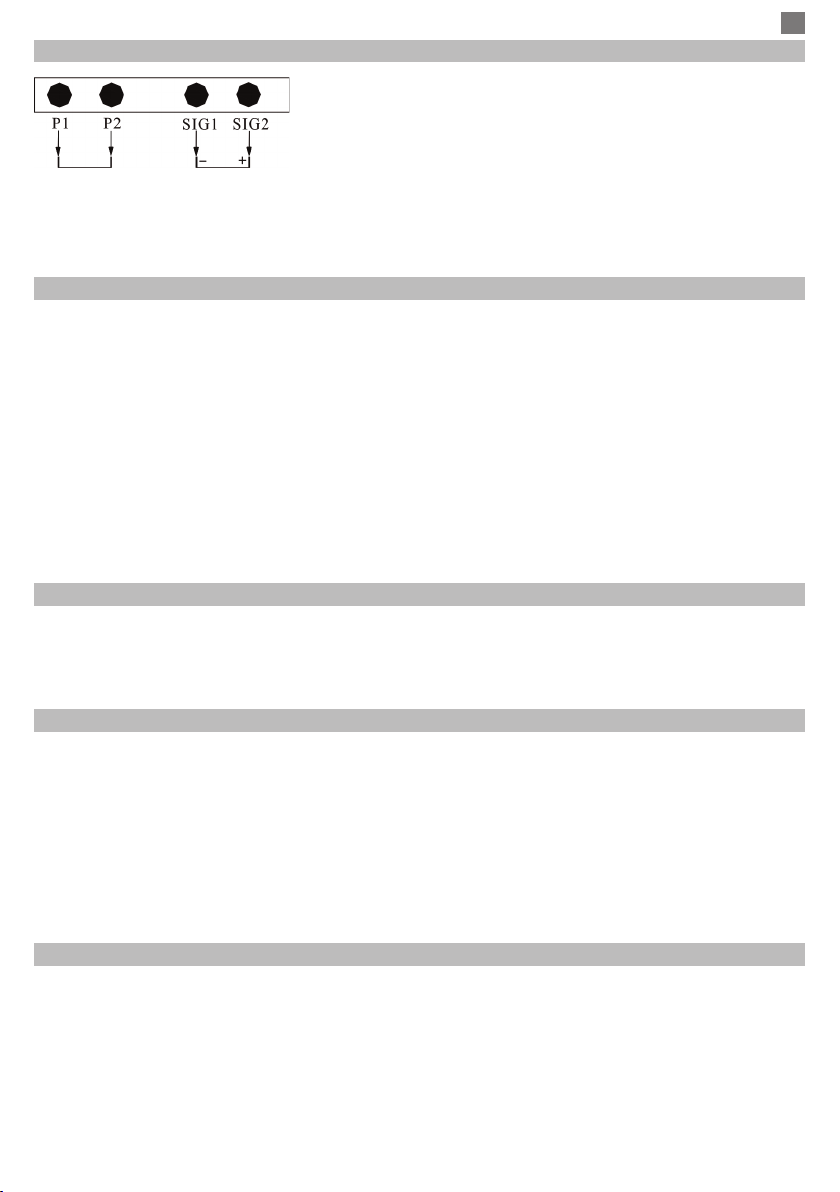
PNI GD-01 User manual

PNI GD-01
Gas detector / Gázérzékelő / Detektor gazu / Senzor gaz
EN User manual 2
HU Használati utasítás 4
PL Instrukcja obsługi 6
RO Manual de utilizare 8

EN
2
INTRODUCTION
This product is a detector designed to identify gas leaks.
GAS DETECTOR DESCRIPTION
Main features
- High reliability sensor
- Auto reset after alarm
- Induced gas - natural gas / LPG
- Indoor use, wall mounting
TECHNICAL SPECIFICATIONS
Power voltage 230V
Output voltage for the gas valve 9 - 12V (impulse)
Standby current ≤ 1W
Alarme current ≤ 2.5W
Rating power 3W (la 230V)
Warm-up time about 180 seconds
Sound level ≥ 70dB/m
Alarm level 20% LEL (Lower Explosive Limit)
Alarm gas density level 0.1% - 0.5%
Operating temperature -26°C ~ +60°C
Dimensions 110 x 73 x 41 mm
INSTALLATION
1. Please confirm the induced gas is heavier than air or lighter than air. Gas heavier than air: LPG etc. Gas lighter
than air: natural gas, marsh gas and etc.
2. Depending on the weight of the gas, choose the correct location of the gas detector. If the gas is heavier than
the air, position the gas detector at 0.3 - 1.0 m up from the oor, over a range of max. 1.5 m of the gas source. If the
gas is lighter than the air, position the gas detector at 0.3 - 1.0 m down from the ceiling, over a range of max. 1.5 m
of the gas source.
3. Fasten the screws fermly into the wall, then hang the gas detector.
4. Avoid installing the gas detector near the following sources: direct air ow caused by wind, ventilators, open
doors or windows, steam sources, oil vapor, etc.
5. The wires must have the correct size and color to avoid damages to the device or shortcircuit. A faulty wire
connection may have repercussions in the event of an alarm due to gas leakage.

EN
3
TERMINAL BLOCK FIGURE
Power input Gas valve
Wire conguration:
• Brown thread: (+)
• Blue thread: (-)
OPERATING INSTRUCTIONS
The gas detector can be used stand alone or with a wired gas valve.
USING THE GAS DETECTOR INDEPENDENTLY OR TOGETHER WITH A SOLENOID VALVE
1. Choose the right place to install the gas detector. Follow the installation instructions.
2. Power the gas detector to a 230V source. During the priming period of the sensor, for about 3 minutes, the green
LED will remain lit and the red LED will blink. After this period, the detector will enter the normal operating mode.
The green light stays on for the entire duration of operation.
3. If the detector identifies a gas leak, the red LED will light and the siren will sound continuously. If the detector
is connected to an solenoid valve, it will transmit to it an impulse that will cause this device to stop the gas supply.
The gas detector will return to its initial state of operation after the gas dispersion or after restarting the detector.
4. If the yellow LED is lit - indicates an internal sensor error. Disconnect power and contact a service center.
TESTING THE PRODUCT
To test an installed gas detector, you can spread in the air a bit of lighter gas to about 5 cm from the detector gas
slots. CAUTION: Frequent testing may cause sensitivity reduction. The detector will interrupt the alarm and return
to the normal mode after the gas density drops below the alarm level.
PROCEDURES IN THE EVENT OF AN ALARM
The gas detector enters the alarm condition if the gas density inside the room exceeds the minimum alarm level
(20% LEL).
Proceed as follows:
1. Close the gas supply immediately
2. Open the window and let air quickly penetrate into the room
3. Close any source of fire and do not use anything that could cause fire, for example lighters, matches
4. Avoid lighting any electrical equipment
5. Try to find the exact location where the gas leak occurs and immediately notify the specialized institutions or a
qualified person
NOTICE
1. The gas detector must be installed and connected correctly.
2. The gas detector must be supplied with a current source.
3. Regularly maintain the detector as directed.
4. Test the detector every six months.
5. For various reasons, such as changing environmental conditions, disruption of electricity, or fraudulent action
on the electronic system, the product may not work properly. The user is advised to take all safety precautions.
CONNECTIONG THE GAS VALVE AND THE GAS SENSOR
Connecting the gas sensor with the gas valve can be done using the plug & play connector. Both products can be
adapted for other valves / sensors if changing the connections system.
Cable recommendations:
1. Cable type: two-wire, 2 x 0.3 mm² or higher
2. Cable length < 20 meters

HU
4
BEVEZETÉS
Ezen termék az esetleges gázszivárás észelésére szolgál.
GÁZSZIVÁRGÁS ÉRZÉKELŐ
Fő tulajdonságok:
- Magas megbízhatóságú érzékelők
- Riasztás utáni automatikus visszaállítás
- Előidézett vagy természetes gáz / LPG
- Beltéri használat, falra való felszerelhetőség
GÁZÉRZÉKELŐ TECHNIKAI TUDLAJDONSÁGOK
Áramerősség 230V
Gázszelep kimeneti feszültsége 9 - 12V (impulzív)
Készenléti áramerősség ≤ 1W
Riasztási áramerősség ≤ 2.5W
Szabályozási áramerősség 3W (la 230V)
Felmelegedési idő Körülbelül 180 másodperc
Hengerő ≥ 70dB/m
Riasztási szint 20% LEL (Alacsony robbanási eshetőségi)
Gázsűrűség riasztási szint 0.1% - 0.5%
Működési hőmérséklet -26°C ~ +60°C
Méretek 110 x 73 x 41 mm
TELEPÍTÉS
1. Kerjük, bizonyosodjon meg hogy a keletkezett/előizdézett gáz nehezebb vagy könnyebb a levegőnél. Ha a gáz
nehezebb mint a levegő: LPG. Ha a gáz könnyebb mint a levegő akkor természetes gáz van jelen.
2. A gáz súlyától függően válassza ki a gázszivárgás érzékelő megfelelő helyét. Ha a gáz nehezebb mint a
levegő, helyezze az érzékelőt 0,3 és 1 méter közötti magasságban a földszinttől a gázforrástól maximum 1,5
méter távolságra. Ha a gáz könnyebb mint a levegő, helyezze a gázérzékelőt 0,3 és 1 méter közötti távolságban a
plafontól és maximum 1,5 méter távolságra a gázforrástól a megfelelő működés érdekében.
4. Biztosítson csavarozott felszerelést a falon az eszköznek, majd helyezze fel azt a falra.
5. Ne helyezze a gázszűrő berendezést a következő helyek közelébe: tiszta levegőáramlás, ventillátorok, nyitott
ajtók, párát kibocsátó berendezések és olaj utáni gőz.
6. A csatlakozóknak megfelelő méretűnek és színűnek kell lenniük annak érdekében, hogy az esetleges
készülékmeghibásodás vagy rövidzálat elkerülhetővé váljon. Egy hibás vezetékcsatlakozás visszaáramlással
járhat a gázszivárgás következtében. .

HU
5
TERMINÁL JELMAGYARÁZAT
BEMENET Gáz szelep
Huzal konguráció:
• Tengeri fenyő: (+)
• Kék szál: (-)
MŰKÖDÉSI INSTRUKCIÓK
Az gázszivárás szűrőberendezés használható önmagában és vezetékes szeleppel is.
A GÁZÉRZÉKELŐT FÜGGETLENÜL VAGY MÁGNESSZELEPPEL EGYÜTT KELL HASZNÁLNI
1. Válassza ki a megfelelő helyet a gázérzékelő telepítéséhez. Kövesse a telepítési utasításokat.
2. Kapcsolja be a gázérzékelőt egy 230 V-os áramforráshoz. Az érzékelő feltöltési ideje alatt, kb. 3 percig, a
zöld LED világít, és a piros LED villog. Ez után az érzékelő normál üzemmódba lép. A zöld fény a működés teljes
időtartama alatt világít.
3. Ha az érzékelő gázszivárgást észlel, akkor a piros LED kigyullad, és a sziréna folyamatosan megszólal. Ha az
érzékelőt mágnesszelephez csatlakoztatják, akkor egy olyan impulzust továbbít, amely miatt az eszköz leállítja a
gázellátást. A gázdetektor visszatér az eredeti működési állapotába a gázszétadás vagy az érzékelő újraindítása
után.
4. Ha a sárga LED világít - jelzi a belső érzékelő hibáját. Húzza ki az áramellátást és lépjen kapcsolatba a
szervizközponttal
A TERMÉK TESZTELÉSE
A telepített szűrőberendezés tesztelése érdekében engedjen egy kis gázt a légtérbe körülbelül 5cm távolságra a
készülék gáznyílásaitól. A gyakori tesztelés az érzékenység romlásához vezethet. A szűrőberendezés megszakítja
a riasztást és visszaáll az alapmódba miután a gázsűrűség a riasztási szint alá esik.
RIASZTÁSI HELYZET ESETÉN TÖRTÉNŐ ELJÁRÁS
A gázszűrő berendezés automatikusan riasztási állapotba lép amikor a gáz sűrűsége a szobában a minimum
riasztási szintet (20% LEL) eléri.
Kövesse az alábbi utasításokat:
1. Azonnal zárja el a gázellátást.
2. Nyisson ablakot, hogy friss levegő jusson a szobába a káros gázok kijuttatása érdekében.
3. Minden tűzforrást zárjon el és ne használjon semmit, amely tűzet generálhat, mint például gyufák, gyújtók.
4. Ne használjon semmilyen elektromos felszerelést.
5. Próbálja megkeresni a pontos területet, ahonnan a gáz szivároghat és azonnal keressen fel szakképzett
segítséget.
A GÁZSZELEP ÉS GÁZÉRZÉKELŐ CSATLAKOZTATÁSA
A gázérzékelő csatlakoztatása végrehajtható a csatlakoztatás és indítás (plug & play) kapcsoló segítségével.
Both products can
be adapted for other valves / sensors if changing the connections system. Mindkét termék alkalmazható
szelepekhez/ érzékelőkhöz a kapcsolati rendszer megváltoztatásának esetében.
Kábel-ajánlások:
1. Kábel típusa: kétvezetékes, legalább 2 x 0,3 mm²
2. Kábelhossz <20 méter

PL
6
WPROWADZENIE
Ten produkt jest czujnikiem przeznaczonym do identyfikacji ulatniania się gazu.
OPIS CZUJNIKA GAZU
Główne cechy:
- Czujnik o wysokiej wrażliwości
- Automatyczne resetowanie po alarmie
- Wykrywa gaz ziemny, gaz płynny (LPG) i czad
- Stosowany tylko we wnętrznach, zawieszany na ścianie
SPECYFIKACJE TECHNICZNE CZUJNIKA GAZU
Napięcie zasilania 230V
Wyjście napięcia dla zaworu elektromagnetycznego 9 - 12V (impuls)
Zużycie w trybie stand-by ≤ 1W
Zużycie w stanie alarmowym ≤ 2.5W
Zużycie maksymalne 3W (la 230V)
Czas zalewania czujnika Ok 180 sekund
Intensywność dźwięku ≥ 70dB/m
Poziom alarmu 20% LEL (Lower Explosive Limit)
Poziom gęstości gazu dla alarmu 0.1% - 0.5%
Temperatura użytkowania -5 ~ +60°C
Wymiary 110 x 73 x 41 mm
INSTRUKCJA INSTALACJI
1. Najpierw sprawdź, czy gaz ze źródła jest cięższy lub lżejszy od powietrza. Gazy cięższe od powietrza: GPL itp.
Gazy lżejsze od powietrza: gaz ziemny, metan itp.
2. W zależności od ciężaru gazu, wybierz właściwe położenie detektora gazu. Jeśli gaz jest cięższy od
powietrza, umieść detektor gazu na wysokości 0,3 - 1,0 m od podłogi, powyżej max. 1,5 m źródła gazu. Jeśli gaz
jest lżejszy od powietrza, umieść detektor gazu na wysokości 0,3 - 1,0 m od sufitu, powyżej max. 1,5 m źródła
gazu.
3. Przykręć mocno śruby do ściany, a następnie umieść czujnik gazu.
4. Unikaj instalowania czujnika gazu w pobliżu następujących źródeł: bezpośredniego przepływu powietrza
spowodowanego wiatrem, wentylatorów, otwartych drzwi lub okien, źródeł pary, oparów oleju itp.
5. Przewody muszą mieć odpowiedni rozmiar i kolor, aby uniknąć błędów. Nieprawidłowe połączenie z
przekaźnikiem może mieć konsekwencje w przypadku alarmu wycieku gazu.

PL
7
POŁĄCZENIA
Wejście zasilania Elektrozawór
Konguracja przewodów:
• Jodła morska: (+)
• Niebieska nić: (-)
INSTRUKCJA UŻYTKOWANIA E
Czujnik gazu może być używany niezależnie lub razem z elektrozaworem.
UŻYWANIE DETEKTORA GAZU NIEZALEŻNIE LUB RAZEM Z ZAWOREM ELEKTROMAGNETYCZNYM
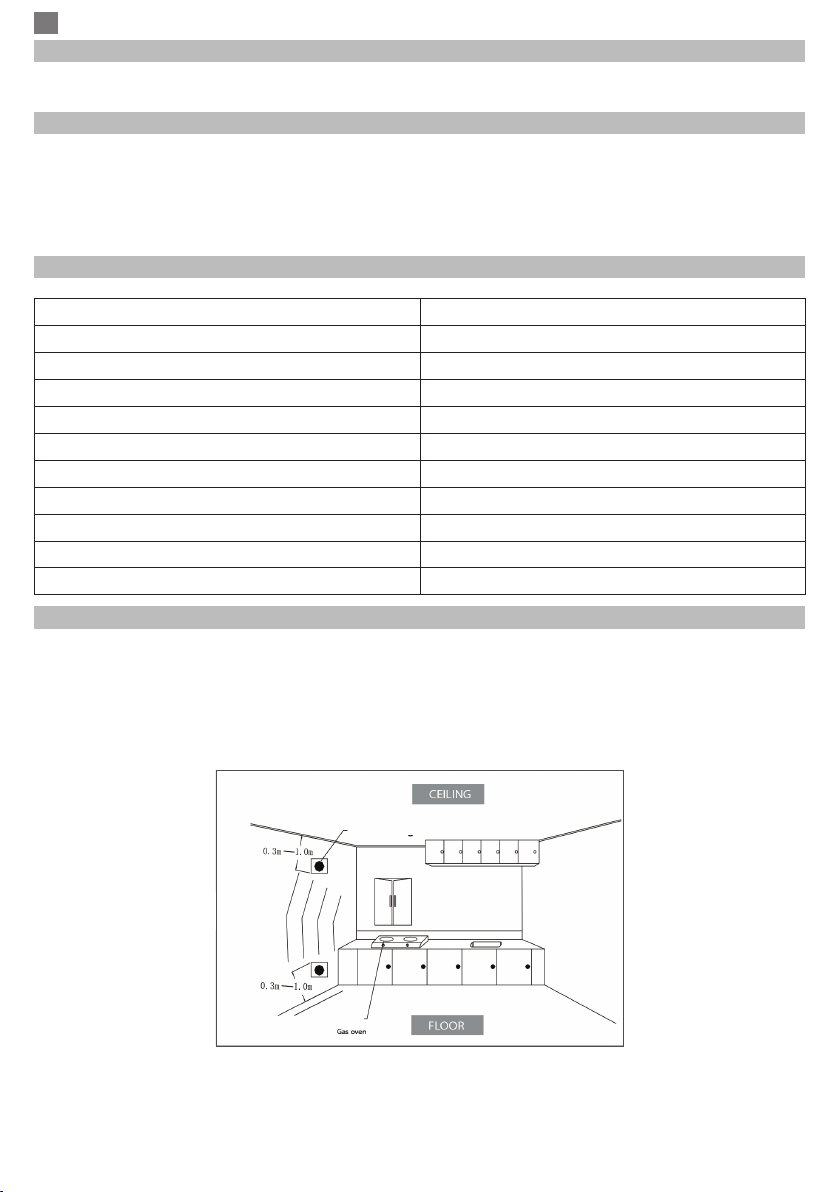
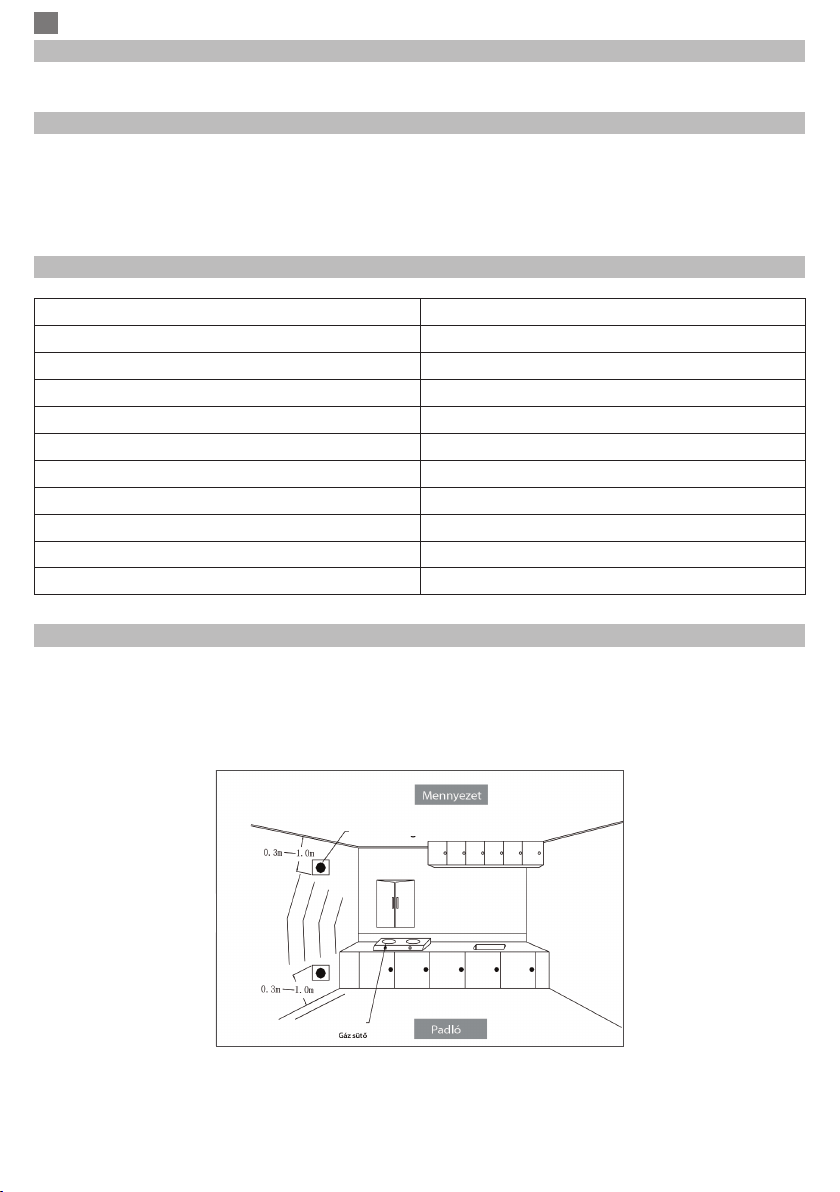
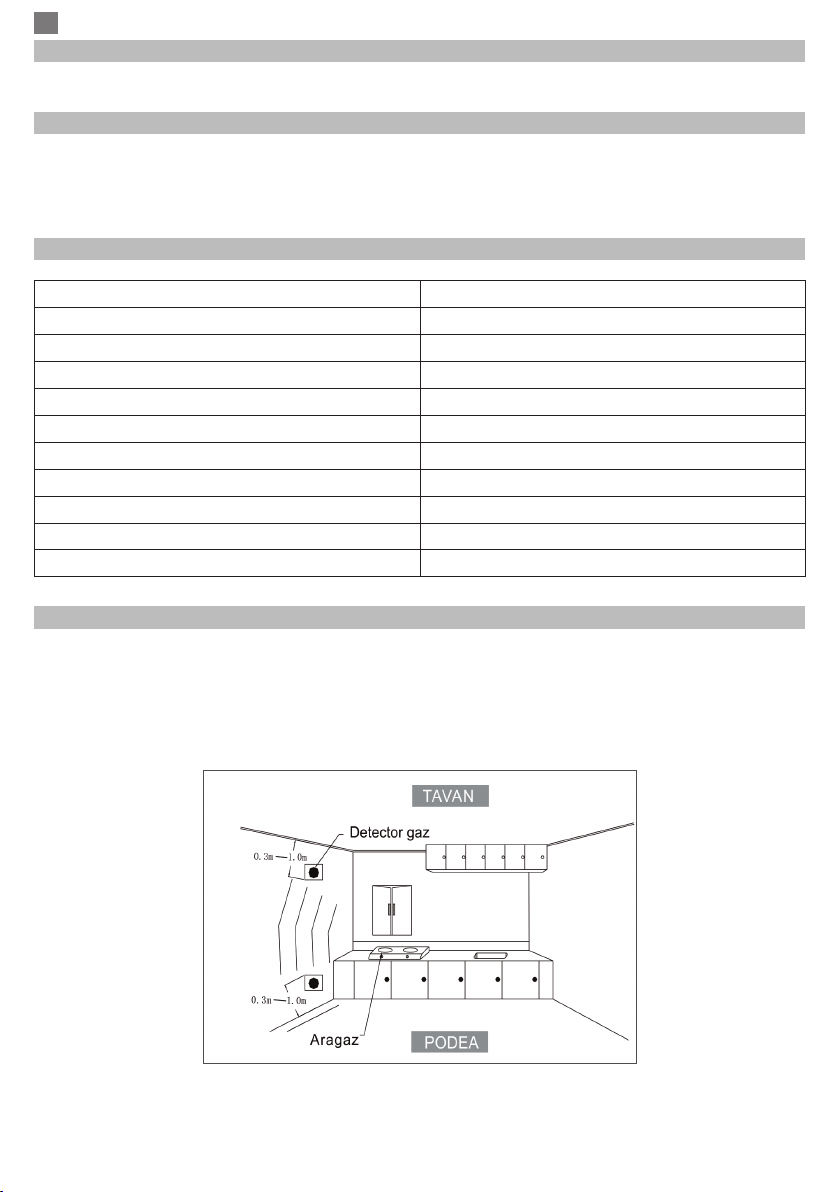
1. Wybierz odpowiednie miejsce do zainstalowania detektora gazu. Postępuj zgodnie z instrukcjami instalacji.
2. Podłączyć wykrywacz gazu do źródła zasilania 230 V. Podczas okresu zalewania czujnika przez około 3 minuty
zielona dioda LED pozostanie zapalona, a czerwona dioda LED będzie migać. Po tym czasie czujka przejdzie w
normalny tryb pracy. Zielone światło pozostaje włączone przez cały czas działania.
3. Jeśli wykrywacz wykryje wyciek gazu, czerwona dioda LED zaświeci się, a syrena będzie wydawać ciągły
dźwięk. Jeśli detektor jest podłączony do elektrozaworu, przekaże mu impuls, który spowoduje zatrzymanie
dopływu gazu przez to urządzenie. Detektor gazu powróci do początkowego stanu działania po rozproszeniu gazu
lub po ponownym uruchomieniu detektora.
4. Jeśli świeci żółta dioda LED - oznacza błąd czujnika wewnętrznego. Odłącz zasilanie i skontaktuj się z centrum
serwisowym
TESTOWANIE
Aby przetestować zainstalowany czujnik gazu, można rozproszyć trochę gazu z zapalniczki w odległości 5 cm od
czujnika. UWAGA: Testowanie częstotliwości może spowodować zmniejszenie czułości. Detektor przerwie alarm i
powróci do normalnej pracy po spadku gęstości gazu poniżej poziomu alarmu.
PROCEDURY W PRZYPADKU ALARMU
Czujnik gazu wchodzi w stan alarmowy, jeśli gęstość gazu w pomieszczeniu przekracza minimalny poziom
alarmowy (20% DGW).
Postępuj w następujący sposób:
1. Natychmiast zamknij dopływ gazu
2. Otwórz okno i pozwól powietrzu szybko wniknąć do pomieszczenia
3. Zamknij wszelkie źródła ognia i nie używaj niczego, co mogłoby spowodować pożar, na przykład zapalniczka,
zapałki
4. Unikaj włączania jakiegokolwiek sprzętu elektrycznego
5. Spróbuj znaleźć dokładne miejsce ulatniania gazu i niezwłocznie powiadom wyspecjalizowane instytucje lub
wykwalifikowaną osobę
OSTRZEŻENIA
1. Czujnik gazu musi być zainstalowany i podłączony prawidłowo.
2. Czujnik gazu musi być zaopatrzony w źródło prądu.
3. Regularnie konserwuj czujnik zgodnie z zaleceniami.
4. Testuj czujnik co sześć miesięcy.
5. Z różnych powodów, takich jak zmieniające się warunki środowiskowe, zakłócenia energii elektrycznej
lub fałszywe działanie w systemie elektronicznym, produkt może nie działać prawidłowo. Zaleca się, aby
użytkownik podjął wszelkie środki ostrożności.
POŁĄCZENIE CZUJNIKA Z ELEKTROZAWOREM
Podłączenie czujnika gazu z zaworem elektromagnetycznym sprawia, że wtyczka w plug & play nie wymaga
żadnych regulacji, produkty można dostosować do innych zaworów elektrozaworu lub czujnika.
Zalecenia dotyczące kabli:
1. Kabel: biofilar, 2 x 0.3 mm² większy
2. Długość kabla < 20 metrów

RO
8
INTRODUCERE
Acest produs este un detector destinat identificarii pierderilor de gaz.
CARACTERISTICI PRINCIPALE
- Senzor cu fiabilitate ridicata
- Resetare automata dupa alarma
- Detecteaza gaze naturale, GPL (gaz petrolier lichefiat) si gaze naturale
- Utilizat doar la interior, montaj pe perete
SPECIFICATII TEHNICE
Tensiune de alimentare 230V
Tensiune de iesire pentru electrovalva 9 - 12V (impuls)
Consum in stand-by ≤ 1W
Consum in alarma ≤ 2.5W
Consum maxim 3W (la 230V)
Timp amorsare senzor Aprox. 180 secunde
Intensitate sonora ≥ 70dB/m
Nivel de alarma 20% LEL (Lower Explosive Limit)
Densitate gaz nivel alarma 0.1% - 0.5%
Temperatura de utilizare -26°C ~ +60°C
Dimensiuni 110 x 73 x 41 mm
INSTRUCTIUNI DE INSTALARE
1. Mai intai identificati daca gazul de la sursa este mai greu sau mai usor decat aerul. Gaze mai grele decat aerul:
GPL etc. Gaze mai usoare decat aerul: gaz natural, gaz metan etc.
2. In functie de greutatea gazului, alegeti amplasarea corecta a detectorului de gaz. In cazul in care gazul este mai
greu decat aerul, pozitionati detectorul de gaz la o inaltime de 0,3 - 1,0 m fata de podea, pe o raza de max. 1,5 m de
sursa de gaz. In cazul in care gazul este mai usor decat aerul, pozitionati detectorul de gaz la o inaltime de 0,3 - 1,0
m fata de tavan, pe o raza de max. 1,5 m de sursa de gaz.
3. Fixati bine suruburile in perete, dupa care pozitionati detectorul de gaz.
4. Evitati sa instalati detectorul de gaz in apropierea urmatoarelor surse: ux direct de aer cauzat de vant,
ventilatoare, usi sau ferestre deschise, surse de abur, vapori de ulei etc.
5. Firele trebuie sa aiba dimensiunea si culoarea corecte, pentru a evita legaturi eronate. O conexiune gresita a
firelor poate avea repercursiuni negative in caz de alarma cauzata de pierderi de gaz.

RO
9
CONEXIUNI
Intrare alimentare Electrovalva
Conguratie re:
• Fir maro: Masa (+)
• Fir albastru: Nul (-)
INSTRUCTIUNI DE FOLOSIRE
Detectorul de gaz poate fi folosit independent sau impreuna cu o electrovalva.
FOLOSIREA DETECTORULUI DE GAZ IN MOD INDEPENDENT SAU IMPREUNA CU O ELECTROVALVA
1. Alegeti locul potrivit instalarii detectorului de gaz. Urmati instructiunile de instalare.
2. Alimentati detectorul de gaz la o sursa 230V. Pe perioada de amorsare a senzorului, de circa 3 minute, ledul
verde va ramane aprins, iar ledul rosu va clipi. Dupa aceasta perioada, detectorul va intra in modul normal de
functionare. Ledul verde ramane aprins pe toata durata functionarii.
3. Daca detectorul identifica o pierdere de gaz, ledul rosu se va aprinde, iar sirena va suna continuu. Daca detectorul
este legat de o electrovalva, va transmite catre aceasta un impuls care va determina acest dispozitiv sa opreasca
furnizarea cu gaz. Detectorul de gaz se va intoarce la starea initiala de functionare dupa dispersarea gazului sau
dupa repornirea detectorului.
4. Daca LED-ul galben este aprins - indica o eroare a senzorului intern. Intrerupeti alimentarea si contactati un
centru service.
TESTARE
Pentru a testa un detector de gaz instalat, puteti raspandi in aer un pic de gaz de bricheta la o distanta de 5 cm de
fantele pentru gaz ale detectorului. ATENTIE: testarea frecventa poate cauza reducerea sensibilitatii senzorului.
Detectorul va intrerupe alarma si va reintra in modul normal de functionare, dupa ce densitatea de gaz va scadea
sub nivelul de alarma.
PROCEDURI DE URMAT IN CAZ DE ALARMA
Detectorul de gaz intra in starea de alarma daca densitatea gazului din incapere depaseste nivelul minim de
alarma (20% LEL).
Procedati dupa cum urmeaza:
1. Inchideti imediat valva de alimentare cu gaz
2. Deschideti fereastra si lasati sa patrunda rapid aer in incapere
3. Inchideti orice sursa de foc si nu folositi nimic care ar putea cauza un foc, de exemplu brichete, chibrituri
4. Evitati sa aprindeti orice echipament electric
5. Incercati sa gasiti locul exact unde are loc scurgerea de gaz si anuntati imediat institutiile specializate sau o
persoana calificata
AVERTIZARI
1. Detectorul de gaz trebuie instalat si conectat in mod corect.
2. Detectorul de gaz trebuie alimentat la o sursa de curent de 230V.
3. Intretineti in mod regulat detectorul conform indicatiilor.
4. Testati functionarea detectorului la fiecare sase luni.
5. Din diferite motive, cum ar fi schimbarea conditiilor de mediu, intreruperea curentului electric sau actionarea
frauduloasa asupra sistemului electronic, produsul ar putea sa nu functioneze corespunzator. Utilizatorul este
sfatuit sa ia toate masurile de precautie privind siguranta sa si a bunurilor sale.

RO
10
CONECTAREA SENZORULUI CU ELECTROVALVA
Conectarea senzorul de gaz cu electrovalva se face mufa in mufa (plug & play) fara alte ajustari, insa ambele
produse se pot adapta si pentru alte aparate de tip electrovalva, respectiv senzor, daca se schimba sistemul de
mufare.
Recomandari pentru cablu:
1. Cablu: bifilar, 2 x 0.3 mm² sau mai mare
2. Lungimea cablului < 20 metri

EN:
EU Simplied Declaration of Conformity
SC ONLINESHOP SRL declares that Gas detector PNI GD-01 complies with the Directive EMC 2014/30/EU. The
full text of the EU declaration of conformity is available at the following Internet address:
https://www.mypni.eu/products/1039/download/certifications
BG:
Опростена декларация за съответствие на ЕС
SC ONLINESHOP SRL декларира, че Газов детектор PNI GD-01 спазва директивата EMC 2014/30/EU.
Пълният текст на ЕС декларацията за съответствие е достъпен на следния интернет адрес:
https://www.mypni.eu/products/1039/download/certifications
DE:
Vereinfachte EU- Konformitätserklärung
SC ONLINESHOP SRL erklärt, dass das Gasmelder PNI GD-01 der Richtlinie EMC 2014/30/EU entspricht. Sie
finden den ganzen Text der EU-Konformitätserklärung an der folgenden Internetadresse:
https://www.mypni.eu/products/1039/download/certifications
ES:
Declaración UE de conformidad simplicada
SC ONLINESHOP SRL declara que el Detector de gas PNI GD-01 cumple con la Directiva EMC 2014/30/EU. El
texto completo de la declaración de conformidad de la UE está disponible en la siguiente dirección de Internet:
https://www.mypni.eu/products/1039/download/certifications
FR
Déclaration de conformité simpliée de l’UE
SC ONLINESHOP SRL déclare que Détecteur de gaz PNI GD-01 est conforme à la directive EMC 2014/30/EU. Le
texte complet de la déclaration de conformité UE est disponible à l’adresse Internet suivante:
https://www.mypni.eu/products/1039/download/certifications
HU:
Egyszerűsített EU Megfelelési Közlemény
SC ONLINESHOP SRL kijelenti azt, hogy a PNI GD-01 gázérzékelő megfelel az EMC 2014/30/EU irányelvnek. Az
EU-megfelelőségi nyilatkozat teljes szövege a következő internetes címen érhető el:
https://www.mypni.eu/products/1039/download/certifications
IT:
Dichiarazione UE di conformità semplicata
SC ONLINESHOP SRL dichiara che il Rivelatore di gas PNI GD-01 è conforme alla direttiva EMC 2014/30/UE. Il
testo completo della dichiarazione di conformità europea è disponibile al seguente indirizzo Internet:
https://www.mypni.eu/products/1039/download/certifications
PL:
Uproszczona deklaracja zgodności UE
SC ONLINESHOP SRL oświadcza, że Detektor gazu PNI GD-01 jest zgodny z dyrektywą EMC 2014/30/EU.
Pełny tekst deklaracji zgodności UE dostępny jest pod następującym adresem internetowym:
https://www.mypni.eu/products/1039/download/certifications
RO:
Declaratie UE de conformitate simplicata
SC ONLINESHOP SRL declara ca Senzor de gaz PNI GD-01 este in conformitate cu Directiva EMC 2014/30/EU.
Textul integral al declarației UE de conformitate este disponibil la urmatoarea adresa de internet:
https://www.mypni.eu/products/1039/download/certifications

Other manuals for GD-01
4
Table of contents
Languages:
Other PNI Gas Detector manuals

PNI
PNI GD-01 User manual

PNI
PNI SafeHouse HS110 User manual

PNI
PNI Safe House Smart Gas 300 WiFi User manual

PNI
PNI SAFE HOUSE 200 User manual

PNI
PNI GD-01 User manual

PNI
PNI SAFE HOUSE 200 User manual

PNI
PNI Safe House Dual Gas 250LR User manual

PNI
PNI SafeHouse HS110 User manual

PNI
PNI JL269 User manual

PNI
PNI GD-01 User manual