PNI Escort HP 8000L User manual

PNI Escort HP 8000L
CB radio / Statie radio CB / CB Rádió-adó-vevő / Radio CB / Radio CB
User manual / Manual de utilizare / Használati utasítás / Instrukcja obsługi / Manuale utente

2
WARNINGS
Please read the following precautions to prevent re, personal injury or the radio destruction.
Do not attempt to adjust the radio while driving; is dangerous.
This radio is designed for power supply at 13.8V DC. Do not use a 24V battery to power the radio.
Do not place the station on an excessively dusty, damp or unstable surface.
Do not connect the antenna during transmission, risk of burning or electric shock.
Please keep distance from devices that cause interference (such as TV, generator, etc.)
People who use pacemakers are advised to keep distance from the antenna during transmission and
especially not to touch it.
Do not connect metal objects to the internal electrical side; danger of electric shock.
Avoid exposing the radio to temperatures below -30°C and above + 60°C, the temperature on a vehicle
may sometimes exceed 80°C, which can cause irreparable damage to electric devices. Do not expose the
radio to sunlight.
Do not place anything on the radio, it will prevent it from cooling down.
Check to see if you have enough charged battery to avoid rapid discharge.
It is important to stop the radio before starting the engine, to avoid damage caused by high starting voltage.
You must use a 2A 250V fuse type F. Under no circumstances use a higher value.
If an abnormal odor or smoke is detected as coming from the radio, switch o the appliance immediately.
Do not transmit for a long time, the radio may warm up.
Keep the station away from children.
OTHER WARNING:
Before connecting or using this product, please read these operating instructions carefully. Keep this manual
for future reference.
Before using the radio, please connect the antenna, then check the SWR before transmitting. A too high SWR
can cause demage to the CB nal output transistors, which is not covered by the warranty.
The radio does not includes components that can be repaired by the user. Please contact an authorized
service center.
To prevent the risk of re, use only a suitable power supply.

EN
3
MAIN CARACTERISTICS:
• 40 FM/AM channels
• FM / AM mode selection switch (AM only works by changing the norm)
• Emergency channel selection switch 9/19
• Key lock switch
• Channel selection UP / DOWN buttons
• Signal level LED
• 2-digit channel number indicator
• Volume and radio start / stop potentiometer
• LED indicators for RX / TX / ASQ
• Microphone with channel selection buttons (up / down) and ASQ activation
• 6-pin microphone jack on the front panel
• External speaker jack
• Manual squelch and adjustable ASQ
TECHNICAL SPECIFICATIONS:
Channels 40 40 AM/FM
Frequency band 26.965 – 27.405 MHz
Frequency control P.L.L.
Operating temperature -26° - +65°C
Power supply 13.8Vdc ±15%
Dimensions / weight 115 x 36 x 152 mm / 0.8 kg
Receiver
Intermediate frequency 1° 10.7 MHz / 2° 450 KHz
Sensitivity -120dBm / 12dB SINAD (FM)
-107dBm / 12dB SINAD (AM)
Audio output @10% THD 2.5W la 8 ohm
Audio distortion <8% at 1 KHz
Image rejection 65 dB
Canal adjacent 85 dB
Current consumption 200 mA in stand-by
Transmitter
Maximum RF power 4W FM at 13.8Vdc
Modulation 85% ~ 90% (AM)
3KHz ±0.2 KHz (FM)
Antenna Impedance 50 Ohm
Current consumption 2 A

4
FRONT PANEL DESCRIPTION:
1. 6-pin microphone connector
2. Increase channel number
3. Decrease channel number
4. Potentiometer for squelch adjustment – the squelch makes your radio quieter by removing the
background noise. Rotate the potentiometer clockwise to reduce the noise or counterclockwise if you
want to hear even the weakest signals.
5. ASQ Potentiometer – to increase the ASQ level rotate the potentiometer clockwise, in this case it
reduces the background noise but also the signal level received.
Tip: turn on the station with ASQ turned left.
6. Potentiometer for turing on / o teh radio and for volume adjustment – Turn clockwise to start station
and increase volume. If no signal is received, we suggest you to adjust the squelch (by rotating the SQ
potentiometer counterclockwise) and then the volume to a comfortable level. When switched on from the
volume potentiometer, the radio will store the last channel used.
7. AM / FM mode select button
Note: The radio works in AM mode only by changing the standard (details on page 6)
8. Multifunctional switch:
• “19“: emergency channel selection
• “CH“: se pot selecta canalele 1~40 (according to the selected standard)
• “L“: key lock
9. TX / ASQ LED indicator - During the transmission the LED will be red, and when the ASQ function is
activated, the LED will be green.
10. Signal level indicator – 4-bar indicator to monitor the power of the received / emitted signals
11. LED display – displays the channel number
REAR PANEL DESCRIPTION:
1. Antenna jack
2. 13.8VDC power cable
3. External speaker jack
ANT EXT
13.8VDC
1 2 3

EN
5
MICROPHONE DESCRIPTION:
1. PTT button – Push to Talk
2. Increase channel number
3. Enable / disable ASQ function
4. Decrease channel number
INSTALLATION INSTRUCTIONS:
Before installing the radio in your vehicle, choose the most suitable location so you can use it without being
disturbed while driving.
To install the radio, use the mounting bracket and accessories in the package. The screws must be securely
clamped to avoid vibration of the station while driving. The mounting bracket can be positioned above or below
the device and can be tilted depending on the installation mode (under the dashboard or under the truck cabin
ceiling).
WARNING: Ensure that the voltage at which the station is powered is the voltage indicated by the manufacturer.
Installation of the central unit:
Before powering the radio, make sure that the power button is fully turned to the left.
The power cord of the station includes a protective fuse on the red wire. Connect the radio's power cable to
the car's electrical system paying attention to the polarity (even if the radio has protection against polarity
reversal).
Connect the red wire to the positive terminal (+) and the black wire at the negative terminal (-) of the vehicle's
electrical system.Check the connections made correctly to prevent them from being disconnected or possibly
short-circuiting.
WARNING: Do not replace the fuse with a higher value. The fone from the actory has 2A.
Antenna installation:
To use this radio, you need an antenna that operates at 27.225MHz.
To install the antenna, call a specialist.
Before connecting the antenna to the radio, it is necessary to check it with a specialized device to prevent the
transmission circuit failure.
ASQ DOWNUP
1
2 3 4

6
Typically, the antenna should be positioned on the highest side of the vehicle without being obstructed by
obstacles and as far from any electrical source or electromagnetic noise. The coaxial cable of the antenna
should not be interrupted or pressed. Connect the plug at the end of the coaxial antenna cable to the antenna
jack on the rear panel of the radio.
Check the radio:
Once installed and powered from the vehicle's electrical system, do the following to verify its operation:
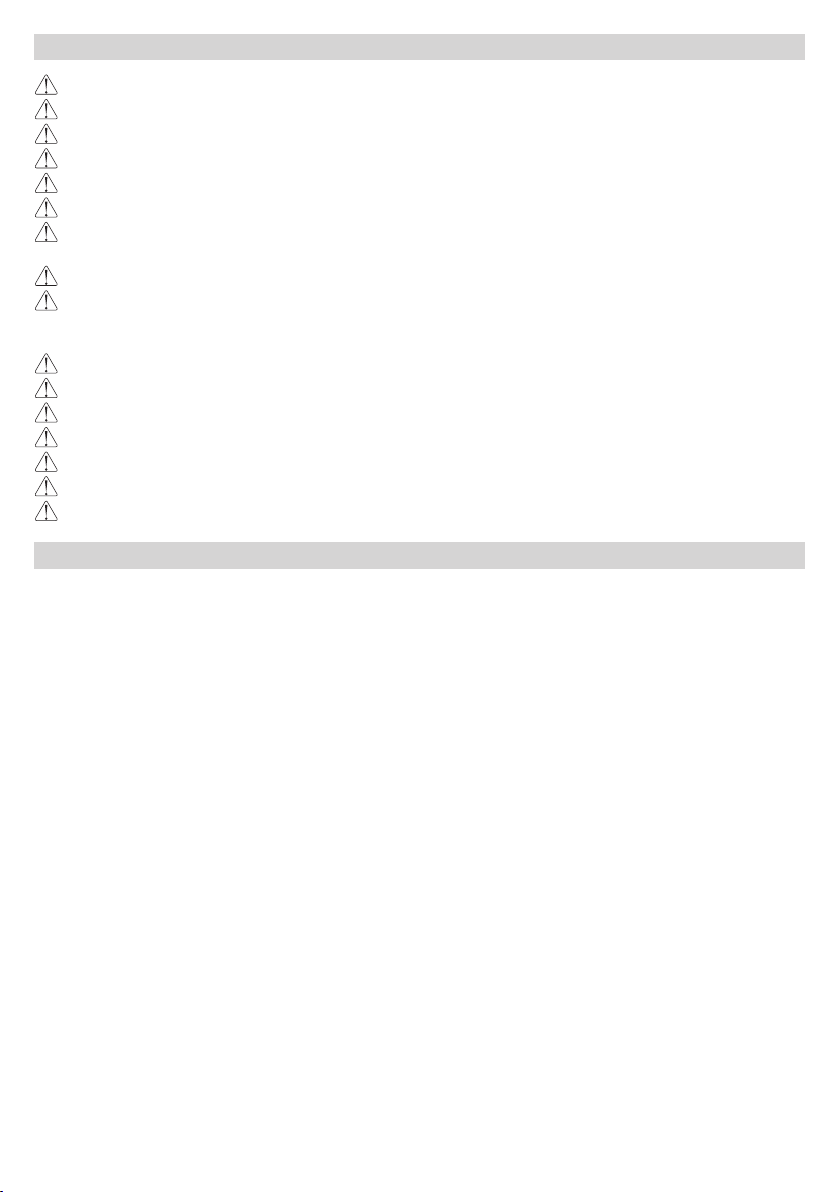
• Check that the radio is powered correctly
• Check the antenna connection to the radio
• Connect the microphone to the jack on the front panel of the radio
• Turn on the radio by rotating the volume knob clockwise and adjust the volume to the desired level
• Select the desired channel with the UP / DOWN keys on the front panel or on the microphone.
• Press the SQ button in the limit area where the background noise disappears.
Note: If the ASQ mode is enabled (by pressing the ASQ on the microphone) the SQ button can not be activated
• Press the PTT button on the microphone to emit, and release it to receive
• Check the signal level received via the signal bars on the front panel
• Turn the ASQ function on the microphone and adjust its level from the ASQ button on the front panel of
the station
USEFUL TIPS:
Do not reverse the polarity when powering the radio.
Do not replace the fuse with a higher value. The fone from the factory has 2A.
Do not emit without an antenna or a broken or not tuned antenna to avoid burning the CB nal output transistors.
Adjust the SQ and ASQ until the background noise disappears. By turning the SQ knob clockwise too much,
you will receive only the strong signals (those emitted nearby).
CHANGING THE STANDARD:
To change the standard in which you are using the CB radio, do the following:
• While holding down the Down and PTT buttons on the microphone, turn on the station
• Use the up and down keys on the station to select the desired setting
• Turn o and then restart the station
To check the current norm do the same procedure.
Available standards:
• CE: 26.965 - 27.405 MHz doar FM (Romania)
• 9: 26.965 - 26.955 80 canale AM FM (germany)
• A: 25.615 - 26.055MHz (Russia)
• b: 26.065 - 26.505MHz (Rusia)
• C: 26.515 - 26.955MHz (Russia)
• d: 26.965 - 27.405MHz (Italy)
• E: 27.415 - 27.855MHz (Spain)
• F: 27.865 - 28.305MHz (France)
• p: 26.960 - 27.400MHz (Poland)
• n: 26.330 - 26.770MHz AM FM (Netherlands)

EN
7
FREQUENCIES AND LEGAL POWERS IN EUROPE:
Band Country Channels number AM or FM Output power
CE (CEPT) Europe 40 FM 4 Watts (used all over Europe)
EU Europe 40 AM and FM 4 Watts FM, 4 Watt AM
UK UK 40 FM 4 Watts
SP Spain 40 AM and FM 4 Watts
I0 Italy 40 AM and FM 4 Watts
I2 Italy 36 AM and FM 4 Watts
FR France 40 AM and FM 4 Watts FM, 1 Watt AM
D2 Germany 40 FM, 12 AM AM and FM 4 Watts FM, 1 Watt AM
DE Germany 80 FM, 12 AM AM and FM 4 Watts FM, 1 Watt AM
PL Poland 40 AM and FM 4 Watts
RU Russia 400 AM and FM 4 Watts (not allowed in Europe)
PO Russia 400 AM and FM 4 Watts (not allowed in Europe)

8
ATENTIONARI SPECIALE
Va rugam sa cititi urmatoarele precautii pentru a preveni incendiile, ranirea personala sau distrugerea
statiei.
Sa nu incercati sa reglati statia in timpul condusului, este periculos.
Aceasta statie este conceputa pentru o alimentare la 13.8V DC. Nu utilizati o baterie de 24V pentru a
alimenta statia.
Nu plasati statia pe o suprafata prafuita excesiv, umeda sau instabila.
Nu conectati antena in timpul transmisiei, risc de ardere sau soc electric.
Va rugam sa pastrati distanta fata de dispozitive care creeaza interferente (cum ar : tv, generator etc.)
Cei care utilizeaza stimulatoare cardiace sunt sfatuiti sa pastreze distanta fata de antena in timpul transmiei
si mai ales sa nu o atinga.
Nu apropiati obiecte metalice de partea electrica interna; pericol de soc electric.
Evitati expunerea statiei la temperature mai mici de -30°C si mai mari de +60°C, temperatura de la
bordul unui vehicul poate depasi uneori 80°C, fapt care poate produce pagube ireparabile in cazul expunerii
indelungate. Nu expuneti statia indelung la razele solare.
Nu plasati nimic pe aparat, va impiedica racirea acestuia.
Vericati daca aveti bateria sucient incarcata, pentru a evita descarcare rapida.
Este important sa opresti statia inainte de pornirea motorului, pentru a evita daunele cauzate de tensiunea
mare la pornire.
Cand inlocuiti siguranta, trebuie sa folositi o siguranta de 2A 250V tip F. In nici un caz nu utilizati valoare
mai mare.
Daca un miros anormal sau fum este detectat ca provine de la statie, opriti aparatul imediat
Sa nu transmiteti cu putere mare timp indelungat, statia se poate incalzi.
Tineti statia departe de copii.
ALTE ATENTIONARI:
Inainte sa conectati sau sa utilizati acest produs, va rugam sa cititi cu atentie aceste instructiuni de utilizare.
Pastrati acest manual pentru o utilizare ulterioara.
Inainte de a se utiliza statia, va rugam conectati antena. Vericati SWR-ul inainte de a emite. Un SWR prea
mare poate duce la distrugerea nalilor statiei, care nu sunt acoperiti de garantie.
Nu exista componente care pot reparate de utilizator. Pentru reparatii adresati-va unui service autorizat.
Pentru a preveni riscul de incendiu nu utilizati decat o sursa de alimentare corespunzatoare.

RO
9
CARACTERISTICI PRINCIPALE:
• 40 de canale FM/AM
• Comutator selectare mod FM/AM (AM functioneaza doar prin schimbarea normei)
• Comutator selectare canal de urgenta 9/19
• Comutator blocare taste
• Butoane selectare canal UP/DOWN
• LED-uri indicatoare nivel semnal
• Indicator numar canal din 2 cifre
• Potentiometru volum si pornire/oprire statie
• Indicatoare LED pentru RX/TX/ASQ
• Microfon cu butoane de selectare canal (sus/jos) si activare ASQ
• Mufa microfon cu 6 pini pe panoul frontal
• Mufa pentru difuzor extern
• Squelch manual si squelch automat reglabil
SPECIFICATII TEHNICE:
Canale 40 40 AM/FM
Banda de frecventa 26.965 – 27.405 MHz
Control frecventa P.L.L.
Temperatura de functionare -26° - +65°C
Alimentare 13.8Vdc ±15%
Dimensiuni / greutate 115 x 36 x 152 mm / 0.8 kg
Receptor
Frecventa intermediara 1° 10.7 MHz / 2° 450 KHz
Sensibilitate -120dBm / 12dB SINAD (FM)
-107dBm / 12dB SINAD (AM)
Iesire audio @10% THD 2.5W la 8 ohm
Distorsiune audio <8% at 1 KHz
Rejectie imagine 65 dB
Canal adiacent 85 dB
Consum curent 200 mA in stand-by
Emitator
Putere maxima RF 4W FM la 13.8Vdc
Modulatie 85% la 90% (AM)
3KHz ±0.2 KHz (FM)
Impedanta antena 50 Ohm
Consum curent 2 A

10
DESCRIERE PANOU FRONTAL:
1. Conector 6 pini pentru microfon
2. Buton crestere numar canal
3. Buton scadere numar canal
4. Potentiometru ajustare squelch – squelch-ul face statia mai silentioasa prin eliminarea zgomotelor de
pe fundal. Rotiti potentiometrul in sensul acelor de ceasornic pentru a reduce zgomotele sau in sensul
invers acelor de ceasornic daca doriti sa auziti si cele mai slabe semnale
5. Potentiometru ASQ – pentru a creste nivelul de ASQ rotiti potentiometrul in sensul acelor de ceasornic,
in acest caz se reduce zgomotul de fundal, dar si nivelul semnalului receptionat.
RECOMANDARE: porniti statia cu ASQ rotit la stanga.
6. Potentiometru pornire/oprire statie si reglare volum – rotiti in sensul acelor de ceasornic pentru a
porni statia si a mari volumul. Daca nu se receptioneaza nici un semnal va sugeram sa reglati squelch-ul
(prin rotirea potentiometrului SQ in sens invers acelor de ceasornic) si apoi volumul la un nivel confortabil.
Cand este pornita din potentiometrul de volum, statia va memora ultimul canal utilizat.
7. Buton selectare mod AM/FM
Nota: Statia functioneza in modul AM functioneaza doar prin schimbarea normei (detalii la pagina 12)
8. Comutator multifunctional:
• “19“: selectare canal de urgenta 19
• “CH“: se pot selecta canalele 1~40 (In functie de norma selectata. In Romania canalul utilizat este 22)
• “L“: blocare taste
9. LED indicator TX/ASQ - In timpul emisiei LED-ul va rosu, iar cand functia ASQ este activata LED-ul
va verde.
10. Indicator nivel semnal – indicator cu 4 bare pentru a monitoriza puterea semnalelor receptionate/emise
11. Ecran LED – aseaza numarul canalului
DESCRIERE PANOU POSTERIOR:
1. Conector antena
2. Cablu de alimentare 13.8VDC
3. Mufa pentru difuzor extern
ANT EXT
13.8VDC
1 2 3

RO
11
DESCRIERE MICROFON:
1. Buton PTT – apasati pentru a emite
2. Buton marire numar canal
3. Buton activare/dezactivare functie ASQ
4. Buton micsorare numar canal
INSTALARE:
Inainte de a instala statia in masina, alegeti locatia cea mai potrivita, astfel incat sa o puteti folosi fara sa va
deranjeze in timpul condusului.
Pentru a instala statia, utilizati suportul si accesoriile din pachet. Suruburile suportului trebuie stranse bine
pentru a evita vibratia statiei in timpul mersului. Suportul de montaj poate pozitionat deasupra sau sub statie,
iar aceasta poate inclinata in functie de modul de instalare (sub bord sau sub tavanul cabinei de camion).
ATENTIE: Asigurati-va ca tensiunea la care alimentati statia este cea indicata de producator.
Instalarea unitatii centrale:
Inainte de a alimenta statia, asigurati-va ca butonul de pornire este rotit maxim la stanga.
Cablul de alimentare al statiei include o siguranta de protectie pe rul rosu. Conectati cablul de alimentare al
statiei la sistemul electric al autovehiculului cu atentie sporita la polaritate (chiar daca statia are protectia la
inversarea de polaritate).
Conectati rul rosu la borna pozitiva (+) si rul negru la borna negativa (-) a sistemului electric al autovehiculului.
Vericati corectitudinea conexiunilor efectuate, pentru a preveni deconectarea acestora sau un eventual
scurtcircuit.
ATENTIE: In cazul arderii sigurantei nu o inlocuiti cu una de valoare mai mare. Cea din fabrica are 2A.
Instalarea antenei:
Pentru utilizarea statiei aveti nevoie de o antena ce functioneaza in frecventa 27.225MHz.
Pentru instalarea antenei apelati la un tehnician specializat.
Inainte de a conecta antena la statie este necesara vericarea acesteia cu un aparat specializat pentru a
preveni defectarea circuitului de emisie al statiei.
De obicei, antena trebuie pozitionata pe partea cea mai inalta a autovehiculului, fara a ecranata de obstacole
ASQ DOWNUP
1
2 3 4

12
si cat mai departe de orice sursa electrica sau zgomot electromagnetic. Cablul coaxial al antenei nu trebuie sa
e intrerupt sau presat. Conectati mufa din capatul cablului coaxial al antenei la mufa de antena din spatele
statiei.
Vericarea functionarii statiei:
Odata instalata statia si alimentata de la sistemul electric al autovehiculului, procedati in felul urmator pentru
a verica functionarea acesteia:
• Vericati daca statia este alimentata in mod corect
• Vericati conexiunea antenei la statie
• Conectati microfonul la mufa de pe panoul frontal al statiei
• Porniti statia prin rotirea potentiometrului de volum in sensul acelor de ceasornic si ajustati volumul la
nivelul dorit
• Selectati canalul dorit prin intermediul tastelor UP/DOWN de pe panoul frontal al statiei sau de pe
microfon. NOTA: in Romania se utilizeaza canalul 22
• Actionati butonul SQ in zona limita in care dispare zgomotul de fundal.
Nota: Daca modul ASQ este activat (prin apasarea tastei ASQ de pe microfon) butonul SQ nu mai poate
actionat
• Apasati butonul PTT de pe microfon pentru a emite, si eliberati-l pentru a receptiona
• Vericati nivelul semnalului receptionat prin intermediul barelor de semnal de pe panoul frontal al statiei
• Porniti functia ASQ de pe microfon si reglati nivelul acestuia din butonul ASQ de pe panoul frontal al
statiei
SFATURI UTILE:
Nu inversati polaritatea de alimentare a statiei.
Nu inlocuiti siguranta arsa cu una de valoare mai mare. Cea din fabrica are 2A.
Nu emiteti fara antena sau cu o antena defecta sau necalibrata, pentru a evita arderea nalului de emisie.
Reglati SQ si ASQ la limita disparitiei zgomotului de fundal. Prin rotirea butonul SQ in sensul acelor de
ceasornic prea mult, nu veti receptiona decat semnalele puternice (cele emise din apropiere).
SCHIMBARE NORMA:
Pentru a schimba norma in care utilizati statia radio CB procedati in felul umator:
• In timp ce tineti apasate butoanele Down si PTT de pe microfon porniti statia
• Utilizati tastele up si down de pe statie pentru a selecta norma dorita
• Opriti si reporniti statia
Pentru a verica norma curenta utilizati aceeasi procedura.
Norme disponibile:
• CE: 26.965 - 27.405 MHz doar FM (Romania)
• 9: 26.965 - 26.955 80 canale AM FM (Germania)
• A: 25.615 - 26.055MHz (Rusia)
• b: 26.065 - 26.505MHz (Rusia)
• C: 26.515 - 26.955MHz (Rusia)
• d: 26.965 - 27.405MHz (Italia)
• E: 27.415 - 27.855MHz (Spania)
• F: 27.865 - 28.305MHz (Franta)
• p: 26.960 - 27.400MHz (Polonia)
• n: 26.330 - 26.770MHz AM FM (Olanda)

RO
13
FRECVENTELE SI PUTERILE LEGALE IN EUROPA:
Banda Tara Numar canale AM sau FM Putere de emisie
CE (CEPT) Europa 40 FM 4 Watts (utilizat in toata Europe)
EU Europa 40 AM si FM 4 Watts FM, 4 Watt AM
UK UK 40 FM 4 Watts
SP Spania 40 AM si FM 4 Watts
I0 Italia 40 AM si FM 4 Watts
I2 Italia 36 AM si FM 4 Watts
FR Franta 40 AM si FM 4 Watts FM, 1 Watt AM
D2 Germania 40 FM, 12 AM AM si FM 4 Watts FM, 1 Watt AM
DE Germania 80 FM, 12 AM AM si FM 4 Watts FM, 1 Watt AM
PL Polonia 40 AM si FM 4 Watts
RU Rusia 400 AM si FM 4 Watts (nepermis in Europe)
PO Rusia 400 AM si FM 4 Watts (nepermis in Europe)

14
FIGYELMEZTETÉS
Kérjük, olvassa el a következő óvintézkedéseket, hogy megelőzze a tüzet, a személyi sérülést vagy az
állomás megsemmisítését
Ne próbálja meg állítani az állomást a veszélyes vezetés közben.
Ez az állomás 13,8 V DC tápfeszültségre lett tervezve. Ne használjon 24 V-os akkumulátort az állomás
táplálásához.
Ne helyezze az állomást túlságosan nedves, nedves vagy instabil felületre.
Ne csatlakoztassa az antennát átvitel, égési sérülés vagy áramütés esetén.
Tartsa távol az interferenciát okozó eszközöket (pl. TV, generátor stb.)
A szívritmus-szabályozókat használóknak javasoljuk, hogy az átvitel során távol tartsák az antennát, és
különösen ne érintsék meg.
Ne csatlakoztasson fémtárgyakat a belső elektromos oldalhoz; áramütés veszélye.
Kerülni kell az expozíciót állomás az alacsonyabb hőmérsékleten, mint -30°C, és nagyobb, mint + 60°C, a
hőmérséklet a jármű esetenként meghaladhatja a 80 ° C-on, ami maradandó károsodást okozhat, ha hosszan
tartó expozíció. Ne tegye ki az állomást napfénynek.
Ne helyezzen semmit a készülékre, mert megakadályozza a hűtést.
Ellenőrizze, hogy van-e elég akkumulátortöltője a gyors kiürülés elkerülése érdekében.
Fontos, hogy a motor indítása előtt állítsa le az állomást, hogy elkerülje a magas indítási feszültség által
okozott károkat.
A biztosíték cseréjekor 2A 250 V típusú biztosítékot kell használni. Semmilyen körülmények között ne
használjon magasabb értéket.
Ha az állomásból érkezik rendellenes szag vagy füst, akkor azonnal kapcsolja ki a készüléket
Ne továbbítsa a hatalom hosszú ideig, az állomás forró lehet.
Tartsa távol az állomást a gyermekektől.
MÁS FIGYELMEZTETÉSEK:
Mielőtt csatlakoztatná vagy használja ezt a terméket, olvassa el gyelmesen az üzemeltetési utasítást.
Tartsa meg ezt a kézikönyvet a későbbiekben.
Az adó használata előtt csatlakoztassa az antennát. Ellenőrizze az ADR-t a kiadás előtt. A túl magas ADR
miatt az állomás vége megsemmisülhet, ami nem tartozik a jótállás hatálya alá.
Nincsenek felcserélhető komponensek. Javításokért forduljon egy hivatalos szervizhez.
A tűzveszély elkerülése érdekében csak megfelelő tápegységet használjon.

HU
15
FŐBB JELLEMZŐK:
• 40 FM / AM csatorna
• FM / AM üzemmód választókapcsoló (AM csak a normál változtatásával működik)
• Sürgősségi csatornaválasztó kapcsoló 9/19
• Kulcszár kapcsoló
• A csatorna kiválasztása FEL / LE gombok
• Jelszint LED-ek
• 2 számjegyű csatorna számkijelző
• Hangerő potenciométer és az állomás indítása / leállítása
• LED-kijelzők RX / TX / ASQ számára
• Mikrofon csatornaválasztó gombokkal (fel / le) és ASQ aktiválással
• 6 pólusú mikrofon csatlakozó az előlapon
• Külső hangszóró csatlakozó
• A Squelch manuális és a zsiradék automatikusan állítható
TEHNIKAI ADATOK:
Csatornák 40 40 AM/FM
Frekvenciasáv 26.965 – 27.405 MHz
Frekvencia szabályozás P.L.L.
Működési hőmérséklet -26° - +65°C
Etetés 13.8Vdc ±15%
Méretek / súly 115 x 36 x 152 mm / 0.8 kg
Vevő
Közbenső frekvencia 1° 10.7 MHz / 2° 450 KHz
érzékenység -120dBm / 12dB SINAD (FM)
-107dBm / 12dB SINAD (AM)
Audió kimenet @10% THD 2.5W nál nél 8 ohm
Hang torzítás <8% nál nél 1 KHz
Image elutasítás 65 dB
Csatorna szomszédos 85 dB
Áramfelvétel 200 mA készenléti állapotban
Adó
Maximális RF teljesítmény 4W FM nál nél 13.8Vdc
Moduláció 85% nál nél 90% (AM)
3KHz ±0.2 KHz (FM)
Impedanta antena 50 Ohm
Áramfelvétel 2 A

16
ELŐLAP LEÍRÁSA:
1. 6 pólusú mikrofon csatlakozó
2. Növelje a csatorna számát
3. Csatorna szám le gomb
4. A squelch-squelch beállító potenciométer a csendesebb állomást teszi a háttérzaj kiküszöbölésével.
Fordítsa el a potenciométert az óramutató járásával megegyező irányba a zaj csökkentése érdekében,
vagy az óramutató járásával ellentétes irányba, ha még a leggyengébb jeleket is szeretné hallani
5. ASQ potenciométer - az ASQ szint növeléséhez fordítsa el a potenciométert az óramutató járásával
megegyező irányba, ebben az esetben csökkenti a háttérzajt, de a kapott jelszintet is.
JAVASLAT: kapcsolja be az állomást az ASQ balra fordítva.
6. Potenciométer be / ki állomás és hangerő beállítása - Forgassa az óramutató járásával megegyező
irányba az állomás indításához és növelje a hangerőt. Ha nem érkezik jel, javasoljuk, hogy állítsa be a
szaggatott hangot (az SQ potenciométer óramutató járásával ellentétes irányú forgatásával), majd a
hangerő kényelmes szintre állításával. A hangerő-potenciométer bekapcsolásakor az állomás tárolja az
utoljára használt csatornát.
7. AM / FM üzemmód kiválasztó gomb
Megjegyzés: Az AM üzemmód csak a normál változtatásával működik (lásd a 12. oldalt)
8. Többfunkciós kapcsoló:
9. "19": vészhelyzeti csatorna kiválasztása 19
10. "CH": 1 ~ 40 csatornát lehet választani (A kiválasztott szabálytól függően Romániában a használt
csatorna 22)
11. "L": billentyűzár
12. LED kijelző TX / ASQ - Átvitel közben a LED piros lesz, és ha az ASQ funkció be van kapcsolva, a
LED zöld lesz.
13. Jelszint-jelző - 4 bar-jelző a beérkező / kibocsátott jelek teljesítményének gyeléséhez
14. LED képernyő - Megjeleníti a csatorna számát
HÁTLAP LEÍRÁSA:
15. Antenna csatlakozó
16. 13,8VDC tápkábel
17. Külső hangszóró csatlakozó
ANT EXT
13.8VDC
1 2 3

HU
17
MICROFON LEIRÁS:
18. PTT gomb - Nyomja meg a gombot a kibocsátáshoz
19. Csatorna szám gomb
20. ASQ funkció engedélyezése / tiltása gomb
21. Csatorna szám le gomb
TELEPITÉS:
Mielőtt az állomást az autóba telepítené, válassza ki a legmegfelelőbb helyet, így használat közben zavarhatja
a vezetést.
Az állomás telepítéséhez használja a csomagban található támogatást és tartozékokat. A tartócsavarokat
biztonságosan rögzíteni kell, hogy megakadályozzák az állomás vibrációját vezetés közben. A szerelőkeret
az állomás felett vagy alatt helyezhető el, és a beszerelési módtól függően (a tehergépkocsi vezetőfülke alatt
vagy alatt).
VIGYÁZAT: Győződjön meg róla, hogy a feszültség, amelyen az állomás működik, a gyártó jelzi.
A központi egység felszerelése:
Az állomás bekapcsolása előtt győződjön meg róla, hogy a bekapcsológomb teljesen balra fordult.
Az állomás tápkábele védő biztosítékot tartalmaz a vörös vezetéknél. Csatlakoztassa az állomás tápkábelét
a gépkocsi elektromos rendszeréhez, fokozott polaritással (még akkor is, ha az állomás polaritás elleni
védelemmel rendelkezik).
Csatlakoztassa a vörös vezetéket a pozitív (+) csatlakozóhoz és a fekete vezetéket az autó elektromos
rendszerének negatív (-) kapcsához. Ellenőrizze a helyesen csatlakoztatott csatlakozásokat, hogy
megakadályozzák azok leválasztását vagy esetleg rövidzárlatot.
FIGYELEM: Égés esetén ne cserélje ki magasabb értékkel. A gyár 2A-val rendelkezik.
Telepítse az antennát:
Az állomás használatához 27,225MHz-es antennát kell használnia.
Az antenna felszereléséhez forduljon szakemberhez.
Mielőtt az antennát az állomáshoz csatlakoztatná, meg kell vizsgálnia egy speciális eszközzel, hogy
megakadályozza az átviteli áramkör meghibásodását.
ASQ DOWNUP
1
2 3 4

18
Általában az antennát a jármű legmagasabb oldalán kell elhelyezni anélkül, hogy árnyékolt volna az
akadályoktól és olyan távolabb, mint bármely elektromos forrás vagy elektromágneses zaj. Az antenna
koaxiális kábelét ne szakítsa meg vagy ne nyomja meg. Csatlakoztassa a koaxiális antennakábel végén levő
csatlakozót az állomás mögötti antennacsatlakozóhoz.
Az állomás működésének ellenőrzése:
• A gépkocsi elektromos rendszerének beszerelését és bekapcsolását követően hajtsa végre az alábbi
műveleteket:
• Ellenőrizze, hogy az erőmű megfelelően működik-e
• Ellenőrizze az antenna csatlakozását az állomásra
• Csatlakoztassa a mikrofont az állomás elülső panelének aljzatához
• Kapcsolja be az állomást az óramutató járásával megegyező irányú elforgatásával, és állítsa a hangerőt
a kívánt szintre
• Válassza ki a kívánt csatornát a fel / le gombokkal az előlapon vagy a mikrofonon. MEGJEGYZÉS:
Romániában a 22-es csatornát használják
• Nyomja meg az SQ gombot a határfelületen, ahol a háttérzaj eltűnik.
Megjegyzés: Ha az ASQ üzemmód engedélyezve van (a mikrofonon lévő ASQ megnyomásával), az SQ gomb
nem aktiválható
• Nyomja meg a mikrofonon lévő PTT gombot, hogy kibocsásson, és engedje el a vételhez
• Ellenőrizze a jelszintet az előlapi panel jelsávjai segítségével
• Fordítsa el az ASQ funkciót a mikrofonon, és állítsa be a szintet az állomás előlapján található ASQ gomb
segítségével
HASZNOS TIPPEK:
Ne fordítsa meg az erőmű polaritását.
Ne cserélje ki a biztosítékot magasabb értékre. A gyár 2A-val rendelkezik.
Ne hagyjon antennát vagy törött vagy nem kalibrált antennát az emisszió végének égetésének elkerülése
érdekében.
Állítsa az SQ és az ASQ értéket a háttérzaj eltűnéséhez. Az SQ gomb óramutató járásával megegyező irányú
túl nagy beavatása csak erős jeleket fog kapni (a közelben kibocsátott jelek).
MÓDOSÍTSA A NORMÁT:
Ha módosítani szeretné azt a normát, amelyben a CB rádiót használja, tegye a következőket:
• Miközben lenyomva tartja a mikrofon alsó és alsó gombját, kapcsolja be az állomást
• Az állomás fel és le gombjaival válassza ki a kívánt beállítást
• Kapcsolja ki és indítsa újra az állomást
Az aktuális normák ellenőrzéséhez használja ugyanazt az eljárást.
Normák:
• CE: 26.965 - 27.405 MHz doar FM (Románia)
• 9: 26.965 - 26.955 80 canale AM FM (Németország)
• A: 25.615 - 26.055MHz (Oroszország)
• b: 26.065 - 26.505MHz (Oroszország)
• C: 26.515 - 26.955MHz (Oroszország)
• d: 26.965 - 27.405MHz (Olaszország)
• E: 27.415 - 27.855MHz (Spanyolország)
• F: 27.865 - 28.305MHz (Franciaország)
• p: 26.960 - 27.400MHz (Lengyelország)
• n: 26.330 - 26.770MHz AM FM (Hollandia)

HU
19
FREKVENCIÁK ÉS JOGI HATÁSKÖRÖK EURÓPÁBAN:
Banda Ország Csatornák száma AM vagy FM Átviteli teljesítmény
CE (CEPT) Európa 40 FM 4 Watts (megengedett Europa)
EU Európa 40 AM és FM 4 Watts FM, 4 Watt AM
UK UK 40 FM 4 Watts
SP Spanyolország 40 AM és FM 4 Watts
I0 Olaszország 40 AM és FM 4 Watts
I2 Olaszország 36 AM és FM 4 Watts
FR Franciaország 40 AM és FM 4 Watts FM, 1 Watt AM
D2 Németország 40 FM, 12 AM AM és FM 4 Watts FM, 1 Watt AM
DE Németország 80 FM, 12 AM AM és FM 4 Watts FM, 1 Watt AM
PL Lengyelország 40 AM és FM 4 Watts
RU Oroszország 400 AM és FM 4 Watts ( tilós Europa)
PO Oroszország 400 AM és FM 4 Watts (tilós Europa)

20
OSTRZEŻENIA:
Należy zapoznać się z poniższymi środkami ostrożności, aby uniknąć pożaru, obrażeń ciała lub zniszczenia
stacji.
Nie próbuj regulować stacji podczas prowadzenia pojazdu, jest to niebezpieczne.
Ta stacja jest przeznaczona do zasilania przy napięciu 13.8V DC. Do zasilania stacji nie należy używać
akumulatora 24V.
Nie umieszczaj stacji na zbyt zakurzonej, wilgotnej lub niestabilnej powierzchni.
Nie podłączaj anteny podczas transmisji, ryzyko poparzenia lub porażenia prądem.
Zachowaj odległość od urządzeń zakłócających (takich jak telewizor, generator itp.).
Osoby używające rozruszników serca powinny zachować odległość od anteny podczas transmisji, a
zwłaszcza jej nie dotykać.
Nie podłączaj metalowych przedmiotów do wewnętrznej strony elektrycznej; zagrożenie porażeniem
prądem elektrycznym.
Unikaj wystawiania stacji na działanie temperatur poniżej -30 ° C i powyżej + 60 ° C, temperatura w
samochodzie może czasem przekroczyć 80 ° C, co może spowodować nieodwracalne uszkodzenie wynikające
z długiego czasu na słońcu. Nie wystawiaj stacji na działanie promieni słonecznych.
Nie umieszczaj niczego na urządzeniu, aby zapobiec jego ochłodzeniu.
Sprawdź, czy masz wystarczająco naładowaną baterię, aby uniknąć szybkiego rozładowania.
Ważne jest zatrzymanie stacji przed uruchomieniem silnika, aby uniknąć uszkodzeń spowodowanych
wysokim napięciem rozruchowym.
Podczas wymiany bezpiecznika należy użyć bezpiecznika 2A 250 V typu F. W żadnym wypadku nie należy
używać wyższej wartości.
Jeśli wykryty zostanie nienormalny zapach lub dym ze stacji, natychmiast wyłącz urządzenie
Nie transmituj przez długi czas, stacja może się nagrzać.
Trzymaj stację z dala od dzieci.
INNE OSTRZEŻENIA:
Przed podłączeniem lub użyciem tego produktu należy uważnie przeczytać niniejszą instrukcję obsługi.
Zachowaj tę instrukcję na przyszłość.
Przed użyciem stacji należy podłączyć antenę. Sprawdź SWR przed transmitowaniem. Zbyt wysoki SWR
może spowodować nalne zniszczenie stacji, co nie jest objęte gwarancją.
Nie ma elementów, które można naprawić przez użytkownika. W sprawie naprawy skontaktuj się z
autoryzowanym centrum serwisowym.
Aby uniknąć ryzyka pożaru, używaj tylko odpowiedniego zasilacza.
Other manuals for Escort HP 8000L
2
Table of contents
Languages:
Other PNI Radio manuals

PNI
PNI Escort HP 5500 User manual

PNI
PNI PMR R45 PRO User manual

PNI
PNI PMR R40 Pro User manual

PNI
PNI ESCORT HP 9500 User manual

PNI
PNI Escort HP 9001 PRO User manual

PNI
PNI R40 Pro User manual

PNI
PNI escort HP 8001 ASQ User manual

PNI
PNI ESCORT HP 62 User manual

PNI
PNI Escort HP 8001L ASQ User manual

PNI
PNI ESCORT HP 6550 User manual

PNI
PNI Escort HP 82 User manual

PNI
PNI Escort HP 446 User manual

PNI
PNI Escort HP 8000L User manual

PNI
PNI Escort HP 8500 User manual

PNI
PNI ESCORT HP 6500 User manual

PNI
PNI ESCORT HP 7110 User manual

PNI
PNI RD290 User manual

PNI
PNI Escort HP 2020 User manual

PNI
PNI ESCORT HP 7120 User manual

PNI
PNI Escort HP 8001L User manual