PowerVision PowerEgg X User manual

Quick Start Guide
EN
快速入门指南
クイックスタートガイド
Guide de démarrage rapide
Kurzanleitung
Guía rápida de inicio
Guida rapida
CN
JP
FR
DE
ES
IT
PowerEggTM X
V1.0
TM

CONTENTS / 目录
快速入门指南
クイックスタートガイド
Guide de démarrage rapide
Kurzanleitung
Guida rapida
Guía rápida de inicio
Quick Guide 01
12
23
34
45
56
67
CN
EN
JP
FR
DE
IT
ES

1
EN
PowerEggTM X
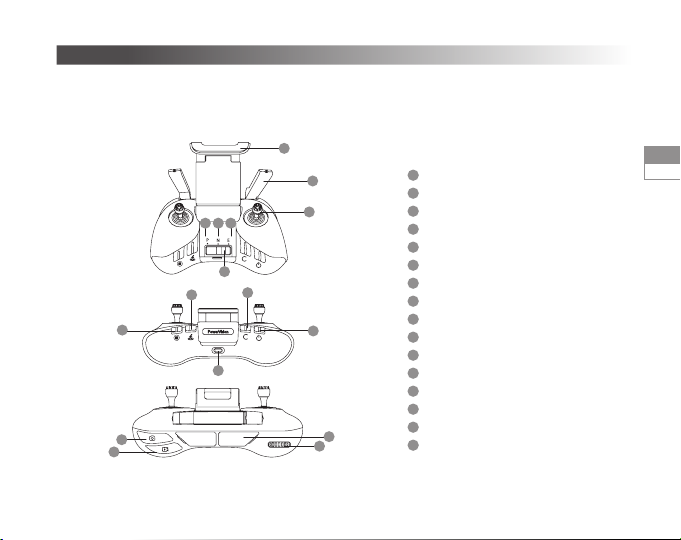
1Front visual system
2Integrated gimbal camera
3Mode indicator (headlight)
4Motor
5Front landing gear (including antennas)
6Rear landing gear
7Propeller
8Battery cover
9Battery level indicator
10 Power Button
9
87
6
5
4
3
2
1
10
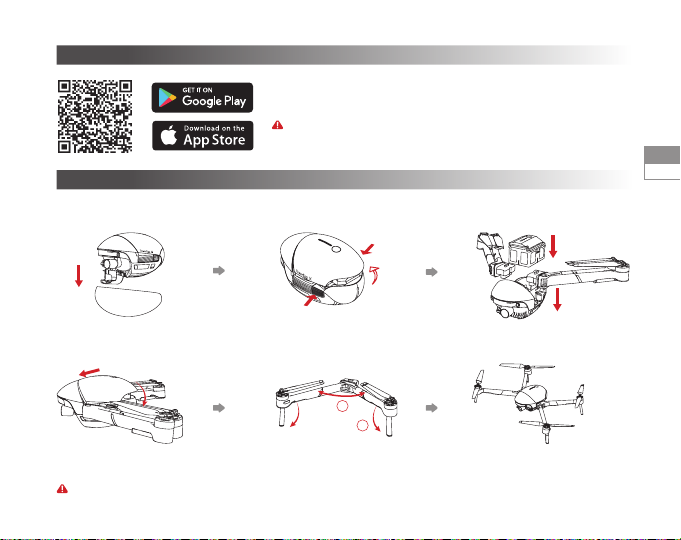
PowerEgg X works in Drone Mode or in AI-Camera Mode.
1. In Drone Mode, PowerEgg X is equipped with a visual system both in the front and at the bottom as well as an ultrasonic sensor
system*, which enables the drone to hover mid-air stably both indoors and outdoors. The drone also features auto-return,
obstacle avoidance, and intelligent ight. Its high-precision, stability augmentation gimbal can record 4K UHD videos at 60 fps.
Its maximum ight time is 30 minutes**.
2. In AI-Camera Mode, PowerEgg X can work without a remote controller. You can operate the camera and preview images or
videos in real time in the specied App by connecting your phone or other mobile devices to the gimbal over a Wi-Fi network.
Its maximum working time is 3.5 hours**.
* The visual and ultrasonic sensor systems both work under environmental requirements, for more information please read <
Disclaimer and Safety Guidelines > and <User Manual >. Please watch the tutorial videos at App or PowerVision ofcial website.
** The maximum ight time and the maximum working time are the test results in the laboratory environment, for reference only.

2
EN
11 Extended port (USB-Mini)
12 Bottom visual system
13 Ultrasonic sensor system
14 Aircraft status indicator (taillight)
15 Battery cover switch button
16 Wrist strap
17 Intelligent battery
18 Tripod converter
19 Aircraft arm installation groove
20 Block for groove
21 Camera micro-SD card slot
22 Data port (USB-C)
Remove the protective case: Pull the label to remove
the protective case.
Remove the gimbal protector: Press the elastic buckles on both
sides simultaneously and then pull them downwards to remove
the protective cover.
• Protective case and Gimbal protector
Note: Install the PowerEgg X's protective case and the gimbal protector when storing or transporting PowerEgg X.
*16/18/20 exclusively use for AI-Camera Mode.
16
17
18
19
20
21
22
11
12 13
14
15

3
EN
PowerEgg X's remote controller can remotely operate the aircraft and streaming HD images and videos on your mobile device via
the specied App in real time. Additionally, the collapsible stand can hold your mobile device stably.
Remote Controller
1Mobile device stand
2Antenna
3Control stick
4Flight mode switch button
5P mode (Professional)
6N mode (Normal)
7E mode (Easy)
8Emergency stop button
9Intelligent return button
10 Custom button
11 Power button
12 Charging port (micro USB)
13 Photo button
14 Video button
15 Mobile device port (USB)
16 Gimbal control thumbwheel
16
15
14
13
12
11
10
9
8
765
4
3
2
1

4
EN
• Charge the Battery
Fully charge the battery to activate it for rst time use.
Press the buckles on both sides of the battery cover simultaneously,
and the battery cover will automatically spring up. You can then take
the battery out.
Charge the Battery and Check the Battery Level
Intelligent battery
charging port
Remote controller
charging port
Charger
1
1
2
• Check the Battery Level and Switch On/ Off
1. Intelligent Battery
Short press once to check the battery level.
Short press once and then press and hold for 2s to
switch battery on/off.
*For details about the battery and charging, please
see Intelligent Battery Safety Guidelines.
level
Low High
Remote controller (Battery level LED indicators)
>60%<20% 20%-60%
2.Remote controller
Press and hold to start the
remote controller.
2

5
EN
Please scan the QR code or go to the App store to install the Vision+ 2 App and
watch tutorials.
The Vision+ 2 App requires an OS version of iOS 10.0.2 and later or Android 5.0
and later.
Download the App and Watch PowerEggTM X Tutorials
1. Prepare PowerEgg X for Drone Mode
Drone mode
Install the arms and insert the battery
into the battery compartment.
Remove the protective case and
the gimbal protector.
Press the buckles on both sides of
the battery cover simultaneously and
remove the battery cover.
Secure the battery cover into place. Unfold the arms and landing
gears.
Complete status.
1
2
Make sure to fully unfold the arms and propellers before starting drone.

6
EN
• How to Replace a Propeller
Attention:
1). Use T6 screwdriver and M2.5x3.5 screws coated with Teon paste.
2). Please install the propeller according to the shape of propeller’s base.
3). Please do not reuse the screws.
Insert one end of the data
cable into the remote
controller and the other
into your mobile device.
Place your mobile device
on the stand.
2. Prepare the Remote Controller
Unfold the antennas. Lift the mobile device
stand.
1
2
3

7
EN
Note: Make sure that the antennas directly face the aircraft to guarantee the strongest communication link.
3. Flight Preparations
Short press once and then press
and hold the power button for 2s
to start the drone.
Long press and hold the
power button to power on
the remote controller.
Run the Vision+ 2 App.
4. Flight
When the App screen indicated take off preparation completed.
• Automatic take off/landing
In the App: Automatic takeoff Automatic landing.
Take Off Preparation Completed

8
EN
• Manual take off/ landing
Or Control stick operations: Start/Stop the motors.
Takeoff: Push the throttle stick upwards slowly. Landing: Pull the throttle stick downwards till the
aircraft lands. Keep the throttle stick at the lowest
point for 2s, and the motors will stop.
• Remote Controller Operations
By default, the remote controller is in mode 2. The left control stick controls the ight altitude and direction, and the right control
stick controls the forward, backward, leftward, and rightward movements. The gimbal control thumbwheel controls the camera's
pitch angle.
Press the pause button to make the aircraft hover in case of an
emergency.
• Intelligent Flight Functions
Normal Quickshot Hyperlapse AI TrackPoint of Interest
Left
Turn left/Turn RightUp/Down Avancer/recule left/right
Right

9
EN
5. Flight Safety
!
Strong GPS signal
Fly in open areas Fly below 120 metersMaintain the line of sight
Precautions during a ight:
1. Avoid ying over or near crowds, trees, power lines, tall buildings, airports, signal towers, etc.
2. Do not fly near strong electromagnetic sources, such as radio transmitting towers, high voltage power lines, transformer
substations, and large blocks of magnetic metal, as they may affect the remote signal and compass and thus endanger ight
safety.
<120m
Properly use PowerEgg X:
Do not y:
Do not y in adverse weather conditions such as rain, fog, snow, thunder, and high winds (wind speed: 10m/s or higher).
It is recommended to purchase the PowerEgg X waterproof case to y during a raining environment and maintain the line of sight
on rainy days.
Stay away from the rotating propellers to avoid
personal injuries and property damage. Do not y at NO FLY ZONE.

10
EN
1. Prepare PowerEgg X for AI-Camera Mode
AI-Camera Mode
Remove the protective
case and the gimbal
protector.
Secure the battery
cover into place.
Install the groove block
on the left side and
the wrist strap on the
right side. Insert the
battery into the battery
compartment.
Press the buckles on
both sides of the battery
cover simultaneously
and remove the battery
cover.
• How to use tripod
Install tripod convertor
Use tripod convertor, PowerEgg X supports camera tripods.
Install tripod
12

11
EN
* You can connect your mobile device to the AI-Camera over a Wi-Fi network or an approved data cable. For details, please read
on-screen instructions in the App or watch the related tutorials.
* More functions will become available in the future via updates. For more information, please refer to the instructions contained
in the App.
2. Get Ready to Shoot
Short press once and then press and
hold the power button for 2s to start
the PowerEgg X’s gimbal camera.
Run the Vision+ 2 App and connect the
gimbal to PowerEgg X following on-screen
instructions.
SSID: EggX_xxxxxx
Password:12345678
3. Shoot with the AI-Camera Functions
For details, please visit PowerVision's ofcial website www.powervision.me and download the user manual. The content is subject to change without further notice.
PowerEgg and PowerVision are Trademarks owned by Powervision Tech Inc.
Hyperlapse Slow-motion*

12
CN
了解 PowerEggTM X
1 前视视觉系统
2 一体式云台相机
3 模式指示灯(前灯)
4 电机
5 前脚架(内含天线)
6 后脚架
7 螺旋桨
8 电池盖
9 电池电量指示灯
10 电池开关
PowerEgg X 具有无人机模式及 AI 相机模式两种工作模式:
1. 在无人机模式下,PowerEgg X 配备有前方、下方视觉系统及超声传感系统 *,可以在室内外稳定悬停飞行,具备自动返航及障碍
物感知能力,并拥有智能飞行功能。高精度增稳云台相机,可稳定录制 4K 超高清 60 帧视频。最长飞行 ** 时间为 30 分钟。
2. 在 AI 相机模式下,PowerEgg X 无需遥控器,仅使用手机等移动设备,通过 WiFi 即可连接 AI 相机模式,并通过 App 进行 AI 相
机的操控及实时拍摄画面预览。最长工作 ** 时间为 3.5 小时。
*视觉及超声传感器系统有使用环境与要求,请阅读《免责声明与安全操作指引 》及《用户手册》了解更详细事项。请在
PowerVision 官网或 App 上观看本产品的教学视频,以正确使用相关功能。
** 最长飞行及最长工作时间为实验室环境下测试所得,仅供参考。
9
87
6
5
4
3
2
1
10

13
CN
移除机身保护壳:向外拉标签,取下保护壳; 移除云台保护罩:同时按压两侧弹性卡扣,再向下拉可以取下云台保护罩。
注意:在贮存和运输 PowerEgg X 时,请安装机体保护壳及云台保护罩。
• 机身保护壳及云台保护罩
11 扩展接口(USB-Mini)
12 下视视觉系统
13 超声传感器系统
14 飞行器状态指示灯(尾灯)
15 电池盖卡扣按钮
16 手持腕带
17 智能电池
18 三脚架转接头
19 机臂安装槽
20 机臂插接孔堵块
21 相机 Micro SD 卡槽
22 数据接口(USB-C)
*16、18、20 专用于 AI 相机模式。
16
17
18
19
20
21
22
11
12 13
14
15

14
CN
PowerEgg X 遥控器可支持远程链路操控飞行器,并通过 App 在移动端高清显示实时图传。同时,折叠式移动设备支架可稳定夹持
移动设备。
了解遥控器
1 移动设备支架
2 天线
3 摇杆
4 飞行模式切换开关
5P 专业档(Professional)
6 N普通档(Normal)
7 E简单档(Easy)
8 急停按键
9 智能返航按键
10 自定义功能按键
11 电源开关
12 充电接口(Micro USB)
13 拍照按键
14 录像按键
15 移动设备接口(USB)
16 云台控制拨轮
16
15
14
13
12
11
10
9
8
765
4
3
2
1

15
CN
• 充电
首次使用需给智能电池充满电以激活电池。
同时按压电池盖两侧卡扣按钮,电池盖自动弹起,即可取出智能
电池。
充电及查看电量
智能电池充电口遥控器充电口
充电器
1
1
2
• 查看电量与开启 / 关闭
1. 智能电池
短按一次查看电量。
短按一次,再长按 2 秒可开启、关闭电池。
• 更多电池及充电说明详见《智能电池安全使用指引》
电量
低 高
遥控器(电源 LED 灯指示图)
>60%<20% 20%-60%
2. 遥控器
长按可开启遥控器。
2

16
CN
请扫描二维码或在软件商店下载安装 Vision+ 2 App,并通过 App 观看教学视频。
Vision+ 2 App 要求使用 iOS 10.0.2 及以上系统或 Android 5.0 及以上系统。
下载 App 和观看 PowerEggTM X 教学视频
一.准备PowerEgg X 飞行器模式
无人机模式
安装机臂,将电池插入到电池仓移除机身保护壳,移除云台
保护罩
按压电池盖两侧卡扣按钮,
取下电池盖
扣上电池盖,确认扣紧 展开机臂及脚架 展开状态
1
2
请确保机臂与桨叶全部展开之后再开启飞行器。

17
CN
• 更换螺旋桨的注意事项
注意:
1. 使用 T6 型号 螺丝刀,及涂有耐落胶的 M2.5×3.5 螺丝。
2. 螺旋桨的桨夹与电机的端盖形状有匹配关系。按照图示对应安装。
3. 拆换后的螺丝请勿再次使用。
将数据线插入遥控器和手机嵌入移动设备
二 . 准备遥控器
展开天线 抬起手机支架
1
2
3

18
CN
注:使天线平面正对飞行器,以获得最佳通讯范围。
三 . 飞行准备
短按一次,再长按 2 秒开关按键,
开启飞行器
长按遥控器开关键,开启遥控器 运行 Vision+ 2 App
四.飞行
当App 图传界面显示“起飞准备完毕”
• 自动起飞 / 降落
在App 界面中: 自动起飞, 自动降落
Other manuals for PowerEgg X
2
Table of contents
Languages:
Other PowerVision Drone manuals

PowerVision
PowerVision PowerEgg User manual

PowerVision
PowerVision PowerEgg User manual

PowerVision
PowerVision PowerEgg User manual

PowerVision
PowerVision PowerDolphin User manual

PowerVision
PowerVision PowerEgg User manual

PowerVision
PowerVision Power Eye User manual

PowerVision
PowerVision PowerDolphin User manual

PowerVision
PowerVision PowerEgg X User manual

PowerVision
PowerVision PowerEgg X User manual

PowerVision
PowerVision PowerEgg Series User manual