manuals.online logo
Brands
  1. Home
  2. •
  3. Brands
  4. •
  5. Precor
  6. •
  7. Elliptical Trainer
  8. •
  9. Precor Resolute RSL 314 User manual

Precor Resolute RSL 314 User manual

ENGLISH
Resolute™ Strength Selectorized Line
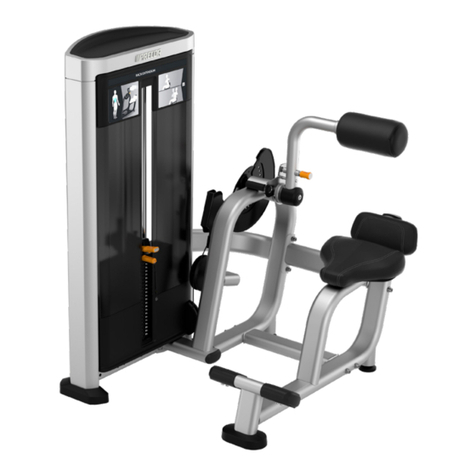
Diverging Lat Pulldown RSL 314
Assembly Guide
©2019 Precor Inc. | Diverging Lat Pulldown RSL 314 | Assembly Guide 3
Assembly Requirements
It takes about 90 minutes to assemble this equipment. If this is your rst time doing this, allow more time.
CAUTION
At least two people are required to assemble the equipment. DO NOT attempt to assemble this by yourself. Precor recommends that all strength equipment be bolted to the
ooring at all anchoring points.
Installation Requirements
●Unpack the boxes and assemble the equipment close to where you plan to use it.
● Locate equipment at least 40 inches (1 meter) away from any walls, furniture, or objects on all sides.
● While tightening the fasteners, be sure to leave room for adjustments. DO NOT fully tighten fasteners until instructed to do so.
● Set up and assemble the equipment on a solid, at surface, so that it remains level and stable.
●DO NOT move the equipment without assistance.
Required Tools
● Torque wrench with torque range to at least 150 ft-lb (206 N-m) and ts the following hex bits: 6, 8, and 10 mm
● Socket wrench sets, metric and standard, plus extensions
● Open-end wrench sets, metric and standard
● Hex wrench sets, metric and standard, plus extensions
●Box cutter
●Rubber mallet
● Retaining ring pliers - large, medium, and small
● Pliers - large, medium, and small
Trademarks
Resolute is a trademark and Precor is a registered trademark of Precor, Incorporated.
All other trademarks belong to their respective owners.
©2019 Precor Inc. | Diverging Lat Pulldown RSL 314 | Assembly Guide 4
Parts List
Part # Name Quantity Part # Name Quantity
Main frame 1Shroud, front middle (left and right) 2
Arm, left 1Top tray 1
Arm, right 1Shroud, lower pulley cover 1
Seat assembly 1Seat pad 1
Thigh adjustment bar 1Roller pads 2
Upper cross brace 1Weight plates 10 lb (4.5 kg) 23
Lower cross brace 1Weight labels 1
Roller pad ring caps 2Collars 2
Roller pad caps 2End plugs with sleeves 2
Shaft, 19 mm x 136 mm 1Roller adjustment tool (part of Seat assembly ) 1
Bumpers 4Washers, 12.2 mm ID x 35 mm OD 2
Shaft, 19 mm x 127 mm 1Washers, rubber, black 3
Roller assembly 1Washers, domed, silver 2
Gas spring 1Retaining rings, medium 2
Weight stack tower frame 1Washer, silver, 13.5 mm ID x 35 mm OD 1
Weight stack spacer, 1-inch 1Retaining rings, small 2
Add-on weight spacer, 3-inch 1Socket head cap screws (SHCS) M12 x 25 mm 2
Top plate assembly 1Socket head cap screws (SHCS) M12 x 35 mm 6
Add-on weight 5 lb (2.2 kg) 1Socket head cap screws (SHCS) M12 x 130 mm 2
Add-on weight handle 1Socket head cap screws (SHCS) M10 x 25 mm 2
Kick plate 1Socket head cap screws (SHCS) M10 x 40 mm 2
Guide rods 2Socket head cap screws (SHCS) M10 x 65 mm 2
Shroud, crown 1Button head cap screws (BHCS) M10 x 125 mm 2
Guide rod with cap 1Button head cap screw (BHCS) M6 x 15 mm 1
Counterweight 1Hex head screws 5/16-inch x 1½-inch 4
Shroud, rear upper 1Nylon lock nuts, M12 2
Shroud, front upper placard 1Nylon lock nuts, M10 2
Shroud, front lower 1Washers, 9 mm 4
Shroud, rear lower 1Washers, 13 mm 8
Shroud, rear middle 1Washers, 11 mm 4
1
10
11
12
13
15
16
17
18
19
20
21
22
23
24
25
26
27
28
29
3
30
31
32
33
34
35
36
37
39
4
40
42
43
44
45
46
47
48
49
6
7
8
9
2
5
14
38
41
50
51
52
53
54
55
56
57
58
59
60
4
©2019 Precor Inc. | Diverging Lat Pulldown RSL 314 | Assembly Guide 5
Frame Assembly
DO NOT tighten fasteners until instructed to do so.
Have your assistant hold frame parts in place during assembly.
Image Hardware Instructions
1 2 M12 x 130 mm SHCS
4 washers, 13 mm
2 M12 nylon lock nuts
Tools: Hex wrench, 10 mm
Socket wrench, 19 mm
2 M10 x 125 mm BHCS
2 washers, 11 mm
Connect lower cross brace to weight stack tower and kick
plate .
Align at last hole on left under pulley.
Insert both guide rod fasteners from user side to align the kick
plate. Hand tighten only. These will be removed temporarily in
a later step.
2 2 M12 x 35 mm SHCS
2 washers, 13 mm
Tool: Hex wrench, 10 mm
Attach lower cross brace to main frame .
7
15
56
59
21
59
49
53 60
48
7
1
59
15
21
48
49
7
53
56
59
60
59
7
1
7
15
21
1
6
©2019 Precor Inc. | Diverging Lat Pulldown RSL 314 | Assembly Guide 6
3 2 M12 x 35 mm SHCS
2 washers, domed
Tool: Hex wrench, 10 mm
Attach upper cross brace to weight stack tower .
4 2 M12 x 35 mm SHCS
2 washers, 13 mm
Tool: Hex wrench, 10 mm
Attach upper cross brace to main frame .
5Tools: Hex wrench, 10 mm
Socket wrench, 19 mm
Torque wrench
Gently rock the frame to align. Tighten all M12 fasteners to a
torque of 55 ft-lb (75 N-m).
Do not tighten the M10 screws installed in step 1 at this time.
They will be removed temporarily in a later step.
48
43
6
15
1
6
48
59
1
15
48
6
59
43
48
6
©2019 Precor Inc. | Diverging Lat Pulldown RSL 314 | Assembly Guide 7
Moving Parts
Image Hardware Instructions
1 2 collars Slide collars onto arm shafts on main frame . Place at sides towards
frame.
2 Slide left arm onto left shaft on main frame and then slide right
arm onto right shaft. Each arm and shaft have and labels.
Match labels to ensure proper assembly.
32 washers, rubber, black
2 washers, 12.2 mm ID x 35 mm OD
2 M12 x 25 mm SHCS
Tools: Hex wrench, 10 mm
Torque wrench
Secure each arm into place as shown. Hold washers centered while
tightening.
Tighten to 55 ft-lb (74 N m).
4 2 end plugs with sleeves
Tool: Mallet
Slide end plugs with sleeves over shaft ends. Tap gently with mallet if
needed.
Remove all and labels.
51 shaft, 19 mm x 136 mm
2 M10 x 25 mm SHCS
2 washers, 11 mm
Tools: Two hex wrenches, 8 mm
Connect thigh adjustment bar to main frame with thigh bars
pointing upwards. Slide thigh adjustment bar bracket around frame and
secure.
1
3
2
L
R
1
38
L R
2
1
42
41
47
LR
L
39
1
1
10
50
60
5
50
60
10
5
38
50
60
42
47
41
39
1
L
R
©2019 Precor Inc. | Diverging Lat Pulldown RSL 314 | Assembly Guide 8
Seat Assembly
Image Hardware Instructions
1 1 roller assembly
1 shaft, 19 mm x 129 mm
2 retaining rings
Tool: Pliers
Attach the seat assembly to the main frame . Place the roller assembly
between the seat assembly brackets and insert the shaft. Secure each side with
retaining rings.
2 1 gas spring Snap gas spring into place under seat and at base of main frame . The larg-
er body of the gas spring attaches to the seat.
3To adjust the roller clearance on the seat assembly, have your assistant apply
downward force on seat.
4Tools: Two open end wrenches Preinstalled on the front roller of the seat assembly is a roller adjustment tool .
Continue to apply force to the seat assembly and press the adjustment tool down-
ward to turn the roller. Turn until it just contacts the plastic ratchet plate and no
more than 180 degrees. Tighten the socket head screws on the sides of the front
roller (ensure the position of the roller tool does not change). Remove tool.
5 4 hex head screws 5/16-inch x 1½-inch
4 washers, 9 mm
Tool: Socket wrench, ½-inch with extension
Attach seat pad to seat assembly with the wider end towards frame.
4
1
46
14
13
12
40
34
4
58
55
12
13
34
4
46
55
58
4
4
1
14
40
1
©2019 Precor Inc. | Diverging Lat Pulldown RSL 314 | Assembly Guide 9
Image Hardware Instructions
1Tools: Two open end wrenches, 19 mm Have assistant lift both arms and secure cables to arms. Hold rod end
and tighten the nut. Maximum distance is 25 mm.
2Tools: Hex wrench, 8 mm
Hex wrench, 4 mm
To route the cable around the lower pulley on the weight stack tower,
remove the cable retainer. Route the cable around the pulley and then
replace the cable retainer.
3Tools: Hex wrench, 8 mm
Open-end wrench, 19 mm
Torque wrench
To route the cable to the upper pulleys of weight stack tower, remove
the cable retainers, route the cables, and replace the retainers. Tighten
to 50 ft-lb (67 N-m) of torque.
Route the Cable
6 2 roller pad cap rings
2 roller pads
Snap cap rings on to roller pads.
72 retaining rings
Tool: Retaining ring pliers
Slide roller pads with cap rings onto thigh bar shafts. Secure roller pads.
82 roller pad caps Snap on roller pad caps on to each roller pad.
8
35
9
44
35
8
9
44
©2019 Precor Inc. | Diverging Lat Pulldown RSL 314 | Assembly Guide 10
Finish the Weight Stack Tower
Image Hardware Instructions
1 2 M10 x 125 mm BHCS
2 washers, 11 mm
Tool: Hex wrench, 6 mm
Remove the guide rod fasteners installed in step 1 of the Frame Assembly.
2 2 guide rods
1 weight stack spacer, 1-inch
Align the weight stack spacer over the holes on the base of the tower. Insert two
weight guide rods and lean outwards about 6 inches (15 cm), enough clearance
for the weights. Flat side of weight stack spacer should face user side.
3 2 bumpers
23 10 lb (4.5 kg) weight plates
1 top plate assembly
Slide one bumper on to each rod. Place the weight plates on the rods. Ensure the
side with three holes face the user side and single hole to the back. Place the top
plate over the weight plates. The plates and top plate should align ush on the
user side.
53
60
22
16
36
18
11
11
16
18
22
36
53
60
©2019 Precor Inc. | Diverging Lat Pulldown RSL 314 | Assembly Guide 11
4 1 M10 x 65 mm SHCS
2 washers, 11 mm
1 M10 nylon lock nut
Tools: Hex wrench, 8 mm
Socket wrench, 17 mm
1 guide rod with cap
Prepare the lower base for the add-on weight assembly. Place the retaining
screw through the bracket on the weight stack spacer.
Remove the cap from the guide rod and place the rod into bracket opening se-
cured by the screw.
5 2 bumpers
1 add-on weight spacer, 3-inch
1 add-on weight
1 add-on weight handle
Place one bumper onto the third guide rod, followed by the add-on weight spac-
er, another bumper, the add-on weight, and the add-on weight handle.
6 1 counterweight Place counterweight over front two rods and handle.
7Straighten the front two guide rods to a vertical position. Have your assistant lift
the guide rods up into the upper part of the frame.
8 Tools: Hex wrench, 6 mm
Torque wrench
While the assistant is holding the rods into the upper frame, reinsert the two
bolts underneath the guide rods in the bottom frame, and secure to the kick
plate. Let the guide rods drop onto the bolts and fully tighten the bolts.
Tighten M10 screws to 32 ft-lb (43 N-m) of torque.
24
52
60 57
20
19
17
11
11
25
11
17
19
20
24
25
52
57
60
53 60
©2019 Precor Inc. | Diverging Lat Pulldown RSL 314 | Assembly Guide 12
9 1 M10 x 65 mm SHCS
2 washers, 11 mm
1 M10 nylon lock nut
Tools: Hex wrench, 8 mm
Socket wrench, 17 mm
Replace the cap to the top of the rod and secure top of rod to weight stack
tower frame.
10 1 washer, rubber
1 washer, silver 13.5 mm ID x 35 mm OD
Place the washers into the top of the cable connector in the add-on weight
handle.
11 Tool: Torque wrench Attach the cable to the weight stack. Thread the bolt into the top plate assem-
bly until the cable meets ALL of the following requirements.
The top weight begins to separate from the second weight.
The selector pin can be easily inserted into each of the weight plates.
The add-on weight is engaged when the latch is in the down posi-
tion.
At least six turns of the threads on the cable bolt extend into the
add-on weight selector stem.
The distance from the underside of the jam nut to the top of the washer
should be no more than 1.61 inch (41mm).
Tighten the locking bolt against the select stem to 50 ft-lb (81 N-m) of
torque.
Check and further tighten adjust connections at arms if needed.
12 1 weight labels Remove back of labels. Align top holes and place pin into hole. Remove pin
and place into a lower hole on labels. Re-align labels as necessary and then
press rmly onto weights. Rub vigorously and thoroughly to adhere. Peel the
extra label away and rub remaining labels again.
13 Lubricate the guide rods with a Teon-based lubricant, such as Tri-Flow Supe-
rior Lubricant. Remove any excess with a clean cloth or tissue.
52
57
60
60
52 57
45
42
42
45
37
41 mm
©2019 Precor Inc. | Diverging Lat Pulldown RSL 314 | Assembly Guide 13
Image Hardware Instructions
1 Snap the lower pulley shroud onto the lower front shroud . Place
the lower front shroud with pulley cover into frame and hook on to but-
tons.
2 1 M6 x 15 mm SHCS
Tool: Hex wrench, 4 mm
Secure lower pulley shroud.
3 Place the lower rear shroud onto the frame. Raise it enough to hook
over buttons.
4 Install the rear middle shroud . Slide it over the triangular tabs of the
lower shroud and hook it onto middle buttons.
Repeat for the front middle shrouds .
5 Install the upper rear and front shrouds . Ensure to hook them
over the buttons and spacers.
6 2 M10 x 40 mm SHCS
Tools: Hex wrench, 8 mm
Torque wrench
Place shroud crown on top and secure. Recommended bolt torque
is 25 ft-lb (34 N-m).
7Securely snap top tray into place.
Install the Shroud
23
26
27
28
29
30
31
32
33
51
54
23
54
33
28 29
30
31
27 26
51
32
IMPORTANT
Before installing the shroud, ensure that cable connections are correct and cables move smooth through their paths. If they do not,
STOP and adjust cable and routing. In addition, ensure all fasteners (including those preinstalled) are tightened appropriately.
Note The location of the lower pulley cover will vary depending on the model.
©2019 Precor Inc. | Diverging Lat Pulldown RSL 314 | Assembly Guide 14
Complete the Assembly
IMPORTANT
As oor materials vary, it is important that you consult a licensed contractor to advise you on proper bolting techniques and appropriate fastener
types.
Standards can be changed or updated. Precor recommends that you keep apprised of your local industry standards. Precor shall not be liable for fail-
ure to properly secure and bolt strength equipment to the oor.
Precor recommends that the strength equipment be bolted down at all anchoring points. Adjust the round feet on the frame up or down by turning them left or right to help level the
equipment.
Anchor each oblong foot on the frame to the oor, including the feet on the weight stack tower. Each oblong foot has a rubber cap with slits to allow access the anchor points.
Final Checklist
• Lubricate the guide rods and chrome pad adjustment tubes with a Teon spray lubricant. Precor recommends using TriFlow brand.
• For all movable arm and pad frames, adjust and test each position. Verify that the adjustment pin fully engages and inserts freely into each position.
• Verify cables fully sit in cams (if applicable) and in pulleys. Cables should move without rubbing.
• Place the selector pin into the holder on the top plate assembly of the weight stack. Perform the exercise slowly. Verify cable moves freely without any binding. Select a
moderate weight and repeat.
• Verify the selector pin can be inserted into each weight plate.
• Verify all fasteners and the cable retention nut are tight. Ensure they meet the torque call outs in the assembly guide.
• Refer to the Maintenance Guide that came with your product for details on maintaining the equipment.
RSL Diverging Lat Pulldown 314 | Assembly Guide | P/N CW39523-101 ENG
© Precor, Incorporated | 30 August 2019

Other Precor Elliptical Trainer manuals
Precor ELLIPTICAL FITNESS CROSSTRAINERS EFX 835 Assembly Instructions

Precor

Precor ELLIPTICAL FITNESS CROSSTRAINERS EFX 835 Assembly Instructions

Precor C576i User manual

Precor

Precor C576i User manual

Precor EFX524 User manual

Precor

Precor EFX524 User manual
Precor Elliptical Fitness Crosstrainer EFX 5.21 User manual

Precor

Precor Elliptical Fitness Crosstrainer EFX 5.21 User manual

Precor EFX 883 Assembly Instructions

Precor

Precor EFX 883 Assembly Instructions

Precor C544 User manual

Precor

Precor C544 User manual

Precor EFX 5.21i User manual

Precor

Precor EFX 5.21i User manual

Precor EFX EFX 5.23 User manual

Precor

Precor EFX EFX 5.23 User manual

Precor EFX524 User manual

Precor

Precor EFX524 User manual

Precor Resolute RSL 605 User manual

Precor

Precor Resolute RSL 605 User manual

Precor Resolute RSL 310 User manual

Precor

Precor Resolute RSL 310 User manual

Precor EFX 576i User manual

Precor

Precor EFX 576i User manual

Precor Resolute RSL 324 Operating manual

Precor

Precor Resolute RSL 324 Operating manual

Precor C546i User manual

Precor

Precor C546i User manual

Precor Resolute RSL 414 User manual

Precor

Precor Resolute RSL 414 User manual

Precor EFX 425 User manual

Precor

Precor EFX 425 User manual

Precor HANDBOEK EFX 556i Installation and operating instructions

Precor

Precor HANDBOEK EFX 556i Installation and operating instructions

Precor EFX546 User manual

Precor

Precor EFX546 User manual

Precor Resolute RSL 215 User manual

Precor

Precor Resolute RSL 215 User manual

Precor Elliptical Fitness Crosstrainer EFX 5.25 User manual

Precor

Precor Elliptical Fitness Crosstrainer EFX 5.25 User manual

Precor 5.21i User manual

Precor

Precor 5.21i User manual

Precor EFX 815 User manual

Precor

Precor EFX 815 User manual

Precor EFX 556i Installation and operating instructions
Precor

Precor EFX 556i Installation and operating instructions

Precor Resolute RSL 621 User manual

Precor

Precor Resolute RSL 621 User manual

Popular Elliptical Trainer manuals by other brands

BH FITNESS G2334RF Instructions for assembly and use

BH FITNESS

BH FITNESS G2334RF Instructions for assembly and use

Weslo Momentum 4.0 Elliptical Manual do utilizador

Weslo

Weslo Momentum 4.0 Elliptical Manual do utilizador

NordicTrack Commercial 14.9 user manual

NordicTrack

NordicTrack Commercial 14.9 user manual

NordicTrack ASR 630 831.23765.0 user manual

NordicTrack

NordicTrack ASR 630 831.23765.0 user manual

Octane Fitness Q35 Operation manual

Octane Fitness

Octane Fitness Q35 Operation manual

Hammer Ocean One manual

Hammer

Hammer Ocean One manual

Horizon Fitness Andes 3 owner's manual

Horizon Fitness

Horizon Fitness Andes 3 owner's manual

Smooth Fitness CE 07859-999 Assembly manual

Smooth Fitness

Smooth Fitness CE 07859-999 Assembly manual

NordicTrack E 4.1 NTEVEL75012.0 user manual

NordicTrack

NordicTrack E 4.1 NTEVEL75012.0 user manual

Horizon Fitness ELLIPTICAL E1201 user guide

Horizon Fitness

Horizon Fitness ELLIPTICAL E1201 user guide

Kettler CX3 manual

Kettler

Kettler CX3 manual

Ironman Fitness 420E owner's manual

Ironman Fitness

Ironman Fitness 420E owner's manual

VIRTUFIT CTR 1.2i Crosstrainer user manual

VIRTUFIT

VIRTUFIT CTR 1.2i Crosstrainer user manual

Weslo Momentum 410 Elliptical Bedienungsanleitung

Weslo

Weslo Momentum 410 Elliptical Bedienungsanleitung

LifeCore Fitness LC-CD450 User's product manual

LifeCore Fitness

LifeCore Fitness LC-CD450 User's product manual

Spirit XE 125 owner's manual

Spirit

Spirit XE 125 owner's manual

NordicTrack E 12.5 user manual

NordicTrack

NordicTrack E 12.5 user manual

Spirit Group Exercise Elliptical owner's manual

Spirit

Spirit Group Exercise Elliptical owner's manual

manuals.online logo
manuals.online logoBrands
  • About & Mission
  • Contact us
  • Privacy Policy
  • Terms and Conditions

Copyright 2025 Manuals.Online. All Rights Reserved.