3
1. Bench can now be placed in the upright stored position against the wall.(Fig.9) The help of a second
person may be needed at this time, as the bench will be fairly heavy until the shocks are installed. (See
Fig. 8 for suggested lifting points)
2. With someone holding the bench against the wall, insert the gas shocks into the ‘ears’ of the
wall bracket. Use the serrated flange nut to secure the shocks to the wall bracket (Figure 10) and tighten
using the 1/2” socket and open-ended wrench. (Figure 11)
3. Once both shocks are fully attached to the wall bracket, fully tighten the lag bolts securing the wall
bracket to the wall.
4. Now you can deploy the bench to the flat position again and check to make sure the bench lays down
flat, and whether or not you need to adjust the leveling feet on the bottoms of the front and middle legs.
NOTE: If the bench will not stay up against the wall when it is placed in the upright position,
check to make sure the hardware holding the shocks in place are fastened securely and not
loose.
Figure 10 Figure 11
support@prxperformance.com 701-566-0452
Figure 9
Attach Shocks and Level
Safe to grab bench in these
locations for deploying from &
returning to the wall.
Figure 8
Leveling Feet
Shock
Serrated Flange Nut
3
1. Bench can now be placed in the upright stored position against the wall. (Figure 6) The help of a second
person may be needed at this time, as the bench will be fairly heavy until the shocks are installed. (See
Figure 5 for suggested lifting points)
2. With someone holding the bench against the wall, insert the gas shocks into the ‘ears’ of the
wall bracket. Use the serrated flange nut to secure the shocks to the wall bracket (Figure 7) and tighten
using the 1/2” socket and open-ended wrench. (Figure 8)
3. Once both shocks are fully attached to the wall bracket, fully tighten the lag bolts securing the wall
bracket to the wall. NOTE: If the bench will not stay up against the wall when it is placed in the
upright position, check to make sure the hardware holding the shocks in place are fastened se-
curely and not loose.
4. Now you can deploy the bench to the flat position again and check to make sure the bench lays down
flat. If the bench does not lay flat, use the leveling feet to adjust the front and middle legs. (Figure 5)
To ensure proper functionality, periodic checks should be made to ensure the bench lays flat when de-
ployed.
support@prxperformance.com 701-566-0452
Figure 6
Attach Shocks and Level
Safe to grab bench in these
locations for deploying from &
returning to the wall.
Figure 5
Leveling Feet
Figure 8
Serrated Flange Nut
Shock
Shock
Serrated Flange Nut
5
1. Bench can now be placed in the upright stored position against the wall. (Figure 10) The help of a sec-
ond person may be needed at this time, as the bench will be fairly heavy until the shocks are installed.
(See Figure 9 for suggested lifting points)
2. With someone holding the bench against the wall, insert the gas shocks into the ‘ears’ of the
wall bracket. Use the serrated flange nut to secure the shocks to the wall bracket (Figure 11) and tighten
using the 1/2” socket and open-ended wrench. (Figure 12)
3. Once both shocks are fully attached to the wall bracket, fully tighten the lag bolts securing the wall
bracket to the wall. NOTE: If the bench will not stay up against the wall when it is placed in the
upright position, check to make sure the hardware holding the shocks in place are fastened se-
curely and not loose.
4. Now you can deploy the bench to the flat position again and check to make sure the bench lays down
flat. If the bench does not lay flat, use the leveling feet to adjust the front and middle legs. (Figure 9)
To ensure proper functionality, periodic checks should be made to ensure the bench lays flat when de-
ployed.
support@prxperformance.com 701-566-0452
Figure 10
Attach Shocks and Level
Figure 12
Serrated Flange Nut
Shock
Shock
Serrated Flange Nut
Figure 11
Safe to grab bench in these
locations for deploying from &
returning to the wall.
Figure 9
Leveling Feet
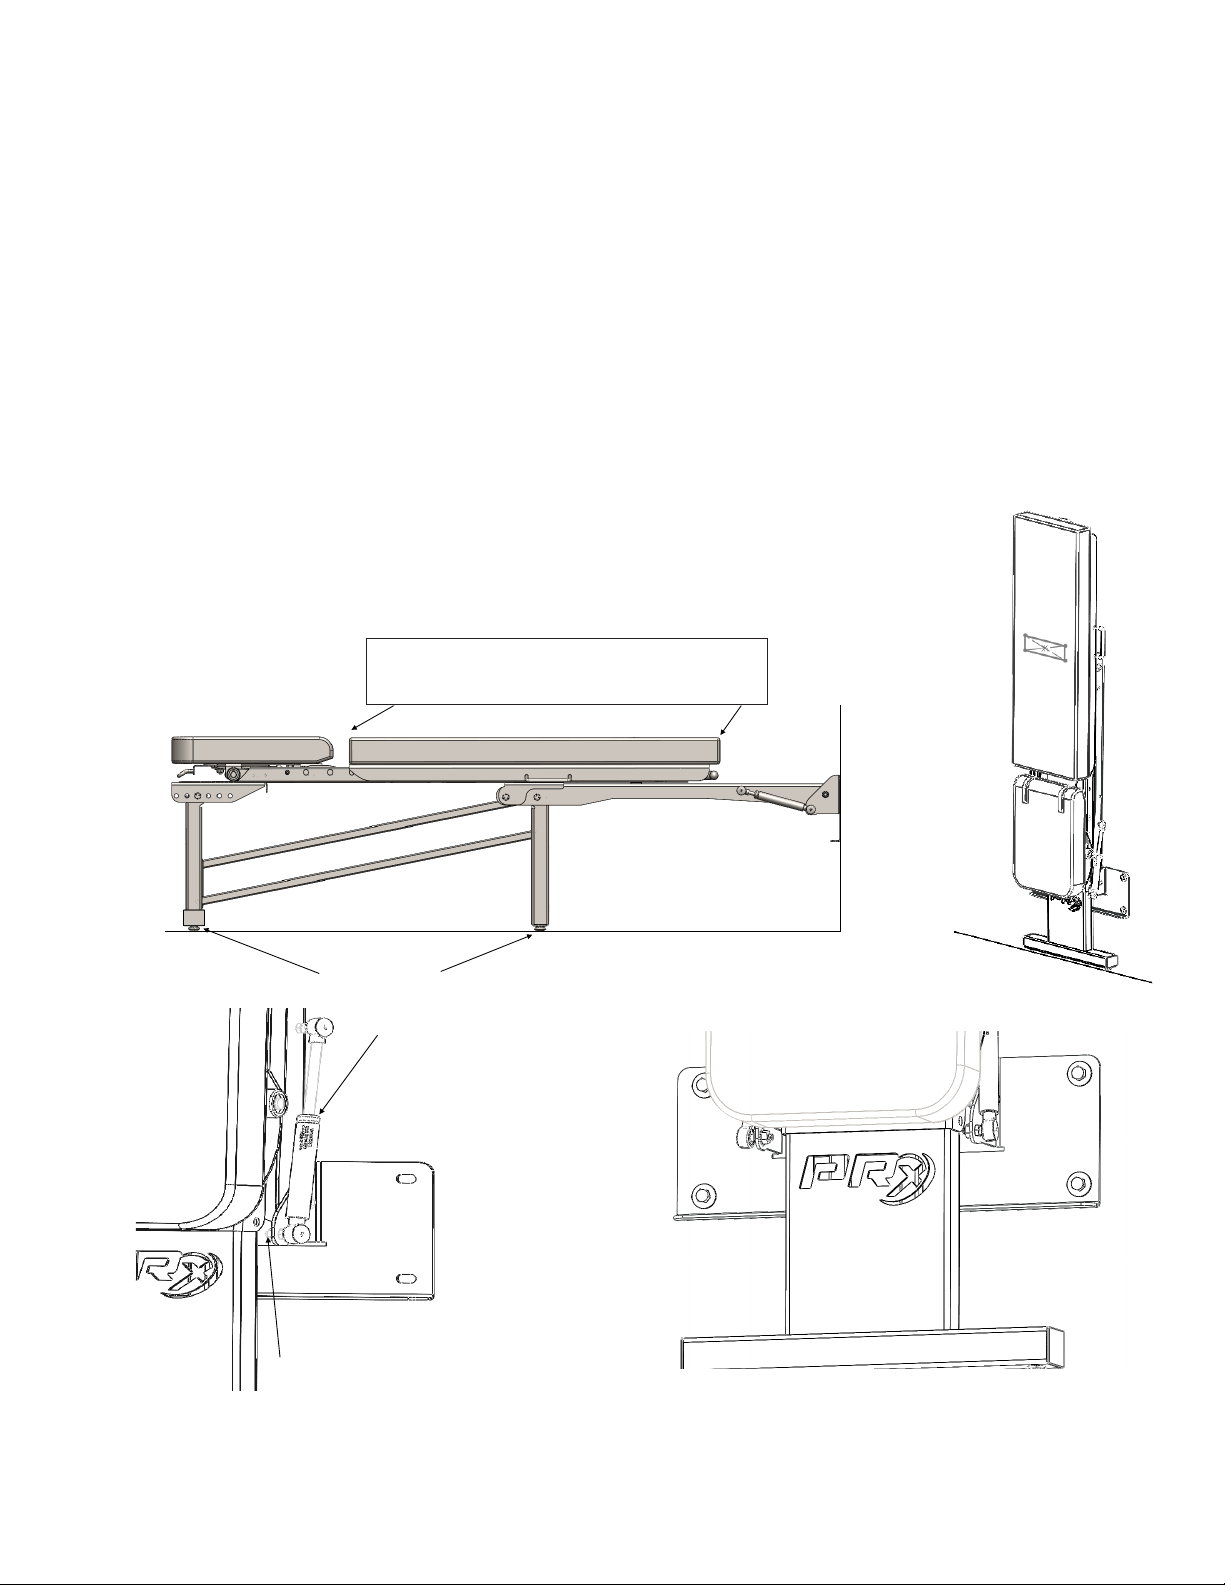
3
1. Bench can now be placed in the upright stored position against the wall.(Fig.9) The help of a second
person may be needed at this time, as the bench will be fairly heavy until the shocks are installed. (See
Fig. 8 for suggested lifting points)
2. With someone holding the bench against the wall, insert the gas shocks into the ‘ears’ of the
wall bracket. Use the serrated flange nut to secure the shocks to the wall bracket (Figure 10) and tighten
using the 1/2” socket and open-ended wrench. (Figure 11)
3. Once both shocks are fully attached to the wall bracket, fully tighten the lag bolts securing the wall
bracket to the wall.
4. Now you can deploy the bench to the flat position again and check to make sure the bench lays down
flat, and whether or not you need to adjust the leveling feet on the bottoms of the front and middle legs.
NOTE: If the bench will not stay up against the wall when it is placed in the upright position,
check to make sure the hardware holding the shocks in place are fastened securely and not
loose.
Figure 10 Figure 11
support@prxperformance.com 701-566-0452
Figure 9
Attach Shocks and Level
Safe to grab bench in these
locations for deploying from &
returning to the wall.
Figure 8
Leveling Feet
Shock
Serrated Flange Nut
1. Place bench in the upright stored position against the wall (Figure 11). The help of a second
person may be needed at this time, as the bench will be fairly heavy until the shocks are
installed. (See Figure 10 for suggested lifting points)
2. With someone holding the bench against the wall, insert the gas shocks into the ‘ears’ of the
wall bracket.* Use the serrated ange nut to secure the shocks to the wall bracket (Figure 12)
and tighten using the 1/2” socket and a 7/16” open-ended wrench (Figure 13).
3. Once both shocks are fully attached to the wall bracket, fully tighten the lag bolts securing the
wall bracket to the wall.
NOTE: If the bench will not stay up against the wall when it is placed in the upright
position, check to make sure the hardware holding the shocks in place are fastened
securely and not loose.
4. Deploy the bench to the at position. Check to make sure the bench lays
down at to see whether or not you need to adjust the leveling feet on the
bottoms of the front and middle legs (Figure 10).
Attach Shocks and Level
Safe to grab bench in these locations for
deploying from & returning to the wall.
Figure 10
Figure 12
Figure 13
Figure 11
*If gas shocks do not align with the ‘ears’, then deploy bench from wall making sure shocks are out of the way. Locate
the nut that connects the gas shock to the bench and loosen 3/4 of the way and repeat Step 2. Once Step 2 is complete,
retighten the loosened nut.


 Service manual")


