PURE FREE User manual

PURE FREE E-BIKE
Set-up & Care Guide


Welcome to the Set-up & Care Guide for your
Pure Free e-Bike.
This guide explains how to get started on your Pure Free e-bike and
features some important information specic to these models.
Please read this document along with the full owner’s manual
supplied with the e-bike, which covers essential safety, maintenance
and care information. Both manuals are necessary for you to use your
new e-bike safely and to understand how best to care for your e-bike
now and in the future.
Thank you for purchasing a Pure e-bike and joining
our green revolution!
Pure Electric is determined to make a real, meaningful impact on
the way we all travel every day. You’ve just joined us in the ght for
cleaner air for everyone.
There are also detailed manufacturer’s information documents
supplied with the bike to be read and kept for reference.

Section 1 – Quick-start assembly instructions....................................... 1
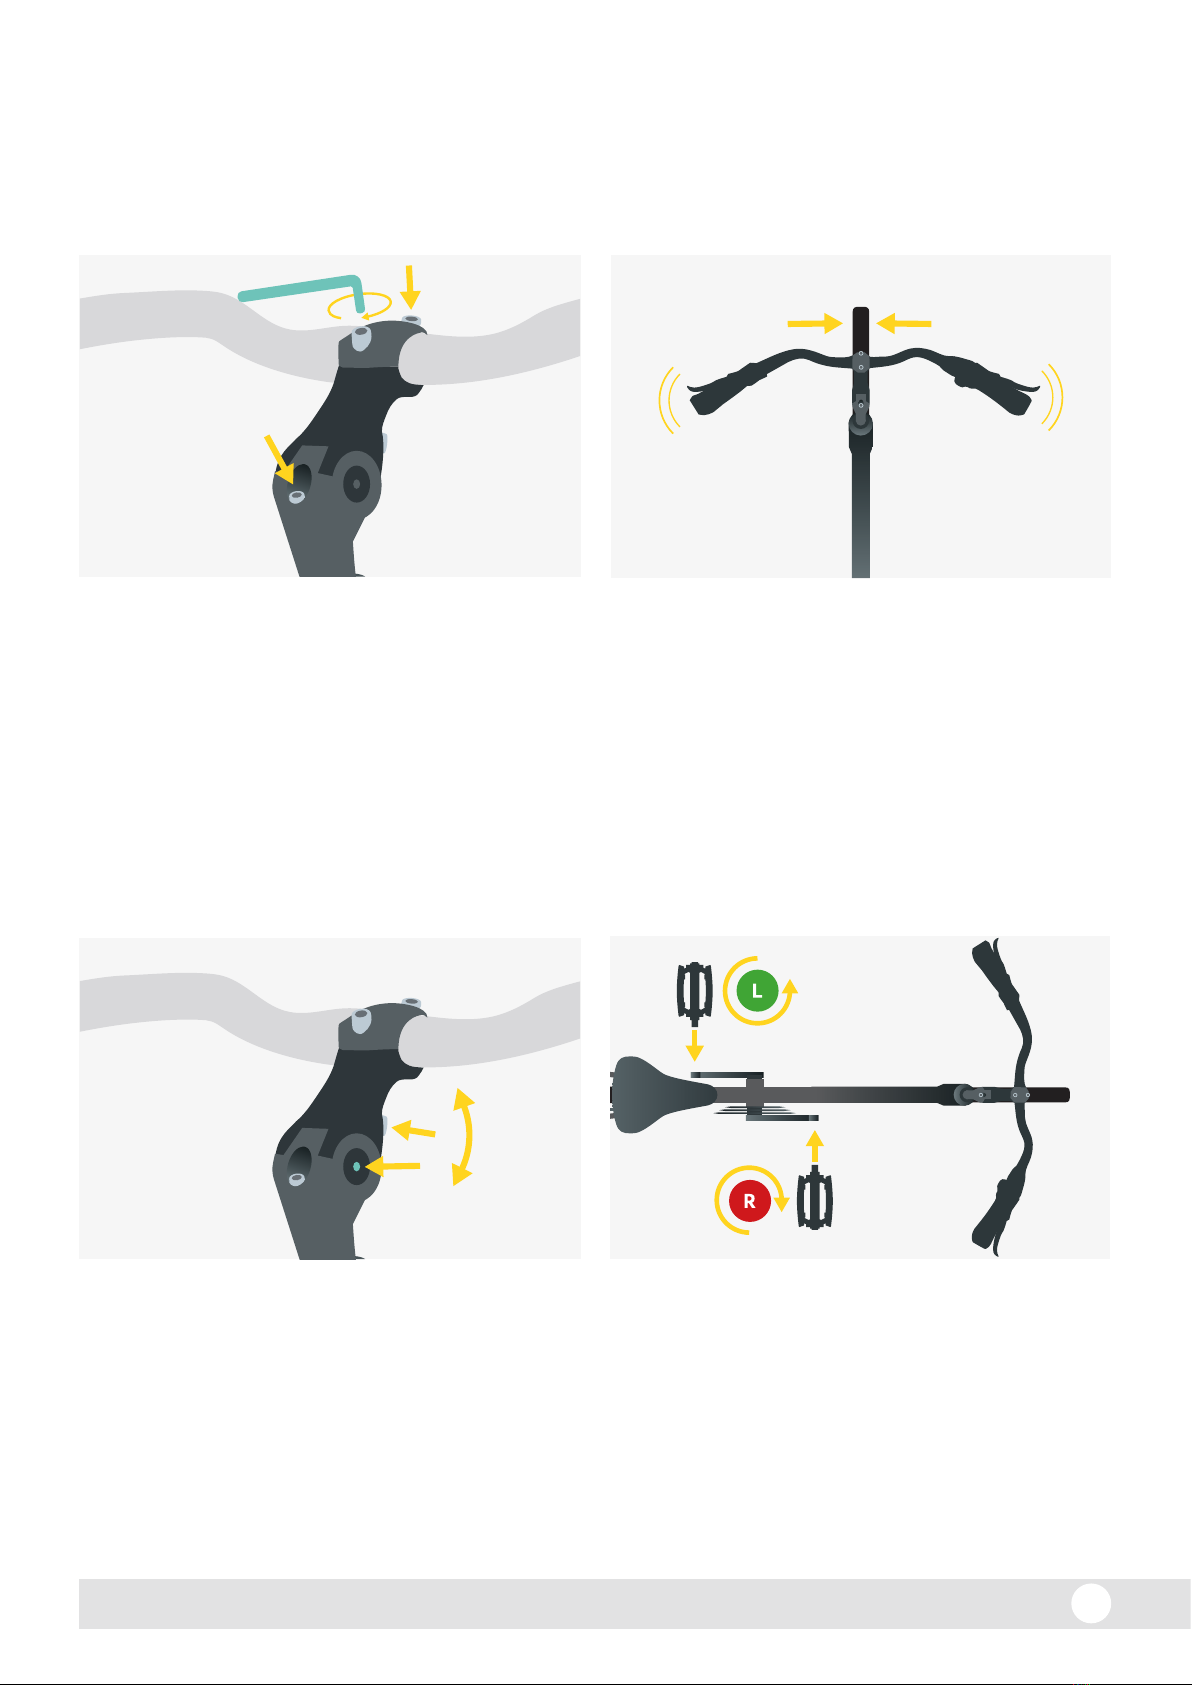
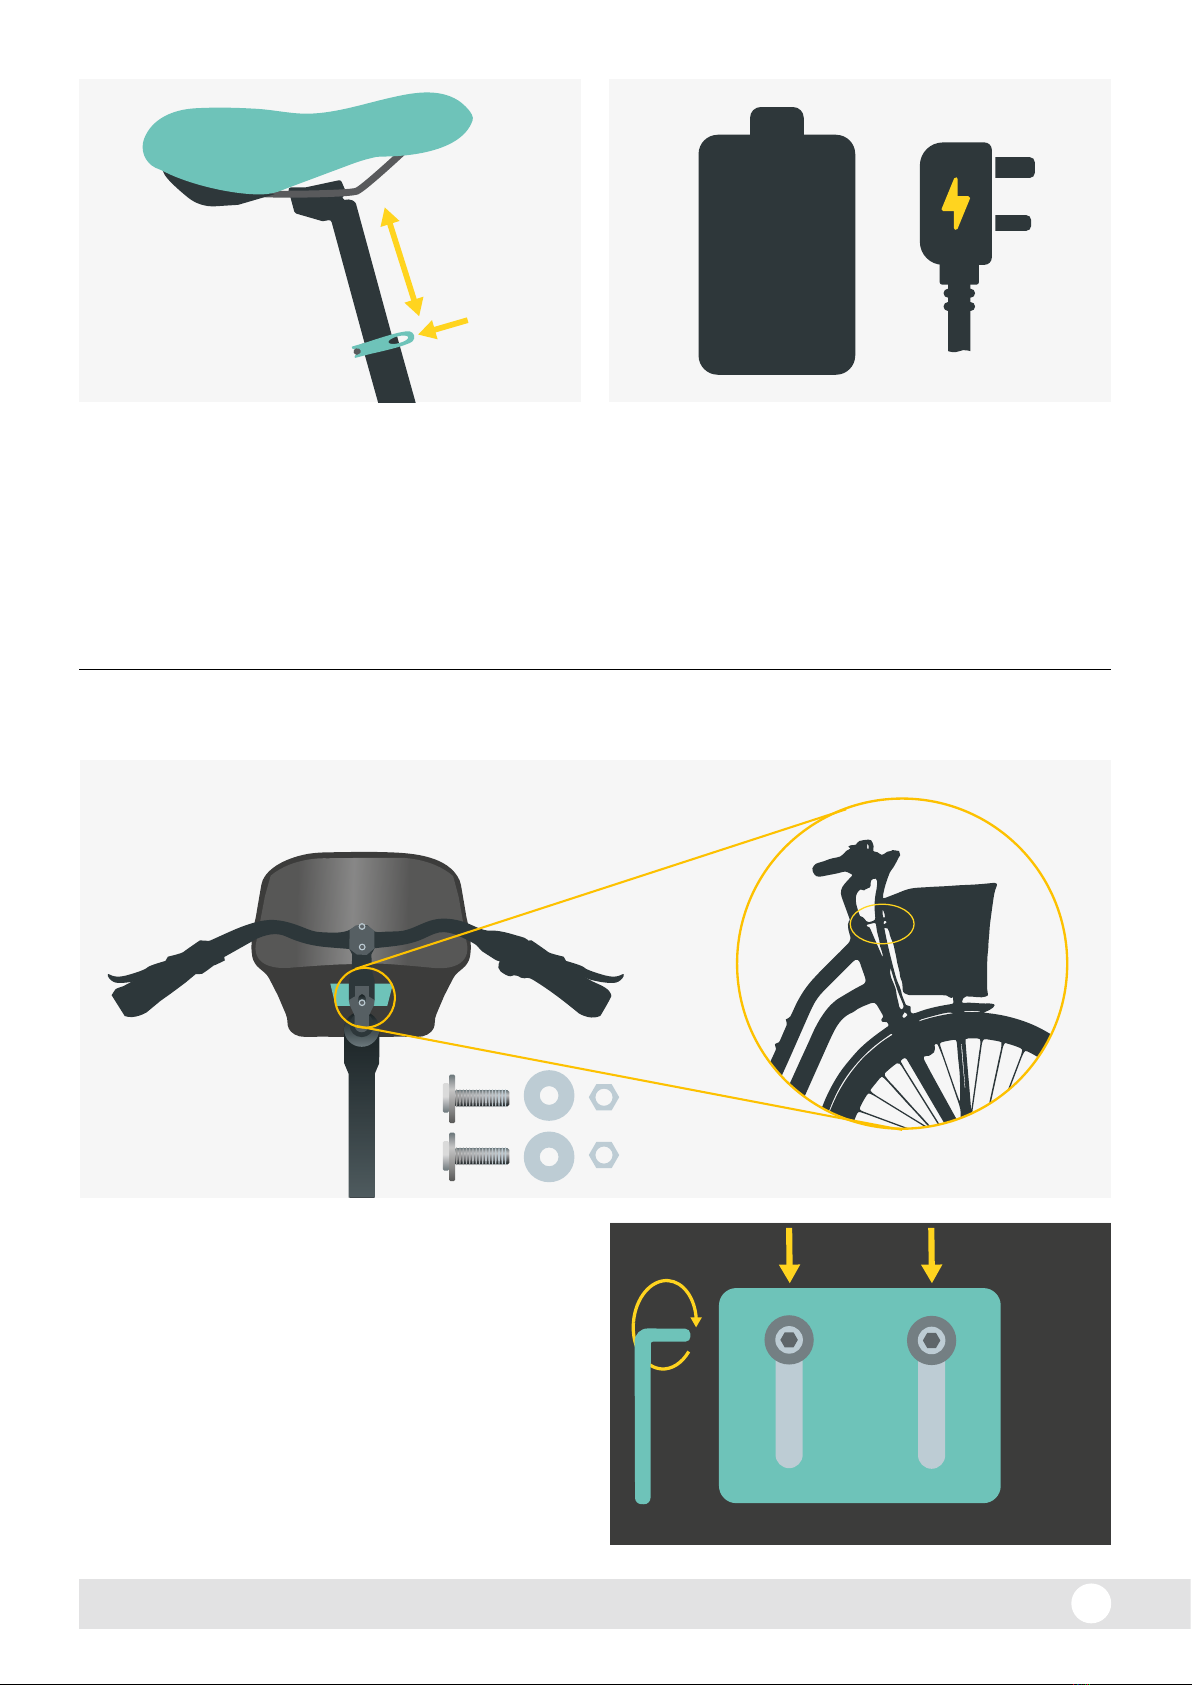
Setting up your new e-bike........................................................................................................................................1
Care tips for you & your e-bike............................................................................................................................... 5
Section 2 - Systems overview.................................................................. 6
1. Getting started – the display unit.......................................................................................................................7
2. Functional overview............................................................................................................................................... 8
2.1 Switching on and o ...................................................................................................................................... 8
2.2 Main form and operation .................................................................................................................................. 8
3. Troubleshooting error messages and related checks.............................................................................. 9
4. Frequently asked questions...............................................................................................................................11
5. Gears and the drivetrain ......................................................................................................................................11
Section 3 - Caring for your e-bike ..........................................................12
6. Battery removal and general care..................................................................................................................13
6.1 Guidelines for safe use and optimised battery life ...........................................................................13
6.2 Charging and battery operation...............................................................................................................14
6.3 Charging function – indicator lights........................................................................................................14
6.4 Troubleshooting – charging.......................................................................................................................14
7. Cleaning and wet-weather use .........................................................................................................................15
8.Essential maintenance .........................................................................................................................................15
8.1 Brakes ..................................................................................................................................................................15
8.2 Tyres....................................................................................................................................................................16
8.3 Wheel, crank and headset bearings.......................................................................................................16
9. Pre-ride safety checks .........................................................................................................................................16
Section 4 - Technical & warranty information .................................... 17
10. General specications....................................................................................................................................... 18
14. Intended use...........................................................................................................................................................19
15. Warranty terms.....................................................................................................................................................19
16. Declaration of conformity................................................................................................................................20
Set-up & Care Guide – Contents

1
Quick-Start
Assembly Instructions
SECTION 1

Pure Free E-Bike 1
SPARES
PACK
BIKE BOX
3. 4.
With the bolts still not fully tightened (loosen
them a little if you need to), adjust the height
of the stem, ensuring that the maximum height
marker is not showing.
Line up the handlebar with the wheel facing
directly forward, so that from above the bar is at a
90° angle to the front wheel.
2.1.
Ensure that the stem bolts are in place. They
shouldn’t be fully tightened yet.
Remove the e-bike and the spares pack from
the box*.
* We strongly recommend that you keep the main box and
packaging for at least 30 days in case you need to return the
e-bike.
Setting up your new e-bike
Our technicians have thoroughly checked and assembled your new e-bike, packing it carefully inside
the box. It’s almost ready to ride – just follow the easy instructions below, charge up your battery, pump
up your tyres, and you’ll be ready to go!

Pure Free E-Bike 2
(A)
(B)
7.
(1)
(2)
6.5.
To adjust the angle of the handlebar stem, rst
fully loosen the bolt on the underside of the
stem (1). Then, loosen the bolts on the side of
the stem (2). Move the bars to the angle you
want, then tighten bolt (1) carefully to lock the
position. Aer this, tighten bolts (2) rmly (up to
10-15Nm if you have a torque wrench).
Check that the stem is secure by placing the
front wheel between your legs and twisting the
handlebars. If the bars and wheel move out of
the 90° alignment, you will need to realign and
tighten the stem bolts further.
Double check that the handlebars are still
90°to the front wheel, then tighten the stem
bolt (A) to secure it into position. If you have a
torque wrench, tighten to 15-20Nm (NOTE: the
bolts securing the handlebar (B) should only
be tightened to 5-6Nm). If you don’t, aim to
rmly tighten by hand without straining to your
full strength.
8.
Using your ngers, begin to t the pedals to
the matching colour-coded cranks, turning the
le pedal anti-clockwise, and the right pedal
clockwise to t. Once the pedals are loosely
installed, tighten with the supplied 15mm spanner
- be careful not to damage the threads by forcing
the pedal in. Pedals should be tightened very
rmly (30-40Nm if you have a torque wrench).

Pure Free E-Bike 3
6
HOURS
Pure Free Step – Securing the basket
Use the washers supplied underneath the bolt
head so that the plate is well supported.
Tighten clockwise to secure, rmly but not to the
limit of strength.
9.
1.
10.
Adjust the saddle height by loosening the quick-
release latch found on the seat clamp. Raise
the saddle to a comfortable height (you may
need to make a few adjustments before nding
a comfortable height for you), then tighten the
quick-release latch until the seatpost is secure.
First, secure the basket to the upper bracket using
the two nuts, washers and bolts supplied (‘upper’
ttings, as shown). Be sure that the bolt head is
facing inside the basket.
Make sure that you fully charge your e-bike before
riding it. This will help to prolong the long-term
life of the battery. You should achieve full charge
in 4.5 to 6 hours.
(Inside View)

Set-up & Care Guide 4
2. 3.
The metal basket support is already attached.
You can adjust it by loosening the front wheel nuts
a little to move the support to the correct position
under the basket if you need to. Remember to
tighten the nuts when you’re done.
Position the metal plate against the basket
support to hold it to the underside of the basket.
Thread the bolts in from the top, and tighten
evenly so that the plate has even gaps each
side, then tighten fully. Use the nuts provided to
tighten up against the plate*.
Pure Free Step – Securing the front light
(Outside View)
* NOTE: Check the bolts securing the basket aer the rst few rides and periodically aerwards. Bolts may loosen in use and pose a risk of
the basket moving or becoming detached, causing loss of contents and a potentially serious accident for you and/or other road users.

Pure Free E-Bike 5
1. Keep your
tyres pumped
3. Remove
yourbattery
4. Lubricate!
2. Care for
thebattery
5. Ride safely and
responsibly
Remove when not
in use for longer
periods or when
locking your bike.
You’ll increase the
range and the life of
your e-bike.
We advise wearing
a helmet and using
lights, while always
following the law in
your local area.
Care tips for you & your e-bike
You’ll get fewer
punctures and better
e-bike performance.
...occasionally to
reduce friction
and wear.
1.
2.
Bolt the light to the basket support as shown. Adjust the angle so that the lens is facing forward and
gently tighten the nut and bolt until it is secure and xed in place, but can still be adjusted as needed.
When you are satised with the position, tighten the bolt a little more to secure it rmly.
Use the supplied zip ties to x the light wire to the basket support and to the basket body as shown.
Be sure that the wire isn’t in danger of catching on the brakes or tyre.

2
Systems Overview
SECTION 2

Pure Free E-Bike 7
Getting started – the display unit
1
+
MODE ASSIST
–+
(Battery Level)
B.L
(6km/h ‘walk-assist’)
M
(Power Assist)
PAS
Your Pure Free Step / Free City display unit has three buttons as shown below in grey:
(Power)
(Lights)
P
L

Set-up & Care Guide 8
2
25%
50%
75%
100% Full
Empty
4
2
3 1
To power on, press the small power button on the
battery indicator display (at the rear upper side
of the battery casing). The green LED next to the
power button will show 25, 50, 75 or 100% charge
status. When the battery is on, you can press Pon
the handlebar display which will cause the display
unit to switch on and show how much charge is in
the battery.
To power o, press and hold P.
If the e-bike is not used for a period of time, the
display and power will automatically turn o.
The display unit includes:
1. Power Assist (PAS) level display:
Displays the current assistance level. When the
system is turned on the default power level
is level 1. Press the MODE button to cycle
through assistance modes 0-3. Power level 0
indicates no assistance, while level 3 indicates
maximum assistance.
2. Battery level:
Displays the current charge. When the battery
is fully charged, the LED display will show
4 LEDs, which will go out one by one as the
power level drops. When the last indicator
starts ashing, the battery needs charging.
If this happens when riding, we recommend
switching the power o and riding home
without power to protect the battery.
3. 6km/h ‘Walk-assist’ mode:
‘Walk-assist’ mode helps you to walk with the
e-bike, providing assistance at 6km/h without
pedalling. Hold the MODE button for more
than 2 seconds and the e-bike will go into
‘walk-assist’ mode. This function is only to be
used when pushing the e-bike.
Functional overview
2.2 Main form and operation
2.1. Switching on and o
4. Lights:
Press the LIGHT button to turn on the front
and rear lights. Press it again to turn o
the lights.

Pure Free E-Bike 9
Number Display Fault description Check items
and measures
1PAS level 1
light ashing
Abnormal current 1. Check the wiring
between the
controller and the
motor.
2. Have the controller
replaced.
2PAS level 1
light ashing
Throttle error This error message
is displayed for
information purposes
only. If displayed,
restart the unit. If this
does not clear the
error, have the display
unit replaced by
contacting your local
Pure Electric store, or
contacting customer
services for support.
3PAS level 1
light ashing
Motor phase error 1. Check the
controller cable
2. Have the controller
replaced.
4PAS level 1
light ashing
Hall sensor (magnetic
sensor in motor) error
1. Check the
motor cable.
2. Have the motor
replaced.
Troubleshooting error messages and related checks
3
If there’s a fault in the electronics of the e-bike, the display will ash LEDs to indicate the nature of the
problem. The fault must be resolved before the e-bike can be used. As a general rule, the rst check you
can perform is to see if the cables are in good condition and connected. Accidental disconnection is a
common cause of most faults.

Set-up & Care Guide 10
Number Display Fault description Check items
and measures
5PAS level 1 & 3 lights
ashing
Abnormal braking 1. Release the brake,
power down
andturn back on.
2. Check the brake
cable cut-out at the
brake lever.
3. Check general
brake function.
6PAS level 1
light ashing
Abnormal braking 1. Release the brake
and turn it on.
2. Check the brake
cable cut-out at the
brake lever.
3. Check general
brake function.
7All PAS lights ashing Abnormal
communication
1. Charge the battery.
2. Have the battery
replaced.
8All battery indication
and level lights ash
at the same time
Power On/O
button sticking
1. Power down and
restart
2. Check button
function or display
unit integrity
9All battery indication
lights ash
6kmh mode
button sticking
1. Power down
and restart
2. Check button
function or display
unit integrity
10 All of the battery
indication lights
and PAS level lights
ash alternately
Register error 1. Possible
overheating
2. Replacement of
controller
3. Replacement of
crank sensor
* NOTE: If you require support or replacement parts and tting, please don’t hesitate to contact your local store to book in for a service, or
Pure customer services.

Pure Free E-Bike 11
4Frequently asked questions
Q: Why can’t I turn the e-bike on?
Q: The display shows a fault code?
Q: The electrical system has no response, what should I do next?
A: The power button on the battery needs to be turned on rst – there’s a small button on the upper
rear of the battery, and when switched on a green LED will indicate the charge level. When this
green LED is on, then press the power button on the display unit to switch on the e-bike’s systems.
If you still can’t turn the system on and you’re sure the battery has charge, check the wires and the
display connectors are all connected. If there is damage or reconnection doesn’t resolve the issue,
please contact us via email, online chat, or visit your nearest Pure Electric store for assistance.
A: Please check section 2.3 of the Set Up & Care Guide for fault codes. If the basic checks don’t resolve
the issue or aren’t possible for you to perform, please contact us via email, online chat, or visit your
nearest Pure Electric store for assistance.
A: A long press of the power button for more than 2 seconds should reset the system. If it doesn’t
and you still can’t turn the e-bike on and you’re sure that the battery is charged, check the wires
and connections for any damage or disconnection. If there is damage or reconnection doesn’t
resolve the issue, please contact us via email, online chat, or visit your nearest Pure Electric store
for assistance.
5Gears and the drivetrain
Your Pure Free Step / Free City e-bike uses a
7-speed Shimano Tourney™ transmission.
The gears are selectable by a twist action of
the Shimano RevoShi™ grip on the right
handlebar grip.
• The chain will benet from cleaning and
re-lubricating from time to time. Don’t over
lubricate – apply just enough bike chain
lubricant to prevent excess noise in use.
• Wash with a degreaser, warm water and a
so brush to remove debris from the chain,
sprocket and chainring.
• Do not use aggressive degreasers near to the
pedal, chainset of hub bearings as this may
cause accelerated wear of the components.
• Once dry, lubricate with a little light oil or a
wax ‘dry’ lubricant. Apply sparingly and rotate
the pedals backwards a few revolutions before
wiping o any excess with a cloth.
Serious injury could occur if body parts were to
be dragged in between the chain and teeth of the
system. Take particular care when rotating the
cranks while cleaning the bike in this area.
Watch out for loose trouser legs near the drive
system – a chain guard is tted but it cannot
completely avoid the risk of clothing becoming
caught in the drive system.

3
Caring for your e-bike
SECTION 3

Pure Free E-Bike 13
6Battery removal and general care
Battery unit layout:
Battery indicator display Lock
The battery is removed by unlocking it – don’t
attempt to forcibly remove the battery without
unlocking it rst. Be sure that it’s fully in place and
secured before riding – make sure that the key is
turned fully to the right and removed.
When removing the battery or handling, avoid
dropping the battery as this can damage the cells
and cause malfunction.
When re-tting the battery, be sure to give it a rm
push into position. There’s no need to force it, just
enough pressure to be sure that the connections
are made and that the locking pin can engage and
lock the battery in place before riding.
Riding with the battery unlocked may cause it to
disconnect over a bump, losing power until it’s re-
tted correctly. Always make sure the battery is
locked in place before riding.
• Only use the supplied charger to charge
the battery.
• Store the battery in a cool, dry location.
• To maintain maximum capacity during long
term storage, the optimum charge level for the
lithium-ion battery is around 40%.
However, fully charged is better than empty
– a stored at battery may not accept charge
in future.
• Charge the battery for 1 to 1.5 hours per
2-month period while unused (see charging
information below).
• Avoid washing all over with a hose. The
battery casing is rated to IPX2, and is not
designed to withstand constant spray.
• Don’t connect the positive and negative
terminals directly – this will cause a
short circuit.
• Do not expose the battery to high temperature
e.g. close to central heating radiators, direct
sunlight or inside a car on a hot day.
• Do not place the battery in water or expose to
salts, solvents, acids or bases.
• Avoid prolonged exposure to elements. It’s
waterproof and suitable for wet weather
cycling, but it’s not designed to be stored
outdoors for extended periods.
• Never disassemble the battery.
6.1 Guidelines for safe use and optimised battery life

Set-up & Care Guide 14
The charger supplied with the Pure Free City and
Free Step is an intelligent lithium battery charger.
The charger has protections including current
overload, short circuit, temperature protection
and minimum charging limit protection.
This safeguards against re and damage related
to charging.
This charger has CE certication and is suitable
for use in mainland Europe. It is only to be used
indoors and has an operating range of 0 to 30
degrees Celsius for ambient temperature.
The charger supplies 2A current to the 8.7Ah 36V
313Wh battery. Charging time to full capacity is
around 6 hours with 80% charge taking around
4.5 hours.
6.2 Charging and battery operation
Condition Dependant on Light Indication
Connected and ready to
charge, not connected
to battery
Connected to mains power
supply, empty or semi-
charged battery
Red
Completed charging Connected to mains plug and
fully charged battery
Turns to green
6.3 Charging function – indicator lights
6.4 Troubleshooting – Charging
When the battery charger shows a green LED indicating a fully charged battery, disconnect the charger
from the mains before disconnecting the charger from the battery.
Fault description Check items and measures
The power indicator light does not illuminate. A. Check the power supply is UK or EU mains
AC supply.
B. Check the connection.

Pure Free E-Bike 15
7
8
Cleaning and wet-weather use
Essential maintenance
8.1 Brakes
Take care when cleaning this bike. Avoid washing
the battery all over with a hose. The battery
casing is not designed to withstand constant
spray. The electrical components are water
resistant in normal use, but a jet wash can
overpower seals and force water into electrical
components or bearings.
The rear battery unit also houses the controller
which needs to stay cool so the battery carrier is
air-vented underneath. The following conditions
may direct water inside the battery carrier which
may get onto electrical contacts:
• Being on a car roof or boot rack in the rain
• Washing the rack battery area with a hose
• Heavy, prolonged rain or storage outdoors
The Pure Free Step / Free City has cable-operated
rim brakes that will need adjustment as the pads
wear. This is a job to leave to a trained mechanic
as the brakes are an obvious safety feature. If the
brake pads wear down too far without adjustment
there will be a lack of brake power or the brake
lever may contact the bars without applying
suicient braking force. A failure to stop you when
you need to will cause a serious accident.
There are barrel adjusters on the brake levers
and brake callipers that can adjust for some pad
wear if you feel the levers are getting closer to the
bar before the brake engages – turn the barrel
adjusters half a turn or more anti-clockwise to
take up some slack in the cables.
If the brakes have worn pads, need adjustment
of the cable tension or anything else that’s more
than a couple of turns of the barrel adjusters, get
it booked in for a service at your nearest Pure
6.4 Trouble Shooting – Charging (cont.)
Fault description Check items and measures
The charging indicator light is not lit Check the battery condition – when the on
button is pressed does the green light come on?
If not the battery may be fully discharged and
if le in this condition for too long it may not
accept charge again.
The charging indicator light is always red. The battery may be damaged – seek the advice of
a professional and do not attempt to dismantle
the battery.
This manual suits for next models
2
Table of contents
Other PURE Scooter manuals