RADWAG CY10 User manual

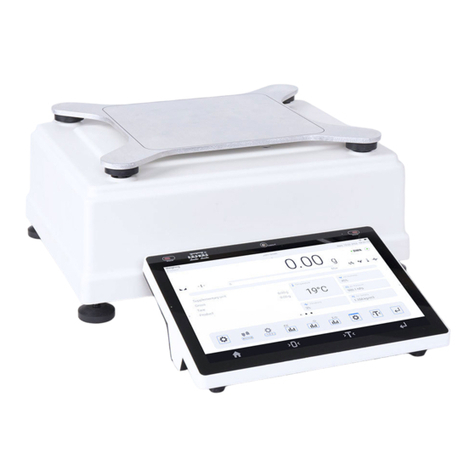
CY10
MULTIFUNCTIONAL SCALES
OPERATING MANUAL
ITKU-134-01-02-23-EN

2
FEBRUARY 2023

3
SAFETY MEASURES AND PRECAUTIONS
Before you start installing, using or maintaining the device, you are obligated
to get familiar with this operating manual and follow its guidelines.
Before use, please read this Operating Manual carefully and use
the device as per its intended use.
Put loads in the central part of the weighing pan.
Load the weighing pan with goods whose gross mass is lower than the
maximum loading capacity of the scale.
Do not leave large loads on the weighing pan for a long time.
Secure the device against excessive temperature fluctuations, solar
radiation and UV radiation, substances that cause chemical reactions.
The device must not be used in explosive atmospheres (gas or dust).
Do not use sharp tools (e.g. knife, screwdriver, etc.) to use the touch
panel.
In case of failures, unplug the device immediately.
The device that is to be withdrawn from service must be disposed of in
accordance with applicable rules of law.
If the device is to operate in the bothersome electrostatic environment
(e.g. printing house, packhouse, etc.), an earthing cable must be
connected. To do so, use a functional earthing terminal in the device,
marked as .
Wi-Fi®is a registered trademark owned by Wi-Fi Alliance. This trademark
has been used is this document for reference only and is not intended to
mark compliance of any products with products certified by Wi-Fi Alliance.

4
Table of contents
1. INTENDED USE .................................................................................................................................................5
2. GUARANTEE TERMS........................................................................................................................................5
3. CLEANING .........................................................................................................................................................5
3.1. Cleaning ABS Elements..............................................................................................................................6
3.2. Cleaning Stainless Steel Elements .............................................................................................................6
3.3. Cleaning Powder-coated Elements.............................................................................................................6
3.4. Cleaning Aluminum Elements .....................................................................................................................6
4. SERVICE AND REPAIRS ..................................................................................................................................7
5. DISPOSAL..........................................................................................................................................................7
6. STRUCTURE......................................................................................................................................................7
6.1. Dimensions..................................................................................................................................................8
6.2. Description of Connectors.........................................................................................................................10
7. INSTALLATION................................................................................................................................................11
7.1. Unpacking and Assembly..........................................................................................................................11
7.1.1. CY10.D2 Series Scales..................................................................................................................11
7.1.2. CY10.xx.K Series Scales ...............................................................................................................12
7.2. Scale Leveling ...........................................................................................................................................12
7.3. Connection to Network..............................................................................................................................12
8. HOME PAGE....................................................................................................................................................13
9. NAVIGATION IN THE MENU...........................................................................................................................14
9.1. Scale Keyboard .........................................................................................................................................14
9.2. Return to Weighing Function.....................................................................................................................15
10. WEIGHING .....................................................................................................................................................15
11. CONNECTION WIRE DIAGRAMS ................................................................................................................16
12. TECHNICAL PARAMETERS.........................................................................................................................17
13. ERROR MESSAGES .....................................................................................................................................17

5
1. INTENDED USE
Scales are the response to growing expectations of the market regarding
simple use and maximum automation of the weighing process. The scales are
intended to quickly and precisely specify mass in laboratory and industrial
conditions. The scale is equipped with an ABS and aluminum housing as well
as a 10” high-resolution color display.
In the standard variant, the scale is supplied with 2 USB type-A connectors,
a USB type-C connector, Ethernet, wireless connection, Hotspot, 2 proximity
sensors, RFID sensor, HDMI port, loudspeakers, camera and microphone.
The device cooperates with receipt and label printers, barcode scanners
and PC equipment (mouse, keyboard, USB flash memory).
2. GUARANTEE TERMS
A. RADWAG undertakes to repair or replace the elements that prove
defective in terms of manufacture or structure.
B. It is allowed to specify defects of unclear origin and establish methods
of eliminating them only in cooperation with representatives of the
manufacturer and user.
C. RADWAG shall not be held responsible for defects or losses deriving from
unauthorized or improper production or servicing.
D. The guarantee does not cover the following:
mechanical damage arising from wrong use of the scale, and thermal,
chemical damage, or damage caused by atmospheric discharge,
overvoltage in the power system or other random event,
maintenance works (cleaning).
E. The guarantee cover becomes invalid when:
the repair is conducted out of the authorized service center,
the service technician detects unauthorized intervention in the
mechanical or electronic structure of the scale,
other version of the operating system is installed,
the scale does not hold any company protective marks.
F. The rights on accounts of the guarantee for storage batteries supplied with
devices cover a period of 12 months.
G. Detailed terms of the guarantee can be found in the service log.
H. The contact phone number for the authorized service center:
+48 (48) 386 63 30.
3. CLEANING
To clean the device safely, unplug it in the first place. Next disassemble
the weighing pan and other moving elements of the scale.
6
If you clean the weighing pan while it is installed, you can
damage the scale.
3.1. Cleaning ABS Elements
Dry surfaces are cleaned with clean cellulose or cotton cloths that do not leave
streaks or colors. It is also allowed to use water solution and cleaning agent
(soap, dishwashing liquid, window cleaner). While cleaning surfaces, it is
necessary to regularly press the cloth against the surface. The surface must be
wiped and then dried. Cleaning can be repeated if necessary.
In case of stubborn dirt, such as glue, gum, tar, polyurethane foam, etc., you
can use special cleaning agents based on aliphatic hydrocarbons. Before using
the cleaning agent, it is advisable to conduct usability tests for all surfaces.
Do not use abrasive agents.
3.2. Cleaning Stainless Steel Elements
While cleaning stainless steel, it is essential that you avoid cleaning agents
based on caustic chemicals, e.g. bleaches (chlorine-rich products). It is
forbidden to use abrasive preparations. Always remove dirt with a microfiber
cloth so that protective coatings of the elements cannot be damaged.
In case of daily care and stain removal, follow the steps below:
1. Remove dirt with a cloth immersed in warm water.
2. For the best results, you can add a drop of dishwashing liquid.
3.3. Cleaning Powder-coated Elements
The first step is to pre-clean elements under running water or with a large-pore
sponge and large amount of water in order to eliminate loose or stubborn dirt.
It is forbidden to use abrasive agents. Next, using a suitable cloth and water
solution and cleaning agent (soap, dishwashing liquid), apply a regular
pressure of the cloth against the surface while cleaning. Never dry-clean with
a very detergent as it may damage the coating. It is advisable to use a large
amount of water or water solution with a cleaning agent.
3.4. Cleaning Aluminum Elements
For cleaning aluminum, use products based on natural acids. The following
products will be perfect: synthetic vinegar, lemon. It is forbidden to use
abrasive agents. Do not use coarse brushes that can easily scratch aluminum.
A soft microfiber cloth will be the best choice.

7
To clean polished surfaces, make circular movements. After removing all dirt,
polish the surface with a dry cloth to dry the surfcae and make it glow.
4. SERVICE AND REPAIRS
If you can notice any damage, unplug the device
immediately. Damaged element must be immediately
replaced or repaired by RADWAG service technicians.
If the scale malfunctions, contact the manufacturer’s local service center.
In case of any defect, the operator must supply the defective device to the
manufacturer’s service center or, if impossible, report the defect to the service
center to arrange the scope and method of repair.
The operator is not allowed to repair the product in any way.
Any unauthorized manipulations (modifications, repairs,
etc.) shall invalidate certificates, declarations and
guarantees of the manufacturer.
5. DISPOSAL
Scales must be recycled and are not considered as household waste.
The product must be disposed of when its life ends in accordance with
applicable law.
6. STRUCTURE
CY10 are single-sensor scales intended to quickly and precisely measure
masses up to 300 kg. In single-sensor scales, mass is measured by one mass
sensor located in the structure of the platform.
Platforms are equipped with a stainless steel weighing pan and, depending on
the scale type, star-piece structure and foundation that is made of stainless
steel or painted.

8
Single-sensor scale components –general view:
Single-sensor scale components –general view: 1 - Weighing pan, 2 - Star-piece,
3 –Mass sensor, 4 –Foundation
6.1. Dimensions
CY10.D2 scales –dimensions

9
CY10.F1.K scales –dimensions
CY10.C2.K scales –dimensions

10
CY10.C3.K scales –dimensions
6.2. Description of Connectors
1
Reboot or on/off button
2
Left loudspeaker
3
Right loudspeaker
4
USB type-A port
5
USB type-A port

11
6
Microphone
7
Kensington Lock
8
Ethernet port.
9
Power supply power
10
Power supply port –USB type-C
11
HDMI port
12
Media box port
13
RFID sensor
14
Reflective sensors
15
Camera
16
Camera LED light
17
Signal LED light
18
Weighing platform cable glands
7. INSTALLATION
7.1. Unpacking and Assembly
7.1.1. CY10.D2 Series Scales
A. Remove the scale from the factory box.
B. Place the device in the place of use, on the even and hard flooring, away
from sources of heat.
C. Install the weighing pan as showed in the figure below:

12
7.1.2. CY10.xx.K Series Scales
A. Remove the scale from the factory box.
B. Place the device in the place of use, on the even and hard flooring, away
from sources of heat.
C. Pull transportation protection out and put the weighing pan on:
7.2. Scale Leveling
Turn adjustment feet to level the scale. Leveling is correct if the air bubble is in
the center of the level that has been placed on the foundation:
7.3. Connection to Network
The device can be plugged in only with the use of the original feeder cable
supplied. The rated voltage of the feeder cable (given in dedicated rating plate)
should correspond to the mains rated voltage.
Procedure:
Plug the feeder cable into the mains socket and put the feeder cable plug
into the port at the back of the weighing indicator housing.
The operating system and RADWAG software loading procedure will
initiate in a moment. While the program is being launched, a signal LED
light and LED lights at the lower frontal part of the indicator will flash.
Once the start-up procedure has ended, the home page will be displayed.
The weighing indicator starts with the operator being unlogged (no user).
To start working, log in (logging procedure has been described below).
Switch the scale on without any load –with the empty
weighing pan. As per EN 45501 standard, in verified scales
the mass value of less than -20e must not be displayed.
Therefore when the result drops below this value,
the home page will display <Lo mass>. This being the
case, zero the scale by pressing .

13
If the program crashes during operation, reboot it. To do
so, press and hold the button in the scale head for about
5 seconds. The program will restart and device will reload.
8. HOME PAGE
The home page can be divided into 5 fields:
The upper part of the screen shows information on current working mode,
logged user, date, time, active connection to PC.
The weighing result and scale leveling box is displayed below.
The field provides additional information related to ongoing actions.

14
Information in this field can be freely programmed. Defining
method can be found in ‘PUE CY10 indicator software
manual’.
The on-screen functional buttons are showed below:
The scale operator can define on-screen functional buttons.
Defining method can be found in „PUE CY10 indicator
software manual”.
At the bottom of the screen you can see permanent functional buttons:
9. NAVIGATION IN THE MENU
Navigation in the menu is intuitive and user-friendly. Thanks to the touch
screen display, it is very easy to use the program. Press the screen button
or field in the screen to activate the assigned operate or function.
9.1. Scale Keyboard
Enter main menu
Confirm changes
Return to previous window and do not change values
Add item in database
Search item in database by date

15
Search item in database by name
Search item in database by code
Print item from database
Select variables for printout template
Return to previous menu level
9.2. Return to Weighing Function
Any changes made in the scale memory are automatically recorded in the
menu after going back to the home screen.
Procedure:
Press button a couple of times to make the scale return to home
screen.
Press in the lower bar to return to home page immediately.
10. WEIGHING
Load the weighing pan. When marker is displayed, read the value.
To assure long-term life of the scale and proper measurements, please do as
follows:
Load the weighing pan in a gentle
manner.
Place loads in the center of the
weighing pan (non-centric errors are
defined in PN-EN 45501 point 3.6.2).

16
Do not use concentrated force to load
the weighing pan.
Avoid side loads of the scale,
particularly side strokes.
11. CONNECTION WIRE DIAGRAMS
Scale –computer wire (RS232)
Scale –printer wire (RADWAG, ZEBRA)
To assure correct cooperation with peripherals with the use
of RS232 ports, use a USB-RS232 converter.

18
Table of contents
Other RADWAG Scale manuals

RADWAG
RADWAG HY10 Series User manual

RADWAG
RADWAG APP 3Y User manual

RADWAG
RADWAG PM 5Y User guide

RADWAG
RADWAG XA 5Y.M.A User guide

RADWAG
RADWAG WLT L Series User manual

RADWAG
RADWAG AS series User manual

RADWAG
RADWAG AS R2.PLUS User manual

RADWAG
RADWAG HX7 User manual

RADWAG
RADWAG TWM4 User manual

RADWAG
RADWAG MYA.3Y User manual

RADWAG
RADWAG WLC User manual

RADWAG
RADWAG WTC/4 3000 C8/EX User manual

RADWAG
RADWAG WLC A1 User guide

RADWAG
RADWAG HRP User manual

RADWAG
RADWAG HRP.R Series User manual

RADWAG
RADWAG WLY User manual

RADWAG
RADWAG WTC 6 User manual

RADWAG
RADWAG WTC series User manual

RADWAG
RADWAG WLC/A1/C/2 User manual

RADWAG
RADWAG ITKU-22-02-01-12-A User manual