manuals.online logo
Brands
  1. Home
  2. •
  3. Brands
  4. •
  5. Rain
  6. •
  7. Irrigation System
  8. •
  9. Rain Click Plus User manual

Rain Click Plus User manual

TECHNICAL DATA
- Timer for Micro-irrigation by tap
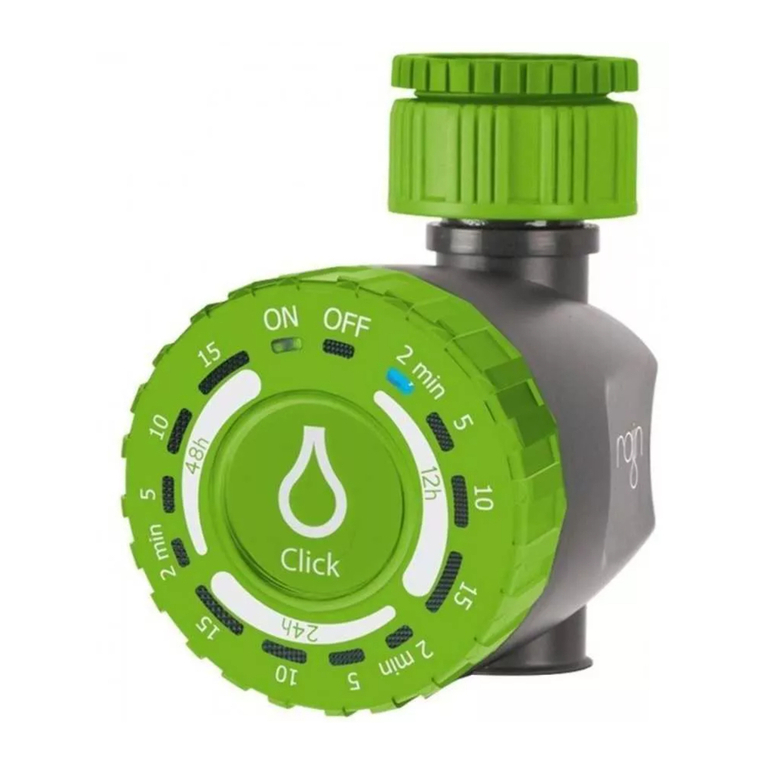
- Multifunction button Click
- Number of zone 1
- Inlet theread for tap 1” F and
reduction of ¾” F
- Output threaded ¾” M
- Powered by 2 AAA 1,5V Alkaline
batteries
- ABS case
- Battery compartment with O-Ring
- Diaphragm electric valve
- Working water pressure:
1.0 bar to 5.0 bar
- Flow rate: 5 l/min to 35 l/min
ENGLISH
BATTERY INSTALLATION
Warning: install the batteries before connect Click at the tap, because installing the
batteries, the timer will close the solenoid valve.
[Figures: 1, 2, 3] Unscrew the front cover, remove the cap of the battery compart-
ment positioned on the back side of the cover, being sure that the battery
compartment is clean.
Install the batteries into the battery compartment warning at the right pole of
batteries as shown into the battery compartment.
Close the battery compartment with the cover (making sure that its seal is perfectly
fits into the compartment) and replace the front cover, making ensure correct
position of the cable to avoid compromising their integrity and functionality of the
unit control.
TIMER INSTALLATION
Screw the unit to the tap through the upper ring, with threaded of 1” and reduction
of ¾” Female.
FIRST PROGRAMMING
Clicking on the Click button the green LED light goes on and off quickly, then a red
LED light goes on for 3 seconds, click for the second time the Click button to start
the programming, meanwhile the red LED light is on.
Press the Click button all the times need to reach the required setting. The blue
LED light shows the setting selected.
Press repeatedly the Click button until the blue light reaches the favourite duration
and frequency. After few seconds the led light will turn in green color. Then press
repeatedly the Click button to choose the delay of the irrigation start time.
The timer allows you to program the irrigation every 12, 24 and 48 hours, with a
duration of 2, 5, 10 and 15 minutes and to set a delay of 2, 4, 6, 8, 10, 12, 14, 16,
18, 20 and 22 hours for the first start time.
To view the setting press one time on the Click button.
EXAMPLE
If we press the Click button repeatedly for 11 times to turn on the LED as shown in
Figure 4, the timer will start every 48 hours for 10 minutes.
Warning: the timer will start immediately an irrigation cycle as time set, the second
one will start after the selected range (in our example, after 48 hours).
SUBSEQUENT PROGRAMMING
Pressing the Click button one time, the LEDs will light up in sequence one by one
up to programmed position. Pressing again the Click button, you can change the
programming.
To end the programming and the irrigation cycle, press the Click button repeatedly
until the red led will turn on.
MANUAL START
Press and hold the Click button for 5 seconds until the green LED will be on, the
LED will continue to flash for all the duration of the manual irrigation cycle.
To stop the manual irrigation press one time the Click button.
Warning: you cannot set the opening time with manual setting.
WARNINGS
- Install the batteries before connect the
timer to the tap, because installing the
batteries the timer will close the solenoid
valve.
- Low Battery: when the battery will reach
the safety level, it will automatically turn
off and the red LED (OFF) will begin
flashing.
To replace the batteries follow steps in
section 1 of this manual.
- Use only cold water
- Do not expose timer to frost
- Remove and store the timer in a dry place
during the winter.
-Replace all batteries at the same time.
CARATTERISTICHE TECNICHE
- Centralina da rubinetto per
microirrigazione
- Tasto multifunzione Click
- Numeri di settori 1
- Connessione rubinetto con ghiera
da 1” F e riduzione ¾” F
- Uscita filettata ¾” M
- Alimentata con 2 batterie AAA 1.5V
Alcaline
- Materiale di fabbricazione ABS
- Vano batterie con OR di
tenuta
- Elettrovalvola a membrana
- Pressione minima di utilizzo 1.0 bar
- Pressione massima di utilizzo 5.0
bar
- Portata da 10 l/min a 35 l/min
ITALIANO
INSTALLAZIONE DELLE BATTERIE
Attenzione: installare le batterie prima di montare la centralina al rubinetto
(all’installazione delle batterie la centralina chiuderà l’elettrovalvola).
[Immagini: 1, 2, 3] Svitare il coperchio frontale e rimuovere il tappo del vano
batterie posizionato nella parte posteriore del coperchio frontale.
Assicurarsi che la sede delle batterie e il vano batteria siano puliti.
Installare le batterie rispettando la polarità come da illustrazione sul fondo del
vano batteria.
Richiudere il vano batterie con il tappo (assicurarsi che la guarnizione si inserisca
perfettamente nel vano) e riposizionare il coperchio frontale.
Prestare attenzione al corretto posizionamento del cavo per non comprometter-
ne la sua integrità e il funzionamento della centralina.
INSTALLAZIONE CENTRALINA
Avvitare la centralina al rubinetto tramite la ghiera superiore.
PRIMA PROGRAMMAZIONE
Premendo una volta il tasto Click si accenderà prima la luce verde e poi la luce
rossa per circa 3 secondi. Premere una seconda volta il tasto Click per iniziare la
programmazione mentre la luce rossa è accesa.
Premere ripetutamente il tasto Click per raggiungere la durata e la frequenza
d’irrigazione desiderata con il led blu. Dopo pochi secondi il led si accenderà di
colore verde. Premere ripetutamente per selezionare il ritardo dell’avviamento
dell’irrigazione.
La centralina consente di programmare l’irrigazione ogni 12, 24 e 48 ore con
tempi d’irrigazione di 2, 5, 10 e 15 minuti e di selezionare il ritardo della prima
partenza di 2, 4, 6, 8, 10, 12, 14, 16, 18, 20 e 22 ore.
Per visualizzare la programmazione premere una volta il tasto Click.
ESEMPIO
Premendo una volta il tasto Click i led si accenderanno in sequenza uno alla
volta fino ad arrivare nella posizione programmata. Premendo di nuovo il tasto
Click sarà possibile modificare la programmazione.
Per sospendere la programmazione premere ripetutamente il tasto Click fino
all’accensione del led rosso.
PROGRAMMAZIONI SUCCESSIVE
Premendo una volta il tasto Click i led si accenderanno in sequenza uno alla
volta fino ad arrivare nella posizione programmata. Premendo di nuovo il tasto
Click sarà possibile modificare la programmazione.
Per sospendere la programmazione premere ripetutamente il tasto Click fino
all’accensione del led rosso.
PARTENZA MANUALE
Tenere premuto il tasto Click per circa 5 secondi fino all’accensione del led
verde ON. Il led continuerà a lampeggiare per tutta la durata dell’irrigazione
manuale. Per interrompere l’irrigazione manuale premere una volta il tasto Click.
Attenzione: non è possibile impostare il tempo di apertura durante la funzione
manuale.
AVVERTENZE
Attenzione: installare le batterie prima di
montare la centralina sotto al rubinetto
(all’installazione delle batterie la
centralina chiuderà l’elettrovalvola).
- Batteria scarica: quando la batteria
scenderà sotto il livello di sicurezza, la
centralina si spegnerà automaticamente
e il led rosso (OFF) comincerà a
lampeggiare. Per sostituire le batterie
seguire i passaggi al punto 1 di questo
manuale.
- Utilizzare solo con acqua fredda.
- Non esporre al gelo.
- Smontare e conservare la centralina in
un luogo riparato nel periodo invernale.
- Sostituire tutte le batterie
contemporaneamente. 1. 2.
3.
LED
4.
IT
EN
FR
SP
C
M
Y
CM
MY
CY
CMY
K
click plus FOGLIO 2 verticale copia.pdf 1 21/12/2016 11:00:10
CARACTERÍSTICAS TÉCNICAS
- Programador de grifo para
microriego
- Botón multifunción Click
- Números de sectores 1
- Conexión al grifo con entrada rosca
1 "F y reducción ¾" F
- Salida de rosca ¾ "M
- Alimentada por 2 batería
AAA de 1,5 V alcalinas
- Material de fabricación ABS
- Compartimiento de baterías con
junta tórica;
- Electroválvula de diafragma
- Presión mínima de utilizo 1.0 bar
- Presión máxima de utilizo 5.0 bar
- Caudal desde 10 l/min hasta 35 l/min
ESPAÑOL
INSTALACIÓN DE L AS BATERÍAS
Advertencia: Instalar las baterías antes de montar el programador bajo el grifo, porque
con la instalación de las baterías, el programador cerrará la electroválvula.
[Imágenes: 1, 2, 3] Desenroscar la tapa frontal y remover la tapa del compartimento de
baterías colocado en la parte delantera de la tapa frontal.
Asegurarse que el asiento y el compartimiento de baterías sean limpios.
Instalar las baterías respectanto la polaridad como se muestra en la parte inferior del
compartimento.
Cerrar el compartimiento de batería con la tapa (asegurase que la junta encaja
perfectamente en el compartimiento) y volver a colocar la tapa delantera con atención.
Garantizar la correcta posición del cable para evitar comprometer la integridad y
funcionalidad del programador.
INSTALACIÓN DEL PROGRAMADOR
Atornillar el programador al grifo a través de la rosca superior.
PRIMERA PROGRAMACIÓN
Pulsando una vez el botón click se encienderán antes la luz verde y después la luz roja
durante unos 3 segundos. Pulsar una segunda vez el botón click para iniciar la
programación, mientras que la luz roja está encendida.
Pulse el botón CLICK ripetutamente para llegar a la duración y la frecuencia del riego
deseado con el LED azul. Después de unos segundos, el LED se iluminará en verde.
Pulse varias veces para seleccionar el retraso del inicio del riego.
El programador permite programar el riego cada 12, 24 y 48 horas con los tiempos de
riego de 2, 5, 10 y 15 minutos y seleccionar el retraso del primer inicio de 2, 4, 6, 8, 10,
12 , 14, 16, 18, 20 y 22 horas.
Para ver la programación, pulse una vez el botón click.
EJEMPLO
Pulsando el botón Click repetidamente por 11 veces hasta que el LED se enciende
como se muestra en la imagen 4, el
programador empezará el riego cada 48 horas durante 10 minutos.
Advertencia: el programador realizará inmediatamente un ciclo de riego. La segunda
apertura pasará después del intervalo seleccionado (en nuestro ejemplo después de 12
horas).
PROGRAMACIÓN SIGUIENTE
Pulsando una vez el botón Click todos los LED se encenderán en secuencia de uno a la
vez hasta llegar a la posición programada.
Pulsando otra vez el botón click se puede cambiar la programación.
Para suspender la programación, pulsar el botón click
hasta encender el LED rojo.
INICIO MANUAL
Pulsar el botón durante unos 5 segundos hasta que se enciende el LED verde ON. El
LED continuará parpadeando durante la duración del riego manual. Para suspender el
riego manual pulsar una vez el botón click.
Advertencia: No se puede programar el tiempo de apertura con la función manual.
ADVERTENCIAS
Advertencia: : Instalar las baterías antes
montar el programador bajo el grifo porque
con la instalación de las baterías el programa-
dor cierrará la electroválvula.
- Batería baja: cuando la batería bajará por
debajo el nivel de seguridad, el programador
se apagará automáticamente y
el LED rojo (OFF) comenzará a parpadear.
Para reemplazar las baterías seguir los pasos
de la sección 1 de este manual.
- Utilizar sólo agua fría.
- No exponer a las heladas.
- Desmontar y guardar el programador en un
lugar seco en invierno.
- Sostituir todas las baterías al mismo tiempo.
CARACTÉRISTIQUES TECHNIQUES
- Programmateur robinet pour
micro-irrigation
- Bouton multifonction Click
- Nombre de secteurs 1
- Connexion robinet avec écrou
tournant 1 "F et réduction ¾" F
- Sortie filetée ¾ "M
- Alimenté par deux piles alcalines de
1.5V 2 AAA
- Matériel de fabrication ABS
- Logement de la batterie avec le
joint torique
- Électrovanne à membrane
- Pression de service minimum 1,0 bar
- Pression maximale de 5,0 bar
- Débit 10l/min - 35 l / min
FRANÇAIS
INSTALLATION DES BATTERIES
Avertissement: Installez les batteries avant de monter l'appareil sous le robinet,
car durant l'installation des piles, l'appareil va fermer l'électrovanne.
[Images: 1, 2, 3] Dévissez le couvercle frontal, enlevez le bouchon du logement de
la batterie positionné dans la partie postérieure du couvercle frontal, assurez-vous
que le logement de la batterie sont propres. Installez les piles dans leur logement
en respectant la polarité indiquée sur le fond du logement de la batterie.
Fermez le logement de la batterie avec le couvercle (faire en sorte que son joint
est parfaitement inséré dans le logement) et remettez en place le couvercle
frontal, en faisant attention de bien veiller à la position du câble pour éviter de
compromettre son intégrité et le fonctionnement du programmateur.
INSTALLATION DU PROGRAMMATEUR
Vissez l'appareil au robinet en utilisant l’écrou tournant doté un filetage de 1" et
d’une réduction ¾" F.
PREMIÈRE PROGRAMMATION
En appuyant une fois sur le bouton Click, la lumière verte clignotera, puis la
lumière deviendra rouge pendant 3 secondes. Appuyez une deuxième fois
sur le bouton Click quand la lumière rouge est allumée pour démarrer la
programmation.
Appuyez sur le bouton Click à plusieurs reprises pour vous positionner sur la
fréquence d'arrosage désirée avec la LED bleu. Après quelques secondes, le LED
deviendra vert. Appuyez plusieurs fois pour sélectionner le retard de démarrage
de l'irrigation.
Le programmateur permet de programmer l'arrosage toutes les 12, 24 et 48
heures avec une durée de 2, 5, 10 et 15 minutes, et permet également de
sélectionner le retard du premier démarrage de 2, 4, 6, 8, 10, 12 , 14, 16, 18, 20
et 22 heures.
Pour voir la programmation, appuyez une fois sur le bouton Click.
EXEMPLE
En cliquant sur le bouton Click pour 11 fois de suite, le LED s’allumera comme le
montre la figure 4, le programmateur démarrera toutes les 48 heures pour une
durée de 10 minutes.
Attention: le programmateur effectuera immédiatement un cycle d’irrigation selon
le réglage sélectionné,
le deuxième départ sera effectué après l’intervalle sélectionné (dans notre cas 48
heures plus tard).
PROGRAMMATIONS SUIVANTES
En appuyant une fois sur le bouton Click, tous les LED vont s’allumer l’un après
l’autre en séquence jusqu'à la position du réglage sélectionnée.
En appuyant encore sur le bouton Click vous pouvez modifier la programmation.
Pour suspendre la programmation, appuyez sur le bouton Click à plusieurs
reprises jusqu'à ce que le LED soit rouge.
DÉMARRAGE MANUEL
Appuyez sur le bouton Click pendant environ 5 secondes jusqu'à ce que le LED «
ON » soit vert. Le LED continuera à clignoter pendant toute la durée de
l'irrigation manuelle, pour arrêter l’irrigation manuelle, appuyez une fois sur le
bouton Click.
Attention: Vous ne pouvez pas régler la durée d'ouverture avec le mode manuel.
AVERTISSEMENTS
Attention: Installez les batteries avant de
monter l'appareil sous le robinet, parce
que durant l'installation des piles,
l'appareil va fermer l'électrovanne.
- Batterie faible: Lorsque la batterie
descend au-dessous du niveau de
sécurité, le programmateur s’éteint
automatiquement et le LED rouge (OFF)
se met à clignoter.
Pour remplacer les piles suivez les étapes
de la section 1 de ce manuel.
- Utilisez uniquement avec l'eau froide.
- Ne pas exposer au gel.
- Démonter et retirer l'appareil dans un
endroit sec en hiver.
- Remplacer toutes les piles en même
temps
C
M
Y
CM
MY
CY
CMY
K
click plus FOGLIO 1 verticale copia.pdf 1 21/12/2016 10:48:24

Other Rain Irrigation System manuals

Rain PROSPORT KRN02210 Operating manual

Rain

Rain PROSPORT KRN02210 Operating manual

Rain PRESSURE ZERO 094 HSB4068 User manual

Rain

Rain PRESSURE ZERO 094 HSB4068 User manual

Rain C-dial Compact User manual

Rain

Rain C-dial Compact User manual

Rain SO75 Operating manual

Rain

Rain SO75 Operating manual

Rain SO50 Operating manual

Rain

Rain SO50 Operating manual

Rain Click User manual

Rain

Rain Click User manual

Rain S-Dial User manual

Rain

Rain S-Dial User manual

Rain AMICO+ User manual

Rain

Rain AMICO+ User manual

Rain ACQUA CLICK User manual

Rain

Rain ACQUA CLICK User manual

Rain i-dial User manual

Rain

Rain i-dial User manual

Rain SuperPro S075 S Operating manual

Rain

Rain SuperPro S075 S Operating manual

Rain elite 9 VDC User manual

Rain

Rain elite 9 VDC User manual

Rain S050 S Operating manual

Rain

Rain S050 S Operating manual

Popular Irrigation System manuals by other brands

Reliable XL Commercial manual

Reliable

Reliable XL Commercial manual

Bauer Ecostar 6000 operating manual

Bauer

Bauer Ecostar 6000 operating manual

Viking MICROFAST VK311 Technical data

Viking

Viking MICROFAST VK311 Technical data

Tyco F690 manual

Tyco

Tyco F690 manual

Viking V-SD Technical data

Viking

Viking V-SD Technical data

IrriGreen Irrigreen2 Guide

IrriGreen

IrriGreen Irrigreen2 Guide

Viking MIRAGE VK465 Technical data

Viking

Viking MIRAGE VK465 Technical data

Viking VK192 Technical data

Viking

Viking VK192 Technical data

Reliable F1-300 Bulletin

Reliable

Reliable F1-300 Bulletin

Tyco ESFR-17 quick start guide

Tyco

Tyco ESFR-17 quick start guide

Reliable The Non-Ferrous Concealer F4FR-NF manual

Reliable

Reliable The Non-Ferrous Concealer F4FR-NF manual

NxEco HWN12-100 quick start guide

NxEco

NxEco HWN12-100 quick start guide

Reliable GFR manual

Reliable

Reliable GFR manual

Tyco Ultra K17 quick start guide

Tyco

Tyco Ultra K17 quick start guide

Pierce CP600 Operator's manual

Pierce

Pierce CP600 Operator's manual

Tyco ELO-231B Series manual

Tyco

Tyco ELO-231B Series manual

Johnson Controls tyco TY-L Series manual

Johnson Controls

Johnson Controls tyco TY-L Series manual

Hunter I-31 Plus instructions

Hunter

Hunter I-31 Plus instructions

manuals.online logo
manuals.online logoBrands
  • About & Mission
  • Contact us
  • Privacy Policy
  • Terms and Conditions

Copyright 2025 Manuals.Online. All Rights Reserved.