REED R3500 User manual

pH Meter
Instruction
Manual
R3500
REED Instruments

2
Table of Contents
Introduction ................................................................................................... 2
Product Quality.............................................................................................. 3
Safety ............................................................................................................ 3
Features......................................................................................................... 3
Included......................................................................................................... 3
Specications................................................................................................ 4
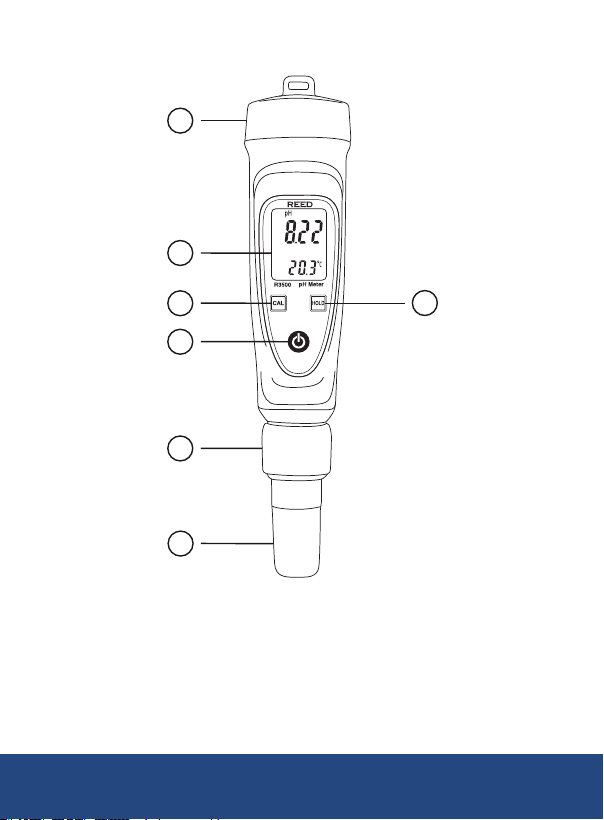
Instrument Description.................................................................................. 5
Operating Instructions................................................................................6-8
Power ON/OFF......................................................................................... 6
Selecting the Temperature Unit of Measure............................................. 6
Taking Measurements............................................................................... 6
Data Hold ................................................................................................. 6
Over Range............................................................................................... 6
Auto Power Off......................................................................................... 7
pH Calibration Procedure...................................................................... 7-8
Replacing the Electrode ................................................................................ 8
Battery Replacement..................................................................................... 8
Applications................................................................................................... 9
Accessories and Replacement Parts ............................................................ 9
Product Care ............................................................................................... 10
Product Warranty ........................................................................................ 11
Product Disposal and Recycling ................................................................. 11
Product Support.......................................................................................... 11
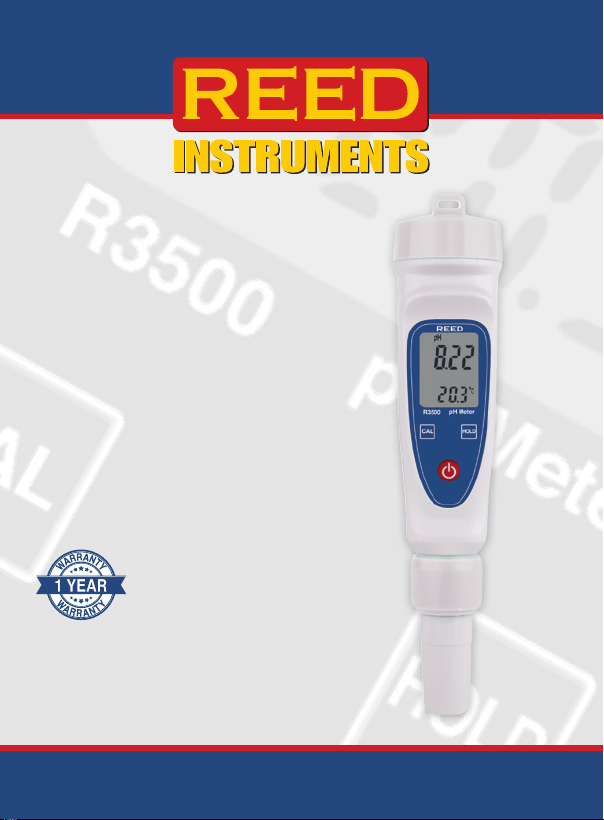
Introduction
Thank you for purchasing your REED R3500 Pen Type pH Meter. Please
read the following instructions carefully before using your instrument. By
following the steps outlined in this manual your meter will provide years of
reliable service.
REED Instruments

3
Product Quality
This product has been manufactured to meet stated product specications.
If a certicate of calibration is required please contact the nearest authorized
REED distributor or authorized Service Center. Please note an additional fee
for this service will apply.
Safety
Never attempt to repair or modify your instrument. Dismantling your
product, other than for the purpose of replacing batteries, may cause
damage that will not be covered under the manufacturer's warranty.
Servicing should only be provided by an authorized service center.
Features
• DualLCDdisplaystemperatureandpHmeasurements
• Userselectable°For°C
• Automatictemperaturecompensation
• ReplaceablepHelectrodemodule
• Dataholdfunction
• Waterproofhousing
• Protectivecapkeepssensormoistened
• Lowbatteryindicatorandautoshutoff
Included
• ProtectiveCap
• HardCarryingCase
• Batteries
REED Instruments

4
Specifications
Temperature
MeasuringRange: 32to140°F(0to60°C)
Accuracy: ±1.8°F(1°C)
Resolution: 0.1°F(0.1°C)
pH
Measuring Range: 0.00 to 14.00 pH
Accuracy: ±0.02 pH
Resolution: 0.01 pH
General Specifications
Display: DualDisplay,LCD
Data Hold: Yes
AutoShut-Off: Yes(afterapproximately10minutes)
Waterproof: Yes
LowBatteryIndicator: Yes
PowerSupply: 4xLR44CellBatteries
OperatingTemperature: 32to122°F(0to50°C)
StorageTemperature: 14to122°F(-10to50°C)
Operating Humidity: 10 to 80%
Dimension: 7.3x1.6x1.6"(185x40x40mm)
Weight: 3.1oz(88g)
REED Instruments

5
Instrument Description
1. Battery Compartment Cap
2. LCDDisplay
3. CALButton
4. HOLDButton
1
2
34
5
6
7
5. Power Button
6. Electrode Collar
7. Electrode
REED Instruments

6
Operating Instructions
Before use, soak the glass bulb in
distilled water for a minimum of 1 hour
Power ON/OFF
Turn the meter on or off by pressing the Power button.
Selecting the Temperature Unit of Measure
When the meter is rst powered ON, the default scale setting is set to Celsius
(°C).Followthestepsbelowtotogglebetweentemperatureunitsofmeasure.
1. Press and hold the HOLD button while powering on the meter.
2. Release the HOLDbuttonwhen°Cappearsonthedisplay.
3. Press the CALbuttontotogglebetween°Cand°F.
4. Press the HOLD button to conrm selection and resume
normal operation.
Note: The meter will automatically save the selected unit of measure as
the new default when powered off.
Taking Measurements
Submerge the electrode in the solution to be tested while stirring gently.
Wait for the measurements to stabilize. The pH value automatically com-
pensatedfortemperatureisshownatthetopoftheLCDDisplaywhereas
the secondary value below indicates the temperature of the sample.
Data Hold
1. Press the HOLD button to freeze the current reading on the display.
2. Whileinthismode"Hold"willappearontheLCDdisplay.
3. Press the HOLD button again to resume normal operation.
Over Range
WhenthepHvalueisunder"0"orover"14",theLCDdisplaywillindicate
"L---"whenunderor"H---"whenover.Iftheelectrodeisnotplacedin
anysolution,thepHvaluewillindicate"----"or"0.00".
continued...
REED Instruments

7
Auto Power Off
Topreservebatterylife,themeterisprogrammedtoturnoffafterapproxi-
mately 10 minutes of inactivity.
pH Calibration Procedure
IfthepHmeterisstoredforanextendedperiodoftime,priortocalibration,
condition your electrode in pH 4 buffer solution or distilled water for a mini-
mum of 1 hour. The electrode is now ready for calibration.
1. Prepare buffer solutions for calibration. It is recommended to start
with calibration buffer pH 7.00 pH, followed by either pH 4.00 or pH
10.00(whicheverisnearesttotheexpectedsamplevalue).Usethe
pH 4.00 and pH 7.00 buffer solutions when measurements are
expectedtobeonthelowersideofthepHscale.UsethepH7.00
andpH10.00buffersolutionswhenmeasurementsareexpectedto
be on the higher side of the pH scale.
Note:TheAutomaticTemperatureCompensation(ATC)isnotactiveduring
the calibration process. For a more accurate calibration, make sure that
calibrationbuffersolutionsareat77°F(25°C).
2. Turn the meter on by pressing the Power button.
3. Place the electrode into the pH 7.00 buffer solution, so that the tip
of the electrode is fully immersed in the buffer solution, and stir at a
moderate, uniform rate.
4. When calibration has stabilized, a pH value will appear at the top of
the display.
5. PressandholdtheCALbuttonuntil"CAL"appearsonthedisplay
and release to enter the calibration mode.
6. "CAL"willnowbegintoblinkindicatingthecalibrationprocess
has begun.
Note:If"Err"isdisplayedafterholdingtheCALbutton,makesureavalid
pH buffer solution is being used, and that the electrode is not dried out.
7. The pH meter will then automatically identify the buffer solution and
the current temperature.
continued...
REED Instruments

8
8. Whencompleted,thepHmeterwilldisplay"End"forseveralseconds
and will then resume normal operation.
9. Repeat steps 3 through 8 for the pH 4.00 and pH 10.00 buffer solutions.
Note: Always rinse the electrode with distilled water to remove any
residualbuffersolutionbeforenextcalibration.
Replacing the Electrode
pH Electrodes have a nite lifespan due to inherent properties and is
dependent on frequency of use and care. Proper maintenance of your pH
meteristhebestwaytomaximizethelifeofyourpHelectrode.Whenthe
reading becomes unstable or sluggish it may be time to replace your
electrode. If you can no longer calibrate the electrode, it is time to replace it.
Follow the steps below to replace the electrode:
1. Remove the electrode protective cap.
2. Unscrewtheelectrodecollarclockwise,andremoveitcompletely.
3. Pull the pH electrode module out.
4. Carefullypluganewelectrodemodule(R3500-ELECTRODE)into
the socket.
5. Tighten the electrode collar to ensure a good seal and replace the cap.
Battery Replacement
WhenthelowbatteryiconappearsontheLCD,thebatteriesmust
be replaced.
1. Twist off the battery compartment cap.
2. Replacethefour(4)LR441.5Vbuttoncellbatteries.
3. Replace the battery compartment cap.
REED Instruments

9
Applications
• WaterConditioning
• GeneralpurposepHmeasurement
• Aquariums
• Wastewatermonitoring
• BeverageProduction
Accessories and Replacement Parts
• R3500-ELECTRODE Replacement pH Electrode
• PH-04 4 pH Buffer Solution
• PH-07 7 pH Buffer Solution
• R1004 4 pH Calibration Buffer Pouches
• R1007 7 pH Calibration Buffer Pouches
• CA-52A Soft Carrying Case
Don't see your part listed here? For a complete list of all accessories and
replacement parts visit your product page on www.reedinstruments.com.
REED Instruments

10
Product Care
To keep your instrument in good working order we recommend the following:
• Storeyourproductinaclean,dryplace.
• Changethebatteryasneeded.
• Ifyourinstrumentisn'tbeingusedforaperiodofonemonthorlonger
please remove the battery.
• Cleanyourproductandaccessorieswithbiodegradablecleaner.Donot
spraythecleanerdirectlyontheinstrument.Useonexternalpartsonly.
•
Before rst use or after storage, you may notice white KCl crystals forming
outside your electrode. This will not interfere with measurements. Simply
rinse the electrode.
• AlwayskeepthepHglassbulbwetbyusingthecaptoprotectand
store the electrode.
• AlwaysrinsethepHelectrodeinde-ionizedwaterorrinsesolution
beforenextus.
• Nevertouchorrubtheglassbulb.
• Makesuretheelectrodeisclean.Betweenmeasurements,rinsethe
electrodewithde-ionizedwater.Iftheelectrodehasbeenexposedtoa
solvent immiscible with water, clean it with a solvent miscible with water
e.g. ethanol or acetone and rinse carefully with water.
• Storetheelectrodecarefullyusingstoragesolution(Ifnotavailable
usepH4solution).
REED Instruments

11
Product Warranty
REED Instruments guarantees this instrument to be free of defects in
materialorworkmanshipforaperiodofone(1)yearfromdateofshipment.
During the warranty period, REED Instruments will repair or replace, at no
charge, products or parts of a product that proves to be defective because
of improper material or workmanship, under normal use and maintenance.
REED Instruments total liability is limited to repair or replacement of the
product. REED Instruments shall not be liable for damages to goods,
property, or persons due to improper use or through attempts to utilize the
instrumentunderconditionswhichexceedthedesignedcapabilities.In
order to begin the warranty service process, please contact us by phone at
claim and determine the appropriate steps to process the warranty.
Product Disposal and Recycling
Please follow local laws and regulations when disposing or recycling your
instrument. Your product contains electronic components and must be
disposed of separately from standard waste products.
Product Support
If you have any questions on your product, please contact your authorized
REED distributor or REED Instruments Customer Service by phone at
Please visit www.REEDINSTRUMENTS.com for the most
up-to-date manuals, datasheets, product guides and software.
Product specifications subject to change without notice.
All rights reserved. Any unauthorized copying or reproduction of
this manual is strictly prohibited without prior written permission
from REED Instruments.
REED Instruments

TEST & MEASURE
WITH CONFIDENCE
CHECK OUT OUR LATEST PRODUCTS!
REED Instruments
Table of contents
Other REED Measuring Instrument manuals
Popular Measuring Instrument manuals by other brands

LINSHANG
LINSHANG LS195 user manual

Nic
Nic PE-1 instruction manual

KERN
KERN DAB 200-2 operating manual

Endress+Hauser
Endress+Hauser Solimotion FTR20 operating instructions

PCB Piezotronics
PCB Piezotronics EX611A20 Installation and operating manual

LOVATO ELECTRIC
LOVATO ELECTRIC DMED100T1MID instruction manual