Reiner B6 User manual

www.reiner.de
Award for
Operational
Excellence
Bedienungsanleitung
Operating instructions
Mode d’emploi
Instrucciones de servicio
Istruzioni per l’uso
Instruções de utilização
Instrukcja obsługi
Руководство по эксплуатации
D
GB
F
E
I
P
PL
RUS
B6, B6K, ND6K

Vielen Dank, dass Sie sich für ein Original
REINER Produkt entschieden haben.
Thanks a lot for making your mind for an
original REINER product.
Merci infiniment d’avoir choisi un produit
Original REINER.
Muchas gracias por haberse decidido por
un producto original de REINER.
Vi ringraziamo per aver optato per un
prodotto originale REINER.
Muito obrigado por ter optado por um
produto REINER original.
Dziękujemy Państwu za to, że zdecydowali
się Państwo na zakupienie oryginalnego
produktu REINER.
Благодарим за выбор оригинальной
продукции REINER.
Ernst Reiner GmbH & Co. KG

1
2
3
4
5

D D
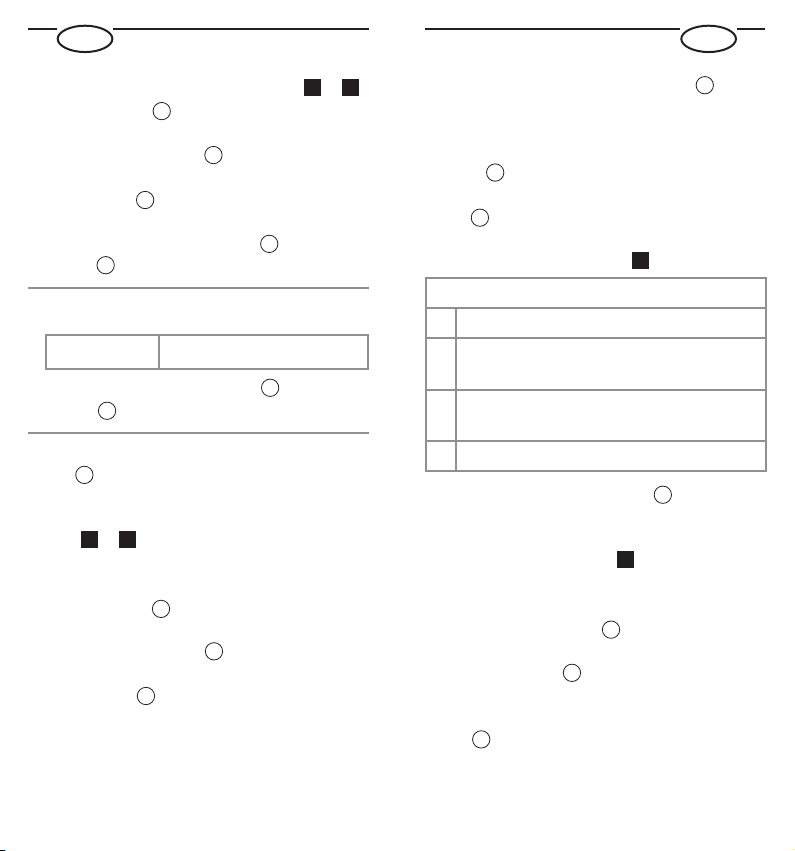
Stempelräder einstellen Abb. 1+ 2
Griff bis zum Anschlag durchdrücken
und gedrückt halten.
Überstand an Frontplatte drücken
und gedrückt halten.
Griff nach oben führen, bis der Griff
in einer tiefen Position einrastet.
Stempelräder mit Einstellstift
einstellen.
Sie können vorstehende Nullen ausblenden!
Beispiel: 49 statt 000049
Stempelräder mit Einstellstift auf die
Leerstellen zwischen „0“ und „1“ stellen.
Um in die Ausgangsposition
zurückzukehren, Griff drücken.
Farbkissen einsetzen Abb. 1+ 3
Vorsichtig handhaben, um Verschmutzung
durch Tinte zu vermeiden!
Griff bis zum Anschlag durchdrücken
und gedrückt halten.
Überstand an Frontplatte drücken
und gedrückt halten.
Griff nach oben führen, bis der Griff
in einer tiefen Position einrastet.
Farbkissen vorsichtig auspacken.
Rastgriffe des Farbkissens
zusammendrücken und gedrückt halten.
Farbkissen in den Schacht des Stempels
bis zum Anschlag einführen.
Um in die Ausgangsposition
zurückzukehren, Griff drücken.
Intervall einstellen Abb. 4
Intervalle
0Immer die gleiche Nummer wird
gestempelt.
1Nummer erhöht sich nach jedem
Stempelvorgang.
2Nummer erhöht sich nach jedem
2. Stempelvorgang.
usw.
Schalttaste nach unten drücken und
auf das gewünschte Intervall schieben.
Stempel parken Abb. 5
Um Eindrücke auf dem Farbkissen zu
vermeiden, Stempel parken!
Überstand an Frontplatte drücken
und gedrückt halten.
Griff nach unten drücken, bis der Griff
in einer hohen Position einrastet.
Um in die Ausgangsposition
zurückzukehren, Griff drücken.
A
A
A
A
A
A
A
A
B
B
B
C
C
D
D
E
G
F

GB GB
To set the stamp wheels Fig. 1+ 2
Press the handle up to the limit stop
and then hold it pressed.
Press the overhang on the front plate
and then hold it pressed.
Guide the handle upwards until the
handle snaps into a depression.
In order to set the stamp wheels with
adjusting pin .
You can fade out preceding zeros!
Example: 49 instead of 000049
In order to set the stamp wheels with
the adjusting pin on the empty spaces
between “0” and “1”.
In order to return in the starting position,
press handle .
To insert the inkpad Fig. 1+ 3
Handle with caution to avoid dirt from ink!
Press the handle up to the limit stop
and then hold it pressed.
Press the overhang on the front plate
and then hold it pressed.
Guide the handle upwards until the
handle snaps into a depression.
Unpack the inkpad carefully.
Squeeze the release grip of inkpad
and then hold it pressed.
Insert the inkpad into the slot of the
stamp, up to the limit stop.
In order to return to the starting position,
press handle .
To insert the interval Fig. 4
Intervals
0The same number is stamped always
1Number increases after every stamping
process.
2Number increases after every 2nd
stamping process.
etc.
Press the switch button downwards and
place it at the desired interval.
To park the stamp Fig. 5
To avoid impressions on the inkpad,
park the stamp!
Press the overhang on the front plate
and then hold it pressed.
Guide the handle downwards until
the handle snaps into a raised position.
In order to return to the starting position,
press handle .
A
A
A
A
A
A
A
A
B
B
B
C
C
D
D
E
G
F

F F
Réglage des molettes Fig. 1+ 2
Appuyez sur le manche jusqu’en butée
et maintenez la pression.
Appuyez sur le bouton poussoir situé
sur la plaque avant et maintenez la pression.
Guidez le manche vers le haut jusqu’à ce
qu’il s’enclenche en position basse.
Réglez les molettes à l’aide du pivot de
réglage .
Vous pouvez masquer les zéros non
significatifs !
Exemple : 49 au lieu de 000049
Réglez les molettes à l’aide du pivot de
réglage sur les espaces situés entre
0 et 1.
Pour ramener le timbre en position initiale,
appuyez sur le manche .
Mise en place de l’encreur Fig. 1+ 3
Manipulez l’encreur avec précaution afin
d’éviter de répandre l’encre !
Appuyez sur le manche jusqu’en butée
et maintenez la pression.
Appuyez sur le bouton poussoir situé
sur la plaque avant et maintenez la pression.
Guidez le manche vers le haut jusqu’à ce
qu’il s’enclenche en position basse.
Déballez l’encreur avec précaution.
Pincez les oreilles de l’encrier et
maintenez la pression.
Introduisez l’encrier dans l’emplacement
du timbre jusqu’en butée.
Pour ramener le timbre en position initiale,
appuyez sur le manche .
Réglage de l’intervalle Fig. 4
Intervalles
0Le même numéro est imprimé à
chaque fois.
1Le numéro est incrémenté à chaque
empreinte.
2Le numéro est incrémenté une
empreinte sur 2.
etc.
Appuyez sur le bouton et faites en sorte
d’obtenir l’intervalle souhaité.
Rangement des timbres Fig. 5
Pour éviter toute pression sur l’encrier,
rangez vos timbres !
Appuyez sur le bouton poussoir situé
sur la plaque avant et maintenez la pression.
Appuyez sur le manche jusqu’à ce qu’il
s’enclenche en position haute.
Pour ramener le timbre en position initiale,
appuyez sur le manche .
A
A
A
A
A
A
A
A
B
B
B
C
C
D
D
E
G
F

E E
Ajustar las ruedas del timbre fig. 1+ 2
Apretar el asa hasta el tope y
mantenerlo apretado.
Apretar el remanente de la placa
delantera y mantenerlo apretado.
Pasar el asa hacia arriba hasta que se
enclave en una posición profunda.
Ajustar las ruedas del timbre con la
espiga .
¡Puede ocultar los ceros de delante!
Ejemplo: 49 en vez de 000049
Ajustar las ruedas del timbre con la
espiga a los espacios entre „0“ y „1“.
Para volver a la posición inicial, pulsar el
asa .
Insertar la almohadilla de color
fig. 1+ 3
¡Manejar con cuidado para evitar que la tinta
la ensucie!
Apretar el asa hasta el tope y
mantenerlo apretado.
Apretar el remanente de la placa
delantera y mantenerlo apretado.
Pasar el asa hacia arriba hasta que se
enclave en una posición profunda.
Desembalar cuidadosamente la almohadilla
de color.
Apretar las asas de enclavamiento de
la almohadilla de color y mantenerlas
apretadas.
Introducir la almohadilla de color en el
canal del timbre hasta el tope.
Para volver a la posición inicial, presionar el
asa .
Ajustar el intervalo fig. 4
Intervalos
0Se timbra siempre el mismo número.
1El número aumenta después de cada
timbrado.
2El número aumenta después de cada
2º timbrado.
etc.
Presionar la tecla de cambio hacia abajo
y deslizarla sobre el intervalo deseado.
Aparcar el timbre fig. 5
¡Aparcar el timbre para evitar una impresión
en la almohadilla de color!
Apretar el remanente de la placa
delantera y mantenerlo apretado.
Presionar el asa hacia abajo hasta que
se enclave en una posición elevada.
Para volver a la posición inicial, presionar el
asa .
A
A
A
A
A
A
A
A
B
B
B
C
C
D
D
E
G
F

I I
Impostazione delle ruote del timbro
Ill. 1+ 2
Premere l’impugnatura fino all’arresto
e tenere premuta.
Premere e tenere premuta la sporgenza
contro la piastra frontale.
Portare l’impugnatura verso l’alto finché
scatta in una posizione bassa.
Impostare le ruote del timbro con
l’apposita matita .
E’ possibile mascherare gli zeri antecedenti!
Esempio: 49 invece di 000049
Con l’apposita matita mettere le ruote
del timbro sugli spazi tra “0” e “1”.
Per ritornare nella posizione iniziale,
premere l’impugnatura .
Inserimento del cuscinetto inchiostrato
Ill. 1+ 3
Maneggiare con cura per evitare
imbrattamenti dovuti all’inchiostro!
Premere l’impugnatura fino all’arresto
e tenere premuta.
Premere e tenere premuta la sporgenza
contro la piastra frontale.
Portare l’impugnatura verso l’alto finché
scatta in una posizione bassa.
Disimballare con precauzione il cuscinetto
inchiostrato.
Unire e tenere unite le alette di arresto
del cuscinetto inchiostrato.
Introdurre fino all’arresto il cuscinetto
inchiostrato nell’apposito vano del timbro.
Per ritornare nella posizione iniziale,
premere l’impugnatura .
Impostazione dell’intervallo Ill. 4
Intervalli
0Viene timbrato sempre lo stesso numero
1Il numero aumenta dopo ogni
timbratura
2Il numero aumenta dopo ogni 2a
timbratura
ecc.
Abbassare la leva di commutazione e
posizionarla sull’intervallo desiderato.
Parcheggiare il timbro Ill. 5
Per evitare impronte sul cuscinetto
inchiostrato, parcheggiare il timbro!
Premere e tenere premuta la sporgenza
contro la piastra frontale.
Portare l’impugnatura verso il basso
finché scatta in una posizione alta.
Per ritornare nella posizione iniziale,
premere l’impugnatura .
A
A
A
A
A
A
A
A
B
B
B
C
C
D
D
E
G
F

P P
Ajustar rodas de impressão Fig. 1+ 2
Carregue no punho até ao limite inferior
e mantenha-o premido.
Prima a saliência na cobertura frontal e
mantenha-a premida.
Suba o punho até encaixar numa
posição baixa.
Desloque as rodas de impressão com o
pino de ajuste .
Pode ocultar zeros precedentes!
Exemplo: 49 em vez de 000049
Coloque as rodas de impressão com
o pino de ajuste nos espaços entre
“0” e “1”.
Para voltar à posição de partida, carregue
no punho .
Colocar a almofada Fig. 1+ 3
Tenha cuidado durante o manuseamento para
evitar sujar-se com tinta!
Carregue no punho até ao limite inferior
e mantenha-o premido.
Prima a saliência na cobertura frontal e
mantenha-a premida.
Suba o punho até encaixar numa
posição baixa.
Retire cuidadosamente a almofada da
embalagem.
Comprima as duas abas da almofada e
mantenha-as comprimidas.
Introduza a almofada no corpo do
carimbo até ao limite.
Para voltar à posição de partida, carregue
no punho .
Definir intervalo Fig. 4
Intervalos
0É carimbado sempre o mesmo número.
1O número aumenta depois de cada
processo de carimbagem.
2O número aumenta depois de cada
segundo processo de carimbagem
etc.
Empurre a tecla de comutação para
baixo e desloque-a para o intervalo
pretendido.
Bloquear o carimbo Fig. 5
Para evitar marcas na almofada, bloqueie
o carimbo!
Prima a saliência na cobertura frontal e
mantenha-a premida.
Empurre o punho para baixo até
encaixar numa posição alta.
Para voltar à posição de partida, carregue
no punho .
A
A
A
A
A
A
A
A
B
B
B
C
C
D
D
E
G
F

PL PL
Ustawienie kół stemplowych Rys. 1+ 2
Uchwyt docisnąć do oporu i przytrzymać
w poz. wciśniętej.
Nacisnąć wystającą część przy płycie
czołowej i przytrzymać w poz. wciśniętej.
Uchwyt ustawić do góry, do momentu
gdy uchwyt zaczepi się na zapadkę w
głębokiej pozycji.
Koła stemplowe ustawić przy pomocy
kołka regulacyjnego .
Zera na pierwszych pozycjach można
zamaskować!
Przykład: 49 zamiast 000049
Koła stemplowe ustawić przy pomocy
kołka regulacyjnego na wolne pozycje
między ”0“ a ”1“.
W celu powrotu do pozycji wyjściowej należy
nacisnąć uchwyt .
Wsadzenie poduszki barwiącej Rys. 1+ 3
Postępować ostrożnie, aby zapobiec
zabrudzeniu tuszem!
Uchwyt docisnąć do oporu i przytrzymać
w poz. wciśniętej.
Nacisnąć wystającą część przy płycie
czołowej i przytrzymać w poz. wciśniętej.
Uchwyt ustawić do góry, do momentu
gdy uchwyt zaczepi się na zapadkę w
głębokiej pozycji.
Ostrożnie rozpakować poduszkę barwiącą.
Uchwyty zapadkowe poduszki barwiącej
ścisnąć i przytrzymać w pozycji zaciśniętej.
Poduszkę barwiącą wprowadzić do
gniazdka stempla do oporu.
W celu powrotu do pozycji wyjściowej
należy nacisnąć uchwyt .
Ustawienie interwału Rys. 4
Interwały
0Stemplowany jest zawsze ten sam numer.
1Numer narasta po każdym stemplowaniu.
2Numer narasta po każdym
2. stemplowaniu.
itd.
Wcisnąć klawisz przełączania i na żądany
interwał.
Parkowanie stempla Rys. 5
Aby zapobiec wciśnięciom na poduszce
barwiącej stempel należy ”zaparkować“.
Nacisnąć wystającą część przy płycie
czołowej i przytrzymać w poz. wciśniętej.
Wcisnąć uchwyt do momentu, gdy
zaczepi się na zapadkę w wysokiej pozycji.
W celu powrotu do pozycji wyjściowej
należy nacisnąć uchwyt .
A
A
A
A
A
A
A
A
B
B
B
C
C
D
D
E
G
F

RUS RUS
Настройка штемпельных дисков
рис. 1 + 2
Нажмите рукоятку до упора
и удерживайте ее в нажатом положении.
Нажмите выступ на передней панели
и удерживайте его в нажатом положении.
Потяните ручку вверх, пока она не
защелкнется в нижнем положении.
Настройка штемпельных дисков с
установочным штифтом .
Нули вначале можно пропустить!
Например: 49 вместо 000049
Установите штемпельные диски с
установочным штифтом на пробел между
”0“ и ”1“.
Для того, чтобы вернуться в исходное
положение, нажмите ручку .
Установка штемпельных подушек
рис. 1 + 3
Обращайтесь с ними осторожно, так как чернила
могут испачкать одежду!
Нажмите рукоятку до упора
и удерживайте ее в нажатом положении.
Нажмите выступ на передней панели
и удерживайте его в нажатом положении.
Потяните ручку вверх, пока она не
защелкнется в нижнем положении.
Распаковывайте штемпельные подушки
аккуратно.
Сожмите ручки с фиксаторами
штемпельной подушки и удерживайте их в
нажатом положении.
Вставьте штемпельную подушку в шахту
штемпеля до упора.
Для того, чтобы вернуться в исходное
положение, нажмите ручку .
Настройка интервала рис. 4
Интервалы
0Штампуется один и тот же номер.
1Номер инкрементируется с каждой новой
маркировкой.
2Номер инкрементируется через одну
маркировку.
и т. д.
Нажмите кнопку включения и
задайте желаемый интервал.
Отвод штемпеля рис. 5
Для того, чтобы на штемпельную подушку не
нанеслись отпечатки, отведите штемпель!
Нажмите выступ на передней панели
и удерживайте его в нажатом положении.
Потяните ручку вниз, пока она не
защелкнется в верхнем положении.
Для того, чтобы вернуться в исходное
положение, нажмите ручку .
A
A
A
A
A
A
A
A
B
B
B
C
C
D
D
E
G
F

عربى عربى
4
0
1
2
5
G
A
A
A
A
A
A
A
A
B
B
B
C
CD
D
E
F
2+ 1
000049 49
3+ 1
Other manuals for B6
1
This manual suits for next models
2
Table of contents
Languages:
Other Reiner Office Equipment manuals

Reiner
Reiner K1 User manual

Reiner
Reiner jetStamp graphic 970 User manual

Reiner
Reiner B2 User manual

Reiner
Reiner B6 User manual

Reiner
Reiner jetStamp graphic 970 User manual

Reiner
Reiner D280 User manual

Reiner
Reiner N53a User manual

Reiner
Reiner jetStamp graphic 970 User manual

Reiner
Reiner D41 User manual

Reiner
Reiner P1-MP2-RD User manual