Reiner P1-MP2-RD User manual

P1-MP2-RD
DE
GB
ES
FR
IT
PT
Manual de instrucciones
Bedienungsanleitung
Instructions
Mode d‘emploi
Istruzioni per l‘uso
Manual de instruções

1
AD
B
C
E
1
2
3
4
5
6
7
3
3
4
5
7
1
Schweißnaht
2
Zip-Verschluss
3
Clip
4
Druckkopf
5
Clip-Arme
6
Druckkopf-Düsen
7
Druckkopf-Kontakte

2
DE
Zu Ihrer Sicherheit
GEFAHR Warnungen vor Gefahren, die bei Missachtung
der Maßnahmen unmittelbar zu Tod oder
schweren Verletzungen führen.
WARNUNG Warnungen vor Gefahren, die bei Missachtung
der Maßnahmen zu Tod oder schweren Verlet-
zungen führen können.
VORSICHT Warnungen vor Gefahren, die bei Missachtung
der Maßnahmen zu Verletzungen führen
können.
ACHTUNG Warnungen vor Gefahren, die bei Missachtung
der Maßnahmen zu Sachschäden führen
können.
Hinweise und Tipps
Sicherheitshinweise für MP Tinte
WARNUNG
Spezialtinte ist leicht entzündlich. Mögliche Verbrennungen!
fLagertemperatur 10°C bis 20°C.
fNicht direkter Sonneneinstrahlung aussetzen.
WARNUNG
Bei Kontakt mit den Augen.
fEinige Minuten lang behutsam mit Wasser ausspülen.
fEventuell Vorhandene Kontaktlinsen nach Möglichkeit
entfernen.
fWeiter ausspülen. Sofort GIFTINFORMATIONSZENTRUM
oder Arzt anrufen.

3
1. Druckkopf gebrauchsfertig machen
1.1. Önen der Verpackung Abb. A
Der Aluminiumbeutel ist mit einem wiederverschließbaren
Zip-Verschluss
2
versehen.
fAluminiumbeutel zwischen Schweißnaht
1
und
ZIP- Verschluss
2
mit einer Schere abschneiden.
fZip-Verschluss
2
aufziehen.
fDruckkopf
4
entnehmen.
1.2. Clip vom Druckkopf lösen Abb. B+ C
Der Druckkopf
4
wird mit einem wiederverwendbaren
Clip
3
ausgeliefert.
fDruckkopf
4
etwa 45° angewinkelt wie in Abbildung C
auf einer festen Unterlage positionieren.
fDen roten Clip
3
mit einer Hand an der Spitze halten.
fDruckkopf
4
mit der anderen Hand in Richtung der
Unterlage kräftig herunterdrücken.
Dabei werden die Clip-Arme
5
nach außen gespreizt und der
Druckkopf
4
wird vom Clip
3
geschoben.
2. Druckmedien
Beste Ergebnisse werden erreicht, wenn die zu bedruckende
Oberfläche sauber, fettfrei, trocken und temperaturangeglichen ist.
Eignung vor Serieneinsatz durch Probedruck überprüfen.

4
DE
3. Aufbewahrung Abb. A + D
MP Tinte ist schnelltrocknend.
Die Dauer bis zum Eintrocknen der Druckkopf-Düsen
6
ist abhängig von der Umgebungstemperatur und der
Luftfeuchtigkeit.
- Ist die Druckpause voraussichtlich länger als 5 Min,
muss der Druckkopf
4
mit dem Clip
3
versehen werden.
- Ist die Druckpause voraussichtlich länger als 2 Stunden,
den Druckkopf
4
mit Clip
3
im Aluminiumbeutel
luftdicht lagern.
fDruckkopf
4
aus dem Gerät entnehmen.
fDruckkopf
4
mit Clip
3
wie in Abbildung Dauf einer
ebenen und festen Oberfläche positionieren.
fDruckkopf
4
herunterdrücken bis dieser im Clip
3
einrastet.
fDruckkopf
4
mit Clip
3
in den Aluminiumbeutel legen
und Zip-Verschluss komplett schließen.
Druckkopf nach dem Önen innerhalb von vier Wochen
aufbrauchen.

5
4. Umweltbedingungen
Temperatur für die
Lagerung
10°C bis +20°C
Temperatur für den
Transport
-20 °C bis +40 °C (bis 24 Stunden)
5. Störungen erkennen und beseitigen
Eingetrocknete Tinte an den Druckkopf-Düsen
6
kann zu
Streifenbildung oder zu eingeschränkter Druckqualität führen.
5.1. Automatischer Reinigungsmechanismus
fBeachten Sie die Hinweise zur Reinigung der
Druckkopf-Düsen
6
in der Bedienungsanleitung
zum Elektrostempel.
5.2. Manuelle Reinigung der Druckkopf-Düsen
Wenn die automatische Reinigung der Druckkopf-Düsen
6
nicht zu
dem gewünschten Erfolg führt, empfehlen wir folgende Maßnahme:
fUm die getrocknete Tinte zu lösen, ein weiches,
eventuell leicht in Ethanol (Spiritus) getränktes Tuch etwa drei
Sekunden gegen die Druckkopf-Düsen
6
drücken.
fGelöste Tinte abtupfen und Druckkopf-Düsen
6
trocken
wischen.

6
DE
5.3. Reaktivierung des Druckkopfes
Wenn sich getrocknete Tinte abgesetzt hat, kann eine
Reaktivierung des Druckkopfes
4
notwendig sein.
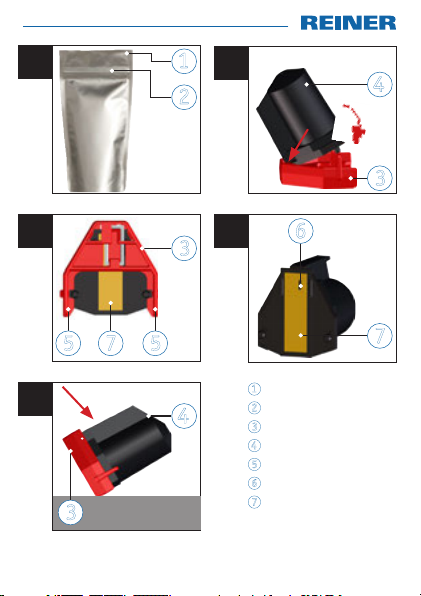
fDruckkopf auf einer festen mit einem fusselfreien Sto
oder Tuch abgedeckten Unterlage absetzen.
fBeiliegende Spritze fest auf der Önung auf der Oberseite des
Druckkopfes
4
positionieren und vorsichtig ein wenig Luft
(ca. 0,5 ml) hineindrücken.
ACHTUNG
Mögliche Verschmutzungen durch austretende Tinte.
fAusgetretene Tinte mit einem fusselfreien Sto oder Tuch
abwischen.
5.4. Druckkopf-Kontakte reinigen
In seltenen Fällen können Verunreinigungen an den
Druckkopf-Kontakten
7
fehlerhafte Druckergebnisse hervorrufen.
fDruckkopf-Kontakte am Druckkopf
4
und im Gerät mit einem
weichen, eventuell leicht in Ethanol (Spiritus) getränkten
Tuch oder Wattestäbchen reinigen.
Entsorgung
Elektro- und Elektronik-Altgeräte
Altgeräte nicht mit dem gewöhnlichen Hausmüll
entsorgen, sondern einer dafür vorgesehenen Annahme-
stelle für das Recycling von elektrischen und elektroni-
schen Geräten zuführen.

7
1
Weld seam
2
Zip fastening
3
Clip
4
Print head
5
Clip arms
6
Print head nozzles
7
Print head contacts
AD
B
C
E
1
2
3
4
5
6
7
3
3
4
5
7

8
GB
For your safety
DANGER Warnings about risks where non-observance
of the measures may directly cause death or
serious injury.
WARNING Warnings about risks where non-observance
of the measures may cause death or serious
injury.
CAUTION Warnings about risks where non-observance of
the measures may cause injury.
PLEASE NOTE Warnings about risks where non-observance of
the measures may cause material damage.
Instructions and tips
Safety instructions for MP ink
WARNING
Special ink is highly flammable. Possible burns!
fStore at 10 °C - 20 °C.
fDo not expose to direct sunlight.
WARNING
If in eyes.
fRinse cautiously with water for several minutes.
fRemove contact lenses, if present and easy to do.
fContinue rinsing. Immediately call a POISON CENTER
or doctor/physician.

9
1. Making the print head ready for use
1.1. Opening the pack Fig. A
The aluminium pouch has a resealable zip fastening
2
.
fWith scissors, cut open the top of the pack between
the weld seam
1
and the zip fastening
2
.
fUnzip
2
the pack.
fTake out the print head
4
.
1.2. Releasing the clip Fig. B+ C
The print head
4
is supplied with a reusable clip
3
.
fPlace the print head
4
on a firm surface at an angle
of about 45° as shown in figure C.
fHold the red clip
3
by the point with one hand.
fWith the other hand, press the print head
4
down firmly. The
clip arms
5
will spring out and the print head
4
will slide
away from the clip
3
.
2. Printing material
For the best results, use material that is clean, non-greasy, dry
and at the same temperature as the print head.
Before carrying out a large print job, perform a test print.

10
GB
3. Storage Fig. A + D
MP ink is fast-drying. The time it takes the print head
nozzles
6
to dry up depends on the ambient temperature
and the humidity.
- If the printing break will probably take more than 5 minutes,
the print head
4
should be protected with the clip
3
.
- If the printing break will probably take more than 2 hours,
the print head
4
with the clip
3
should be stored in the
air-tight aluminium pouch.
fRemove the print head
4
out of the device.
fPlace the print head
4
with the clip
3
on a smooth and solid
surface as shown in figure D.
fPress the print head
4
down until it snaps in the clip
3
.
fPlace the print head
4
into the aluminium pouch and close
the zip fastening completely.
Use the print head within four weeks after opening.

11
4. Environmental Conditions
Temperature for storage 10°C to +20°C
Temperature for transport -20 °C to +40 °C (up to 24 hours)
5. Troubleshooting
Dried ink on the print head nozzles
6
may result in streaks
or reduced print quality.
5.1. Automatic cleaning
fRead the information about the cleaning of the print head
nozzles
6
in the manual for the electronic stamp.
5.2. Cleaning the print head nozzles manually
If the automatic cleaning of the nozzles
6
does not produce the
desired result, we recommend proceeding as follows:
fTo remove dried ink, press a soft cloth, if necessary lightly
soaked in ethanol (spirits), against the print head nozzles
6
for about 3 seconds.
fDab o the dissolved ink and wipe the nozzles dry.

12
GB
5.3. Reactivating the print head
If ink has dried inside the print head
4
it may be necessary
to reactivate it.
fLay the print head down on a firm surface protected by
a lint-free cloth or piece of material.
fPlace the syringe supplied firmly against the opening on top
of the print head
4
and carefully inject a small amount of air
(approx. 0.5 ml).
PLEASE NOTE
Posible staining from discharged ink.
fWipe up discharged ink with a lint-free cloth or piece of
material.
5.4. Cleaning the print head contacts
In rare cases, dirt on the print head contacts
7
may result in
inferior printing results.
fClean the contacts on the print head
4
and in the device with
a soft cloth or cotton bud, if necessary lightly soaked
in ethanol (spirits).
Disposal
Electrical and electronic waste devices
Waste devices must not be disposed of in the conventio-
nal household waste. They must be returned to a special
collection point for recycling of electrical and electronic
devices.

13
1
Costura de soldadura
2
Cierre hermetico
tipo zip
3
Clip
4
Cabezal de impresión
5
Brazos clip
6
Poros de impresión
7
Contacto de cabezal
de impresión
AD
B
C
E
1
2
3
4
5
6
7
3
3
4
5
7

14
ES
Para su seguridad
PELIGRO Advertencias de peligro que causan la muerte
o lesiones graves de inmediato en caso de
incumplimiento.
ADVERTENCIA Advertencias de peligro que causan la muerte
o lesiones graves en caso de incumplimiento.
ATENCIÓN Advertencias de peligro que causan lesiones
en caso de incumplimiento.
AVISO Advertencias de peligro que causan daños
materiales en caso de incumplimiento.
Indicaciones y consejos
Indicaciones de seguridad de la Tinta MP
ADVERTENCIA
La tinta especial es fácilmente inflamable.
¡Posible de quemaduras!
fTemperatura de almacenamiento de 10ºC a 20ºC.
fNo exponer a la luz solar directa.
ADVERTENCIA
En caso de contacto con los ojos.
fAclarar cuidadosamente con agua durante varios minutos.
fQuitar las lentes de contacto, si lleva y resulta fácil.
Seguir aclarando.
fLlamar inmediatamente a un CENTRO DE INFORMACION
TOXICOLOGICA o a un médico.

15
1. Preparar el cabezal de impresión
1.1. Abrir el embalaje Imagen A
La bolsa de aluminio está provista de un cierre hermetico
tipo zip
2
que se puede abrir y cerrar.
fCortar la bolsa de aluminio con unas tijeras entre la costura
de soldadura
1
y el cierre tipo zip
2
.
fAbrir el cierre tipo zip
2
.
fSacar el cabezal de impresión
4
.
1.2. Soltar el clip del cabezal de impresión Imagen B+ C
El cabezal de impresión
4
se suministra con un clip reutilizable
3
.
fColocar el cabezal de impresión
4
con una inclinación de
aproximadamente 45 º sobre una base fija C.
fSujetar el clip rojo
3
de la parte superior con una mano.
fPresionar con fuerza el cabezal de impresión
4
con la otra
mano hacia abajo en dirección a la base. Al presionar, los brazos
de clip
5
se abren y el clip
3
se desplaza sobre el cabezal de
impresión
4
.

16
ES
2. Materiales de impresión
Los mejores resultados se obtienen cuando la superficie en la
que se va a imprimir se encuentra limpia, sin grasa, seca y a una
temperatura adecuada.
Realizar una impresión de prueba antes de la impresión
en serie.
3. Almacenamiento Imagen A + D
La Tinta MP es de secado rápido.
Los poros de impresión, situados en el cabezal, pueden secarse
dependiendo de la temperatura ambiente y de la humedad.
- Si se prevé que la pausa de impresión será superior a 5
minutos, colocar el clip
3
en el cabezal de impresión
4
.
- Si se prevé que la pausa de impresión será superior a 2 horas,
guardar el cabezal de impresión
4
con el clip
3
en la bolsa
de aluminio
4
.
fRetirar el cabezal de impresión
4
del dispositivo.
fColocar el cabezal de impresión
4
con el clip
3
sobre una
superficie plana y fijar como se muestra en la imagen D.
fPresionar el cabezal de impresión
4
hacia abajo hasta
que encaje en el clip
3
.
fColocar el cabezal de impresión
4
con el clip
3
en la bolsa
de aluminio y cerrar completamente el cierre tipo zip.
Una vez abierto el cabezal de impresión, gastar en
el plazo de cuatro semanas.

17
4. Condiciones ambientales
Temperatura de alma-
cenamiento
10 °C a +20 °C
Temperatura de trans-
porte
-20 °C a +40 °C (hasta 24 horas)
5. Detección y eliminación de fallos
La tinta seca en las aberturas del cabezal de impresión
6
puede
causar rayas o reducir la calidad de impresión.
5.1. Mecanismo de limpieza automático
fSiga las instrucciones para limpiar las aberturas del cabezal de
impresión
6
en el Manual de Usuario del sello eléctrico.
5.2. Limpieza manual de las aberturas del cabezal de impresión
Si con la limpieza automática de la abertura del cabezal de impresi-
ón
6
no se obtiene el resultado esperado, se recomienda seguir
las siguientes medidas:
fPara quitar la tinta seca, presionar en la abertura del cabezal
de impresión
6
con un paño levemente humedecido con etanol
(alcohol) durante, aproximadamente, tres segundos.
fRetirar la tinta que se quita y secar las aberturas del cabezal
de impresión
6
.

18
ES
5.3. Reactivación del cabezal de impresión
Cuando la tinta seca se asienta, puede que sea necesario
reactivar el cabezal de impresión
4
.
fColocar el cabezal de impresión encima de un paño o tela
sin pelusa sobre una base fija.
fIntroducir la jeringa suministrada junto con cabezal de
impresión
4
en la abertura de la parte superior del cabezal
de impresión y, con cuidado, introducir un poco de aire
(0,5 ml aprox.).
AVISO
Posible de contaminación por vertido de tinta.
fLimpiar la tinta vertida con un paño o tela sin pelusa.
5.4. Limpiar los contactos del cabezal de impresión
En raras ocasiones, la suciedad en los contactos del cabezal de
impresión
7
puede dar como resultado una impresión imperfecta.
fLimpiar los contactos del cabezal de impresión
4
y
del dispositivo con un paño ligeramente humedecido
con etanol (alcohol) o un bastoncillo de algodón.
Eliminación
Aparatos eléctricos y electrónicos viejos
Los aparatos viejos no deben tirarse a la basura
doméstica. Deben entregarse en un punto de recogida
designado para el reciclaje de equipos eléctricos y
electrónicos.

19
1
Soudure
2
Fermeture zip
3
Clip
4
Tête d‘impression
5
Bras du clip
6
Buses de tête
d‘impression
7
Contacts de tête
d‘impression
AD
B
C
E
1
2
3
4
5
6
7
3
3
4
5
7
Other manuals for P1-MP2-RD
1
Table of contents
Languages:
Other Reiner Office Equipment manuals

Reiner
Reiner jetStamp graphic 970 User manual

Reiner
Reiner D53V User manual

Reiner
Reiner D28 User manual

Reiner
Reiner B6 User manual

Reiner
Reiner K1 User manual

Reiner
Reiner jetStamp graphic 970 User manual

Reiner
Reiner N53a User manual

Reiner
Reiner jetStamp graphic 970 User manual

Reiner
Reiner B6 User manual

Reiner
Reiner 880 User manual
Popular Office Equipment manuals by other brands

promethean
promethean AP9-NFC COMPLIANCE GUIDE

Woodworker's Hardware
Woodworker's Hardware KV5710 quick start guide

Formax
Formax FlashCard Operator's manual

Koplus
Koplus Kolo Solo Assembly instructions

Kimball Office
Kimball Office Perks Complete Series Assembly instructions

Evolve
Evolve Power Beam installation guide