Ricoh Fax 2100L User manual

BeforeYou
Use This
Machine
Before you can send or receive fax messages,
please take about 30 minutes to set up your machine.
Set up your machine using the following procedures.
Keep going...
H5358671_COVER_A4.pm6 00.12.8, 10:35 AM1
Printed Matters

1
ZCKS020E
ZCKS050E
3.Pull the front cover release lever in the
direction indicated by the arrow and open
the front cover.
Note
TIf you do not pull the lever, only the operation panel
will open.
4.Prepare the toner cassette.
Important
TDo not touch the green drum.
1. Remove the toner cassette from its bag.
2.Hold the cassette horizontally and shake it
gently from side to side a few times to loosen
the toner.
5.Hold the toner cassette as shown in the
illustration and set it in the machine. Make
sure that the pins (marked with “p” in the
step 4 illustration) on either side of the
toner cassette slide along the guides inside
the machine.
1
Keep going...
ZCKS015E
Installing the
Toner
Cassette
1.Remove the plastic wrapping sheet from
the machine, and then remove all shipping
tape.
2.Open the operation panel and remove the
protective sheet, then re-close the
operation panel.
Note
TPlease refer to the illustration printed on the pro-
tective sheet.
H5358671_A4.pm6 00.12.8, 10:29 AM1
Printed Matters

2
ZCKS080E
ZCKS100E
2
Installing the
Main Paper
Cassette
1.Pull the cassette out of the main unit.
2.If necessary, adjust the paper size.
Reference
TTo change the paper size in the cassette, see Chapter
9, “Changing the Paper Size in the Main Cassette”
in theAdvanced Features manual.
3.Load paper into the cassette.
6.Press down on the cassette until it locks
into place.
Note
TIf you do not push the cassette in fully, the cover
will not close.
7.Close the front cover.
ZCKS070E
ZCKS060E
4.Install the cassette. Push it in firmly until it
locks into place.
H5358671_A4.pm6 00.12.8, 10:29 AM2
Printed Matters

3
ZCKS140E
ZCKS130E
ZCKS120E
Attaching the
Trays And Docu-
ment Table
The machine has three types of trays. Please
carefully refer to the illustrations when attaching
them. Make sure that the frosted side faces up.
1.Remove the trays and document table from
their shipping bags.
2.Attach the Print Delivery Tray. Insert it at an
angle so that the tabs fit in the slots pro-
vided.
3.Hold the Document Delivery Tray at the
points indicated by the circles in the
illustration, then attach it to the fax
machine. Attach the Document Delivery
Tray.
4.Attach the Document Table.
4
Keep going...
Attaching the
Quick Dial
Sheet
1.Unpack the Quick Dial sheet, then remove
the cover sheet from the Quick Dial keys.
2.Holding the Quick Dial sheet so that the
QWERTY layout faces up, fit the sheet over
the Quick Dial keys. Then affix the cover
sheet over the Quick Dial sheet.
Insert the tabs on either side of the Quick
Dial Cover into the slots on the machine.
Reference
TUpon shipment from the factory, this machine’s
QuickDial keysare arrangedin aQWERTYlayout.
Please use the QWERTY layout while doing the
setup procedure. If desired, you may then change
tothe QWERTZ,AZERT, orABC layout.Tochange
the layout, see Chapter 7, “Key Layout” in the
Advanced Features manual.
3
Note
TRemove the glossy plastic coating sheets from the
display and other surfaces.
H5358671_A4.pm6 00.12.8, 10:29 AM3
Printed Matters

4
Connecting the
Power and
Switching On
1.Insert the power cable into the socket
located at the rear of the machine.
2.Plug the cable into a wall socket.
Warning
TPower requirements: 220-240 V, 50/60 Hz
TInsert the power plug securely into the wall socket.
TMake sure that the wall outlet is near the machine
and readily accessible.
TDo not connect other equipment to the same socket.
3.Turn the power switch on.
2.
Connect the other end to your telephone line.
6
ZCKS170E
Connecting to
the Tele-
phone Line
There are two similar sockets located at the rear
of the machine:
TEL1: For the optional handset or external telephone
LINE: For connecting to the telephone line
1.Insert the line cable into the socket labeled
“LINE”.
5
Before you can use the fax machine, you must
perform some simple initial settings.
H5358671_A4.pm6 00.12.8, 10:29 AM4
Printed Matters

5
The keys used for making settings are as fol-
lows. 4.Press the [OK] key.
A. (If you select a country or region name in
step 3, the following display will appear.)
Year: Press OK
[2001]
B. (If you select “Others” in step 3, the
following display will appear.)
Country Code:
[02]
When A is displayed: Go to step 7.
When B is displayed: Go to step 5.
5.Enter the country code. You can confirm
country codes on the “Country code List”.
Caution
Make sure you enter the proper country code. The
machine might function improperly if you enter the
wrong code.
Country Code: /OK
[02]
Press the [Clear] key to erase mistaken characters.
7
Initial Settings &
Adjustments
The following display appears when the power
is turned on for the first time. Do not turn off the
power until you have completed the following
procedure.
Language?: WV/OK
[ENGLISH]
Before using the machine, make the following
settings.
TLanguage
TCountry Code
TDate and time
TLine type
TYour own name, fax header, and fax number
Important
TIf you press the [Cancel] key while making settings,
"Completed?" is displayed. To end setup, select
"Yes" by pressing Wor V, then press the [OK] key.
If you select “No” and press the [OK] key, the
display returns to the screen for year entry if you
wereentering thedate and time. If you were making
some other setting, the display returns to the entry
that was being made.
This function is not available with "Language" and
"Country Code".
Note
TYou can enter uppercase characters from A to Z,
symbols, and spaces using the Quick Dial keys.
Numbers can be entered using the number keys.
TIf you make a mistake, press the [Clear] key and try
again.
1.Press the Wor Vkey to select a language.
Your screen should now be displayed in the
language of your choice.
Language?: WV/OK
[ENGLISH]
2.Press the [OK] key. One of the following is
displayed.
A.
Year: Press OK
[2001]
B.
Country?: WV/OK
Germany
When A is displayed: Go to step 7.
When B is displayed: You must select a
country or region name (country code) for
your machine. Go to step 3.
3.Press the Wor Vkey to select a country or
region name. If your country or region
name is not displayed, select “Others”.
Number keys
(0~9)
Quick Dial keys
(A~Z, Symbol)
[Clear] key
[OK] key
key
EE GB H535
H5358671_A4.pm6 00.12.8, 10:29 AM5
Printed Matters

6
Country Code List
Code Country / Region Name Code Country / Region Name
00 France 34 Hungary
01 Germany 35 Czech
02 UK 36 Poland
03 Italy 02 Cyprus
04 Austria 06 Iceland
05 Belgium 02 Malta
06 Denmark 02 SaudiArabia
07 Finland 18 Morocco
08 Ireland 18 Bahrain
09 Norway 02 Egypt
10 Sweden 02 Iran
11 Switzerland 02 Jordan
12 Portugal 18 Kuwait
13 The Netherlands 02 Mauritius
14 Spain 02 Qatar
15 Israel 02 Oman
21 South Africa 02 UAE
32 Turkey 02 Zimbabwe
33 Greece
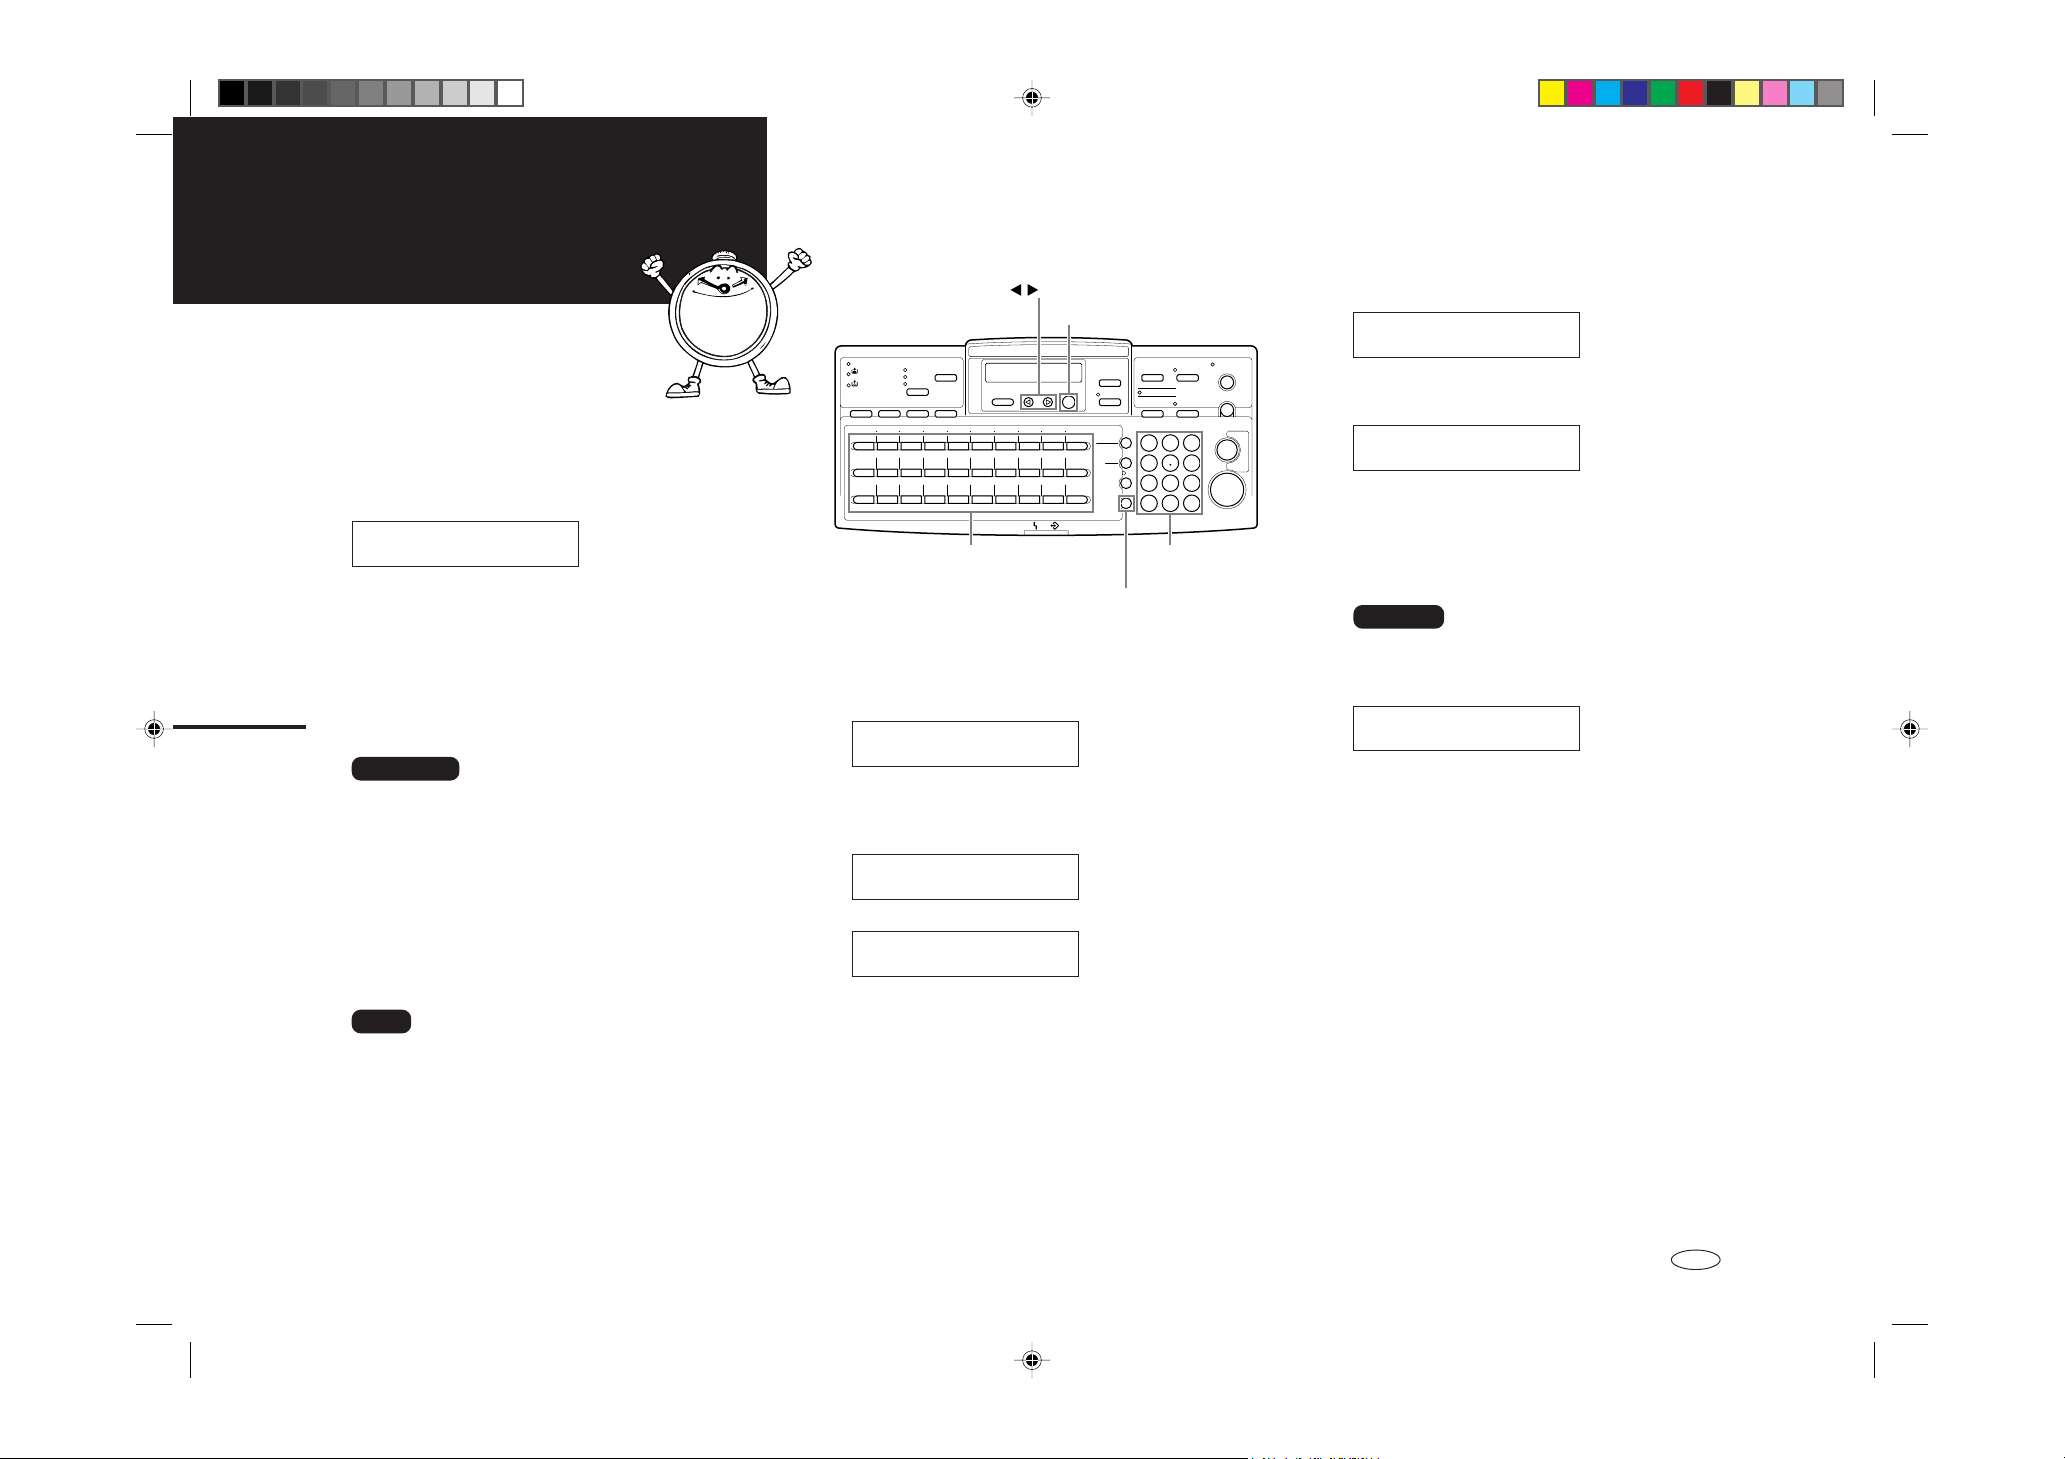
6.Press the [OK] key.
“PROGRAMMED” will flash on the display. The
following display appears.
Year: Press OK
[2001]
7.Use the number keys to enter the year. If
the year is correct, press the [OK] key.
Year: Press OK
[2002]
8.Press Wor Vkey to select the correct
month and press the [OK] key.
Month: WV/OK
[January]
9.Use the number keys to enter the correct
number for the date (1~31) and press the
[OK] key.
Day: Press OK
[ 4]
10.
Use the number keys to enter the correct
time.
Time: Press OK
[09:30]
Enter the current hour setting (0~23). If the hour is
a single digit, press the Vkey to continue.
Time: Press OK
[04:30]
Press the number keys to enter a 2-digit number for
the correct minute setting (00~59).
Time: Press OK
[04:55]
11.
Press the [OK] key.
“Function Accepted” will flash on the
display. One of the following is displayed.
A.
Line Type: WV/OK
Pulse [Tone]
B.
Own Name[ABC]
_■■■■■■■■■■■■■■■■■■■
When A is displayed: Go to step 12.
When B is displayed: Go to step 13.
12.
Press the Wor Vkey to select “Tone” or
“Pulse” for the type of telephone line
connected to the fax machine, and then
press the [OK] key.
Line Type: WV/OK
Pulse [Tone]
13.
Enter your office, company, or personal
name, or any other appropriate identifica-
tion, and then press the [OK] key. You can
enter uppercase characters from A to Z,
symbols, and spaces using the Quick Dial
keys. Numbers can be entered using the
number keys.
Own Name[ABC] OK
ABC COMPANY_■■■■■■■■
Reference
TFor details, see Chapter 3, “Initial Settings and
Adjustments” in the Basic Features manual.
TAlso see Chapter 3, "Entering Characters" in the
Basic Features manual.
14.
The name you just entered for Own Name
flashes in the Header display.
Header[ABC] OK
ABC COMPANY■■■■■■■■■
If you want to use the Own Name entry for the
Header entry, go to step 15.
If you want to enter a different name for the
Header, use the A~Z keys to enter another name.
Reference
TFor details, see Chapter 3, “Initial Settings and
Adjustments” in the Basic Features manual.
TAlso see Chapter 3, "Entering Characters" in the
Basic Features Manual.
15.
Press the [OK] key. One of the following is
displayed.
A.
Fax Number
_■■■■■■■■■■■■■■■■■■■
B.
Ready 100% 04:55
Set Orig./ Enter No.
When A is displayed: Go to step 16.
When B is displayed: The initial settings are
finished.
H5358671_A4.pm6 00.12.8, 10:29 AM6
Printed Matters

7
16.
Use the number keys to enter your fax
number as it must be dialed from outside of
your country. (You cannot enter pauses.)
Fax Number OK
+4401234567890
Note
TThe format of the number is normally as follows:
International Dial Prefix, your Country Code, your
Area Code, followed by your telephone number.
Check the International Dialing Prefix and the
Country Code with your local telecommunications
operator.
17.
Press the [OK] key.
“Initial Setup Completed” will flash briefly
in the display.
Ready 100% 04:55
Set Orig./ Enter No.
After Initial Settings
You can check and adjust these settings.
TTo change the Language, see Chapter 6, “Selecting
the Display Language” in the Advanced Features
manual (CD-ROM).
TTo change the Country Code, see Chapter 7,
“Country” in the Advanced Features manual (CD-
ROM).
TTo change the date and time, see Chapter 6, “Setting
the Date and Time” in the Advanced Features
manual (CD-ROM).
TTo change the line type, see Chapter 7, “Line Type”
in the Advanced Features manual (CD-ROM).
TTo change your own name, fax header, and fax
numbersettings, see Chapter 3, “Initial Settings and
Adjustments” in the Basic Features manual.
Reference
TSee Chapter 10, “Installation” in the Advanced
Featuresmanual (CD-ROM) forfurther information
regarding installation.
Please keep this manual and any leftover
parts in a safe place. Printed in The Netherlands
EE GB H535-8671
That’s it!
H5358671_A4.pm6 00.12.8, 10:29 AM7
Printed Matters
Table of contents
Other Ricoh Fax Machine manuals

Ricoh
Ricoh FAX 1190L Safety guide

Ricoh
Ricoh 3900L User manual

Ricoh
Ricoh FAX 1190L User manual

Ricoh
Ricoh 2400L User manual

Ricoh
Ricoh Fax 680 MP User manual

Ricoh
Ricoh FAX5510L Operating instructions

Ricoh
Ricoh Fax 2210L User manual

Ricoh
Ricoh FAX4430L User manual

Ricoh
Ricoh MV310 User manual

Ricoh
Ricoh Stella-C1 Service manual

Ricoh
Ricoh Aficio 1018 User manual

Ricoh
Ricoh Fax 2210L User manual

Ricoh
Ricoh FAX2900L User manual

Ricoh
Ricoh FAX1700L User manual

Ricoh
Ricoh 1190L Operating and safety instructions

Ricoh
Ricoh 3232 User manual

Ricoh
Ricoh FAX 1190L User manual

Ricoh
Ricoh 5510L User manual

Ricoh
Ricoh FAX1400L Owner's manual

Ricoh
Ricoh HL-F1 Quick start guide