RIOTEC iDC9602N User manual

1
Bluetooth 2D
Pocket barcode scanner
Quick Guide
Model no.: iDC9602N
Introduction
Designed primarily for P.O.S. retail environments, the
iDC9602N is a Bluetooth pocket barcode scanner that
allows you to scan various barcoded items.
Its in-built Motorola SE2707 engine allows you to reliably
read 2D barcodes on various shapes and is a great
space-saver for busy or limited workspaces.
It supports iOS, Android, and Windows devices through
Bluetooth HID or SPP communication.
Delivery content
* Pocket Barcode scanner x 1 * Quick instructions x 1
* Mini USB cable x 1(for
charging only)
* Strap x 1
Limited Warranty
Riotec provides one-year limited warranty.
Riotec will not warranty any product which has been subjected
to improper usage, neglect or unauthorized repair or
installation.
Besides, warranty does not cover the faulty usages or
consumable parts.
(Cable & battery are consumable.)
Safety instructions
Read the operating instructions carefully and especially
observe the safety information. If you do not follow the safety
instructions and information on proper handling in this
manual, we assume no liability for any resulting personal
injury or damage to property.
* Don’t put scanner in places excessively high temperatures,
such as expose under direct sunlight
* Don’t use scanner in extremely humid area or drastic
temperature change
* The rechargeable battery is permanently built into the
product and cannot be replaced.
Never damage the rechargeable battery. Damaging the casing
of the rechargeable battery might cause an explosion or a fire!
Operating elements
** Please switch ON and charge scanner for 3~4 hours at first time
before use.
* In the beginning, you must press the orange trigger button
for 8 seconds to turn on the pocket barcode scanner.
Then, press it for scanning barcodes & waking up from
sleeping mode.
* If you won’t use pocket scanner for quite a long time, you
can press 2 grey buttons to enter “Deep Sleep Mode” (like
turn-off).
Power Saving button:
Press the button for 2~3
seconds then enter
power saving mode
SCAN/ENTER/Power ON
Button
The button to
raise/lower ON-Screen
Keyboard (refer to left
column of page #6)
Indicator (LED)
Exit
Window
Mini USB port
with protective cover
charge scanner via mini USB host cable

2
How to Connect to Smartphone or Tablet
1. Make sure your device supports BT HID or BT SPP profile
2. Turn off Power-Saving mode on your smartphone/tablet first
3. Then, choose HID or SPP device before connecting to smartphone/tablet.
If you don’t know what profile your device is, please try HID profile first,
then, SPP profile.
1. Main MENU 2. select Setup
MAIN> S 12:52
Direct-scan
Memor
y
-scan
Upload
↑ ENTER ↓
MAIN> S 12:52
Memor
y
-scan
Upload
Setup
↑ ENTER ↓
3. select BT setup
S> S 12:52
BT setup
Sleep time
Output Speed
ESC ENTER ↓
After you select what you want,
press the orange button to enter
the next or ESC button back to
the previous.
How to connect to SPP or HID device
SPP device (from A1 to A2); HID device (from B1 to B3)
A
1. select SPP device B1. select HID device
S/B> S 12:52
HID device
SPP device
don
g
le
ESC ENTER ↓
S/B> S 12:52
HID device
SPP device
don
g
le
ESC ENTER ↓
A
2. select Simple pairin
g
or Pairing
B2. select Simple pairin
g
or Pairing
S/B/S> S 12:52
Simple pairin
g
Pairin
g
ESC ENTER ↓
S/B/H> S 12:52
Simple pairin
g
Pairin
g
ESC ENTER ↓
A
3. Settin
g
… Completed. B3. Settin
g
… Completed.
Settin
g
…
Completed!!!
Settin
g
…
Completed!!!
After you select what you want, press the orange button to enter
the next or ESC button back to
the previous.
1. click the “Settin
g
s” 2. click “General”
3. click “Bluetooth” 4. Turn it ON, and search the
Devices
5. Select “Rxxxxxx” to connect 6. When see the “Connected” means
the connection is OK.
(example: pairing with iPhone)
4. Please complete the connection procedures as the above photos.
5. After the connection is completed, the RED light will be OFF.
6. Before using WordPad or appropriate APP, Then, scan the barcodes and the
barcode data will show on the cursor side.
Notes:
* This product complies with Bluetooth standards. This device that
communicated with this product must support the same SPP or HID. For
other Bluetooth devices with other profiles we cannot guarantee a connection
before the product has been tested.
* The communication speed and range of the product may vary due to
obstacles and radio wave condition between the product and device to which
it is connected. Condition on the host device may also affect the
communication speed and range of the scanner.
LED Indicator Information
Oran
g
e LED ON Full char
g
ed
Oran
g
e LED Flashin
g
Char
g
in
g
/ Low battery
Red LED ON Offline / out of service
Green LED ON Good read
Oran
g
e LED ON Good read (Batch mode)
Remark:
* When the battery power is too low, the Orange LED will flash and beep once.
Scanner should be charged immediately.
* In case the power consumed out totally; the RTC (Real Time Clock) will back to
original setting 01012000.
* If scanner shuts down it is recommended to charge it fully before turning it
back on.
* Under power-saving mode, there will not be LED indication when charging.
Reset Configuration to Defaults
(scan from A1 to A2 for HID or B1 to B3 for RS232/USB Serial)
HID profile SPP profile
A1
B1
A2
B2
B3

3
There are two operating modes on the scanner
1. Direct-scan Mode
1. select Direct-scan 2a. BT connected, be
g
in to
scan the barcodes
MAIN> H 12:52
Direct-scan
Memor
y
-scan
Upload
↑ ENTER ↓
D> H 12:52
ESC SCAN
2b. BT is disconnected.
D> H 12:52
Off line !!!
…Linkin
g
!
ESC
If BT is disconnected, please back to
page #2 and do the pairing procedure
again.
2. Memory-scan Mode
1. select Memor
y
-scan 2. be
g
in to scan the barcodes
MAIN> H 12:52
Direct-scan
Memor
y
-scan
Upload
↑ ENTER ↓
M> H 12:52
ESC SCAN
Under Memory-scan mode, enable/disable “Quantity
entry” function
Disable “Quantity entry” (default)
1. disable “Quantity entry”
Setting code 2. begin the scan the barcodes
M> H 12:52
ESC SCAN
3. press DEL to delete the last
barcode data
4. be sure that you want to
delete the last barcode.
M> H 12:52
1234567
ESC SCAN DEL
M> H 12:52
The last code
Will be deleted !
A
re you sure ?
NO
Y
ES
Enable “Quantity Entry” function,
decide the order of the output data to your device first
1.
Q
’ty first, then, barcode 2. Barcode first, then,
Q
’t
y
3. Enable “
Q
uantity Entry”
Setting code 4. begin the scan the barcodes
M> H 12:52
Scan code:
Q
’ty:
ESC SCAN
When “Quantity Entry” is enabled, decide how to type-in
the number.
By button (default) By scannin
g
the number code
C1. enable D1. enable
C2. scan the barcode D2. scan the barcodes
M> H 12:52
1234567
Q
’ty: 1
ESC SCAN ENTER
M> H 12:52
7654321
Q
’ty: 1
ESC SCAN ENTER
C3. Press the ENTER to type the q’ty D3. Press the ENTER to type the q’ty
M> H 12:52
1234567
Q
’ty: 1
ESC SCAN ENTER
M> H 12:52
7654321
Q
’ty: 1
ESC SCAN ENTER
C4. press ↓ to choose number,
then, press ENTER to confirm D4. scan numeric code (page #5)
M> H 12:52
1234567
Q
’ty: 5---
ESC ENTER ↓
M> H 12:52
7654321
Q
’ty: 5---
ESC SCAN
5. Then, scan the next barcode 5. end by X code, then,
be ready to scan the next
M> H 12:52
SCAN:
Q
’ty:
ESC SCAN
M> H 12:52
SCAN:
Q
’ty:
ESC SCAN
Upload data (Memory-scan)
1. press ESC, select Upload 2. BT connected, press
START to send data
MAIN> H 12:52
Direct-scan
Memor
y
-scan
Upload
↑ ENTER ↓
U> H 12:52
Push START ke
y
to send data…
ESC START
3. After data upload, press
ERASE to delete memory data
4. be sure that you want to delete
memory data.
U> H 12:52
ESC SPEED ERASE
U/E> H 12:52
Data in memor
y
Will be erased!
A
re you sure?
NO
Y
ES
5. After you delete the memory data, it will be back to MAIN MENU
Switch from Memory-scan to Direct-scan mode
1. switch Memor
y
-scan to
Direct-scan mode
2. must delete all data in the
memory
D> H 12:52
Data in memor
y
will be erased!
Are you sure?
NO
Y
ES
Completed!!!
3. be
g
in to scan the barcode
D> H 12:52
ESC SCAN
Power-saving Mode
1. Main MENU 2. select Setup
MAIN> H 12:52
Direct-scan
Memor
y
-scan
Upload
↑ ENTER ↓
MAIN> H 12:52
Memor
y
-scan
Upload
Setup
↑ENTER ↓
3. select Sleep time 4. press ↓, decide the time to
enter sleeping mode
S> H 12:52
BT setup
Sleep time
Output Speed
ESC ENTER ↓
S/P/S> H 12:52
Sleep time
00
ESC ENTER ↓
* When charging, the scanner will not enter power-saving mode automatically.

4
Transmission Speed
Transmission speed is dependent on your device. In order not to lose data,
please choose the correct speed.
1. Main MENU 2. select Setup
MAIN> H 12:52
Direct-scan
Memor
y
-scan
Upload
↑ ENTER ↓
MAIN> H 12:52
Memor
y
-scan
Upload
Setup
↑ ENTER ↓
3. select Output Speed 4. select the speed type,
S> H 12:52
BT Status
Sleep time
Output Speed
ESC ENTER ↓
S/O> H 12:52
Unlimited
Extra hi
g
h
Hi
g
h
ESC ENTER ↓
RTC (Real-time clock)
1. Main MENU 2. select Setup
MAIN> H 12:52
Direct-scan
Memor
y
-scan
Upload
↑ ENTER ↓
MAIN> H 12:52
Memor
y
-scan
Upload
Setup
↑ ENTER ↓
3. select Time setup 4. select Stamp
S> H 12:52
Sleep time
Output Speed
Time setup
ESC ENTER ↓
S/T> H 12:52
Stamp
Format
Date ad
j
.
ESC ENTER ↓
5. select Date Stamp 6. Date Stamp is on or off.
S/T/S> H 12:52
Date Stamp
Time Stamp
Interval char.
ESC ENTER ↓
S/T/S/D> H 12:52
Date Stamp
On
Of
f
ESC ENTER ↓
7. press ESC, select
T
ime
Stamp 8. Time Stamp is on or off
S/T/S> H 12:52
Date Stamp
Time Stamp
Interval char.
ESC ENTER ↓
S/T/S/T> H 12:52
Time Stamp
On
Of
f
ESC ENTER ↓
9. press ESC, select
Interval char. 8. select Interval char.
S/T/S> H 12:52
Date Stamp
Time Stamp
Interval char.
ESC ENTER ↓
S/T/S/P
> H 12:52
Interval char.
,
ESC ENTER ↓
The format of Date setting
1. Main MENU 2. select Setup
MAIN> H 12:52
Direct-scan
Memor
y
-scan
Upload
↑ ENTER ↓
MAIN> H 12:52
Memor
y
-scan
Upload
Setup
↑ENTER ↓
3. select
T
ime setup 4. select Format
S> H 12:52
Sleep time
Output Speed
T
ime setup
ESC ENTER ↓
S/T> H 12:52
Stamp
Format
Date ad
j
.
ESC ENTER ↓
5. select the format of date
S/T/F> H 12:52
MM/DD/Y
Y
DD/MM/Y
Y
Y
Y/MM/DD
ESC ENTER ↓
Date setting
1. Main MENU 2. select Setup
MAIN> H 12:52
Direct-scan
Memor
y
-scan
Upload
↑ ENTER ↓
MAIN> H 12:52
Memor
y
-scan
Upload
Setup
↑ENTER ↓
3. select
T
ime setup 4. select Date ad
j
.
S> H 12:52
Sleep time
Output Speed
T
ime setup
ESC ENTER ↓
S/T> H 12:52
Stamp
Format
Date ad
j
.
ESC ENTER ↓
5. Set the date, press ↓ to select
number, then, press ENTER to
go to the next
6. Save the date data
S/T/D> H 12:52
Y
ear (00-99) : 11
Month (01-12) : 12
Date (01-XX) : 02
ESC ENTER ↓
Save it ?
NO
Y
ES
Time setting
1. Main MENU 2. select Setup
MAIN> H 12:52
Direct-scan
Memor
y
-scan
Upload
↑ ENTER ↓
MAIN> H 12:52
Memor
y
-scan
Upload
Setup
↑ENTER ↓
3. select
T
ime setup 4. select Clock ad
j
.
S> H 12:52
Sleep time
Output Speed
T
ime setup
ESC ENTER ↓
S/T> H 12:52
Format
Date ad
j
.
Clock ad
j
.
ESC ENTER ↓
5. set the time. Press ↓ to
select the number, then,
press the ENTER to go the next
6. save the time setting
S/T/T> H 12:52
Hour (00-23) : 00
Min (00-59) : 00
Sec (00-59) : 00
ESC ENTER ↓
Save it ?
NO
Y
ES
Trigger Mode
Trigger always
(Trigger available at any time)
Trigger standard (Default)
(Trigger available, after data sent to the
device)
Multi-language UI setting
(can be changed to different UI by reading the below setting code)
Germany UI Japan UI
English UI (Default) Spain UI

5
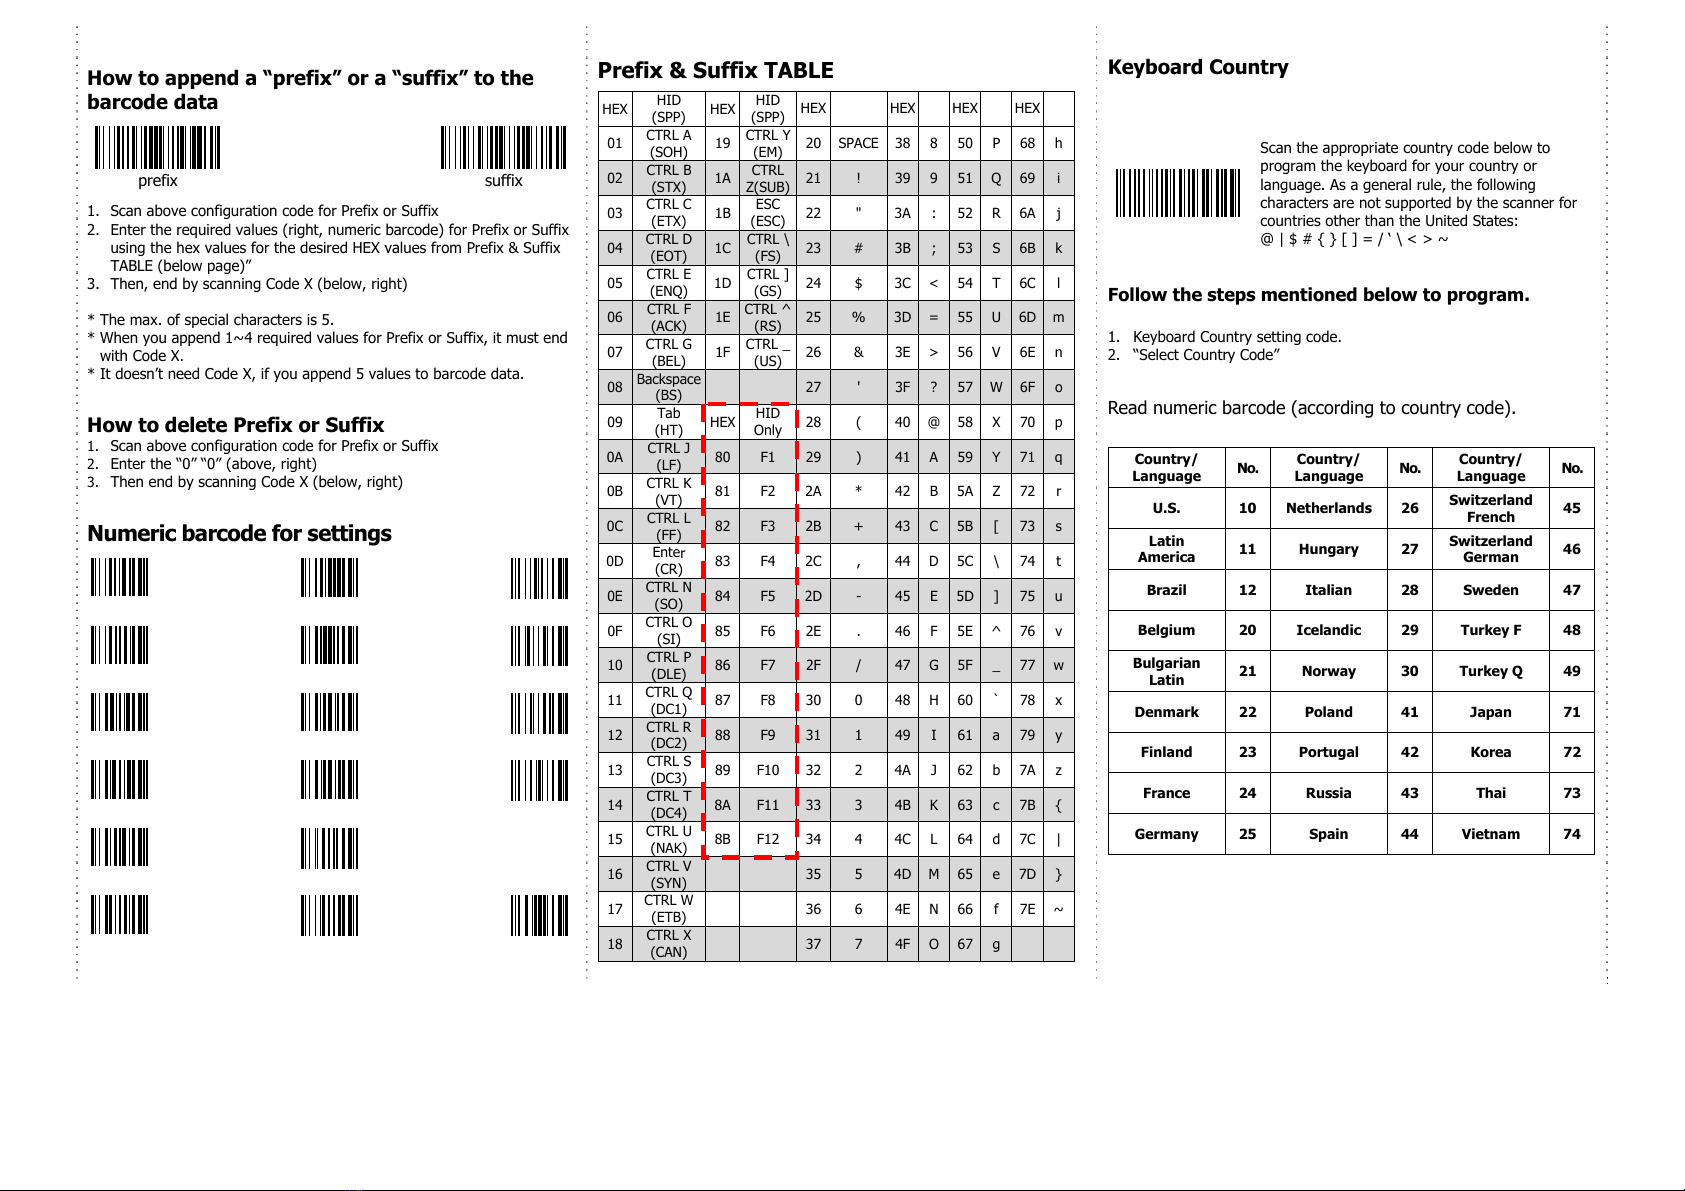
How to append a “prefix” or a “suffix” to the
barcode data
prefix suffix
1. Scan above configuration code for Prefix or Suffix
2. Enter the required values (right, numeric barcode) for Prefix or Suffix
using the hex values for the desired HEX values from Prefix & Suffix
TABLE (below page)”
3. Then, end by scanning Code X (below, right)
* The max. of special characters is 5.
* When you append 1~4 required values for Prefix or Suffix, it must end
with Code X.
* It doesn’t need Code X, if you append 5 values to barcode data.
How to delete Prefix or Suffix
1. Scan above configuration code for Prefix or Suffix
2. Enter the “0” “0” (above, right)
3. Then end by scanning Code X (below, right)
Numeric barcode for settings
Prefix & Suffix TABLE
HEX HID
(SPP) HEX HID
(SPP) HEX HEX HEX HEX
01 CTRL A
(SOH) 19 CTRL
Y
(EM) 20SPACE388 50 P68h
02 CTRL B
(STX) 1A CTRL
Z(SUB) 21 ! 39 9 51 Q69 i
03 CTRL C
(ETX) 1B ESC
(ESC) 22 " 3A : 52 R 6A j
04 CTRL D
(EOT) 1C CTRL \
(FS) 23 # 3B ; 53 S6B k
05 CTRL E
(ENQ) 1D CTRL ]
(GS) 24 $ 3C < 54 T 6C l
06 CTRL F
(ACK) 1E CTRL ^
(RS) 25 % 3D = 55 U6D m
07 CTRL G
(BEL) 1F CTRL _
(US) 26 & 3E > 56 V 6E n
08 Backspace
(BS) 27 ' 3F ? 57 W6F o
09 Tab
(HT) HEX HID
Only 28 ( 40 @ 58 X 70 p
0A CTRL J
(LF) 80 F1 29 ) 41 A 59 Y71 q
0B CTRL K
(VT) 81 F2 2A * 42 B 5A Z 72 r
0C CTRL L
(FF) 82 F3 2B + 43 C 5B [73 s
0D Ente
r
(CR) 83 F4 2C , 44 D 5C \ 74 t
0E CTRL N
(SO) 84 F5 2D - 45 E 5D ]75 u
0F CTRL O
(SI) 85 F6 2E . 46 F 5E ^ 76 v
10 CTRL P
(DLE) 86 F7 2F / 47 G 5F _77 w
11 CTRL Q
(DC1) 87 F8 30 0 48 H 60 ` 78 x
12 CTRL R
(DC2) 88 F9 31 1 49 I 61 a79 y
13 CTRL S
(DC3) 89 F10 32 2 4A J 62 b 7A z
14 CTRL T
(DC4) 8A F11 33 3 4B K 63 c7B {
15 CTRL U
(NAK) 8B F12 34 4 4C L 64 d 7C |
16 CTRL
V
(SYN) 35 5 4D M 65 e7D }
17 CTRL W
(ETB) 36 6 4E N 66 f 7E ~
18 CTRL
X
(CAN) 37 7 4F O 67 g
Keyboard Country
Scan the appropriate country code below to
program the keyboard for your country or
language. As a general rule, the following
characters are not supported by the scanner for
countries other than the United States:
@ | $ # { } [ ] = / ‘ \ < > ~
Follow the steps mentioned below to program.
1. Keyboard Country setting code.
2. “Select Country Code”
Read numeric barcode (according to country code).
Country/
Language No. Country/
Language No.
U.S. 10 Netherlands 26 Switzerland
French 45
Latin
America 11 Hungary 27 Switzerland
German 46
Brazil 12 Italian 28 Sweden 47
Belgium 20 Icelandic 29 Turkey F 48
Bulgarian
Latin 21 Norway 30 Turkey Q 49
Denmark 22 Poland 41 Japan 71
Finland 23 Portugal 42 Korea 72
France 24 Russia 43 Thai 73
Germany 25 Spain 44 Vietnam 74
0
6
C
1 7
D
2 8
E
3 9
F
4
A
5
B X

6
Soft-Keyboard setting code for Android / iOS
For Android
For iOS
* Under Android system:
If you want to raise/lower soft-keyboard, please read the
above setting code first. Then, press left button for 2
seconds to raise keyboard (refer to drawing #5 on page
#1, LED is RED /Bluetooth is offline), press it again to
lower keyboard (LED is off/ Bluetooth is online).
*It will take 5~10 seconds to make BT
online/offline.
*Please be noted that when BT is offline, scanning
function is stopped.
* Under iOS system:
If you want to raise/lower soft-keyboard, please read the
above setting
code first. Then, press Left button for 2 seconds to
raise/lower soft-Keyboard;
Press the left button for 4 seconds to un-pair. Then,
scanner can be connected with other BT device.
Redundancy Level
This scanner offers two levels of decode redundancy. Select higher
redundancy levels for decreasing levels of bar code quality.
As redundancy levels increase, the decoder’s aggressiveness decreases.
Select the redundancy level appropriate for the bar code quality.
Redundancy Level 1
barcode must be successfully read twice before
being decoded
Redundancy Level 2
barcode must be successfully read three times
before being decoded
1D Symbologies -1
ENABLE UPC-A DISABLE
ENABLE UPC-E DISABLE
ENABLE EAN-8 DISABLE
ENABLE EAN-13 DISABLE
ENABLE ISBT 128 DISABLE
ENABLE MSI DISABLE
1D Symbologies -2
ENABLE
Code 39
FULL ASCII DISABLE
ENABLE
T
rioptic
Code 39 DISABLE
ENABLE Code 32 DISABLE
ENABLE CODE 93 DISABLE
ENABLE CODE 11 DISABLE
ENABLE Interleaved 25 DISABLE
ENABLE Discrete 25 DISABLE
ENABLE CODABAR DISABLE

7
1D Symbologies -3
ENABLE
Code 39 DISABLE
ENABLE Chinese 25 DISABLE
ENABLE Matrix 25 DISABLE
ENABLE GS1 DataBar DISABLE
ENABLE
GS1 DataBar
Limited DISABLE
ENABLE
GS1 DataBar
Expanded DISABLE
ENABLE
Composite
CC-C DISABLE
ENABLE
Composite
CC-A/B DISABLE
ENABLE
Composite
TLC 39 DISABLE
2D Symbologies
ENABLE
PDF 417 DISABLE
ENABLE
Micro
PDF 417 DISABLE
ENABLE Data Matrix DISABLE
ENABLE Maxicode DISABLE
ENABLE QR CODE DISABLE
ENABLE
Micro
QR CODE DISABLE
ENABLE Aztec DISABLE
1. Pull out the USB cover its
slot
2. Press inward firmly on the
USB cover to reattach it
Top
Bottom
Insert a thin object (e.g. a bent paper clip) into the small hole.
To click the reset button inside
R_181227_01
Pressing
direction
Reset
Table of contents
Other RIOTEC Barcode Reader manuals

RIOTEC
RIOTEC iDC9278K User manual

RIOTEC
RIOTEC iDC9277L User manual

RIOTEC
RIOTEC DC9250KP User manual

RIOTEC
RIOTEC LS6308K User manual

RIOTEC
RIOTEC LS6300J User manual

RIOTEC
RIOTEC iLS6300JBQ User manual

RIOTEC
RIOTEC LS6300 User manual

RIOTEC
RIOTEC LS6000B series User manual

RIOTEC
RIOTEC iDC9500 User manual

RIOTEC
RIOTEC OM7220J User manual

RIOTEC
RIOTEC LS6300E User manual

RIOTEC
RIOTEC iDC9608KW User manual

RIOTEC
RIOTEC iDC9503A User manual

RIOTEC
RIOTEC DC9257AP User manual

RIOTEC
RIOTEC LS6322A User manual

RIOTEC
RIOTEC iDC9607L User manual

RIOTEC
RIOTEC iLS6300JB User manual

RIOTEC
RIOTEC CR6300C User manual

RIOTEC
RIOTEC LS6320E User manual

RIOTEC
RIOTEC LS6308J User manual