Ritos 6090115AIP20 User manual

GB Halogen floodlight
with tripod
Reflector de halógeno
con trípode
Réflecteur halogène
à pied
Riflettore alogeno
con cavalletto
Halojen projektör
statifli
Halogeenstraler
met statief
Halogenový reflektor
se stativem
Halogén fényszóró
sztatívval
Reflektor halogenowy
ze statywem
Halogeninis šviestuvas
su štatyvu
Галогенный рефлектор
со штативом
Halogenski reflektor
s stativom
Halogenski reflektor
sa stativom
Halogenstrålkastare
med stativ
Halogenprojektør
med stativ
Halogeenivalaisin
jalustalla
Halogen-Flomlys
med stativ
Halogénová Lampa
so statívom
Lâmpada de halogénio
com tripé
6
ES 9
FR 11
IT 13
TR 15
NL 17
CZ 19
HU 21
PL 23
LT 25
RU 27
SI 29
DK 35
FI 37
NO 39
SK 41
PT 43
Halogeenvalgusti
statiiviga
EE 45
Halógenflóðljós
með statífi
IS 47
HR 31
SE 33
10.14
Ritter Leuchten GmbH
Frankenstr. 1-4 •D-63776 Mömbris •www.ritos.de
HALOGENFLUTER
mit Stativ
Typ: 6090115AIP20, 6090150AIP20,
6090140AIP44, 6091240AIP44
ХАЛОГЕНЕН ПРОЖЕКТОР
със статив
BG 49
ANL_6090115AIP20_6090150AIP20_6090140AIP44_6091240AIP44.indd 1 22.10.2014 11:49:19
2
1
2
ANL_6090115AIP20_6090150AIP20_6090140AIP44_6091240AIP44.indd 2 22.10.2014 11:49:20

3
DE
Halogenfluter mit Stativ
Montage- und Bedienungsanleitung
Sehr geehrte Kundin, sehr geehrter Kunde,
wir bedanken uns, dass Sie unseren Fluter gekauft haben. Bitte lesen Sie die nachfolgende Bedie-
nungsanleitung vor der Inbetriebnahme des Halogenfluters aufmerksam durch und bewahren Sie
sie für späteres Nachschlagen gut auf.
Bestimmungsgemäße Verwendung
Typ 6090115AIP20, 6090150AIP20: Die Fluter mit IP20 Kennzeichnung sind nur für Verwendung im
trockenen Innbenbereich geeignet. Nicht für rauhen Betrieb geeignet.
Typ 6090140AIP44, 6091240AIP44: Der Fluter ist spritzwassergeschützt, IP44 und zur Verwendung
im Außenbereich geeignet.
Der Fluter ist konform mit den zutreffenden europäischen
CE-Richtlinien.
Allgemeine Sicherheitshinweise
• immer mindestens 1m von angestrahlten Flächen entfernt anbringen - besonders das
Anschlusskabel darf nicht angestrahlt werden oder in Berührung mit dem Metallgehäuse
kommen - sowie die erforderlichen Mindestabstände einhalten.
• immer ausreichend abkühlen lassen - das Gehäuse des Fluters kann extrem heiß werden und
z.B. zum Lampenwechsel oder zur Reinigung den Fluter spannungsfrei schalten und den
Stromkreis gegen Wiedereinschalten sichern.
• nur auf ebenen und stabilen Flächen anbringen.
• nur in Verbindung mit einer ausreichend abgesicherten 230V~-Installation verwenden.
• nicht in Räumen mit Explosionsrisiko benutzen (z. B. Schreinerei, Lackierbetrieb oder Ähnliches).
• nicht in unmittelbarer Nähe von brennbarem Material benutzen.
• nicht in unmittelbarer Nähe von Planschbecken, Springbrunnen, Teichen oder ähnlichen
Gewässern anbringen.
• nicht in Wasser oder andere Flüssigkeiten eintauchen.
• nicht mit nassen Händen bedienen und niemals direkt in die Lichtquelle sehen.
• niemals abdecken.
• niemals mit offenem Gehäuse, fehlender oder beschädigter Abdeckung des Anschlussraumes
oder fehlender oder beschädigter Schutzscheibe betreiben.
• niemals zur Reinigung abspritzen oder einen Dampfdruckreiniger verwenden, dabei können die
Isolierungen und Dichtungen beschädigt werden.
• niemals selber reparieren. Reparaturen dürfen ausschließlich vom Hersteller oder dessen
Servicebeauftragten durchgeführt werden.
Technische Daten
• Typ 6090115AIP20: Leistung: max. 150W Schutzart: IP20 Leitung: H05VV-F
• Typ 6090150AIP20: Leistung: max. 500W Schutzart: IP20 Leitung: H05VV-F
• Typ 6090140AIP44: Leistung: max. 500W Schutzart: IP44 Leitung: H05RN-F
• Typ 6091240AIP44: Leistung: max. 2x500W Schutzart: IP44 Leitung: H05RN-F
• Spannung: 230V~, 50Hz
ANL_6090115AIP20_6090150AIP20_6090140AIP44_6091240AIP44.indd 3 22.10.2014 11:49:20

4
Leuchtmittel einsetzen
• Lösen Sie die Schraube an der Oberseite des Fluters und klappen Sie die Schutzscheibe nach
vorne.
• Nehmen Sie das Leuchtmittel aus der Verpackung.
• Achten Sie darauf, es nicht mit bloßen Fingern zu berühren, dies hinterlässt Fettflecken, die zu
einer Überhitzung führen. Benutzen Sie ein sauberes, trockenes, fusselfreies Tuch.
• Setzen Sie ein Ende des Leuchtmittels in die Fassung ein, pressen Sie gegen diese und setzen
Sie das andere Ende des Leuchtmittels in die Fassung ein. Achten Sie darauf, dass die Fassung
nicht verbogen wird.
• Schließen Sie anschließend die Schutzscheibe und ziehen Sie die Schraube wieder fest.
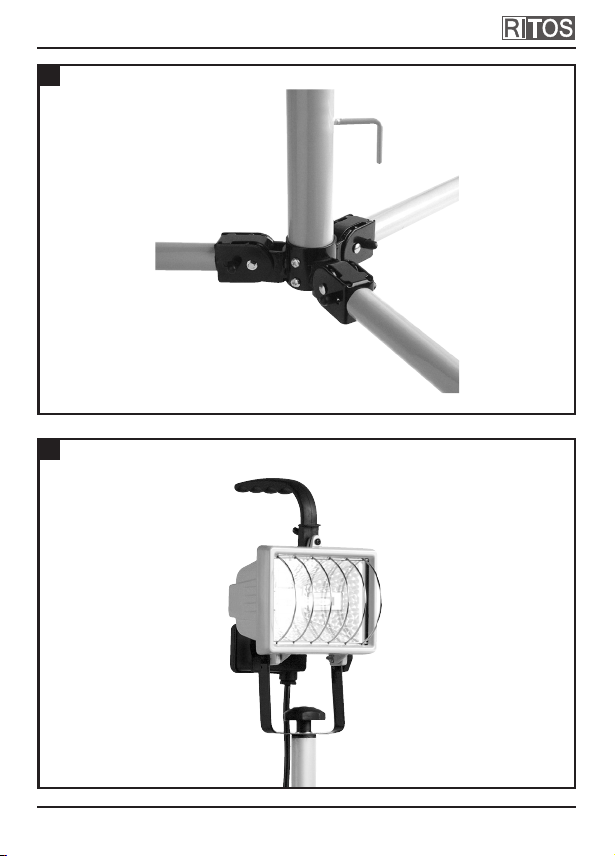
Stativ montieren
• Lösen Sie die Arretierbolzen der Stativfüße und klappen Sie jeden einzeln nach unten, bis diese
im rechten Winkel hörbar wieder einrasten.
• Befestigen Sie den Fluter mit Hilfe der mitgelieferten Schraube im mittleren Loch des Gehäuse-
bügels am Stativ.
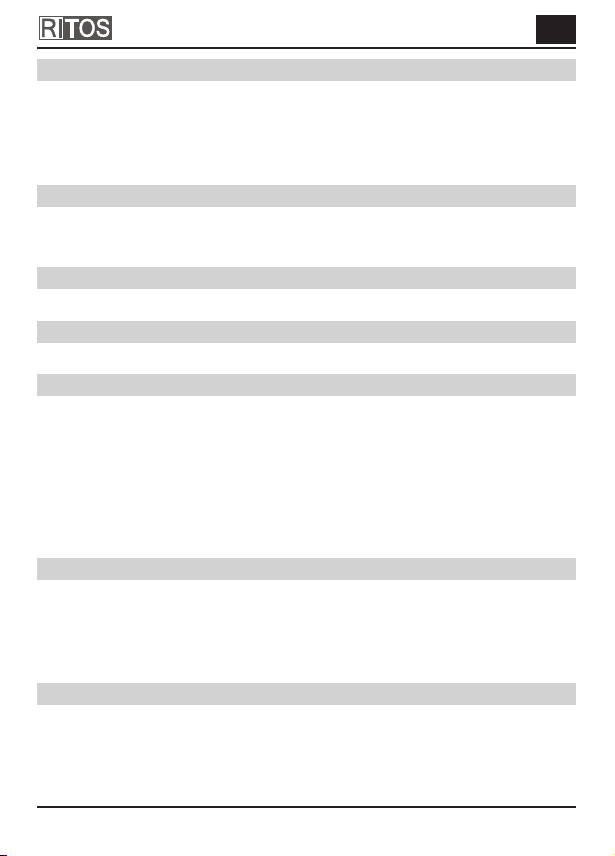
Handgriff montieren
Lösen Sie die Flügelmutter an der Oberseite des Fluters. Stecken Sie den mitgelieferten Griff auf
und ziehen Sie die Flügelmutter wieder fest.
Einstellen der Strahlrichtung
Lösen Sie die seitlichen Schrauben am Montagebügel, stellen Sie die gewünschte Strahlrichtung
des Fluters ein und ziehen Sie anschließend alle Schrauben wieder fest.
Leuchtmittel ersetzen
Die technischen Daten des Leuchtmittels finden Sie unter „Technische Daten“ oder auf dem Typen-
schild des Flutergehäuses.
• Schalten Sie den Fluter spannungsfrei und sichern Sie den Stromkreis gegen Wiedereinschalten.
Lassen Sie den Fluter ausreichend abkühlen!!
• Lösen Sie die Schraube der Schutzscheibe an der Oberseite des Fluters und klappen Sie die
Scheibe nach vorne.
• Nehmen Sie das Leuchtmittel aus der Verpackung.
• Achten Sie darauf, es nicht mit bloßen Fingern zu berühren, dies hinterlässt Fettflecken, die zu
einer Überhitzung führen. Benutzen Sie ein sauberes, trockenes, fusselfreies Tuch.
• Setzen Sie ein Ende des Leuchtmittels in die Fassung ein, pressen Sie gegen diese und setzen
Sie das andere Ende des Leuchtmittels in die Fassung ein. Achten Sie darauf, dass die Fassung
nicht verbogen wird.
• Schließen Sie anschließend die Schutzscheibe und drehen Sie die Schraube wieder fest.
Reinigung
• Schalten Sie den Fluter spannungsfrei und sichern Sie den Stromkreis gegen Wiedereinschalten.
Lassen Sie den Fluter ausreichend abkühlen!
• Zur Reinigung nur ein trockenes oder leicht feuchtes, fusselfreies Tuch, eventuell ein mildes
Reinigungsmittel verwenden. Keine scheuer- oder lösungsmittelhaltigen Reinigungsmittel
anwenden.
• Wenn nötig, kann das Leuchtmittel mit einem leicht mit Spiritus angefeuchteten, fusselfreien
Tuch gereinigt werden. ACHTUNG! Nach der Reinigung des Leuchtmittels mit Spiritus, dieses
mindestens 20 Minuten auslüften lassen.
DE
ANL_6090115AIP20_6090150AIP20_6090140AIP44_6091240AIP44.indd 4 22.10.2014 11:49:20

5
Wartung
• Ersetzen Sie umgehend beschädigte Schutzscheiben.
• Entfernen Sie sofort alle Verschmutzungen am Gehäuse oder der Schutzscheibe, da diese zu
Überhitzung führen können.
Garantie
Dieses Produkt durchläuft während der Fertigung mehrere, nach Neuesten
Techniken aufgebaute Prüfstationen. Sollte dennoch ein Mangel auftreten, leisten
wir im nachfolgenden Umfang Gewähr:
1. Die Dauer der Garantie beträgt 2 Jahre ab dem Kaufdatum.
2. Das Gerät wird entweder unentgeltlich nachgebessert oder ausgetauscht, wenn es
innerhalb der Gewährleistungspflicht nachweisbar wegen eines Fertigungs- und
Materialfehlers unbrauchbar wird.
3. Die Haftung erstreckt sich nicht auf Transportschäden sowie auf Schäden, die durch
fehlerhafte Installation entstehen.
4. Wird innerhalb von 6 Monaten nach Nichtanerkennung des Haftungsfalles durch uns
kein Widerspruch eingelegt, verjährt das Recht auf Nachbesserung.
5. Im Gewährleistungsfall ist das Gerät zusammen mit dem Kaufbeleg und einer kurzen
Mängelbeschreibung an den Händler oder uns zu senden.
6. Ohne Garantienachweis erfolgt Nachbesserung ausschließlich gegen Berechnung.
DE
ANL_6090115AIP20_6090150AIP20_6090140AIP44_6091240AIP44.indd 5 22.10.2014 11:49:20

6
GB
Halogen floodlight with tripod
Operation and maintenance manual
Dear valued customer,
Thank you for purchasing our floodlight.
Before operating the floodlight, please read the following instructions for use carefully and keep
them in a safe place for future reference.
Proper Use
Type 6090115AIP20, 6090150AIP20: The IP20 designated floodlights are only suitable for use in a
dry interior. Not suitable for heavy duty work.
Type 6090140AIP44, 6091240AIP44: The floodlight is spray-protected, IP44 and for use outdoors
The floodlight conforms with the appropriate European CE regulations
General Safety Instructions
• must always be placed at least 1m away from the surface being illuminated – in particular, the
power cable must not be illuminated or come into contact with the metal housing – maintain the
specified minimum clearances.
• must always be given sufficient time to cool down – the floodlight housing can get extremely hot –
the power supply to the floodlight must always be disconnected and locked out before servicing,
e.g. for bulb replacement or cleaning.
• must only be used on flat, stable surfaces.
• use only with a sufficiently protected 230V~ installation.
• must not be used in rooms that represent an explosion hazard (e.g. cabinetmaker‘s workshop,
painting operation, or similar).
• must not be used in the immediate vicinity of flammable materials.
• must not be set up in the immediate vicinity of pools, fountains, ponds, or similar bodies of water.
must not be immersed in water or other liquids.
• must not be immersed in water or other liquids.
• must not be operated with wet hands; never look directly into the light source.
• must never be covered.
• must never be operated with an open housing, missing or damaged wiring compartment, or
missing or damaged lens.
• must never be sprayed or cleaned using a steam pressure cleaner since this can damage the
insulation and seals.
• must never be repaired by the user. Repairs must only be carried out by the manufacturer or an
authorized service representative.
Technical Data
• Type 6090115AIP20: Output: max. 150W Protection class: IP20 cable: H05VV-F
• Type 6090150AIP20: Output: max. 500W Protection class: IP20 cable: H05VV-F
• Type 6090140AIP44: Output: max. 500W Protection class: IP44 cable: H05RN-F
• Type 6091240AIP44: Output: max. 2x500W Protection class: IP44 cable: H05RN-F
• Voltage: 230V~, 50Hz
ANL_6090115AIP20_6090150AIP20_6090140AIP44_6091240AIP44.indd 6 22.10.2014 11:49:20
7
Illuminant Installation
• Loosen the screw on the top of the floodlight and swing the lens forward.
• Remove the illuminant from the packaging.
• Avoid touching it with bare hands since this causes grease stains which lead to overheating. Use
a clean, dry, lint-free cloth.
• Insert one end of the illuminant into the socket, press against it, and insert the other end of the
illuminant into the socket. Ensure that the socket is not damaged.
• Then close the lens and retighten the screw.
Installing the Tripod
• Loosen the locking bolts of the tripod feet and fold each one of them down until they audibly lock
in place at a right angle.
• Attach the floodlight to the tripod using the centre hole of the housing bracket and the supplied
bolt.
Installing the Handle
Loosen the wing nut on the top of the floodlight. Attach the supplied handle and retighten the wing
nut.
Setting the Floodlight Direction
Loosen the screws on the sides of the mounting brackets, adjust the floodlight direction, and then
retighten all screws.
Replacing the Illuminant
You can find the technical data for the illuminant under “Technical Date” or on the type plate
attached to the floodlight housing.
• Disconnect and lock out the power supply to the floodlight. Allow the floodlight to cool down
sufficiently!
• Loosen the screw for the lens on top of the floodlight and swing the lens forward.
• Remove the illuminant from the packaging.
• Avoid touching it with bare hands since this causes grease stains which lead to overheating. Use
a clean, dry, lint-free cloth.
• Insert one end of the illuminant into the socket, press against it, and insert the other end of the
illuminant into the socket. Ensure that the socket is not damaged.
• Then close the lens and retighten the screw.
Cleaning
• Disconnect and lock out the power supply to the floodlight. Allow the floodlight to cool down
sufficiently!
• Clean with a dry or slightly moist, clean, lint-free cloth and a mild detergent if required. Do not
use cleaners that contain abrasives or solvents.
• If required, the illuminant can be cleaned with a lint-free cloth moistened with ethyl alcohol.
ATTENTION! After cleaning the illuminant with ethyl alcohol, it must be allowed to air dry for at
least 20 minutes.
Maintenance
• If the lens is damaged it must be replaced immediately.
• Clean any dirt from the housing or the lens immediately, since it could cause overheating.
GB
ANL_6090115AIP20_6090150AIP20_6090140AIP44_6091240AIP44.indd 7 22.10.2014 11:49:20

8
Warranty
During manufacturing this Ritter Leuchten product is passed through several quality
testing stations which are set up with newest technology. Should nevertheless a
defect arise, Ritter Leuchten offers a warranty to the following extent:
1.The duration of the warranty is 24 months after the date of purchase.
2.The unit is either repaired or replaced by Ritter Leuchten free of charge or if it
can be shown that it has become unusable during the warranty period due to a
manufacturing or material defect.
3.The liability does not cover transport damages or dama ged incurred through
defective installation.
4.If Ritter Leuchten repudiates the warranty claim and no objection is made within
6 months, the right to repair becomes timebarred.
5.In a warranty case the unit must be sent to the dealer or Ritter Leuchten together
with the sales slip and a short descripti on of the defect.
6.If there is no proof for a warranty liability being in place, any repair carried out will
be invoiced.
GB
ANL_6090115AIP20_6090150AIP20_6090140AIP44_6091240AIP44.indd 8 22.10.2014 11:49:20

9
ES
Reflector de halógeno con trípode
Indicación para el montaje y el servicio
Uso correcto
Modelo 6090115AIP20, 6090150AIP20: Los proyectores IP20 solo son aptos para su uso en una
zona cerrada seca. No aptos para trabajos agrestes.
Modelo 6090140AIP44, 6091240AIP44: El proyector está protegido contra salpicaduras de agua,
IP44 apto para su uso en exteriores.
El proyector cumple las directrices CE correspondientes.
Instrucciones generales de seguridad
• Realice siempre la instalación a una distancia mínima de 1m respecto a las superficies ilumina-
das – especialmente el cable de conexión no debe quedar nunca iluminado o entrar en contacto
con la carcasa metálica– y respete siempre las distancias mínimas requeridas.
• Deje enfriar siempre lo suficiente –la carcasa del proyector puede estar excesivamente calien-
te– y para cambiar por ej. las bombillas o para limpiar el proyector, desconectar la corriente y
asegúrese de que el circuito eléctrico no vuelva a conectarse.
• Monte exclusivamente sobre superficies planas y estables.
• Utilícelo solo con una instalación debidamente protegida de 230V~.
• No lo utilice en lugares en los que exista riesgo de explosión (por ejemplo en carpinterías, talle-
res de pintura o similares).
• No debe utilizarse cerca de materiales inflamables.
• No lo monte junto a piscinas, fuentes, lagos u otras zonas acuáticas.
• No debe sumergirse en agua u otros líquidos.
• No lo manipule con las manos mojadas y no mire nunca directamente a la fuente de luz.
• No lo cubra nunca.
• No lo utilice nunca con la carcasa abierta, con la cubierta de la caja de conexiones abierta o
dañada o con el cristal protector dañado o sin él.
• No lo limpie nunca con agua o con vapor a presión, ya que se dañarían los aislamientos y las
juntas.
• No intente repararlo usted mismo. Las reparaciones las debe efectuar únicamente el fabricante
o sus encargados del servicio técnico.
Características técnicas
• Modelo 6090115AIP20:
• Consumo: max. 150W Clase de protección: IP20 Cable: H05VV-F
• Modelo 6090150AIP20:
• Consumo: max. 500W Clase de protección: IP20 Cable: H05VV-F
• Modelo 6090140AIP44:
• Consumo: max. 500W Clase de protección: IP44 Cable: H05RN-F
• Modelo 6091240AIP44:
• Consumo: max. 2x500W Clase de protección: IP44 Cable: H05RN-F
• Tensión: 230V~, 50Hz
ANL_6090115AIP20_6090150AIP20_6090140AIP44_6091240AIP44.indd 9 22.10.2014 11:49:20

10
Colocación de la bombilla
• Afloje el tornillo de la parte superior del foco y abra el cristal protector hacia delante.
• Extraiga la bombilla de su envoltorio.
• Procure no tocarla con los dedos sin guantes, ya que las manchas de grasa que dejan pueden
provocar un sobrecalentamiento. Utilice un paño limpio, seco y sin pelusa.
• Inserte un extremo de la bombilla en su alojamiento, presione hacia dentro de éste e inserte el
otro extremo de el alojamiento del lado opuesto. Compruebe que el alojamiento de la bombilla
no se dobla.
• Cierre a continuación el cristal protector y apriete el tornillo.
Monte el trípode
• Afloje el tornillo de sujeción del trípode y oriente los pies en la posición deseada. Finalmente
vuelva a fijar el tornillo de sujeción. Fije el proyector en el trípode con ayuda de los tornillos
suministrados en el orificio central del estribo de la carcasa.
Monte la empuñadura
Afloje la tuerca de mariposa en el lado superior del foco. Inserte la empuñadura suministrada y
vuelva a apretar la tuerca.
Ajuste de la dirección de iluminación
Afloje los tornillos laterales del estribo de montaje, ajuste la dirección deseada del rayo del proyec-
tor y finalmente vuelva a apretar los tornillos.
Sustitución de la bombilla
Los datos técnicos de la bombilla se encuentran en el apartado “Características técnicas” o en la
placa de características de la carcasa del foco.
• Quite la tensión del proyector y asegúrese de que el circuito eléctrico no vuelve a conectarse.
¡Deje que el proyector se enfríe lo suficiente!
• Afloje el tornillo de la parte superior del proyector y abra el cristal protector hacia delante.
Extraiga la bombilla de su envoltorio.
• Procure no tocarla con los dedos sin guantes, ya que las manchas de grasa que dejan pueden
provocar un sobrecalentamiento. Utilice un paño limpio, seco y sin pelusa.
• Inserte un extremo de la bombilla en su alojamiento, presione hacia dentro de éste e inserte el
otro extremo de el alojamiento del lado opuesto. Compruebe que el alojamiento de la bombilla
no se dobla.
• Cierre a continuación el cristal protector y apriete el tornillo.
Limpieza
• Quite la tensión del proyector y asegúrese de que el circuito eléctrico no vuelve a conectarse.
¡Deje que el proyector se enfríe lo suficiente!
• Para limpiar el foco utilice sólo un paño sin pelusa, seco o ligeramente húmedo. Puede utilizar un
detergente suave si hiciera falta. No utilice ningún producto abrasivo o con disolventes.
• Si fuera necesario, puede limpiarse la bombilla con un paño sin pelusa ligeramente humedecido
con alcohol. ATENCIÓN: Tras la limpieza de la bombilla con alcohol, debe dejar que se ventile
durante al menos 20 minutos.
Mantenimiento
• Si el cristal protector estuviese dañado, sustitúyalo de inmediato.
• Elimine cualquier suciedad en la carcasa o en el cristal protector, ya que provocan sobrecalen-
tamiento.
ES
ANL_6090115AIP20_6090150AIP20_6090140AIP44_6091240AIP44.indd 10 22.10.2014 11:49:20

11
FR
Réflecteur halogène à pied
Notice de montage et d‘utilisation
Emploi conforme à sa destination
Type 6090115AIP20, 6090150AIP20: Les réflecteurs avec le marquage IP20 sont adaptés unique-
ment pour un usage dans un local intérieur sec. Indapté pour les grandes charges d‘exploitation.
Type 6090140AIP44, 6091240AIP44: Le réflecteur est protégé contre les projections d‘eau, IP44 et
adapté pour l‘utilisation à l‘extérieur.
Le réflecteur est conforme aux directives européennes CE pertinentes.
Indications générales de sécurité
• appliquer toujours à 1m des surfaces éclairées - surtout le cordon de raccord ne doit pas être
éclairé ou entrer en contact avec le boîtier en métal - et respecter les distances minimales
nécessaires.
• toujours laisser refroidir en conséquence - le boîtier du luminaire peut devenir extrêmement
chaud - et p. ex. pour changer la lampe ou nettoyer le luminaire, le mettre hors tension et le
protéger le circuit de courant contre une remise en marge.
• ne poser que sur des surfaces planes et stables.
• n‘utiliser qu‘une liaison avec une installation suffisamment protégée 230V~.
• ne pas utiliser dans des pièces à risque d‘explosion (p. ex. menuiserie, atelier de laquage ou
similaire).
• ne pas utiliser à proximité immédiate de matériau inflammable.
• ne pas installer à proximité immédiate de bassins pour enfants, de fontaines, d‘étangs ou de
plans d‘eau similaires.
• ne pas plonger dans de l‘eau ou d‘autres liquides.
• ne pas manipuler avec des mains mouillées et ne jamais regarder directement dans la source de
lumière.
• ne jamais recouvrir.
• ne jamais exploiter avec le boîtier ouvert, avec un couvercle ouvert, manquant ou détérioré de
l‘espace des raccords ou avec une vitre de protection manquante ou détériorée.
• ne jamais pulvériser pour nettoyer ou utiliser un nettoyeur à vapeur, les isolations et les joints
peuvent être détériorés de ce fait.
• ne jamais réparer soi-même. Seuls le fabricant ou ses responsables de service sont autorisés à
faire les réparations.
Caractéristiques techniques
• Type 6090115AIP20: Puissance: max. 150W Type de protection: IP20 Câble : H05VV-F
• Type 6090150AIP20: Puissance: max. 500W Type de protection: IP20 Câble : H05VV-F
• Type 6090140AIP44: Puissance: max. 500W Type de protection: IP44 Câble : H05RN-F
• Type 6091240AIP44: Puissance: max. 2x500W Type de protection: IP44 Câble : H05RN-F
• Tension: 230V~, 50Hz
ANL_6090115AIP20_6090150AIP20_6090140AIP44_6091240AIP44.indd 11 22.10.2014 11:49:20

12
Remplacer la lampe
• Dévisser la vis sur la face supérieure du luminaire et rabattre la vitre de protection vers l‘avant.
• Sortir la lampe de son emballage.
• Veiller à ne pas toucher directement avec les doigts nus, ceci laisse des taches de graisse qui
entraînent une surchauffe. Utiliser un chiffon propre, sec, qui ne peluche pas.
• Insérer une extrémité de la lampe dans la douille, la serrer contre elle et insérer l‘autre extrémité
de la lampe dans la douille. Veiller à ne pas déformer la douille.
• Fermer ensuite la vitre de protection et resserrer la vis à fond.
Monter le trépied
• Desserrer les boulons de blocage des pieds du trépied et rabattre chacun séparément vers le
bas jusqu‘à ce que vous entendiez s‘enclencher à nouveau en angle droit.
• Fixer le luminaire à l‘aide de la vis fournie dans le trou du milieu de l‘étrier du boîtier sur le trépied.
Monter la poignée
Desserrer l‘écrou à oreilles sur la face supérieure du luminaire. Enficher la poignée fournie et
resserrer l‘écrou à oreilles à fond.
Réglage de la direction du faisceau
Dévisser les vis latérales sur l‘étrier de montage, régler la direction de projection du luminaire
souhaitée et resserrer à fond toutes els vis.
Remplacer la lampe
Vous trouverez les caractéristiques techniques de la lampe sous «Caractéristiques techniques» ou
sur la plaque signalétique du boîtier du luminaire.
• Commuter le luminaire hors tension et protéger le circuit de courant contre une remise en mar-
che. Laisser le luminaire se refroidir suffisamment!
• Desserrer la vis de la vitre de protection sur la face supérieure du luminaire et rabattre la vitre vers
l‘avant.
• Sortir la lampe de son emballage.
• Veiller à ne pas toucher directement avec les doigts nus, ceci laisse des taches de graisse qui
entraînent une surchauffe. Utiliser un chiffon propre, sec, qui ne peluche pas.
• Insérer une extrémité de la lampe dans la douille, la serrer contre elle et insérer l‘autre extrémité
de la lampe dans la douille. Veiller à ne pas déformer la douille.
• Fermer ensuite la vitre de protection et resserrer la vis à fond.
Nettoyage
• Commuter le luminaire hors tension et protéger le circuit de courant contre une remise en mar-
che. Laisser le luminaire se refroidir suffisamment!
• Pour nettoyer, n‘utiliser qu‘un chiffon sec ou légèrement humide, qui ne peluche pas, éventuelle-
ment un nettoyant doux. N‘utiliser aucun produit nettoyant abrasif ou contenant des solvants.
• Si nécessaire, la lampe peut être nettoyée avec un chiffon qui ne peluche pas, légèrement imbibé
d‘alcool. ATTENTION ! Après le nettoyage de la lampe avec de l‘alcool, la laisser aérée au moins
durant 20 minutes.
Maintenance
• Remplacer immédiatement les vitres de protection endommagées.
• Retirer immédiatement tous les encrassements sur le boîtier ou la vitre de protection, car ceci
peut entraîner une surchauffe.
FR
ANL_6090115AIP20_6090150AIP20_6090140AIP44_6091240AIP44.indd 12 22.10.2014 11:49:20
13
IT
Riflettore alogeno con cavalletto
Istruzioni per il montaggio e l’uso
Impiego appropriato
Tip 6090115AIP20, 6090150AIP20: I proiettori con denominazione IP20 sono previsti solo per l‘uso
in ambienti interni asciutti. Non adatti ad utilizzo estremo.
Tip 6090140AIP44, 6091240AIP44: Il proiettore è resistente a schizzi, contrassegnato IP44 ed è
adatto all‘uso in ambienti esterni.
Il proiettore è conforme alla relativa direttiva CE
europea.
Avvertenze generali sulla sicurezza
• deve essere disposto sempre ad almeno 1m di distanza dalle superfici che illumina. Ciò vale in
particolare per il cavo di alimentazione che non deve essere illuminato o venire a contatto con
l’alloggiamento metallico.
• si deve lasciare sempre sufficientemente raffreddare – l’alloggiamento del faretto può raggiun-
gere temperature estremamente alte – e si deve estrarre la spina dalla presa di corrente per es.
quando si sostituisce la lampadina o si esegue la pulizia.
• si deve utilizzare solo su superfici piane e stabili.
• utilizzare solo in un impianto elettrico con tensione alternata da 230V~ e fusibile.
• non si deve impiegare in locali a rischio di esplosione (per es. falegnamerie, reparti di vernicia-
tura o simili).
• non si deve impiegare nelle immediate vicinanze di materiale combustibile.
• non disporre nelle immediate vicinanze di piscine, fontane, stagni o simili o in ambienti acquatici
simili.
• non si deve immergere in acqua o altri liquidi.
• non si deve impiegare con le mani bagnate e non si deve mai guardare direttamente la fonte di
luce.
• non si deve mai coprire.
• non si deve impiegare se l’alloggiamento è aperto, se manca o è aperto il coperchio della casset-
ta connessioni o se manca o è danneggiata la lastra di protezione.
• non spruzzare mai acqua o altri liquidi sul faretto o non utilizzare mai un apparecchio di pulizia a
getto di vapore, si potrebbero danneggiare gli isolatori e le guarnizioni.
• non eseguire mai lavori di riparazione in proprio. Le riparazioni devono essere eseguite esclusiva-
mente dal produttore o da un tecnico addetto all’assistenza tecnica.
Dati tecnici
• Tip 6090115AIP20: Potenza: max. 150W Tipo protezione: IP20 Cavo: H05VV-F
• Tip 6090150AIP20: Potenza: max. 500W Tipo protezione: IP20 Cavo: H05VV-F
• Tip 6090140AIP44: Potenza: max. 500W Tipo protezione: IP44 Cavo: H05RN-F
• Tip 6091240AIP44: Potenza: max. 2x500W Tipo protezione: IP44 Cavo: H05RN-F
• Tensione: 230V~, 50Hz
ANL_6090115AIP20_6090150AIP20_6090140AIP44_6091240AIP44.indd 13 22.10.2014 11:49:20

14
Inserimento della lampada
• Allentare la vite sul lato superiore del faretto e ribaltare in avanti la lastra di protezione.
• Togliere la lampada dalla confezione.
• Fare attenzione di non toccarla con le mani nude che potrebbero lasciarvi sopra macchie di
grasso che potrebbero causarne il surriscaldamento. Utilizzare un panno pulito, asciutto e non
filaccioso.
• Inserire un’estremità della lampada nel portalampada, spingerla dentro e inserire anche l’altra
estremità nel portalampada. Procedere con cautela per non deformare il portalampada
• Chiudere in seguito la lastra di protezione e riavvitare a fondo la vite.
Montaggio dello stativo
• Allentare il perno di arresto dei piedi dello stativo e ribaltarli uno per uno verso il basso finché non
scattano in posizione in modo percepibile ad angolo retto.
• Fissare il faretto con l‘aiuto della vite in dotazione nel foro centrale della staffa dell‘alloggiamento
sullo stativo.
Montaggio del manico
Allentare il dado ad alette sul lato superiore del faretto. Applicare il manico in dotazione e riavvitare
a fondo il dado ad alette.
Regolazione della direzione del raggio luminoso
Allentare le viti laterali sulla staffa, regolare la direzione desiderata del raggio luminoso del faretto e
riavvitare poi a fondo tutte le viti.
Sostituzione della lampada
I dati tecnici della lampada sono riportati in “Dati tecnici” o sulla targhetta dei dati tecnici
dell’alloggiamento del faretto.
• Disinserire la tensione di alimentazione del faretto e assicurarsi che il circuito elettrico non possa
essere reinserito inavvertitamente. Lasciar raffreddare sufficientemente il faretto!
• Allentare la vite sulla lastra di protezione dal lato superiore del faretto e ribaltare la lastra in avanti.
• Togliere la lampada dalla confezione.
• Fare attenzione di non toccarla con le mani nude che potrebbero lasciarvi sopra macchie di
grasso che potrebbero causarne il surriscaldamento. Utilizzare un panno pulito, asciutto e non
filaccioso.
• Inserire un’estremità della lampada nel portalampada, spingerla dentro e inserire anche l’altra
estremità nel portalampada. Procedere con cautela per non deformare il portalampada.
• Chiudere in seguito la lastra di protezione e riavvitare a fondo la vite.
Pulizia
• Disinserire la tensione di alimentazione del faretto e assicurarsi che il circuito elettrico non possa
essere reinserito inavvertitamente. Lasciar raffreddare sufficientemente il faretto!
• Per la pulizia si raccomanda di usare un panno asciutto o leggermente inumidito, non filaccioso,
eventualmente anche un detergente delicato. Non usare detergenti contenenti sostanze abrasive
o solventi.
• Se necessario si può pulire la lampada con un panno non filaccioso leggermente inumidito con
dello spirito. ATTENZIONE! Dopo aver pulito la lampada con lo spirito, lasciarla all’aria aperta per
almeno 20 minuti.
Manutenzione
• Sostituire immediatamente le lastre di protezione se risultano danneggiate.
• Rimuovere subito qualsiasi tipo di sporco dall’alloggiamento o dalla lastra di protezione perché
potrebbe causare surriscaldamento.
IT
ANL_6090115AIP20_6090150AIP20_6090140AIP44_6091240AIP44.indd 14 22.10.2014 11:49:20
15
TR
Halojen projektör statifli
Montaj ve Kullanım Kılavuzu
Amacına uygun kullanım
Tip 6090115AIP20, 6090150AIP20: IP20 işaretli projektörler sadece kuru iç mekanlarda kullanılmaya
uygundur. Sert koşullarda kullanılmaya uygun değillerdir.
Tip 6090140AIP44, 6091240AIP44: Projektör sıçrayan sulara karşı korunmuştur, IP44 ve dış mekan-
larda kullanılmaya uygundur.
Projektör ilgili Avrupa CE direktiflerine uygundur.
Genel emniyet bilgileri
• her zaman ışık vuran yüzeylerden en az 1m mesafeye monte ediniz - özellikle bağlantı kablosu
üstüne ışık tutulmamalıdır veya metal gövdeye temas etmemelidir - ayrıca gerekli asgari mesafe-
lere riayet edilmelidir.
• her zaman yeterince soğumasını sağlayınız - projektör gövdesi oldukça sıcak olabilir - ve örn.
ampul değişimi veya temizlik için projektör elektriğini kesiniz ve elektrik devresini yeniden
açılmaya karşı emniyete alınız.
• yalnızca düz ve sağlam zeminler üstüne monte ediniz.
• yalnızca yeterli sigortaya sahip 230V~ tesisatıyla birlikte kullanınız.
• patlama riskinin olduğu ortamlarda (örn. marangozhane, boyahane vb.) kullanmayınız.
• yanıcı malzemelerin hemen yakınında kullanmayınız.
• çocuk havuzları, fıskiyeler, göletler veya benzeri su kaynaklarının doğrudan yakınına monte
etmeyiniz.
• su ya da başka sıvılar içine daldırmayınız.
• ıslak ellerle kullanmayınız ve asla doğrudan ışık kaynağına bakmayınız.
• asla üstünü örtmeyiniz.
• asla gövde açıkken, bağlantı odasındaki kapak eksikken veya hasarlıyken ya da koruyucu camı
eksikken veya hasarlıyken kullanmayınız.
• asla temizlemek için üstüne su püskürtmeyiniz veya tazyikli yıkama makinesi kullanmayınız, bu
sırada izolasyonlar ve contalar zarar görebilir.
• asla kendiniz tamir etmeyiniz. Onarım işlemleri yalnızca üretici veya onun servis görevlileri
tarafından gerçekleştirilebilir.
Teknik özellikler
• Tip 6090115AIP20: Güç: max. 150W Koruma türü: IP20 Gücü: H05VV-F
• Tip 6090150AIP20: Güç: max. 500W Koruma türü: IP20 Gücü: H05VV-F
• Tip 6090140AIP44: Güç: max. 500W Koruma türü: IP44 Gücü: H05RN-F
• Tip 6091240AIP44: Güç: max. 2x500W Koruma türü: IP44 Gücü: H05RN-F
• Voltaj: 230V~, 50Hz
ANL_6090115AIP20_6090150AIP20_6090140AIP44_6091240AIP44.indd 15 22.10.2014 11:49:21

16
Ampulün yerleştirilmesi
• Lambanın üst tarafındaki vidayı gevşetiniz ve koruyucu camı öne doğru katlayınız.
• Ampulü ambalajından çıkartınız.
• Üstüne çıplak parmaklarınızla dokunmamaya dikkat ediniz, aksi takdirde arkasında yağ lekeleri
bırakacak ve bu da aşırı ısınmaya neden olacaktır. Temiz, kuru ve tüy bırakmayan bir bez
kullanınız.
• Ampulün bir ucunu duy içine yerleştiriniz, duya karşı bastırınız ve ampulün diğer ucunu duy içine
yerleştiriniz. Duyun bükülmemesine dikkat ediniz.
• Ardından koruyucu camı tekrar kapatınız ve vidayı yeniden sıkınız.
Sehpanın monte edilmesi
• Sehpa ayaklarının sabitleme pimlerini gevşetiniz ve her birini, dik açıyla yeniden yerlerine
yerleştikleri duyulana kadar aşağı katlayınız.
• Lambayı birlikte verilen vidayı kullanarak sehpadaki orta mandal deliğine sabitleyiniz.
Tutma yerinin monte edilmesi
Lambanın üst tarafında bulunan kelebek somunları gevşetiniz. Birlikte verilen kolu takınız ve kele-
bek somunları yeniden sıkınız.
Işık yayma yönünün ayarlanması
Gövde altındaki gövde askısında yandaki vidaları gevşetiniz, istediğiniz lamba ışık yayma yönünü
ayarlayınız ve ardından tüm vidaları yeniden sıkınız.
Ampulün değiştirilmesi
Ampulün teknik özelliklerini “Teknik özellikler” bölümünde veya lamba gövdesindeki model
levhasında bulabilirsiniz.
• Projektör elektriğini kesiniz ve elektrik devresini tekrar açılmaya karşı emniyete alınız. Projektörün
yeterince soğumasını sağlayınız!
• Lambanın üst tarafındaki koruyucu cam vidasını gevşetiniz ve camı öne doğru katlayınız.
• Ampulü ambalajından çıkartınız.
• Üstüne çıplak parmaklarınızla dokunmamaya dikkat ediniz, aksi takdirde arkasında yağ lekeleri
bırakacak ve bu da aşırı ısınmaya neden olacaktır. Temiz, kuru ve tüy bırakmayan bir bez
kullanınız.
• Ampulün bir ucunu duy içine yerleştiriniz, duya karşı bastırınız ve ampulün diğer ucunu duy içine
yerleştiriniz. Duyun bükülmemesine dikkat ediniz.
• Ardından koruyucu camı tekrar kapatınız ve vidayı yeniden sıkınız.
Temizlik
• Projektör elektriğini kesiniz ve elektrik devresini tekrar açılmaya karşı emniyete alınız. Projektörün
yeterince soğumasını sağlayınız!
• Temizlik için yalnızca kuru veya hafif nemli, tüy bırakmayan bir bez, gerektiğinde yumuşak bir
deterjan kullanınız. Aşındırıcı veya solvent içeren deterjanlar kullanmayınız.
• Gerektiğinde ampul hafifçe ispirtoyla nemlendirilmiş, tüy bırakmayan bir bezle temizlenebilir.
DİKKAT! Ampul ispirtoyla temizlendikten sonra en az 20 dakika havalandırılmasını sağlayınız.
Bakım
• Zarar görmüş koruyucu camları derhal değiştiriniz.
• Aşırı ısınmaya neden olduklarından gövde veya koruyucu cam üzerindeki kirleri derhal temizley-
iniz.
TR
ANL_6090115AIP20_6090150AIP20_6090140AIP44_6091240AIP44.indd 16 22.10.2014 11:49:21
17
NL
Halogeenstraler met statief
Montage- en gebruiksaanwijzing
Gebruik volgens de voorschriften
Type 6090115AIP20, 6090150AIP20: De schijnwerpers met IP120 markering zijn alleen geschikt
voor gebruik in droge binnenruimten. Niet geschikt voor zware omstandigheden.
Type 6090140AIP44, 6091240AIP44: De schijnwerper is bestand tegen spatwater, IP144 en geschi-
kt voor gebruik buiten.
De schijnwerper voldoet aan de toepasselijke Europese CE-richtlijnen.
Algemene veiligheidsadviezen
• altijd op tenminste 1m afstand van de aangestraalde oppervlaktes aanbrengen – met name de
aansluitkabel mag niet aangestraald worden of in aanraking met de metalen kast komen - tevens
de minimaal benodigde afstanden aanhouden.
• Altijd voldoende laten afkoelen – de kast van de straler kan extreem heet worden - en b.v. voor
de vervanging van lampen of voor de reiniging van de straler de stroomtoevoer uitschakelen en
tegen opnieuw inschakelen beveiligen.
• Alleen op vlakke en stabiele oppervlakken aanbrengen.
• Alleen in verbinding met een toereikend beveiligde 230V~-installatie gebruiken.
• Niet in ruimtes met explosiegevaar gebruiken (b. v. schrijnwerkerij, spuitbedrijf of dergelijke).
• Niet in onmiddellijke nabijheid van brandbaar materiaal gebruiken.
• Niet in onmiddellijke nabijheid van pools, fonteinen, vijvers of soortgelijk water aanbrengen.
• Nicht onder water of andere vloeistoffen dompelen.
• Niet met natte handen bedienen en nooit direct in de lichtbron kijken.
• Nooit bedekken.
• Nooit met open kast, ontbrekende of beschadigde afdekking van de aansluitkast of zonder of
beschadigd beschermglas gebruiken.
• Nooit voor de reiniging afspuiten of een stoomreiniger gebruiken, hierbij kunnen de isoleringen
en afdichtingen beschadigd worden.
• Nooit zelfstandig repareren. Reparaties mogen uitsluitend door de fabrikant of diens servicever-
lener uitgevoerd worden.
Technische gegevens
• Type 6090115AIP20:
Vermogen: max. 150W Beschermklasse: IP20 Elektriciteitskabel: H05VV-F
• Type 6090150AIP20:
Vermogen: max. 500W Beschermklasse: IP20 Elektriciteitskabel: H05VV-F
• Type 6090140AIP44:
Vermogen: max. 500W Beschermklasse: IP44 Elektriciteitskabel: H05RN-F
• Type 6091240AIP44:
ermogen: max. 2x500W Beschermklasse: IP44 Elektriciteitskabel: H05RN-F
• Spanning: 230V~, 50Hz
ANL_6090115AIP20_6090150AIP20_6090140AIP44_6091240AIP44.indd 17 22.10.2014 11:49:21
18
Lampen inzetten
• Draai de schroeven aan de bovenkant van de straler los en klap het beschermglas naar voren.
• Haal de lamp uit de verpakking.
• Let erop, deze niet met blote handen aan te raken, dit laat vettige afdrukken achter, die tot
oververhitting leiden.
• Gebruik een schoon, droog en pluisvrij doekje.
• Leg een uiteinde van de lamp in de fitting, druk deze ietsjes aan en druk het andere uiteinde van
de lamp in de fitting. Let erop, dat de fitting hierbij niet verbogen wordt.
• Sluit vervolgens het beschermglas en draai de schroeven weer vast.
Statief monteren
• Draai de bevestigingsschroeven van de statiefvoeten los en plaats de voeten in de gewenste po-
sitie. Draai daarna de bevestigingsschroeven weer vast. Bevestig de halogeenstraler met behulp
van de bijgeleverde schroeven in het middelste gat van de behuizingsbeugel van het statief.
Handgreep monteren
Draai de vleugelmoeren aan de bovenzijde van de straler los. Zet de bijgeleverde handgreep erop
en draai de vleugelmoeren weer vast.
Instellen van de straalrichting
Draai de schroeven aan de zijkant van de montagebeugel los, stel de gewenste straalrichting van
de straler in en draai aansluitend alle schroeven weer vast.
Lampen vervangen
De technische gegevens van de lichtmiddelen vindt u onder „Technische gegevens“ of op het
typeplaatje van de straler.
• Schakel de stroom van de straler uit en beveilig de stroom tegen opnieuw inschakelen. Laat de
straler voldoende afkoelen !!
• Draai de schroeven van het beschermglas aan de bovenkant van de straler los en klap het ruitje
naar voren.
• Haal de lamp uit de verpakking.
• Let erop, deze niet met blote handen aan te raken, dit laat vettige afdrukken achter, die tot over-
verhitting leiden. Gebruik een schoon, droog en pluisvrij doekje.
• Leg een uiteinde van de lamp in de fitting, druk deze ietsjes aan en druk het andere uiteinde van
de lamp in de fitting. Let erop, dat de fitting hierbij niet verbogen wordt.
• Sluit vervolgens het beschermglas en draai de schroeven weer aan.
Reiniging
• Schakel de stroom van de straler uit en beveilig de stroom tegen opnieuw inschakelen. Laat de
straler voldoende afkoelen !!
• Voor de reiniging alleen een droog of licht vochtige, pluisvrije doek en eventueel een zacht
schoonmaakmiddel gebruiken. Geen schurend- of oplosmiddel bevattend schoonmaakmiddel
gebruiken.
• Indien nodig, kan de lamp met een licht met spiritus bevochtigde, pluisvrije doek schoongemaakt
worden. ATTENTIE ! Na het schoonmaken van de lamp met spiritus moet deze tenminste 20
minuten ontlucht worden.
Onderhoud
• Vervang beschadigd beschermglas onmiddellijk.
• Verwijder direct alle vervuilingen aan de kast of het beschermglas, omdat dit tot oververhitting
kan leiden.
NL
ANL_6090115AIP20_6090150AIP20_6090140AIP44_6091240AIP44.indd 18 22.10.2014 11:49:21

19
CZ
Halogenový reflektor se stativem
Návod pro montáž a obsluhu
Použití v souladu s určením
Typ 6090115AIP20, 6090150AIP20: Reflektory s označením IP20 jsou vhodné pouze pro použití v
suchých vnitřních prostorách. Nejsou vhodné pro provoz v drsných podmínkách.
Typ 6090140AIP44, 6091240AIP44: Reflektor je chráněný proti stříkající vodě, má druh ochrany
IP44 a je vhodný pro použití ve venkovním prostředí.
Reflektor je vyroben v souladu s příslušnými evropskými směrnicemi CE.
Všeobecné bezpečnostní pokyny
• umístit vždy minimálně 1m od sledovaných ploch - obzvláště je důležité, aby záření nezasaho-
valo připojovací kabel nebo aby se kabel nedotýkal kovového tělesa, dále dodržovat potřebné
minimální vzdálenosti.
• vždy nechat dostatečně ochladit - těleso zářiče se může zahřát na extrémní teploty - a např. při
výměně lamp nebo při čištění odpojit zářič od napětí a zajistit proudový obvod proti opětovnému
spuštění..
• instalovat pouze na rovné a stabilní plochy.
• používat pouze ve spojení s dostatečně jištěnou instalací 230V~.
• nepoužívejte v prostorách s nebezpečím výbuchu (například v truhlárně, lakovně, apod.).
• nepoužívejte v bezprostřední blízkosti hořlavých materiálů.
• neinstalovat v bezprostřední blízkosti brouzdališť, fontán, rybníků nebo podobných vodních
ploch.
• nenořte do vody nebo jiných tekutin.
• neobsluhujte nikdy s mokrýma rukama a nikdy se nedívejte přímo do zdroje světla.
• nikdy nezakrývejte.
• nikdy neprovozujte s otevřeným krytem, chybějícím nebo poškozeným víčkem přípojného pros-
toru nebo chybějícím nebo poškozeným ochranným kotoučem.
• nikdy nečistěte popraškem vody nebo horkou tlakovou párou. Mohlo by dojít k poškození izolací
a těsnění.
• nikdy neopravujte sami. Opravy smějí provádět výlučně výrobce nebo jím pověřené servisní
osoby.
Technická data
• Typ 6090115AIP20: Výkon: max. 150W Druh ochrany: IP20 Kabel: H05VV-F
• Typ 6090150AIP20: Výkon: max. 500W Druh ochrany: IP20 Kabel: H05VV-F
• Typ 6090140AIP44: Výkon: max. 500W Druh ochrany: IP44 Kabel: H05RN-F
• Typ 6091240AIP44: Výkon: max. 2x500W Druh ochrany: IP44 Kabel: H05RN-F
• Napětí: 230V~, 50Hz
ANL_6090115AIP20_6090150AIP20_6090140AIP44_6091240AIP44.indd 19 22.10.2014 11:49:21
20
Nasazení žárovky
• Uvolněte šroub na horní straně zářiče a vyklopte ochranný kotouč dopředu.
• Vyjměte žárovku z balení.
• Dbejte na to, abyste se žárovky nedotýkali prsty, které na jejím povrchu zanechávají mastné
skvrny a způsobují tak její přehřátí. Používejte čistý a suchý hadřík bez žmolků.
• Vsaďte jeden konec žárovky do objímky, zatlačte žárovku a následně do příslušné objímky vsaďte
i druhý konec žárovky. Dbejte přitom na to, abyste objímku neohnuli.
• Nakonec opět nasaďte ochranný kotouč a šroub opět pevně utáhněte.
Montáž stativu
• Uvolněte aretační čepy noh stativu a vyklopte je jednotlivě dolů až v pravém úhlu slyšitelně
zapadnou.
• Upevněte zářič přiloženým šroubem ve středním otvoru krytového třmenu na stativu.
Montáž rukojeti
Uvolněte křídlovou matici na horní straně zářiče. Nasaďte rukojeť a křídlovou matici opět pevně
utáhněte.
Nastavení směru záření
Povolte boční šrouby montážního třmene, nastavte požadovaný směr zářiče a nakonec opět
utáhněte všechny šrouby.
Výměna žárovky
Technická data žárovky jsou uvedená v “Technických datech” nebo na typovém štítku krytu zářiče.
• Odpojte zářič od přívodu napětí a zajistěte proudový obvod proti opětovnému spuštění. Nechte
zářič dostatečně vychladnout!
• Uvolněte šroub ochranného kotouče na horní straně zářiče a vyklopte kotouč dopředu.
• Vyjměte žárovku z balení.
• Dbejte na to, abyste se žárovky nedotýkali prsty, které na jejím povrchu zanechávají mastné
skvrny a způsobují tak její přehřátí. Použivejte čistý a suchý hadřík bez žmolků.
• Vsaďte jeden konec žárovky do objímky, zatlačte žárovku a následně do příslušné objímky vsaďte
i druhý konec žárovky. Dbejte přitom na to, abyste objímku neohli.
• Nakonec opět nasaďte ochranný kotouč a šroub opět pevně utáhněte.
Čištění
• Odpojte zářič od přívodu napětí a zajistěte proudový obvod proti opětovnému spuštění. Nechte
zářič dostatečně vychladnout!
• K čištění používejte suchý nebo lehce vlhký hadřík bez žmolků, případně jemný saponát.
Nepoužívejte abrazivní čisticí prostředky ani prostředky obsahující rozpouštědla.
• V případě nutnosti lze žárovku očistit lehce v lihu navlhčeným hadříkem bez žmolků. POZOR! Po
očištění žárovky hadříkem navlhčeným v lihu minimálně 20 minut větrejte.
Údržba
• Poškozené ochranné kotouče neprodleně vyměňte za bezvadné kotouče.
• Neprodleně odstraňte veškeré nečistoty na krytu nebo ochranném kotouči, protože v jejich
důsledku může dojít k přehřátí.
CZ
ANL_6090115AIP20_6090150AIP20_6090140AIP44_6091240AIP44.indd 20 22.10.2014 11:49:21
This manual suits for next models
3
Table of contents
Languages:
Other Ritos Floodlight manuals

Ritos
Ritos 6095115AIP20 User manual

Ritos
Ritos 7040115A User manual

Ritos
Ritos 6065120A User manual

Ritos
Ritos 932025 User manual

Ritos
Ritos BTL9000-20-S User manual

Ritos
Ritos A1D08A1 User manual

Ritos
Ritos A1D08B1 User manual

Ritos
Ritos P1H10D4-1 User manual

Ritos
Ritos 7065110A User manual

Ritos
Ritos LY9601H User manual

Popular Floodlight manuals by other brands


EuroLite
EuroLite DMF-5 user manual

Beamz
Beamz MHL510 instruction manual

Chauvet
Chauvet Colordash user manual

Chalmit
Chalmit 800 Series Installation, operation and maintenance instructions

Allremote Wireless Technology
Allremote Wireless Technology 970 Series Instruction guide

Halo
Halo TGS3S401MSRB instruction manual