Rizzoli M Range User manual

ENGLISH
74
The use of economic and ecologic combusbles, the swe-
et warm of natural re, the sweet fragrance of the wood
of our forests are the qualies that make indispensable
wood red cookers in every house.
Your choice fell upon a Rizzoli cooker, result of a tradion
started in 1912 when Carlo Rizzoli began the producon
of wood red cookers with the typical style of the valley in
the dolomites. Year aer year Rizzoli connued to rene
its cookers using even more advanced technologies, but
without losing contact with the elegance, the beauty and
the funconality of the original product.
INSTRUCTIONS
• Respect all the safety distances during the in-
stallaon of the cooker.
• The grids and the venlaon holes must not be
obstructed when you use the device.
• When using the cooker, some parts of the de-
vice may be very hot, keep aenon not to lean
and not to touch by hand hot parts (frame, plate
and doors).
• When you cook and generally when you use the
cooker you must not wear inammable dresses.
• Keep more aenon in presence of children.
• Do not lean to the cooker inammable or explo-
sive materials, in parcular curtains or very close
to it, inammable acons and aerosol bombs.
• The re door must always be closed except for
lighng operaons, re feeding operaons and
during the maintenance operaons.
• Check regularly the fume-circuit and, the chim-
ney connecon and the chimney itself. At least
every six months of normal use contact an expe-
rienced technician for checking and cleaning of
the wood red cooker.
• The plate must be cleaned regularly according
to necessies aer every use and make regularly
the specic maintenance.
• Before you go away for a long me, be sure that
the re is terminated.
• The rst lighngs of the cooker and the rst
seasonal lighngs must be done with temperate
re in order to prevent possible breakings of the
internal parts.
• Aer a long period in which you do not use the
cooker, check carefully that obstrucons are not
present and that the cooker works regularly.
• Use only original or authorized spare parts.
• Do not make any unauthorized modicaon.
1.1 GENERAL INSTRUCTIONS
1.2 SAFETY INSTRUCTIONS
For the perfect working of Rizzoli cookers it is nec-
essary the correct placing and connecon to the
chimney, to AC power and to the heang system if
it is necessary. The installaon normally ends when
you light the cooker. It is necessary to predispose
a duly made chimney and well suited to the model
you chose. Before the connecon of the cooker it
is necessary to contact a local chimney sweeper.
The installaon usually ends with the lighng of
the cooker and the verify of the correct working.
It is necessary to use well dried and good quality
wood: it is also necessary to sweep the chimney
and the cooker regularly.
We recommend to read carefully the instrucons
in this booklet before starng to use the cooker.
Keep this booklet because it could be useful in
case of necessity.
Talking about the working and the installaon of
Rizzoli cookers, all the European laws, naonal and
local laws and rules must be respected.
1

ENGLISH
75
3
13
6
5
8
9
2
1
3
13
6
5
8
9
2
1
14
12
11
10
7
4
15
16
14
12
11
10
7
4
15
16
1 Riser
2 Frame
3 Side
4 Regulaonoftheredoor
coolingair
5 Fire door
6 Ashdoor
7 Starngairregulaon
8 Plinth
9 Woodbox
10 Ovendoor
11 Ovendoorglass
12 Thermometer
13 Flamekeeper
14 Primaryandsecondaryair
regulaon
15 Plate
16 Discorcircles
MRange MZRange
Picture1
Wood red cookers are built to use wood for burn-
ing. We recommend to use good quality wood, dry,
seasoned and possibly broken.
Using good quality wood is warranty of good heat-
ing power and avoid the forming of carbon residuals
and soot.
To avoid dissipaon of energy and eventual deform-
ing and damaging processes you must not use ex-
cessive combusble.
The use of pre-compressed trunks and coal is al-
lowed only desultorily and with moderaon, be-
cause the strong heang produced may damage
the internal refractors, the wood-carrying grill, the
oven and in general all the parts directly exposed
to re. Other combusbles and refuses, for exam-
ple plasc, enamelled or treated wood or carton
must not be burned. Using this materials cause se-
rious damage not only to your health and environ-
ment but also to wood red cooker and chimney.
The cooker must not be used as incinerator. It is
recommended to use only the suggested combus-
bles and not liquid combusbles.
1.3 RECOMMENDED COMBUSTIBLES
1.4 OTHER COMBUSTIBLES
1.5 PARTS OF THE COOKER

ENGLISH
76
Together with the wood red cookers you will nd
some accessories that simplify the installaon, the
maintenance and the daily use of the device.
• Ash drawer
• Glove
• Poker
• Scraper
• Plate care oil
• Plate cleaning oil
• Abrasive sponge
• Sponge for re door cleaning
• Devices for the connecon to the chimney, vari-
able depending on the model of cooker
• Oven grill
• Baking pan
• Instrucon and maintenance booklet
• Green booklet and warranty cercate of the
wood red cooker
• Cercate of quality for the refractory bricks
used
1.6 ACCESSORIES
3
12
6
5
8
2
1
13
11
10
9
7
4
14
15
1 Riser
2 Frame
3 Side
4 Regulaonoftheredoor
coolingair
5 Fire door
6 Ashdoor
7 Starngairregulaon
8 Plinth
9 Ovendoor
10 Ovendoorglass
11 Thermometer
12 Flamekeeper
13 Primaryandsecondaryair
regulaon
14 Plate
15 Discorcircles
MLRange
Picture2
ENGLISH
77
Wood red cookers are easy to install; anyway you
must take some cares to avoid damages due to un-
skillfulness. Before the installaon, we recommend
to verify the necessary space, the safety distances,
the correct predisposion of the chimney and the
possibility to make the necessary connecons.
Do not drag the cooker, move it keeping it lied
from the oor. The cooker must not be moved
making eort on the handrail or on the handles.
For the cookers to be framed into furniture, be
sure that the minimum safety distances are re-
spected in presence of parcularly sensible to
heang materials or combusble (see chapter 6.4).
Rizzoli produces suited spacers to make easier the
installaon of the cooker into furniture. The device
must be placed on a oor with enough load ca-
pacity. If the exisng building does not sasfy this
condion, you must adopt dierent soluons (for
example you can use a plate to distribute the load).
In case of oor made with inammable material, it
is necessary to use a reproof protecon for the
oor in front of the re door. The cover of the oor
must extend for 50 cm minimum in the front part
and 30 cm minimum
over the re door on the sides.
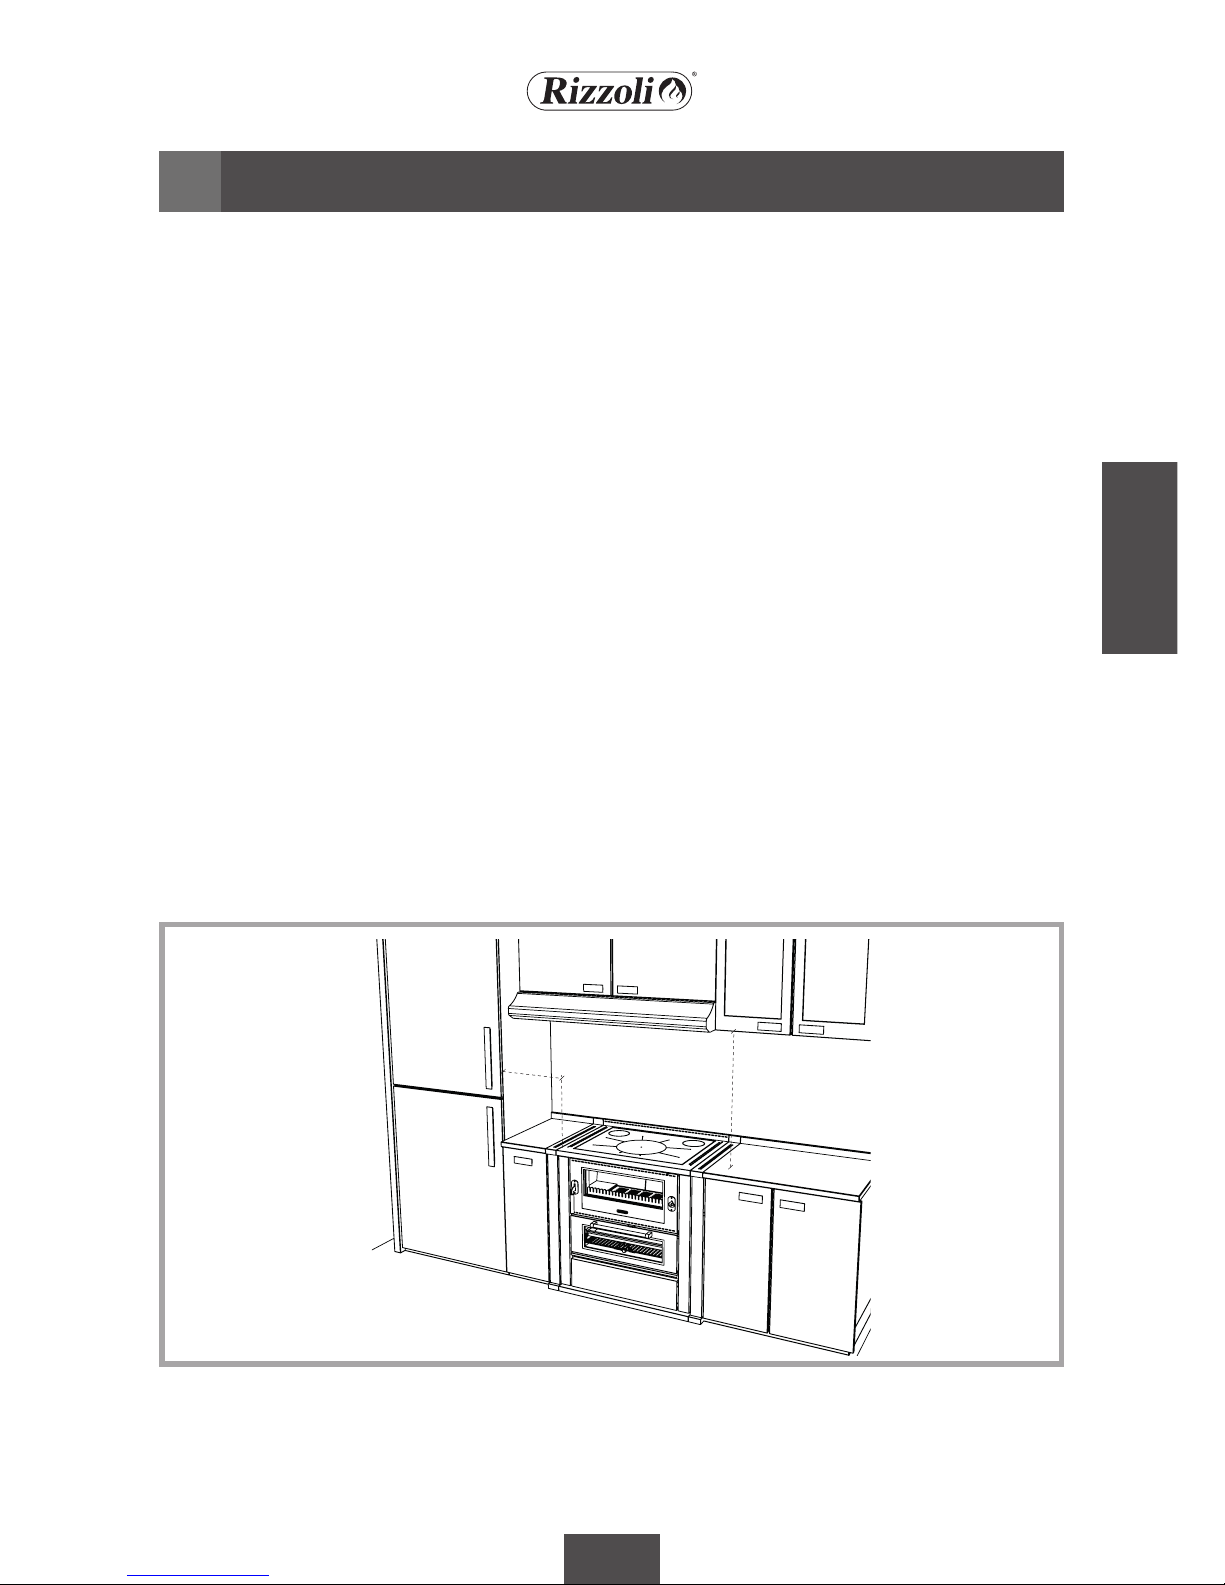
We suggest not to install furniture on the cooker.
Eventually, the resistance of the furniture to heat
must be guaranteed. In case you want to use an
aspiring hood, it is absolutely necessary that it is
resistant to high temperatures. Rizzoli is special-
ized in the producon of aspiring hoods to be used
together with the wood red cookers.
If the cooker is framed between not sensible to
heang materials, it is necessary anyway to keep
a minimum distance of 1-2 mm to allow the dil-
ataon of the materials when the temperature
changes.
During the installaon, you must be sure not to
obstruct the venlaon holes on the top and in
the plinth: this to prevent the decadence of the
isolang properes of the cookers and, in general,
of its correct working.
2.1 GENERAL NOTES
2.2 SAFETY DISTANCES
INSTALLATION2
Picture3-Minimumsafetydistanceswhenusingsuitedspacersfortheinstallaonintofurniture
Min.
20 cm
Min.
60 cm
ENGLISH
78
Chimney has a main importance for the correct
working of a wood red cooker. Wood red cook-
ers are built to insure the maximum eciency,
anyway the performances of the cooker are deep-
ly inuenced by the chimney. If the chimney has
defects or does not match the building laws, it is
not insured the correct working of the cooker. To
build the chimney you must use suitable materials,
made to work with high temperatures and accord-
ing to reproof laws: it is not important the kind of
material, on condion that it is right and that the
chimney is isolated.
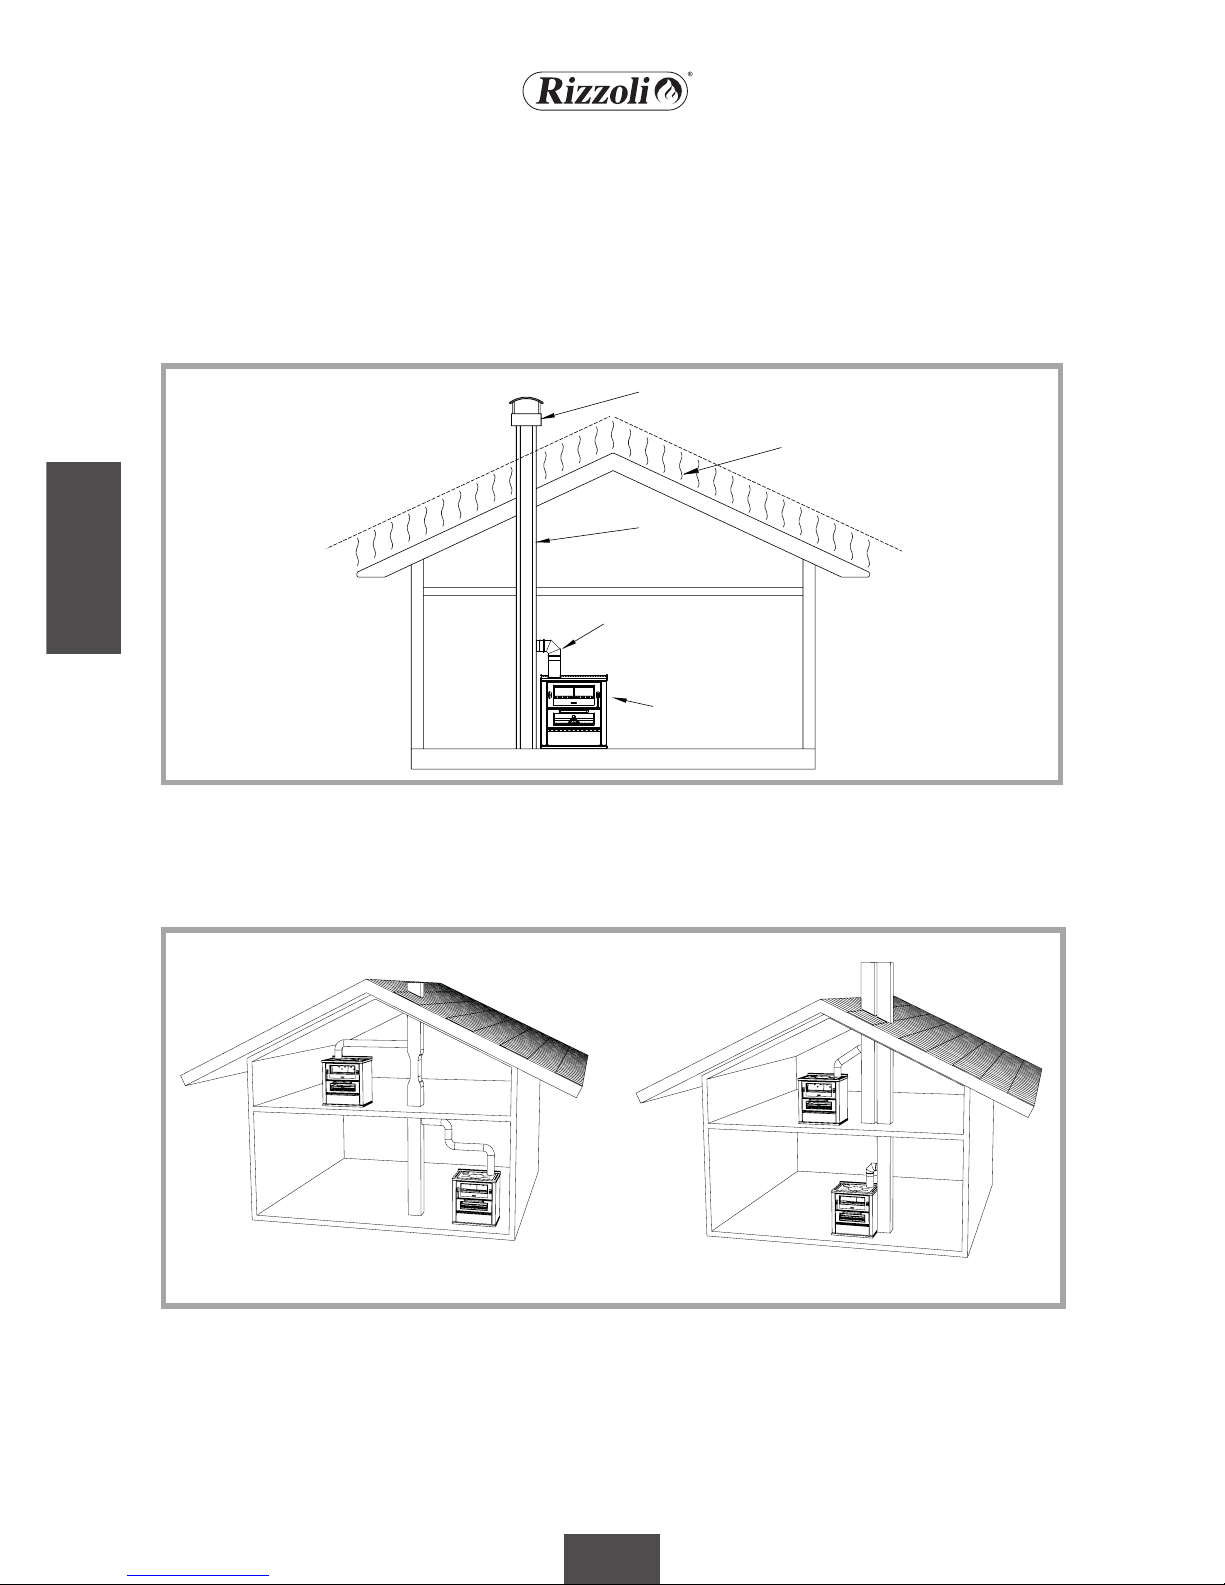
Picture4-Componentsofthechimney.A=cooker,B=conjuncon,C=ue,D=chimney,E=reowzone
2.3 CHIMNEY
Chimney must be dimensioned in a correct way ac-
cording to the type of cooker it is connected with,
minding the environmental and general condions
of the place in which it is placed. The secon of
the chimney must permit the ow of the fumes
produced by the cooker without dicules, but
2.4 DIMENSIONS AND CORRECT FORMS OF CHIMNEY
Picture5-Samplesofcorrectandincorrectchimneyconnecon.
NO YES
D
E
C
B
A

ENGLISH
79
it must not be too big otherwise the chimney will
experience problems in heang itself and this may
generate problems like weak draught and conden-
saon. In table 1 it is indicated the recommended
diameter for the ue according to the height of
the chimney (H). The height of the chimney must
be enough to insure the draught necessary to the
chosen model. Bigger is the height of the chimney,
bigger is the draught; if the chimney is lower than 4
metres, the correct working of the cooker is not in-
sured. The chimney must not have tortuous parts,
horizontal parts or counterslope parts; the number
of bends must be reduced to minimum. In picture 5
you can see some examples of good and bad chim-
ney connecon.
Picture6-Hdimensionforthesizingof
theue.
Table1-Indicaonsforthedimensionofthechimneyaccordingtoitsheight.
H
ø entrance
ø ue H < 4m
ø ue 4m < H < 6m
ø ue H > 6m
Necessary depression
140 mm
Draught not guaranteed
180 mm
160 mm
10 Pa
Model M-MZ-ML Range
The ue must be well isolated and circular if possi-
ble. The ue must not have defects, narrowings or
losses. All the inspecon doors must be closed and
well sealed. The connecon of other devices to the
same chimney is not allowed.
The chimney pot must have an exit secon dou-
bled than the one of the chimney, in order to make
easier the exit of the smoke. The chimney pot must
be enough tall to lean out over the reow zone
generated by the roof: if you are not sure about
this contact experienced technicians. If you are
in a windy place, it might be necessary to install
windproof devices.
2.5 FLUE
2.6 CHIMNEY POT

ENGLISH
80
The conjuncon of the cooker to the ue must be
as short as possible and must not have horizontal
or not much inclined parts. The counterslope parts
are forbidden and must be absolutely avoided.
Near the conjuncon, inammable materials must
not be present. The conjuncon must not go inside
the ue. To increase the safety of the conjuncon,
we suggest to install a washer on the wall being
sure that the connecon between the washer and
the chimney is walled and well sealed. Also the
connecon between the cooker and the conjunc-
on must be xed and sealed.
M-MZ-ML Range models are endowed with the
predisposion of the ue outlet in the upper and
rear parts, right or le. The choice of the side must
be done when ordering the cooker. Aer the deliv-
ery, it is sll possible to change the posion from
right to le and from le to right but it is neces-
sary to make some variaons inside the cooker in
addion to the replacement of the ue connector.
The variaon must be done by experienced tech-
nicians. The use of the ue outlet upper or rear
is free and can be chosen by the installer. Before
connecng the cooker, it is necessary to chose the
correct outlet and to verify that the other outlets
are closed, eventually using the caps given as en-
dowment of the cooker.
2.7 CONJUNCTION OR FUME CONDUCT
2.8 FLUE OUTLET PREDISPOSITION
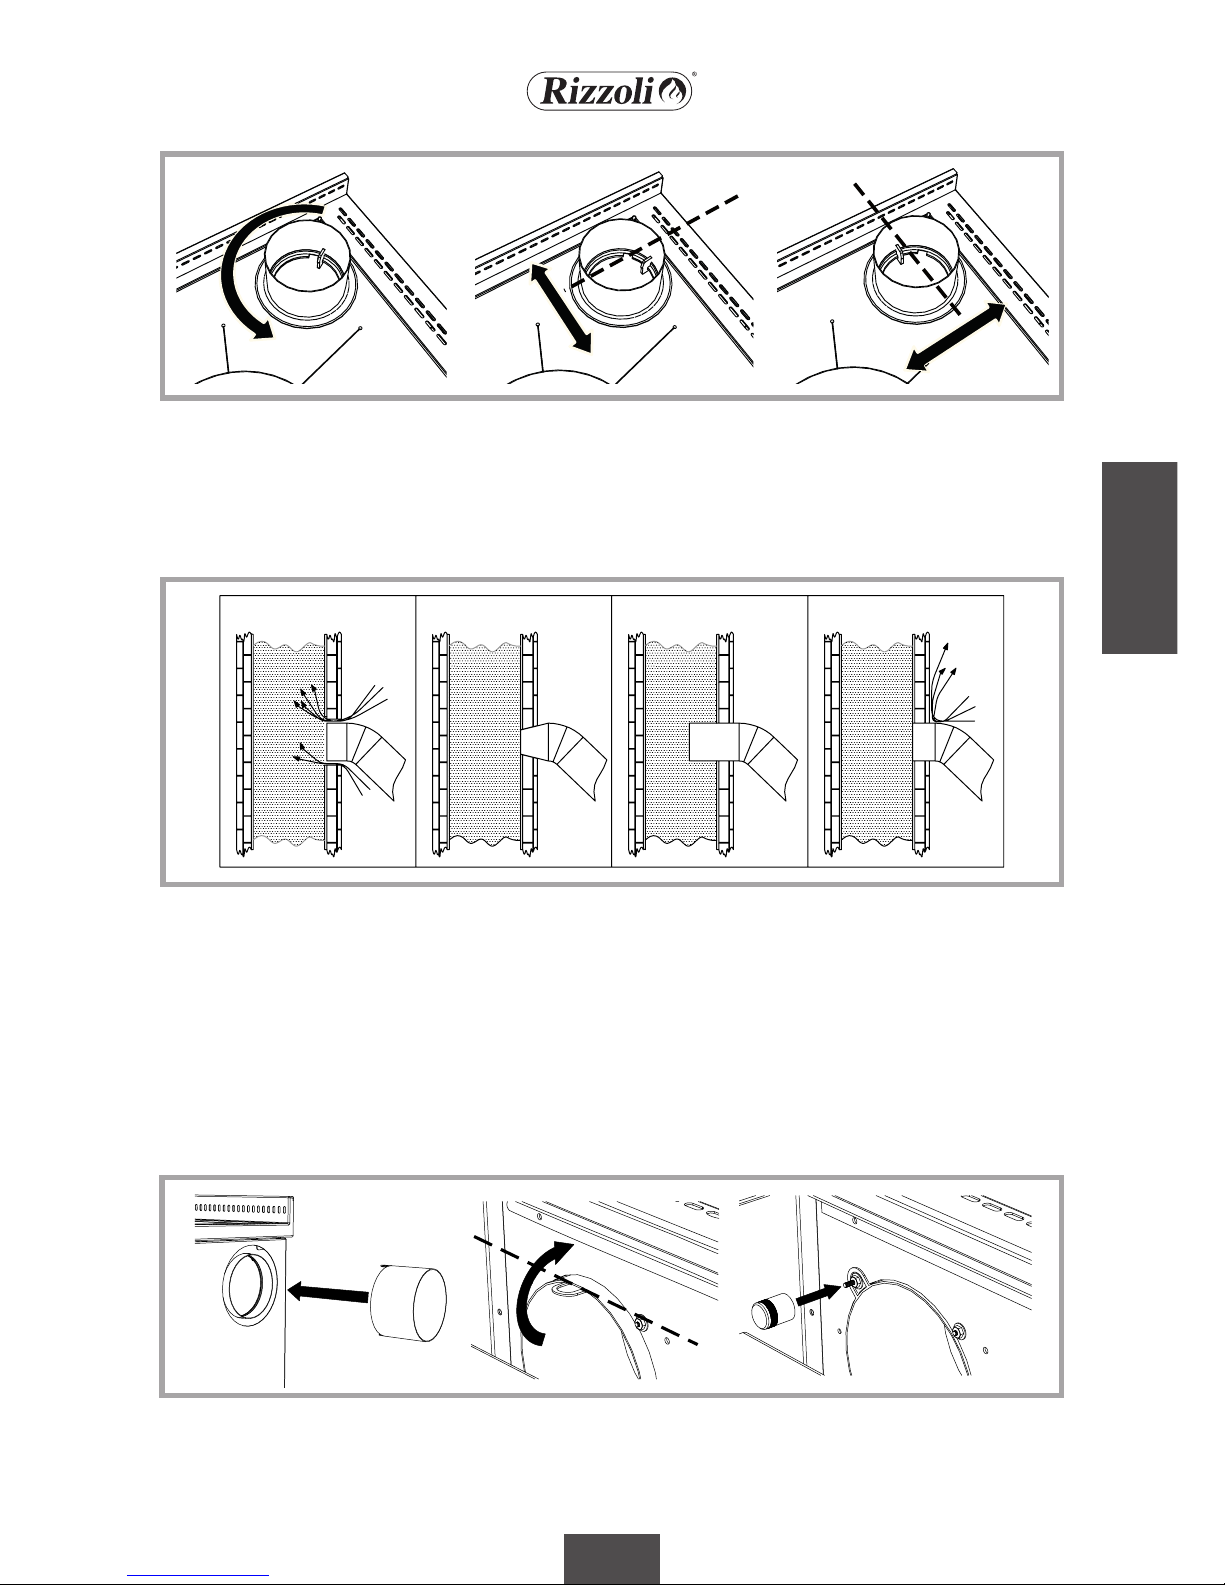
Picture7-Muluecooker,predisposionofthecorrectueoutlet
2.9 CORRECT CONJUNCTION TO THE CHIMNEY
If the conduct of the chimney starts from a lower
oor than the connecon point of the cooker, it
may be necessary to close the conduct under the
connecon pipe with reproof materials. If you
have the chimney behind or up, you have to use
the connector with bayonet coupling. This must be
inserted and turned so that it can remain blocked.
This connector has a tolerance of about 1 cm to
make the installaon easier. The tolerance is avail-
able according to a single direcon which depends
on the orientaon of the connector (see picture 8).
ENGLISH
81
+/-
10 mm
Y
X
+/-
10 mm
Picture8-Toleranceforueoutletonthetopandback.Thetolerancedependsontheorientaonoftheconnector.
The connecon with the chimney must be always
well xed and sealed, it must not have narrowing
and must not decrease the usable secon of the
chimney (see picture 9). If near the cooker there is
inammable material or high temperatures sensi-
ble, the connecon must be isolated and the safe-
ty distances must be strictly observed.
Picture9-Examplesofcorrectandincorrectconneconofthechimney
NO NO NO YES
2.10 FLUEOUTLETONTHESIDE(OPTIONAL)
If the chimney is on the side in correspondence of
a side, it is possible to order the ue outlet on the
side. Also in this case, the connector is extractable.
To install it correctly, it is necessary to remove the
cooking plate. Now, the connector must be com-
pletely inserted inside the wood red cooker or
the chimney, keeping the xing buonhole on the
same side of the cooker. Then, you can place the
wood red cooker, extract correctly the connector
so that it connect the cooker with the chimney.
Finally, bend the buonhole and block the parts
with the screw-lock (see picture 10).
Picture10-Flueoutletontheside.Fixedconnectorfortheueoutletontheside.

ENGLISH
82
Picture11-Installaonwithairintakeintheroomofinstallaonandinstallaonwithairintakedirectlycon-
nectedtothewoodredcooker.
To make the connecon easier we suggest to make
the external air intake on the oor in correspond-
ence with the internal part of the plinth, or on the
wall through the rear part of the cooker according
to species depending on the model (see picture
13 and table 2).
For ML Range wood red cookers it is recom-
mended to connect the external air intake to the
oor but on demand it is possible to have an op-
onal item to make the connecon to the wall.
Are also possible other soluons for the connec-
on but they must be decided together with Riz-
zoli.
Picture12-Possibleconneconsoftheairintakeofthecooker.A=Externalairintakenotconnected
B=ExternalairintakeontheoorC=Externalairintakeonthewall.
A B C
2.11 AIR INTAKE
The standard installaon of the wood red cooker
considers that the comburent air is taken from the
room where the cooker is installed through the air
intake of the cooker located in the plinth. In this
case, in the room must be always ensured the re-
cycle of fresh air, in parcular if the room is small
and window and door frames are hermec.
The correct ow of air in the room must be en-
sured also in presence of other combuson based
devices, aspiring hoods, chimneys and vent-holes.
The air intake in the room must have a minimum
surface of 80 cm2. On demand, Rizzoli can give
specic valves which can allow the automac
opening of the air intake only when it is necessary
for the correct working of the wood red cooker,
in order to warrant a maximum depression of 4 Pa
in the place of installaon.
M-MZ-ML Range wood red cookers can also be
connected so that the comburent air comes di-
rectly from outside. In this way, for the wood red
cooker it is not necessary another air intake in the
room of installaon.
To make this it is necessary to prepare a conduct
connected directly with the external part of the
house and make a direct connecon with the air
intake of the cooker. The air intake of the cooker is
located inside the woodbox in correspondence of
the combuson chamber. For the connecon, we
suggest to use a exible pipe.

ENGLISH
83
C
B
B
B
C
F
A
B
A
H
H
B
H
D
Picture14–Regulaonoftheheightofthecookerwithhexkeythroughthelevellingpins.
2.12 PLINTHREGULATION(MZ)
The plinth of MZ Range cookers can be regulated
in order to match the space in which the cooker
is inserted. It is possible to adjust the level of the
cooker by operang on the levelling pins that can
be regulated in height. To do this, it is necessary
to remove the woodbox and regulate singularly
each pin placed in the plinth near the corners, so
that the adjustment of the cooker is correct. For
the regulaon of the pins, use an hex key n.6: once
you have reached the desired height, x the lock-
nut with a n.13 key (see picture 14). The pins have
an excursion of 50 mm.
WARNING!Aspiring hoods orextracngairfansin the roommaygenerateproblems
tothedeviceifthereisnotasuitedairintakeorincaseofairintakesub-dimensioned.
Picture13-Rearsightoftheplinthofthewoodred
cookerandspeciesfortheconnecon
withtheairintakethroughtheplinth.
External air entry
Table2-Dimensionsfortheconneconoftheexternal
airintake
Dimensions(inmm)
N.13
N.6
0-50 mm
M 60
M 70
M 80
MZ 60
MZ 70
MZ 80
ML 60
ML 70
ML 80
158
158
158
140
140
140
-
-
-
118
118
118
93
93
93
-
-
-
364
464
564
414
514
614
-
-
-
120
120
120
120
120
120
26
26
26
95
95
95
95
95
95
95
95
95
Models A B C Hø

ENGLISH
84
Picture15–Regulaonofthetelescopicplinth.
x2
x2
10 mm
WARNING!Foracorrectinstallaonitisnecessarytokeepabout10mmbetweenthe
oorandtheplinthofthewoodbox.
2.13 TELESCOPICPLINTHREGULATION(MZ)
The wood red cookers MZ Range have a special
woodbox integrated with the plinth. In this case it
is anyway possible the regulaon of the height of
the plinth but not the regulaon of the recess.
The regulaon of the height of the plinth can be
made in the same way as described in paragraph
2.12. Aer the regulaon of the pins, it is possible
to regulate the sliding part of the plinth to cover
the empty part: to do this, remove the 2 screws as
picture 15 A and 15 B. Then, it is necessary to reg-
ulate also the height of the plinth integrated in the
woodbox. To do this, release the two screws on
the woodbox, lower slowly the plinth then screw
again when the chosen height is reached (as in pic-
tures 15 C and 15 D).
A
C
B
D

ENGLISH
85
The electric connecon of M-MZ-ML Range cook-
ers must be done in order to feed the lamp of the
oven. The connecon to AC power must be done
by experienced people and according with exist-
ing laws. The installer is responsible of the correct
connecon according with safety rules. To make
the connecon, you have to connect an electric
cable to the terminal board placed in the rear side
of the cooker. Must be done the correct connec-
ons of line, neutral and earth as described in the
picture 17.
The cable and every other electric device added
must be dimensioned for the electric load to sus-
tain and must not be in contact with points 50° C
hoer than ambient temperature.
2.14 ELECTRIC CONNECTIONS
Picture16-Posionoftheterminalboardfortheconnecontothenetwork
Picture17-Terminalboardfortheconnecontothenetwork:1.Line2.Neutral3.Earth.
12
3

ENGLISH
86
The refractory mortar used for the internal walling
contains always a lile moisture that is eliminated
aer the rst periods of use: so it is normal that
the rst mes you light the cooker a lile conden-
saon is being generated.
All the refractory materials inside the cooker ex-
perience a selement process that may generate
small holes on the bricks, such holes do not pre-
clude anyway the working of the cooker.
Other selements may involve other parts of the
cooker so during the heang and cooling phases
you might hear light noises. These symptoms do
not absolutely preclude the use of the cooker and
fading out ll disappearance with the constant use
of the cooker.
2.17 SETTLEMENTS
Before starng to use the cooker, remove the
packaging materials in the oven and in the wood
box, remove the sckers and remove the plasc
lm in which is wrapped the plate and remove with
a rag the most of the oil on its surface. We suggest
to make a rst lighng of the cooker just to verify
the correct installaon. The rst lighng must be
done with moderate re, using lile wood broken
in small pieces. In the next lighngs you can pro-
gressively increase the load of combusble.
During the rst lighngs some smell due to pro-
cessing residuals might happen. This phenomenon
is normal, it requires the venlaon of the room
and will disappear quickly.
2.16 FIRST LIGHTING
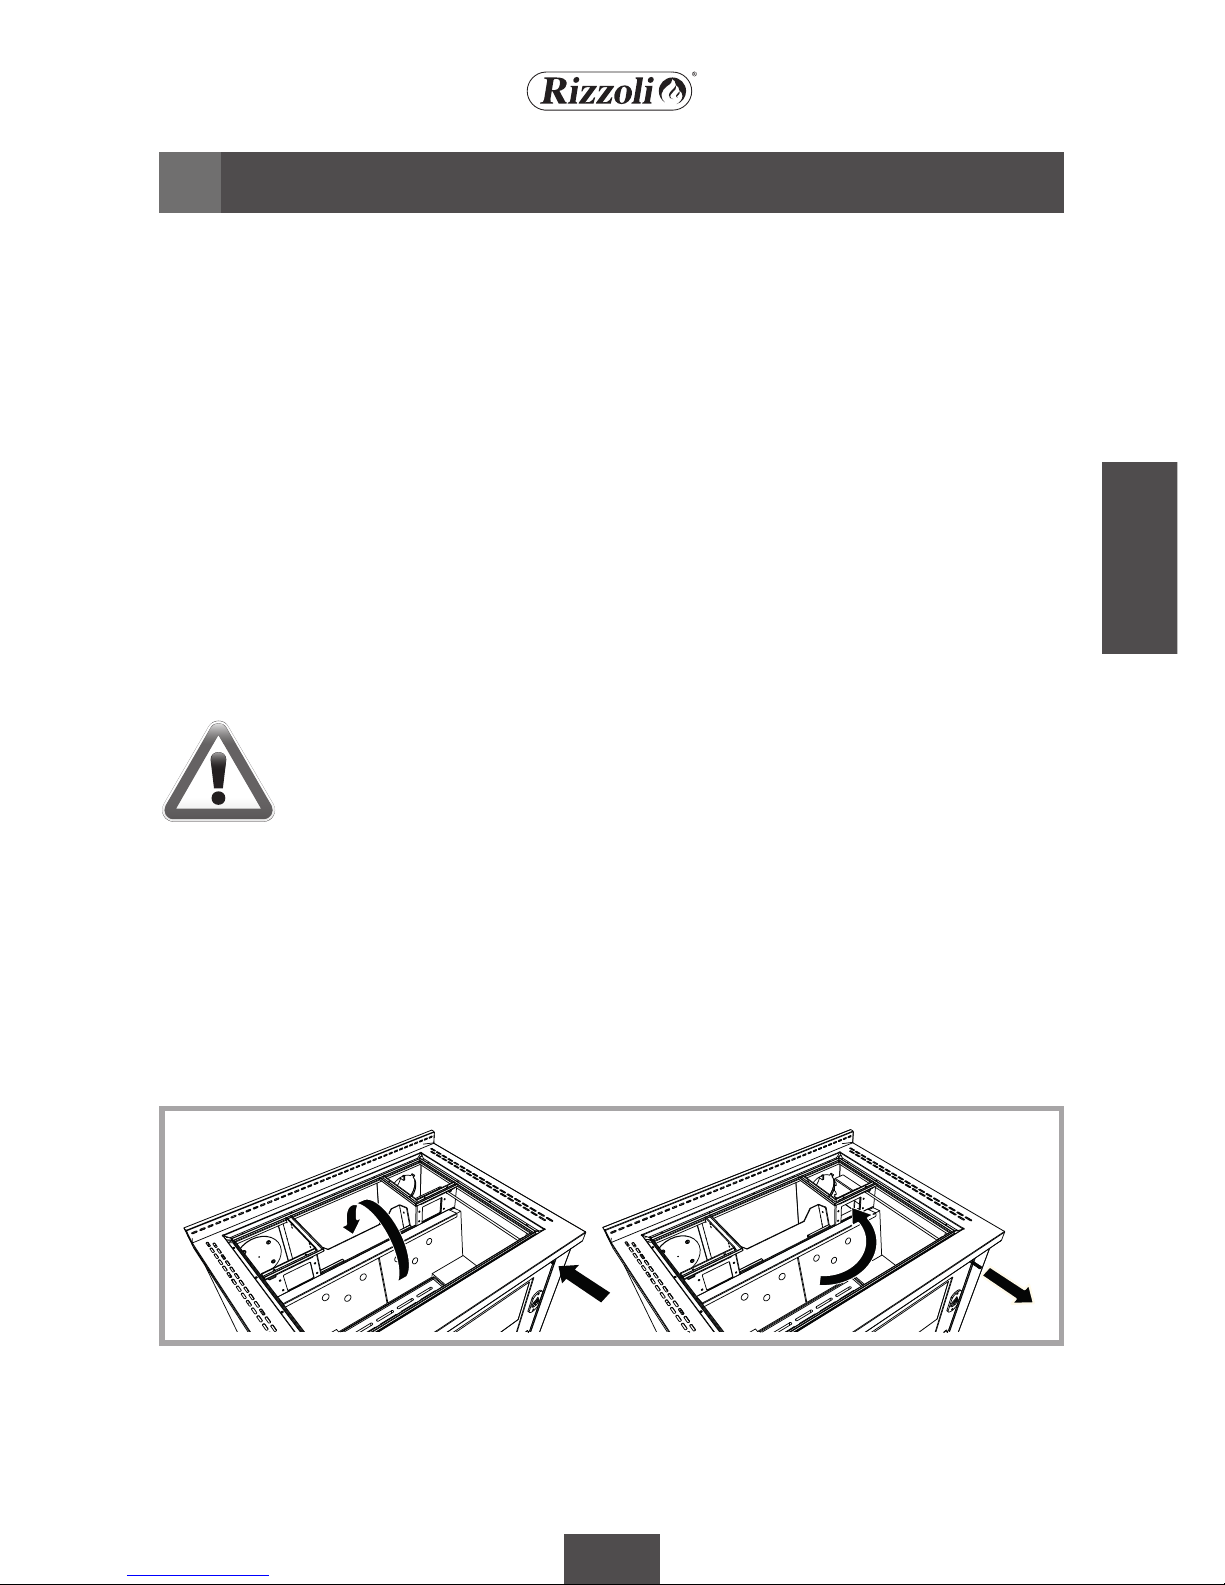
M-MZ-ML Range cookers are predisposed with
the rightwards re door opening, if not indicated
lewards at the order. It is possible to change the
opening also aer the installaon. The operaon
must be done by experienced people.
2.15 DOOR OPENING VARIATION
Picture18–Variaonofthedooropeningdirecon
ENGLISH
87
During the working, inside the cooker happens
a combusve reacon of combusble (the wood
inserted in the combuson chamber) and burn-
ing (the oxygen present in the air of the room in
which the cooker is placed). The wood red cooker
makes an intermient combuson: aer the light-
ing, the combuson goes on ll the exhauson of
the combusble but it can be maintained lighted
by making another load of combusble and so on.
The maintenance of the combuson in me is
guaranteed by the correct working of the chimney,
which allows to evacuate the fumes and in the
same me to feed the ame with comburent air.
In this way, the features of the chimney have a big
inuence on the correct working of the cooker.
The combuson of wood requests that the air ow
inside the combuson chamber happens in dier-
ent points to obtain the maximum eciency. In
parcular, it is present a primary air feeding that
ows in the lower part of the combuson chamber
by the grill, and one or more secondary air feed-
ings that ow in the upper part of the combuson
chamber.
The primary air is the main air and regulates the
combuson speed. The secondary air allows the
post-combuson of the fumes, generang further
heang, knocking down the amount of harmful
gas and so improving both the rendering and the
impact on the environment. Once started the com-
buson it cannot be interrupted in a safe way: it
must be always faded out naturally with the ex-
hauson of all the combusble inserted.
To allow an easier lighng of the cooker with cold
chimney, the M-MZ-ML Range wood red cookers
have two devices useful for starng. The starng
key is ruled by a rod: extracng the rod, the key
opens. This creates a direct connecon between
the combuson chamber and the chimney, in or-
der to obtain an improved draught.
The regulaon of starng primary air allows the
direct entrance of air from the room in which the
cooker is installed to the combuson chamber.
When starng, it is suggested to open both the
devices that later shall be closed when the re will
be started for the normal working of the cooker.
The cooker is designed to be used with the start-
ing regulaons closed, using they in dierent ways
does not allow to the cooker to work at its maxi-
3.1 WORKING OF THE COOKER
3.2 STARTING
USE3
WARNING!Forthecorrectworkingofthewoodredcooker,verifythatthecomburent
airowthroughtheintakeofthecooker,theeventualairintakeintheroomandallthe
aeraonandvenlaongrillsarenotobstructed.
Picture19-Starngkey.Withleveroutside,thekeyisopenandthestarngiseasier;withleverinsidethekey
isclosedforthenormalworking
ENGLISH
88
The air ow is ruled by an apposite valve ruled by
a lever placed below the oven door. The valve is
closed in the le posion, is open in the right po-
sion.
The posion of the valve rules the comburent air
inow: more it is open, faster will be the combus-
on and bigger will be the power of the device.
When the cooker is not working the primary air
must be closed, in order to limit the undesired air
ow that may cause an ancipated cooling of the
device and the room.
This operaon is parcularly important when the
external air intake of the cooker is directly con-
nected.
Generally, for the good working of the device, we
suggest to follow the indicaon for the regulaon
of air reported in table 3.
3.3 AIR REGULATION
Starng
Fast cooking
Slow cooking
Fast heang
Slow heang
Open
Open
Half open
Open
Open at minimum
Open
Closed
Closed
Closed
Closed
Open
Closed
Closed
Closed
Closed
Condion Air regulaon Starng air Starng key
Table3-Cookerregulaonsinthedierentusecondions
Picture21–Regulaonoftheairintakelever.
(M-MZRange).
Picture22–Thevalveisopenincorrespondenceof
theposionmarkedbyleer“A”,while
isclosedintheposionmarkedwith
leer“B”(M-MZRange).
Picture20–Regulaonofstarngprimaryair.
mum and may cause damages. To light the re, you
can use as combusble well dried wood, broken
thin, together with the products available in com-
merce.
The combuson might be dicult as far as the
chimney is cold. The necessary me depends on
the chimney and the weather condions.
B A

ENGLISH
89
The radiant plate is designed to allow a fast and
simple cooking. The hoer part is situated in corre-
spondence with the hotplate, this is the best part
for placing a pot which must get warm quickly. The
external parts of the plate are beer to keep foods
warm. To obtain the maximum cooking speed you
have to use broken and thin wood and make the
regulaons as described in the previous chapters.
The plate must not be overheated and made red
hot because in such way the cooker may experi-
ence damages without having no advantage for
the cooking of foods.
The internal temperature of the oven depends
on the combuson speed and on the amount of
combusble used. In parcular, working on the
primary air regulator and so on the speed com-
buson, you can obtain a more steady combuson
in order to avoid sudden changes in temperature
inside the oven. If you want to heat the oven start-
ing from cold cooker, we suggest to increase the
temperature with bright re and then to decrease
the speed combuson to keep the temperature
steady. The cookers are endowed with oven door
with glass and thermometer that makes easier the
temperature controlling operaons; the tempera-
ture indicated by the thermometer is approximate
ad is useful only for the cooking of foods. When
you do not use the oven, we suggest to keep the
oven’s door slightly open in order to let the heat
go outside the cooker: an overheang can damage
the cooker.
For example, to cook the spineless person biscuits in
a correct way, it is necessary the pre-heang of the
oven at a temperature indicated on the thermometer
of 150°, keeping it in temperature by adding more or
less 1 Kg of wood for every charge as the reaching
of the coals. Once the temperature becomes stable,
insert the baking-pan with the biscuits in the central
posion in the oven for 10 minutes, then extract the
baking-pan, rotate it and reinsert it again in the cen-
tral posion for other 5 minutes. In the end, remove
the baking-pan from the oven and leave cool the bis-
cuits.
3.4 PLATE COOKING
3.5 OVEN COOKING
Picture23–Regulaonoftheairintakelever.
(MLRange).
Picture24–Thevalveisopenincorrespondenceof
theposionmarkedbyleer“A”,while
isclosedintheposionmarkedwith
leer“B”(MLRange).
WARNING! For the correct working of the wood red cooker verify that the passage of
comburent air is not obstructed or, in case of connecon with external air intake, that the
air aspiraon grill is not obstructed.
B A

ENGLISH
90
Cooking meals somemes may generate a steam
excess inside the oven. In M-MZ-ML Range mod-
els there is a valve that allows to eject the steam in
excess. The valve is placed inside the oven on the
lateral side towards external and when necessary it
shall be regulated to open the air intakes. To avoid
possible burns, it is recommended to regulate the
valve only before the lighng of the cooker.
3.6 STEAM EXCESS VALVE
3.7 OVEN LIGHT
Picture25-Steamexcessvalve.
Picture26-Switchtolighttheoven(M–MZrange). Picture27-Switchtolighttheoven(MLrange).
Wood red cookers may be used also to heat the
ambient in which they are installed. The heang
comes from the plate and from the front of the
cooker. So the heang is eecve just in the ambi-
ent in which the cooker is inserted and in parcu-
lar near the cooker itself.
Also for the heang of an ambient you have to
start the cooker with bright ame without using
too much wood as long as a bed of cinders is creat-
ed: at this point you can put more load of combus-
ble inside the combuson chamber. For a bigger
autonomy of the cooker we suggest to use wood
cut in big pieces, hard if possible (ash-tree, beech,
hornbeam and others) and to make the regulaons
as described for the slow heang.
M-MZ-ML Range cookers have a light inside the
oven which, together with the wide glass of the
door, allows to control the cooking process at sight
without opening the door. On M-MZ cookers, the
lighng switch is located on a lateral upright you
can nd extracng the wood box: on ML cookers,
it is in the posion indicated in picture 27.
3.8 HEATING

ENGLISH
91
All the wood red cookers have a telescopic pull-
out for endowed baking pan system. In this way, it
is possible to extract the baking pan without the
necessity to sustain it, ensuring a beer praccali-
ty. The telescopic pullout is placed in a single posi-
on inside the oven, in the upper posion. Only on
ML cookers this can be modied and moved to the
lowest posion or in the posions middle superior
and superior. The process to modify the posion
of the telescopic pullout is indicated in picture 28.
Anyway, on all the cookers it is possible to insert
the baking pan without the telescopic pullout.
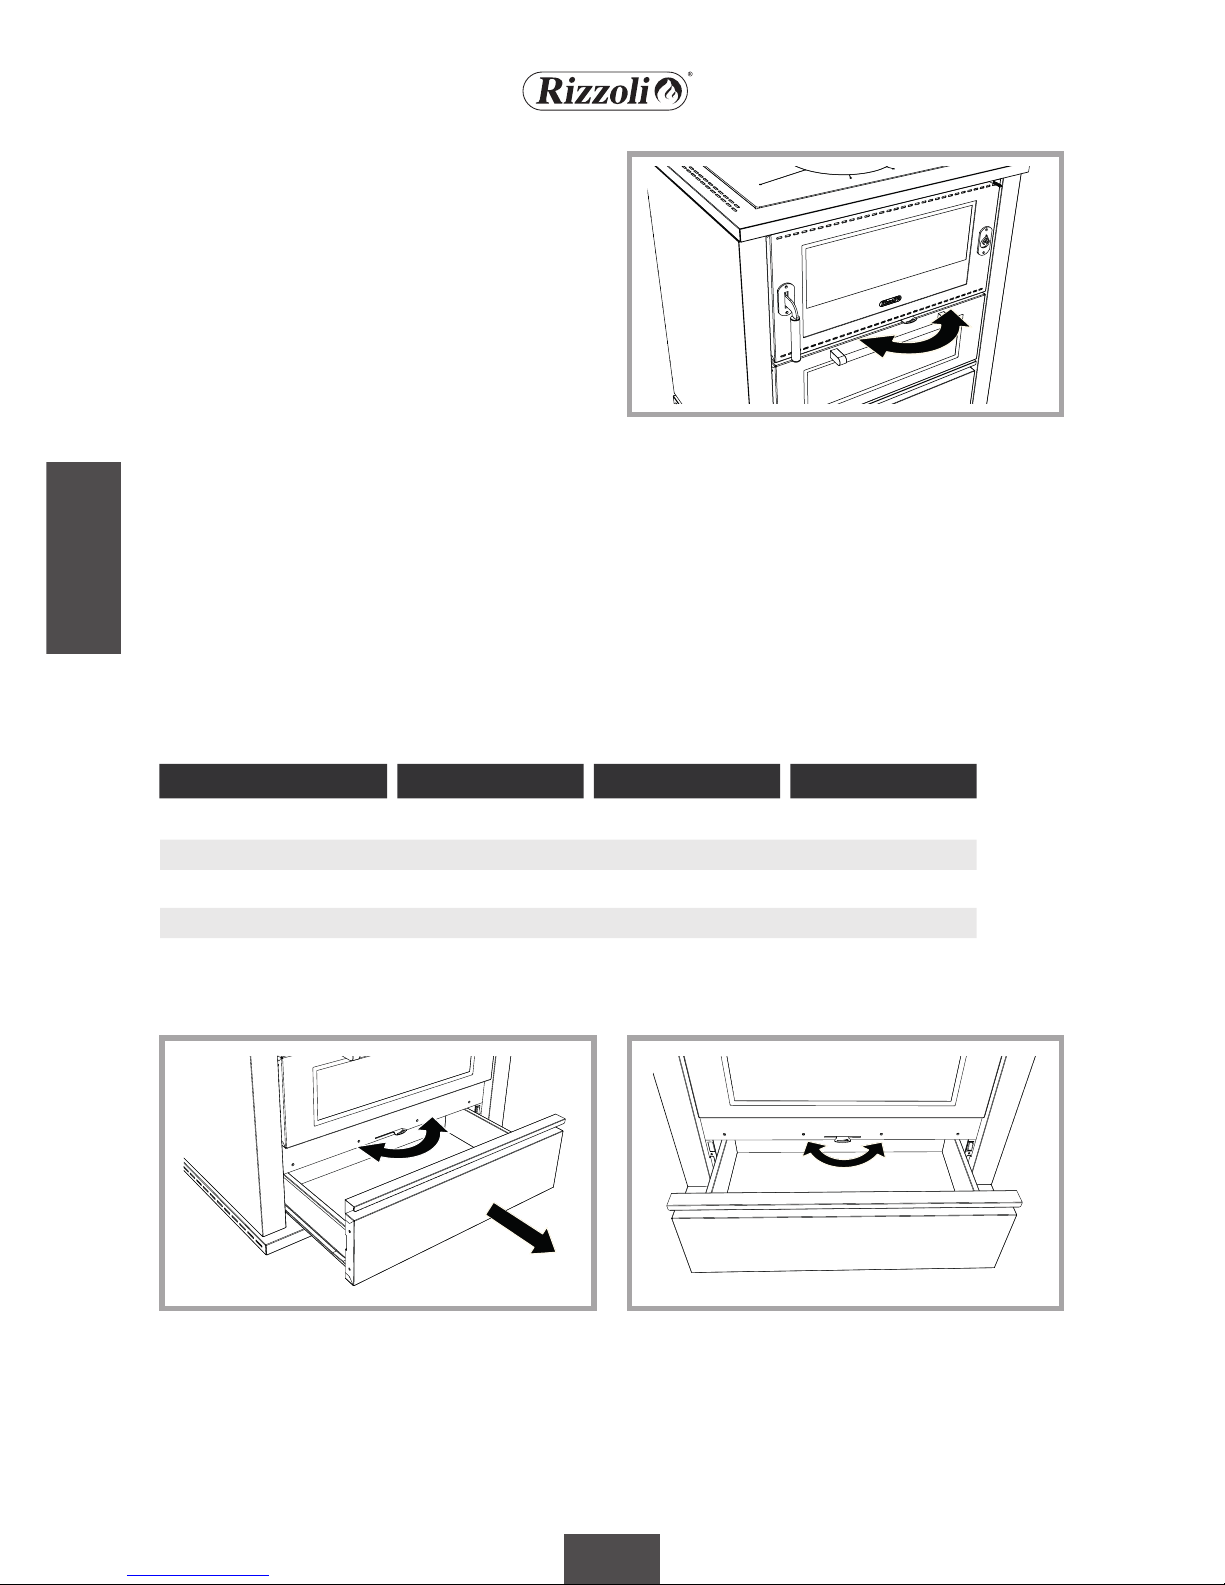
The wood box has a slide scroll system that allows
an assisted closure. When pushing the box, it will
close automacally.
For cleaning and for other reasons it could be nec-
essary to remove the wood box. To make this you
have just to extract the box as the end of its track,
then li it soly and at the same me extract it
again. To set the box to the inial posion, repeat
the same operaons inverted.
3.9 TELESCOPIC PULLOUT FOR BAKING PAN
3.10 WOOD BOX (M - MZ)
Picture28–Variaonprocedurefortheposionofthetelescopicpulloutforbakingpan.

ENGLISH
92
Picture29–Firedoorprotecon
On every cooker it is possible to use a stainless
steel plate cover, made to cover the plate in the
periods in which the cooker is not used. In this way
you obtain an uniform desktop. The plate cover
must be used with cold cooker. Before placing it,
be sure that is not present humidity, that the plate
is clean and that all the necessary maintenance is
done.
On M-MZ-ML Range cookers it is possible to have
on demand a steel protecon which could be
placed on the re door. This protecon is designed
to shield the door when the cooking operaons
require the connuous presence of the user in
front of the cooker or in presence of children. In
the other situaons the use of the protecon de-
pends on your discreon. The placing operaons
must always be done with cold cooker opening the
re door and placing the protecon on the door
by joint.
3.12 PLATECOVER(OPTIONAL)
3.11 FIRE DOOR PROTECTION (OPTIONAL)

ENGLISH
93
MAINTENANCE4
The cooker works beer if all its parts are without
combuson residuals, a clean cooker will be less
exposed to problems due to wear. Cleaning fre-
quency depends on how much and how the cooker
is used, as well as on combusble quality.
Stainless steel parts have to be cleaned cold with
neutral detersives or with a specic soluon for
stainless steel in case of hard to remove dirt. Do
not use at all abrasive sponges that may scratch
the surface. Dry with a so rag, following the glaz-
ing wise.
In parcular situaons, aer the installaon or
with the cooking of meals, an oxidised super-
cial stratus may be generated, in parcular on the
inox stainless steel frame. Also in these situaons,
an accurate cleaning will restore the state of the
product as it was new.
On request Rizzoli gives specic products to clean
stainless steel. For enamelled or painted parts, do
not use abrasive or aggressive soluon and in case
of stains pour some oil and wait while it absorbs
the halo, then clean with a so rag. It is also rec-
ommended to avoid the use of solvents or dena-
tured alcohol on painted parts.
Every me you use the cooker you have to clean
the wood carrying grill before, at least you have
to clean the more rough deposits: the holes of the
grill should not be obstructed. To make this you
can use the poker given together with the cook-
er. If the grill is not well cleaned, the ame could
not be well feed and so you could experience an
irregular combuson. If the grill is being removed,
it must be placed in its housing with the at part
turned upwards.
Every me you use the cooker you have to check
the ash box located under the combuson cham-
ber. When the box is full, you have to empty it.
If you do not empty it, the ash accumulates itself
and makes the cleaning more dicult. In case of
excessive cinders the ame could not be well fed
and you could experience an irregular combuson.
The oven must be cleaned with apposite products
available in commerce, to make this operaon eas-
ier you can remove the oven door. To make this you
have to open the oven door and raise the tongues
located on the door’s hinges. Now, you can un-
hook the door from the cooker closing it soly and
liing the lower part of the door. To hook again
the door to the cooker, make the same operaons
reversed. Also the grids on the sides could be re-
moved to make the cleaning more simple.
4.1 CLEANING
4.2 CLEANING THE VISIBLE PARTS
4.3 GRILL CLEANING
4.4 ASH BOX
4.5 OVEN CLEANING
WARNING!Alltheseoperaonsmustbedonewithcoldkitchen.
This manual suits for next models
2
Table of contents
Other Rizzoli Cooker manuals


Popular Cooker manuals by other brands

Indesit
Indesit KD6G35 operating instructions

Rosito BisanI
Rosito BisanI CPG instruction manual

Ravanson
Ravanson K-01T_TB_BR Series user manual

Artusi
Artusi AFGG701X Guide to use, installation and regulation

Clatronic
Clatronic MM 3496 instruction manual

Indesit
Indesit ID67V9KMB/UK Installation and Quick guide


LA NORDICA
LA NORDICA ROMANTICA 3,5 Instructions for installation, use and maintenance

EAS Electric
EAS Electric EMH750CGB instruction manual

Rayburn
Rayburn 200 G User instructions

CooKing
CooKing SVIF-CK3.0 Instruction guide

CookTek
CookTek ISW061 owner's manual

Parkinson Cowan
Parkinson Cowan SG 332 Operating and installation instructions