Royal 580 User manual


TABLE OF CONTENTS
UNPACKING YOUR CASH REGISTER and SET UP ..................................................................................................................................................... 1
Preparation .................................................................................................................................................................................................................. 1
Standard Accessories ................................................................................................................................................................................................. 1
Initial Set Up ................................................................................................................................................................................................................ 1
Maintenance of your Register ..................................................................................................................................................................................... 1
GETTING TO KNOW YOUR CASH REGISTER .............................................................................................................................................................. 2
Using the Manual ........................................................................................................................................................................................................ 2
How to Get Started ...................................................................................................................................................................................................... 2
SECURITY SYSTEM and ERROR CONDITIONS ........................................................................................................................................................... 3
7-way Security System ............................................................................................................................................................................................... 3
Error Condition Explanation ........................................................................................................................................................................................ 3
Register Tone .............................................................................................................................................................................................................. 3
Entry Error Alarm ........................................................................................................................................................................................................ 3
Maximum Entry Lock-Out ........................................................................................................................................................................................... 3
Clear key ..................................................................................................................................................................................................................... 3
Error ............................................................................................................................................................................................................................. 3
System Clear Information ........................................................................................................................................................................................... 3
CONTROL LOCK SYSTEM ............................................................................................................................................................................................... 4
Control Keys ................................................................................................................................................................................................................ 4
Removable Cash Drawer ............................................................................................................................................................................................ 4
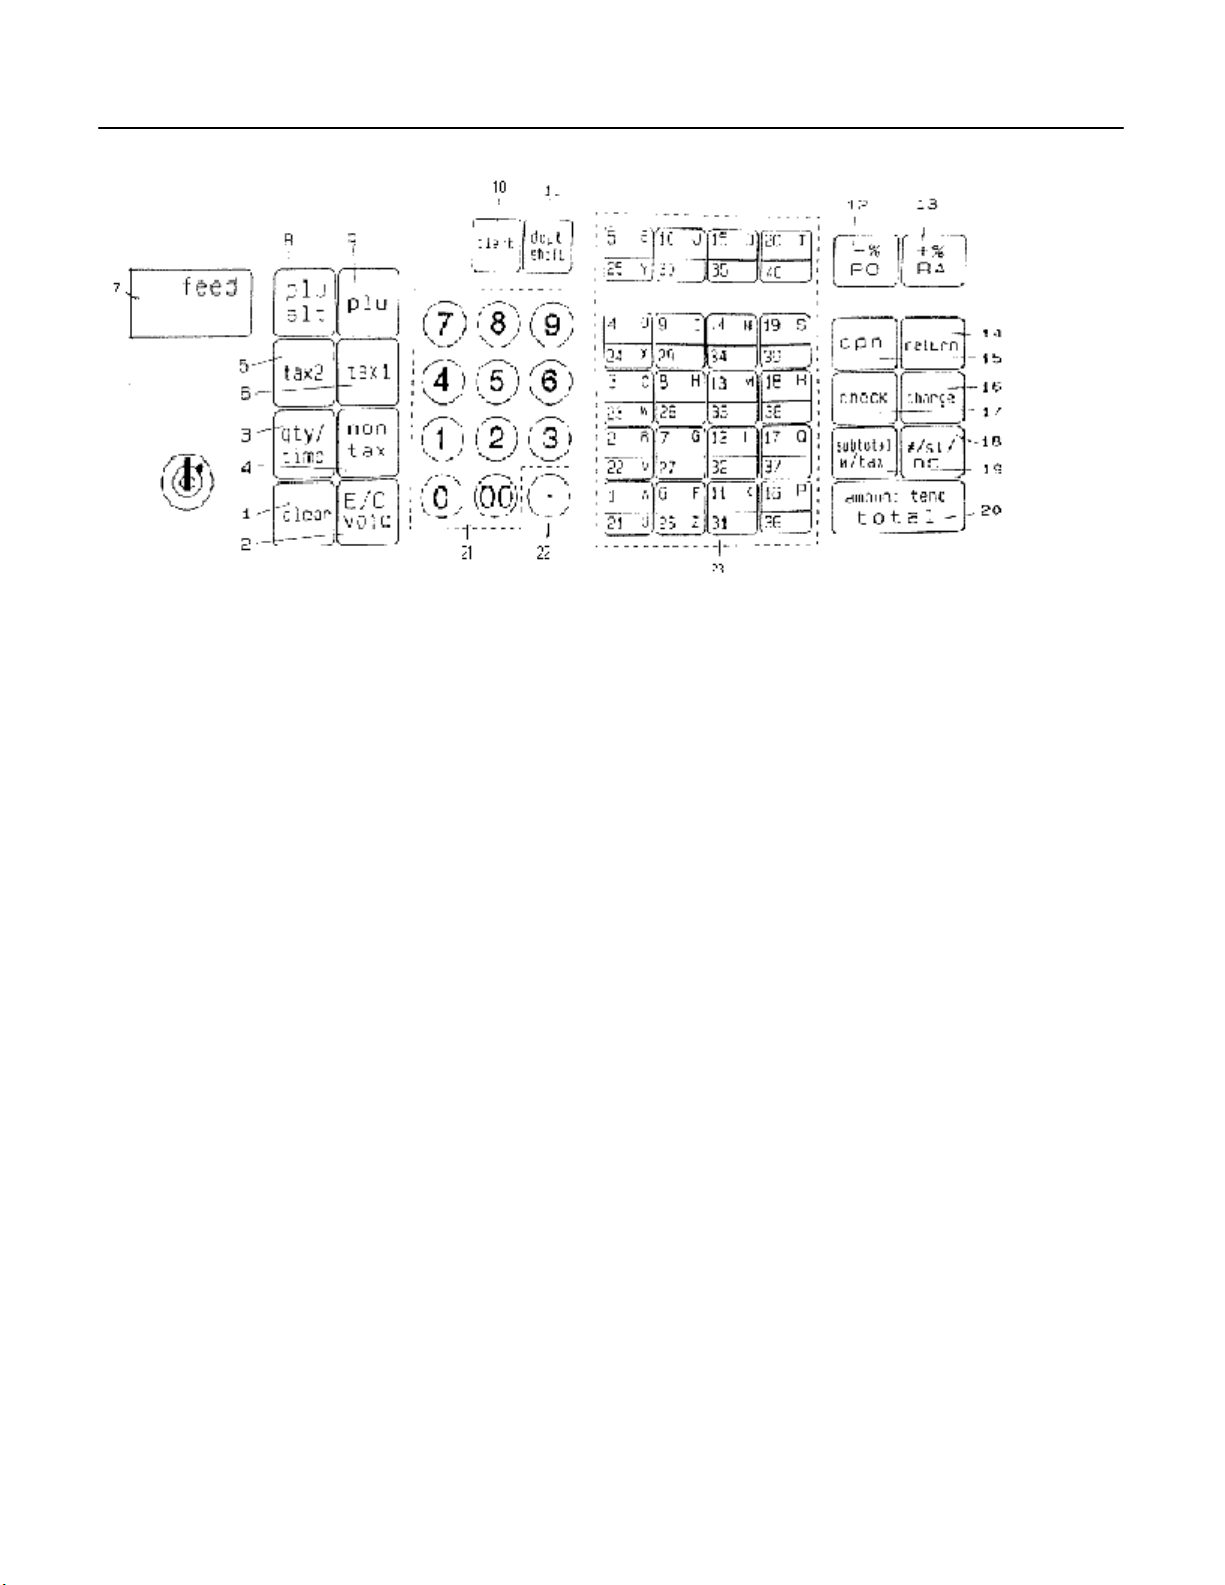
KEYBOARD FUNCTIONS .............................................................................................................................................................................................. 5-7
DISPLAY WINDOWS ......................................................................................................................................................................................................... 8
Operator Display ......................................................................................................................................................................................................... 8
Customer Display ........................................................................................................................................................................................................ 8
PRINTER............................................................................................................................................................................................................................. 9
BATTERY SYSTEM ......................................................................................................................................................................................................... 10
Installing or Replacing the Back-Up Batteries .......................................................................................................................................................... 10
Extending Usage of the Back-Up Batteries .............................................................................................................................................................. 10
INSTALLING THE PAPER ROLL .............................................................................................................................................................................. 11-12
INSTALLING THE RIBBON ............................................................................................................................................................................................. 13
QUICK START ............................................................................................................................................................................................................. 14-15
AFTER QUICK START .................................................................................................................................................................................................... 16
Quick Start Program Confirmation Report ............................................................................................................................................................... 16
BEFORE GOING TO REGISTER MODE ........................................................................................................................................................................ 17
ADVANCED PROGRAMMING ........................................................................................................................................................................................ 18
CLERK NUMBERS AND NAMES ................................................................................................................................................................................... 19
To Program Clerk Numbers and Names .................................................................................................................................................................. 19
To Use Clerk Numbers ............................................................................................................................................................................................. 19
PASSWORDS .................................................................................................................................................................................................................. 20
X and PRG/Z Manager Passwords .......................................................................................................................................................................... 20
To Program Manager Passwords ..................................................................................................................................................................... 20
To Use Manager Passwords ............................................................................................................................................................................ 20
DATE ..........................................................................................................................
....................................................................................................... 21
TIME .................................................................................................................................................................................................................................. 21
MACHINE NUMBER ........................................................................................................................................................................................................ 21
TAX RATES ................................................................................................................................................................................................................. 22-24
To Set Type of Tax Being Used ............................................................................................................................................................................... 22
Fixed Tax Rate .................................................................................................................................................................................................. 22
Tax Table Rate ............................................................................................................................................................................................. 23-24
DEPARTMENT PROGRAMMING .............................................................................................................................................................................. 25-28
COUPON DISCOUNT ................................................................................................................................................................................................. 29-30
MINUS PERCENTAGE DISCOUNT (-%) ................................................................................................................................................................... 31-32
PLUS PERCENTAGE (+%) ........................................................................................................................................................................................ 33-34
PRICE LOOK-UP (PLU) .............................................................................................................................................................................................. 35-36
TRAINING MODE ............................................................................................................................................................................................................. 37
GRAND TOTAL PRESET ................................................................................................................................................................................................ 38
TRANSACTION NUMBER PRESET ............................................................................................................................................................................... 39
X1 and X2 COUNTER PRESET ...................................................................................................................................................................................... 40
Z1 and Z2 COUNTER PRESET ...................................................................................................................................................................................... 41
PROGRAMMING ALPHANUMERIC DESCRIPTIONS ............................................................................................................................................. 42-47
FLAG OPTIONS .......................................................................................................................................................................................................... 48-61
PROGRAM CONFIRMATION REPORTS ....................................................................................................................................................................... 62
Program Confirmation Report - Main Printout .......................................................................................................................................................... 62
Confirmation Report of Tax Rate Programming ....................................................................................................................................................... 63
Program Confirmation Report of Clerk ID Numbers, Clerk Confirmation and Department ............................................................................... 64-66
PLU Confirmation Report .......................................................................................................................................................................................... 67
i

(Continued) TABLE OF CONTENTS
TRANSACTION EXAMPLES FOR OPERATING THE CASH REGISTER .............................................................................................................. 68-83
Sample Receipt ......................................................................................................................................................................................................... 68
Transaction Symbols ................................................................................................................................................................................................ 68
Example 1: Cash Sale Without Tendering Change ........................................................................................................................................... 69
Example 2: Cash Sale With Tendering Change ................................................................................................................................................ 69
Example 3: Using the Dept Shift Key ................................................................................................................................................................. 69
Example 4: Charge Sale ..................................................................................................................................................................................... 70
Example 5: Check Sale ...................................................................................................................................................................................... 70
Example 6: Split Tendering Sale ........................................................................................................................................................................ 70
Example 7: No-Sale Function ............................................................................................................................................................................. 71
Example 8: Registering a Reference Number ................................................................................................................................................... 71
Example 9: Multiplying by a Fraction .................................................................................................................................................................. 71
Example 10: Multiplication Sale ............................................................................................................................................................................ 72
Example 11: Registering a Department Unit Price .............................................................................................................................................. 72
Example 12: Multiplication of a Department Unit Price ........................................................................................................................................ 72
Example 13: Exempting Tax on an Item .............................................................................................................................................................. 73
Example 14: Adding Tax to a Non-Taxable Department ..................................................................................................................................... 73
Example 15: Received-On-Account Sale ............................................................................................................................................................. 74
Example 16: Paid-Out Sale .................................................................................................................................................................................. 74
Example 17: Return Sale ...................................................................................................................................................................................... 74
Example 18: Coupon Discount Sale ..................................................................................................................................................................... 75
Example 19: Minus Percentage Discount Sale .................................................................................................................................................... 76
Example 20: Plus Percentage Sale ...................................................................................................................................................................... 77
Example 21: Use of Error-Correct (VOID) Key..................................................................................................................................................... 78
Example 22: Voiding a Sale .................................................................................................................................................................................. 78
Example 23: Voiding a Multiplication Sale ........................................................................................................................................................... 78
Example 24: Voiding a Coupon Sale .................................................................................................................................................................... 79
Example 25: Voiding a Minus Percentage Discount Sale ................................................................................................................................... 79
Example 26: Voiding a Plus Percentage Sale...................................................................................................................................................... 79
Example 27: Voiding a Department Preset Price ................................................................................................................................................. 80
Example 28: Voiding a Multiplication of a Department Preset Price ................................................................................................................... 80
Example 29: Voiding a Department Preset with a Minus Percentage Discount ................................................................................................. 81
Example 30: Voiding a Department Preset with a Coupon Discount .................................................................................................................. 81
Example 31: PLU Sale .......................................................................................................................................................................................... 82
Example 32: Voiding a PLU Sale ......................................................................................................................................................................... 82
Example 33: Voiding a PLU Multiplication Sale ................................................................................................................................................... 82
Example 34: Voiding a PLU Sale with a Coupon Discount ................................................................................................................................. 83
Example 35: Voiding a PLU Sale with a Minus Percentage Discount ................................................................................................................. 83
Example 36: Voiding a PLU Sale with a Plus Percentage Rate .......................................................................................................................... 83
X/Z MANAGEMENT REPORTS ...................................................................................................................................................................................... 84
Summary of Management Reports .......................................................................................................................................................................... 85
Cash-In-Draw er Report ............................................................................................................................................................................................. 86
Hourly Report ............................................................................................................................................................................................................ 86
Department Range Report ........................................................................................................................................................................................ 87
Clerk Report ......................................................................................................................................................................................................... 87-88
PLU Report................................................................................................................................................................................................................ 88
Cash Declaration Report .......................................................................................................................................................................................... 89
Group Report ............................................................................................................................................................................................................ 90
Full Report ................................................................................................................................................................................................................. 91
Full Report Illustration ............................................................................................................................................................................................... 92
Balancing X/Z Reports .............................................................................................................................................................................................. 93
TROUBLESHOOTING ..................................................................................................................................................................................................... 94
In Case of an Error Tone or if "E" Displays .............................................................................................................................................................. 94
If Printing Problems Occur ........................................................................................................................................................................................ 94
If Cash Register is Malfunctioning ............................................................................................................................................................................ 94
Opening the Cash Drawer in an Emergency ............................................................................................................................................................ 94
Half System Clear ..................................................................................................................................................................................................... 94
Full System Clear ...................................................................................................................................................................................................... 94
SPECIFICATIONS and SAFETY ..................................................................................................................................................................................... 95
LIMITED WARRANTY...................................................................................................................................................................................................... 96
OPTIONAL EXTENDED WARRANTY ............................................................................................................................................................................ 97
APPENDIX 1 - STATE TAX TABLE CODES .............................................................................................................................................................. A1-6
APPENDIX 2 - CALCULATING STATE TAX TABLE CODES ................................................................................................................................ A7-11
APPENDIX 3 - GST/PST TAX SYSTEM FOR CANADA ........................................................................................................................................ A12-13
ii

WELCOME...
to the Royal family of fine business machines.
We sincerely hope you will enjoy the many benefits
of being associated with a distinguished product
name that has represented both quality and
customer satisfaction since 1905.
This electronic cash register is designed to help your busine ss function smoothly by providing efficient register operations
and accurate management reports. Start-up is quick and easy, yet there are many options that can be added and revised so
that you can customize your operations for optimum productivity. Here are just a few of the register's many valuable
features:
• Heavy-duty alpha numeric printer with journal and receipt printouts. Allows the printing of both letters
and numbers on the receipt and journal tapes. Each department can be programmed with a 12
character description i.e., "Food", "Beverages", etc.
• Alpha keyboard cuts programming time in half! Program your own store name and commercial
message - 5 lines by 24 characters each.
• 40 departments allow you to categorize merchandise to be sold. Each department can be programmed
with a 12 character description.
• 500 Price Look-Up (PLU) settings allow for fast, a ccurate entry of an item and records the number of
items sold.
• 10 clerk numbers monitor sales of individual employees.
• Large front and rear displays for easy operator and customer viewing.
• Automatic tax computation available for 4 different tax rates, including add-on and VAT.
• Department-linked entry options that streamline and speed-up operation.
• Periodic management reports provide up-to-date sa les analysis, including mid-day, end-of-day, weekly
or monthly totals.
• Memory protection maintains financial records during power outage.
• Training mode available for new users.

UNPACKING YOUR CASH REGISTER and SET-UP
PREPARATION
When your cash register is new in its factory packaging, you will find the various items for the register packaged
separately. Look for and unwrap the following: 1 paper roll, black journal winder spindle and duplicate key sets for
the Control Lock and Cash Drawer/Journal Lock.
STANDARD ACCESSORIES
The following are included in the box with your cash register:
· Instruction manual.
· 1 black plastic journal winder spindle.
· 1 starter roll of standard single-ply paper tape, Ro yal Reorder Number 013129 (57mm). This model can
also use 2-ply paper rolls, Royal Reorder Number 013130 (57mm).
· 1 purple ribbon (already installed), Royal Reorder Number 013019.
· 3 standard "AA" batteries for battery back-up system.
· Keys: (2) Cash Drawer/Journal Lock Keys (515).
(2) Manager's Program Keys (MA, 33-I).
(2) Operator Register Keys (OP, 33A).
IT IS IMPORTANT THAT YOU READ THE INITIA L SET-UP AND MAINTENANCE INSTRUCTIONS BEFORE
ATTEMPTING TO OPERATE THE CASH REGISTER.
INITIAL SET UP
1. Locate on level surface - Before operating the cash register, be sure it is placed on a level surface to
permit smooth operation of the register cash drawer.
2. Insert Manager's Program Key (MA, 33-1) and turn to the "PRG" position. IMPORTANT: THIS
PROCEDURE MUST BE DONE TO INITIALIZE THE CASH REGISTER. HOLD DOWN THE CLEAR
KEY AND PLUG IN THE CASH REGISTER.
3. This cash register operates on any standard three- hole electrical outlet (115- 120 volt, 60 hertz). It is
recommended that the cash register be connected to an electrical circuit where no other electrical device
or appliance is connected which may overload the circui t or cause electrical interference with the cash
register. It is best that a single circuit be provided for register operations.
4. Install the 3 standard "AA" batteries provided. Refer to Page 10 for battery installation instructions.
5. Install paper - Refer to Page 11-12 for paper installation instructions.
MAINTENANCE OF YOUR REGISTER
· Your register must remain uncovered when tur ned on; this will allow proper cooling of electronic
components.
· Use a dust cover when the register is not in operation to protect mechanical components from dust.
· Take care to keep beverages and other liquids away from the machine to avoid spills which may damage
electronic components (use optional protective keytop cover to prevent damage to machine).
· To clean, use a soft dry cloth. Do not use harsh solutions containing alcohol.
· Your machine should be kept in areas free from dust, dampness or extreme temperatures (hot or cold).
· After storage in extreme temperatures (bel ow 32 degrees fahrenheit or above 104 degrees fahrenheit),
allow the temperature inside the machine enough time to reach room temperature before switching on.
· Never pull the paper tape through the printhead. To prevent damage, always use the electronic paper
feed key.
· Should electronic service be needed, a Royal authorized service center is recommended.
1

GETTING TO KNOW YOUR CASH REGISTER
USING THIS MANUAL
Your cash register manual is organized for easy reference. The front portion contains general information on all
features and functions of the cash regi ster. Instructions for setting the programs are next. Transaction examples for
operating the register are at the back of the manual, along with information on troubleshooting. Use the TABLE OF
CONTENTS to locate a particular section you are interested in.
Throughout this manual references to the Keypad are shown in bold and in parentheses. References to the Numeric
Keypad are preceded by the word "TYPE"; for example: TYPE the number (1). References to the Operational Keys
are preceded by the word "PRESS"; for example: PRESS the [AMT TEND/TOTAL] Key.
HOW TO GET STARTED
Before you begin to program or use your new Royal Cash Register, you should spend some time becoming familiar
with the Control Lock System, Keyboard Functions and the Display. Review setting up and basic maintenance
information. Then proceed by installing the back-up ba tteries and the paper roll. Follow the easy Quick Start
program. Finish by practicing the transaction examples provided.
PROGRAMMING THE CASH REGISTER
Simple step-by-step instructions are provided to help you quickly pr ogram your register for standard
operations. Please refer to the Quick Start programming on Pages 14 and 15.
OPERATING THE CASH REGISTER
Transaction examples are provided for registering va rious operations, such as cash, check, or charge
sales; tendering change; multiple item sale; PLU sale; split tendering; voiding; refunding; discounting;
coupon reduction and more. For details see Pages 68 to 83.
PROBLEMS WITH USAGE OF THE CASH REGISTER
If you are having technical difficulties or if your cash register is malfunctioning, refer to the
Troubleshooting section on Page 94.
2

SECURITY SYSTEM and ERROR CONDITIONS
SEVEN-WAY SECURITY SYSTEM: Your Royal cash register is protec ted by an efficient security system
that incorporates the following:
· A Control Lock that cannot be acti vated without the Operator Register Key or Manager's Program Key.
The Register Key accesses the "OFF" mode and "REG" modes only, thus limiting access to other modes
only to individuals who are authorized to use the Manager's Program key.
· A Journal/Receipt Compartment that can be lock ed to prevent journal tampering and unauthorized receipt
manipulations.
· A heavy duty locking cash drawer.
· High digit lockout option which prevents excessively high register over rings.
· Availability of 10 clerk numbers to monitor access and sales of individual operators.
· 2-way Password system to prevent unauthorized programming or printing of management reports. A
password can be programmed to limit access to "PRG ", "X" and "Z" positions. A separate password
permits an "X1" reading (mid-day reading) to print in the "REG" Mode.
· A broad range of management reports to provide deta iled data on virtually all cash register operations
performed on the machine; monitors use of the "No Sale" key, number of voids, refunds, etc.
ERROR CONDITIONS
REGISTER TONE - This cash register emits a brief audible tone that sounds to confirm registration each time
a key is pressed. If desired, this tone can be eliminated. See Flag #16, Page 60.
ENTRY ERROR ALARM - When using the register, all operations must be performed in the proper sequence.
If an error occurs, the register will sound a conti nuous tone alarm (an "E" appears in the display and the
Keyboard locks). To clear the error/ lock condition, the operator simply presses the [CLEAR] key and
continues to operate in the proper sequence. IMPORTANT - When an operation is begun but not completed in
the "REG" position, turning the control lock to another position will result in an alarm/error condition. When a
transaction is begun in the "REG" position, it must be comp leted by use of one of the totalizer keys (i.e., the
[AMT TEND/TOTAL] key before changing to another position.
MAXIMUM ENTRY LOCK-OUT - To prevent the operator from maki ng an entry into the register of an
erroneously high price, the register can be programmed to limit the number of digits that can be entered in the
transaction. The register can be programmed to "Lock- Out" after an entry of one (.09) to seven (99,999.99)
digits.
CLEAR KEY [CLEAR] - As described above, the Clear [CLEAR] key will erase an alarm condition caused by
an operational error (usually pressing a key which was not proper for that operation). The [CLEAR] key will not
erase a transaction which has been registered by an operati ng key and printed on the register tape. To erase
entries made in error after pressing the Department ke y or any other operating key causing the entry to be
printed on the tape, use the Void [VOID] key function to correct the error.
ERROR - An "E" is displayed when a numerical entry exceeds the specified number of digits or a misoperation
is done.
HALF SYSTEM CLEAR - If an error tone still persists, perform a Ha lf System Clear. For details on a Half
System Clear see Page 94.
FULL SYSTEM CLEAR - If the operator cannot correct an error lock condition, as a last resort a Full System
Clear should be done. For details on the Full System Clear see Page 94.
3

Program Mode (PRG): The position is used to
set and change your individualized
programming for register operations.
Locked Mode (OFF): This position is used
when the cash register is not in use. The
register is inoperable and the cash drawer stays
closed.
Register Mode (REG): You will perform
normal register operations in the REG position.
Report Mode (X): Permits reading of all
transaction totals at any time without clearing
the register (normally known as a "mid-day"
reading). This cash register is capable of
producing numerous management reports.
Reset Mode (Z): Permits reading of all
transaction totals and clears all transaction
totals to zero, except the running grand total
(normally known as the "end-of-day" or "daily
close-out" reading). This cash register is
capable of producing numerous management
reports such as weekly/monthly readings.
CONTROL LOCK SYSTEM
THE CONTROL LOCK: Located at the left of the operating area, t he Control Lock is a switch that places the
cash register into its several operating modes. These modes are:
CONTROL KEYS: Two pairs of keys are provided for the Control Lock and the Cash Drawer/Journal Lock.
Operator's Register Key (OP): Provides movement to the OFF and REG modes only.
Manager's Key (MA): Provides access to all of the operati ng modes. This system effectively limits
access to the PRG, X, and Z modes to individuals who are authorized to use the Manager's Program key
only. (Note: A Manager Password is available for accessing "PRG", "X" and "Z" positions, for details see
Page 20).
Journal Lock/Cash Draw er Key (515): Used to lock both the cash drawer and journal compartment for
additional security.
CASH DRAWER WITH LOCK: The cash drawer will automatically open after completing a transaction, by
pressing the [#/ST/NS] key, or by the hidden emergency lever underneath the register.
The cash drawer is electronically locked when the Control Lock is in the "Off" position. In addition, the cash drawer
is designed with a security lock and when used with the Cash
Drawer key, manually locks the cash drawer and prevents el ectronically opening it by the [#/ST/NS] key or by the
hidden emergency lever underneath the register.
The Bill Tray and Coin Tray can be removed from the r egister by lifting up on the open drawer and pulling toward
you.
4

KEYBOARD FUNCTIONS
FIGURE 1: Control Lock and Keyboard Functions
KEYBOARD FUNCTIONS
The following key functions are primarily for cash register entries in REG mode. Several keys also have other
functions in the PRG, X and Z modes which are explained further in the manual.
(1) Clear Key [CLEAR] clears the display to correct an entry before it is processed. Also stops error alarm when
incorrect entries are made.
(2) Void/Error Correction [VOID/EC] - double function - Void is used for correcting a particular entry after it is
processed and printed. EC is used for deleting the last sales entry.
(3) Quantity and Time Key [QTY/TIME] - double function - is used to multip ly a number of items entered at one
price and to display the current time.
(4) Non Tax Key [NON TAX] is used when no tax is to be registered for a department that is programmed for
tax.
(5) Tax 2 Key [TAX 2] adds a tax amount to the sales figure according to the tax rate programmed for this key.
Tax 2 key is normally used to program a second tax rate required by a particular area or state. It can also be
used to override the pre-programmed tax on a department key.
(6) Tax 1 Key [TAX 1] adds a tax amount to the sales figure according to the tax rate programmed for this key.
Tax 1 Key is normally used to program a single tax rate required by a particular area or state. It can also be
used to override the pre-programmed tax on a department key.
5

KEYBOARD FUNCTIONS
(7) Feed Key advances the paper one line. Hold down to advance paper continuously.
(8) PLU Release Key [PLU ALT] is used to temporarily override a price which was preset to a PLU number.
(9) PLU Key [PLU] allows the numbers from 1 to 500 to be us ed as codes for pre-programming merchandise
prices, to maintain a tally of cost and quantity of the merchandise sold.
(10) Clerk Key [CLERK] is used for entering clerk numbers and the Manager's Password Code.
(11) Department Shift Key [DEPT SHIFT] is used to make entries for departments 21-40. Press Department
Shift before each department entry for departments 21-40. The register goes back to the non-shift mode after
each department entry.
(12) Paid-Out Key/Minus Percentage Discount Key [PO/-%] - double function - Minus Percentage Discount (-
%) is used to subtract a percentage rate such as an em ployee discount from an individual item. The rate can
be pre-programmed or manually entered. Paid-Out (PO) is used to register dollar amounts taken out of the
cash drawer that are not part of a sales transaction; i.e., petty cash.
(13) Received-On-Account Key /Plus Percentage Key [RA/+% ] - double function - Plus Percentage (+%) is
used to add a percentage rate such as a service charge or gratuity to an individual item. The percentage rate
can be pre-programmed or manually entered. Received- On-Account (RA) is used to register dollar amounts
placed in the cash drawer that are not part of a sales transaction. Also used to register payments made to a
customer's charge account or to declare the starting amount of cash in the drawer for the day.
(14) Return Key [RETURN] is used for issuing refunds for returned merchandise.
(15) Coupon Key [CPN] is used to subtract a specific amount from an individual item. This is also known as a
Mark-Down key.
(16) Charge Key [CHG] is used to finalize a transaction paid by a credit card or can be used to denote an in-
house charge.
(17) Check Key [CHK] is used to finalize a transaction paid by a check.
(18) Subtotal, No-Sale and Non-Add Key [#/ST/NS] - triple function - As the No-Sale key, it opens the drawer
without registering any amount s; for example, to give change. The Non-Add key function allows entering up
to a 7 digit reference number which prints on sales receip ts. As the Subtotal key, it displays and prints the
subtotal of a sale without sales tax.
6

KEYBOARD FUNCTIONS
(19) Subtotal With Tax Key [ST W/TAX] displays the total sales amount, including sales tax. It is not printed on
the register receipt until the sale is finalized by pressing either the [CHK], [CHG] or the
[AMT TEND/TOTAL] key.
(20) Amount Tendered/Total Key [AMT TEND/TOTAL] is used to finalize a transaction paid by cash and
calculates the amount of change required from the cash received.
(21) Numeric Input Key s (0-9/00/.) are used to input dollar amounts of merchandise sold, to indicate how many
times a particular item repeats, to add and subtract per centages in conjunction with the -% and +% keys, to
input PLU code numbers, to handle figures that require a decimal point and for other numeric value-related
entries. Double Zero (00) allows for quick entry of number s with two or more zeros. Decimal Point (.) is used
to enter fractional quantity of items being sold. In all modes, the Decimal Point is not to be used when
entering a price.
(22) Department Key s (1-20)/(21-40) are used to specify which department the transaction is for. Each
department can represent a category of merchandise sold and can be programmed as taxable or non-
taxable.
Note: The department key with letters are used in the program mode w hen programming alpha
descriptions.
LEAVING THE REGISTER PLUGGED IN: Keep the register plugged in and at the "OFF" (Locked)
position when not in use. The keyboard is then inoperable and the cash drawer is electronically
locked, but a minimum amount of power maintains the programs and transaction data totals.
7

DISPLAY WINDOWS
OPERATOR DISPLAY
Your cash register provides two displays which featur e large, easy to read fluoresc ent digits for easy operator
and customer viewing. The operator display is located at the top front of the machine and is your visual guide to
the inner workings of the cash register. The displa y shows entry amounts and related transaction information by
the use of numbers and special symbols. The display c apacity is 9 digits; 1 digit for Repeat, 2 digits for
Departments, and an amount display with a 7 digit capacity for numerical entry.
CUSTOMER DISPLAY
To position the rear customer display, simply pull up and rota te for viewing from any direction. To close, simply
turn the display facing away from you (to the rear of the cash register), then press down on the raised display
until it lies flat against the top of the register.
Following is a graphic representation of the items shown on the cash register Operator Display:
The display indicators read from left to right as follows:
R: Repeat symbol, indicates when multiple items are entered at one price.
DEPT (Department): 2 digits, displays the department number entered.
PLU: 3 digits, displays the number of the PLU entered.
DEPT SHIFT: A triangular indicator displays when the [DEPT SHIFT] key is operated.
CA (Cash): A triangular indicator displays when the [AMT TEND/TOTAL] key is operated.
CHK (Check): A triangular indicator displays when the [CHECK] key is operated.
CHG (Charge): A triangular indicator displays when the [CHARGE] key is operated.
AMOUNT: 7 digits for entry and 10 digits for printing (8 numeric, 2 symbols).
Symbols which appear on the display:
C: Displays the change due.
E: Displays if an error is detected. PRESS the [CLEAR] key to reset.
: Displays when the [#/ST/NS] key is pressed.
-: Displays when the total is a negative figure.
U: Void/Return symbol, appears when a void or return operation is performed.
-: RA or PO symbol appears when an amount is entered and the RA or PO key is
pressed.
8
DEPT
SHIFT CA CHK CHG

PRINTER
The figure below shows the printer with the cover removed.
DESCRIPTION OF PART FUNCTION
1. Paper Roll The paper roll is located here.
2. Paper Entrance The end of the paper is inserted into the printer here.
3. Paper Guide Used to guide the journal paper.
4. Journal Spindle Support Used for the journal spindle (take-up spool) to take up the journal paper used
for record keeping.
5. Paper Exit The paper exits here.
6. Battery Compartment Used for 3 "AA" batteries to back up the memory.
7. Ribbon Cartridge Used to supply ink to the printer.
9

BATTERY SYSTEM
BACK-UP BATTERY SYSTEM
The memory is protected by three "AA" batteries that come with the cash regi ster. During cash register operations,
all transaction data for the management report is stored in t he register's memory. The memory also holds all the
optional program information. The memory back-up system keeps this in formation stored in memory when the
register is turned off. The back-up battery power system maintains programming in the event of a power failure or if
the register is accidently disconnected for up to approximately 30 days if necessary.
Important: In order to assure continuous battery back-up protection, it is important that the batteries be
changed approximately every six months.
INSTALLING OR REPLACING THE BACK-UP BATTERIES:
EXTENDING THE USAGE OF THE BACK-UP BATTERIES
If the cash register will not be used for an extended period of time, you may want to remove the batteries to prolong
their life. IMPORTANT: All transaction data and programming will be erased.
10
NOTE: Three "AA" batteries are required.
1. Make sure the register is plugged in and turn the
key to the "OFF" position.
2. Open the journal compartment cover. Grip the
left side of the journal cover and gently pull back.
The cover will remain open in an upright position.
3. Remove the battery cover, located to the rear left
section of the compartment.
4. Position batteries making sure that the positive
and negative poles are aligned correctly.
5. Replace the battery cover by sliding down into
position.
6. Close the journal compartment cover and use the
Cash Drawer/Journal Lock key #515 to lock it, if
desired.

INSTALLING THE PAPER ROLL
Your cash register features a heavy-duty printer which uses one roll of 2-ply, 57mm (2¼") carbonless cash register
paper, one for the customer receipt (outside) and the other for the journal record (inside). The register will also
accept standard 2¼" calculator paper for a single tape record . If a customer receipt is not required, a paper saving
option is offered to reduce the number of blank lines between each transaction printed on the journal tape, for further
details see Flag 15 on Page 60.
INSTALLING THE PAPER ROLL
11
1. Plug in your cash register and set the Control Lock in
the "REG" (Register) mode.
2. Open the journal compartment cover, first be sure
that the lock (located on t he left side of the journal
compartment cover) is unlocked using the Cash
Drawer/Journal Lock key #515. Grip the left side of the
journal cover and gently pull back. The cover will remain
open in an upright position.
3. Cut the end of the paper roll evenly for a straight
even edge for proper feeding through the printhead.
4. Lower the paper roll into the space behind the printer
so that the paper feeds out from the bottom of the roll.
(see illustration)
5. Work the paper roll gently between the two spindles
so that they slip into the center hubs of the roll.
6. Insert the end of the inside paper (journal) under the
plastic bar and the outside paper (customer receipt) over
the plastic paper separator bar. Bring both ends together
before inserting the paper into the paper slot (see
illustration). Depress the Feed key until the paper
catches and advances through the printer.
7. If the paper does not feed through the printer
properly, inspect the end of the paper tape and repeat
steps 3 through 6.
8. Ease the journal (inside) paper through the narrow
opening in the center of the journal winder spindle.
9. Manually turn the spindle several times to take up
some of the excess paper - turn towards back of register.

(Continued) INSTALLING THE PAPER ROLL
10. Place the end of the spindle at the left end of the journal winder.
11. Next, place the black plastic Journal Winder Spindl e on its grooves (the spindle rests above the paper roll).
Advance the paper using the Feed key until the journal paper begins to wind securely around the spindle.
12. Pass the customer (outside) paper through the receipt window of the journal compartment cover.
13. After installing the paper roll, cl ose the journal compartment cover and use the Cash Drawer/Journal Lock key
#515 to lock it, if desired.
NOTE: It is recommended to use Royal brand 2¼" (57mm) "bond quality" paper which will help prevent dust
deposits on the printer mechanism found when using inexpensive paper rolls. Replace with Royal brand
carbonless 2-ply paper, Royal Reorder #013130 or standar d bond quality calculator single ply paper, Royal
Reorder #013129.
12

INSTALLING THE RIBBON
Your cash register comes with the ri bbon already installed. The ribbon releases special ink to the printhead which
produces the printout. After a period of time, depending upon the amount of use, the ink in the ribbon will be used
up. When printout becomes faint, the ribbon needs to be replaced.
CAUTION: The ribbon is not designed to be re-inked. Under no circumstances should this be done or
permanent damage to your cash register printer may result. Such damage will not be covered under Royal's
warranty.
INSTALLING THE RIBBON
NOTE: It is recommended to use Royal brand replacement ribbon (color-purple), Royal Reorder 013019.
13
1. Open the journal compartment cover, first be
sure that the lock (located on the left side of
the cover) is unlocked using the Cash
Drawer/Journal Lock key #515. Grip the left
side of the journal cover and gently pull back.
The cover will remain open in an upright
position; or if preferred, you can remove it
completely and set it aside.
The ribbon cartridge looks as follows (see
illustration).
2. Remove the used ribbon cartridge: On the
right side of the cartri dge, press down where it
is labeled "PUSH" in order to eject the ribbon
from the printer. The left side of the ribbon will
lift up and can be easily removed.
3. Remove the new ribbon cartridge from its
cellophane package. Be careful not to touch the
wet inked portion of the ribbon.
4. To install the new ribbon, holding the ribbon
on both ends, first lower the left side of the ribbon
and then the right side. Push gently on the right
side to snap the ribbon into place (see
illustration).
5. Make sure that the paper feeds up through
the ribbon cartridge. The inked portion of the
ribbon should be in front of the register paper.
6. After installing the ribbon, close the journal
compartment cover and use the Cash
Drawer/Journal Lock key #515 to lock it, if
desired.

QUICK START
The Quick Start program is designed to help you quickly "get started" with the basics you need to run your cash
register. It covers programming the Decimal Point, R ounding, Date, Time, Tax Rate and Department Status for
taxing or non-taxing. Follow the Quick Start straight through, however, skip any steps which are not required by your
business needs. Once the Quick Start is completed, a pr ogram confirmation report can be taken to review your
results. As you go through the Qu ick Start, if an error tone sounds, PRESS the [CLEAR] key and continue by
repeating the step you are attempting to program.
NOTE: It is not necessary to repeat the entire Quick Start program if y ou wish to update or change a step
at any time. Therefore, maintain your owner's manual in a safe place for all future programming.
The word "TYPE" refers to the numeric keypad (the numbers 0 through 9).
The word "PRESS" refers to the operational keys on the machine.
IMPORTANT: Before beginning the Quick Start, read Unpacking Your Cash Register and Set Up (Page 1),
Getting To Know Your Cash Register (Page 2), Contro l Lock (Page 4), Keyboard Functions (Pages 5-7), Display
Windows (Page 8), Battery System (Page 10) and Installing the Paper Roll (Pages 11-12).
FOLLOW THE QUICK START ON THE NEXT PAGE.
14

QUICK START
QUICK START: ROYAL ALPHA 580
IMPORTANT: BEFORE PROCEDING WITH THE QUICK START, THE CASH REGISTER MUST BE
INITIALIZED. PLEASE SEE PAGE 1 FOR PROCEDURE.
1. Insert the Manager Program Key (MA) in the Control Lock and turn to the "PRG" program
position.
2. To set the DATE, enter as year-month-day format. Example: For January 24, 1999:
TYPE (1), PRESS [QTY/TIME], TYPE (19990124), then PRESS [AMT TEND/TOTAL].
3. To set the CURRENT TIME, use military time. Example: To set 10:15 A.M.:
TYPE (2), PRESS [QTY/TIME], TYPE (1015), then PRESS [AMT TEND/TOTAL].
* Reminder: To convert to military time, add the number 12 to every hour after 12:00 noon.
For example, to set 1:15 P.M. TYPE (1315).
4. To set the TAX ROUNDING to the nearest whole number - U.S. standard:
TYPE (3), PRESS [RA/+%], TYPE (005), then PRESS [AMT TEND/TOTAL].
5. To set a single fixed TAX RATE:
a) TYPE (1), PRESS [PO/-%], TYPE the TAX RATE, then PRESS [AMT TEND/TOTAL].
Example: If Tax Rate is 5%: TYPE (1), PRESS [PO/-%], TYPE (50000], then PRESS
[AMT TEND/TOTAL].
b) If the Tax Rate is a decimal, for example 6.5%, program as follows:
TYPE (1), PRESS [PO/-%], TYPE (65000), then PRESS [AMT TEND/TOTAL].
* Note: If you need to program a second or third tax rate, see Pages 21 and 22 for details.
6. Departments can be programmed for the price, tax status and description all in one step. In order to
get started quickly, we will program a price and tax status only. Complete setup is explained under
Department Programming.
a) To program Department 1 as taxable and a price of $1.00:
TYPE (100), PRESS [DEPARTMENT 1], TYPE (00001), PRESS [EC/VOID], then PRESS
[AMT TEND/TOTAL].
If no pre-set price is desired, skip entering the price.
Repeat (PRICE), [DEPARTMENT #], then TYPE (00001) for each Department Key you wish to
charge tax, and then PRESS [EC/VOID] and [AMT TEND/TOTAL].
b) To program Department 2 as non-taxable and a price of $2.00:
TYPE (200), PRESS [DEPARTMENT 2], TYPE (00000), PRESS [EC/VOID], then PRESS
[AMT TEND TOTAL].
If no pre-set price is desired, skip entering the price.
Repeat (PRICE), [DEPARTMENT #], then TYPE (00000) for each Department Key you wish to
charge no tax, and then PRESS [EC/VOID] and [AMT TEND/TOTAL].
(Continue to the next page)
15

AFTER QUICK START
Your tapes should look similar to the reports shown below. Note: The Date, Time, Tax Rate and Department Status
will reflect the information based upon your input. If an e rror is made during programming, repeat only the step in
question. For more details of the symbols printed in the reports see the complete examples of the reports starting on
Page 62.
PROGRAM CONFIRMATION REPORTS (Maintain the key in the "PRG" mode)
The TAX PRESET REPORT prints each tax rate programm ed. To print the Tax Report, PRESS [PLU/ALT]
followed by the [PO/-%] key.
The DEPARTMENT PRESET REPORT prints department descriptions, price and tax status. To print a Department
Report, PRESS [PLU/ALT] followed by any [DEPARTMENT] key.
The BASIC PRESET REPORT prints out the date, time, store logo and commercial message information. To print a
Basic Preset Report, PRESS [PLU/ALT] followed by the [QTY/TIME] key.
Time Display: Press the [QTY/TIME] key in the register mode to show the time. The time display does not need to
be canceled because it is automatically replaced by a figure when the next transaction is performed. The
[QTY/TIME] key is a double function key where, during a tr ansaction, it is used to perform multiplication when a
quantity of more than one is registered.
16
TAX PRESET
TAX-1 0
5.0000%
0.00
TAX-2 0
0.0000%
0.00
TAX-3 0
0.0000%
0.00
TAX-4 0
0.0000%
0.00
12-07-1999 10:40AM
0001 CLERK 1
TAX SYSTEM
(Add-On, VAR or Table)
Tax Rate Programmed
# of Decimal Places
DEPT PRESET
DEPT01 D EPT01
PR ICE 1.00
FLAG 00001
DEPT02 D EPT02
PR ICE 2.00
FLAG 00000
DEPT03 D EPT03
PR ICE 0.00
FLAG 00000
DEPT04 D EPT04
PR ICE 0.00
FLAG 00000
DEPT05 D EPT05
PRICE 0.00
FLAG 00000
DEPT06 D EPT06
PR ICE 0.00
FLAG
00000
PRE-SET PRICE
DEPARTMENT STATUS
(SET FOR TAX-1)
PRE-SET PRICE
DEPAARTMENT STATUS
(NON TAXABLE)
YOUR RECEIPT
Thank You
Call Again
BASIC PRESET
01 DATE 01-24-1999
02 TIME 08:52
03 0
04 MCNO 00
05 +% 0.00%
06 -% 0.00%
07 COUPON 0.12
08 +% FLAG 00
09 -% FLAG 00
10 - FLAG 0012
11 CSCN 0001
12 X1 CNT 0002
13 X2 CNT 0001
14 Z1 CNT 0003
15 Z2 CNT 0001
16 NRGT 1.01
17 TRAINING 0000
18 PASSWORD 0000
19 PASSWORD 0000
20 LOGO LINE 5
21 LOGO 1
22 LOGO 2
YOUR RECEIPT
23 LOGO 3
Thank You
24 LOGO 4
Call Again
25 LOGO 5
26 MESSAGE LINE 0
01-24-1999 08:52AM
0023 JEAN
DATE
TIME
NOT USED
MACHINE NUMBER
RA/+% RATE
Po/ -% RATE
COUPON AMOUNT
+% TAX STATUS
-% TAX STATUS
COUPON TAX STATUS
CONSECUTIVE NUMBER
X1 COUNTER
X2 COUNTER
Z1 COUNTER
Z2 COUNTER
GRAND TOTAL
PASSWORDS
# OF LINES FOR LOGO
LOGO
# LINES FOR COMMERCIAL
MESSAGE
TIME
DATE TRANSACTION NUMBER CLERK NAME OR NUMBER
Other manuals for 580
1
Table of contents
Other Royal Cash Register manuals

Royal
Royal TS4240 User manual

Royal
Royal 101cx User manual

Royal
Royal 120cx User manual

Royal
Royal 110cx Manual

Royal
Royal CMS-482 Plus Owner's manual

Royal
Royal 435dx User manual

Royal
Royal CMS-487 Plus User manual

Royal
Royal ts1200mw User manual

Royal
Royal Alpha5000ML User manual

Royal
Royal Alpha 9180sc User manual

Royal
Royal 425cx User manual

Royal
Royal ALPHA lOOOML User manual

Royal
Royal 482NT User manual

Royal
Royal Alpha 583cx User manual

Royal
Royal Alpha 1000ML User manual

Royal
Royal CMS-8160 User manual

Royal
Royal CMS-482 Plus User manual

Royal
Royal Alpha 710ML User manual

Royal
Royal CMS-482 Plus User manual

Royal
Royal 480nt User manual