Ryobi BCL1418 Operation manual

BCL1418(260037003)
14.4 - 18 VOLT NICKEL-CADMIUM /
LITHIUM-ION BATTERY CHARGER
OWNER'S OPERATING MANUAL
BCL1418_SAA-v6.indd 1 11/27/09 5:14:41 PM

1. BCL1418 Charger
2. Battery Port
3. Green LED
4. Red LED
5. "Key Hole" Hanger
6. Depress Latches to remove Battery Pack
DESCRIPTION
Fig. 1
3
41
2
5
Fig. 2
6
43
BCL1418_SAA-v6.indd 2 11/27/09 5:14:44 PM

Important!
It is essential that you read the instructions in this manual before
operating this product.
Subject to technical modications.
BCL1418_SAA-v6.indd 3 11/27/09 5:14:45 PM

1
English
SAFETY INSTRUCTIONS
This appliance is not intended for use by persons
(including children) with reduced physical, sensory or
mental capabilities, or lack of experience and knowledge,
unless they have been given supervision or instruction
concerning use of the appliance by a person responsible
for their safety. Do not let children play with this
appliance.
CAUTION
When using the battery charger, the following
basic safety precautions should be observed for
protection against electric shock, danger of injury
and burns.
Please read and observe these instructions before using
the device.
nBefore using the device check that the mains cable
and mains plug are not damaged.
nThe device must not be damp, neither should it be
used in a damp environment.
nDo not use the device if it has suffered any heavy
shock or jolting, or is damaged in any other way.
nDue to the heat generated during charging,
the battery charger should not be operated on a
combustible surface/in an inflammable environment.
nDo not cover the ventilating slits
nNever disassemble the device yourself. Danger of
an electric shock or fire could be caused by improper
reassembly.
nPull the plug of the battery charger out of the socket
when it is not in use or when cleaning it.
nOnly use extension cable that is approved and
technically in perfect condition.
nDuring operation provide sufficient ventilation.
Malfunction during charging can be caused by storing
and operating in places where the temperature
exceeds +40°C; this should be avoided. Battery
charging in closed cupboards, near heat sources
(radiators, bright sunshine) etc. causes heat to
accumulate and can damage the device.
nIf the battery is not going to be used for a longer
period, pull the battery off the battery charger and pull
out the mains plug.
nProtect battery contact to avoid a short circuit caused
by metallic object that can cause a fire or explosion!
nDo not rivet or screw any name-plates or signs onto
the device. The protective insulation can thereby
be rendered ineffective. Adhesive labels are
recommended.
nOnly charge original recommended batteries.
nIf the power cord is damaged, it must be replaced by an
Authorised Service Center in order to avoid a hazard.
WARNING
Do not recharge primary cells (non-
rechargeable).
Damage to property/material
Mains voltage must correspond with the voltage
specifications on the device.
nThis appliance is not intended for use by persons
(including children) with reduced physical, sensory
or mental capabilities, or lack of experience and
knowledge, unless they have been given supervi-
sion or instruction concerning use of the appliance
by a person responsible for their safety. Children
should be supervised to ensure that they do not
play with the appliance.
nThis appliance is not intended for use by young children
or inrm persons unless they have been adequately
supervised by a responsible person to ensure that they
do not play with the appliance.
nKeep children and visitors away. Visitors should
wear safety glasses and be kept a safe distance from
the work area. Do not let visitors contact the tool or
extension cord.
nComplies with AS/NZS 60335.
ASSEMBLY
No assembly required on this product.
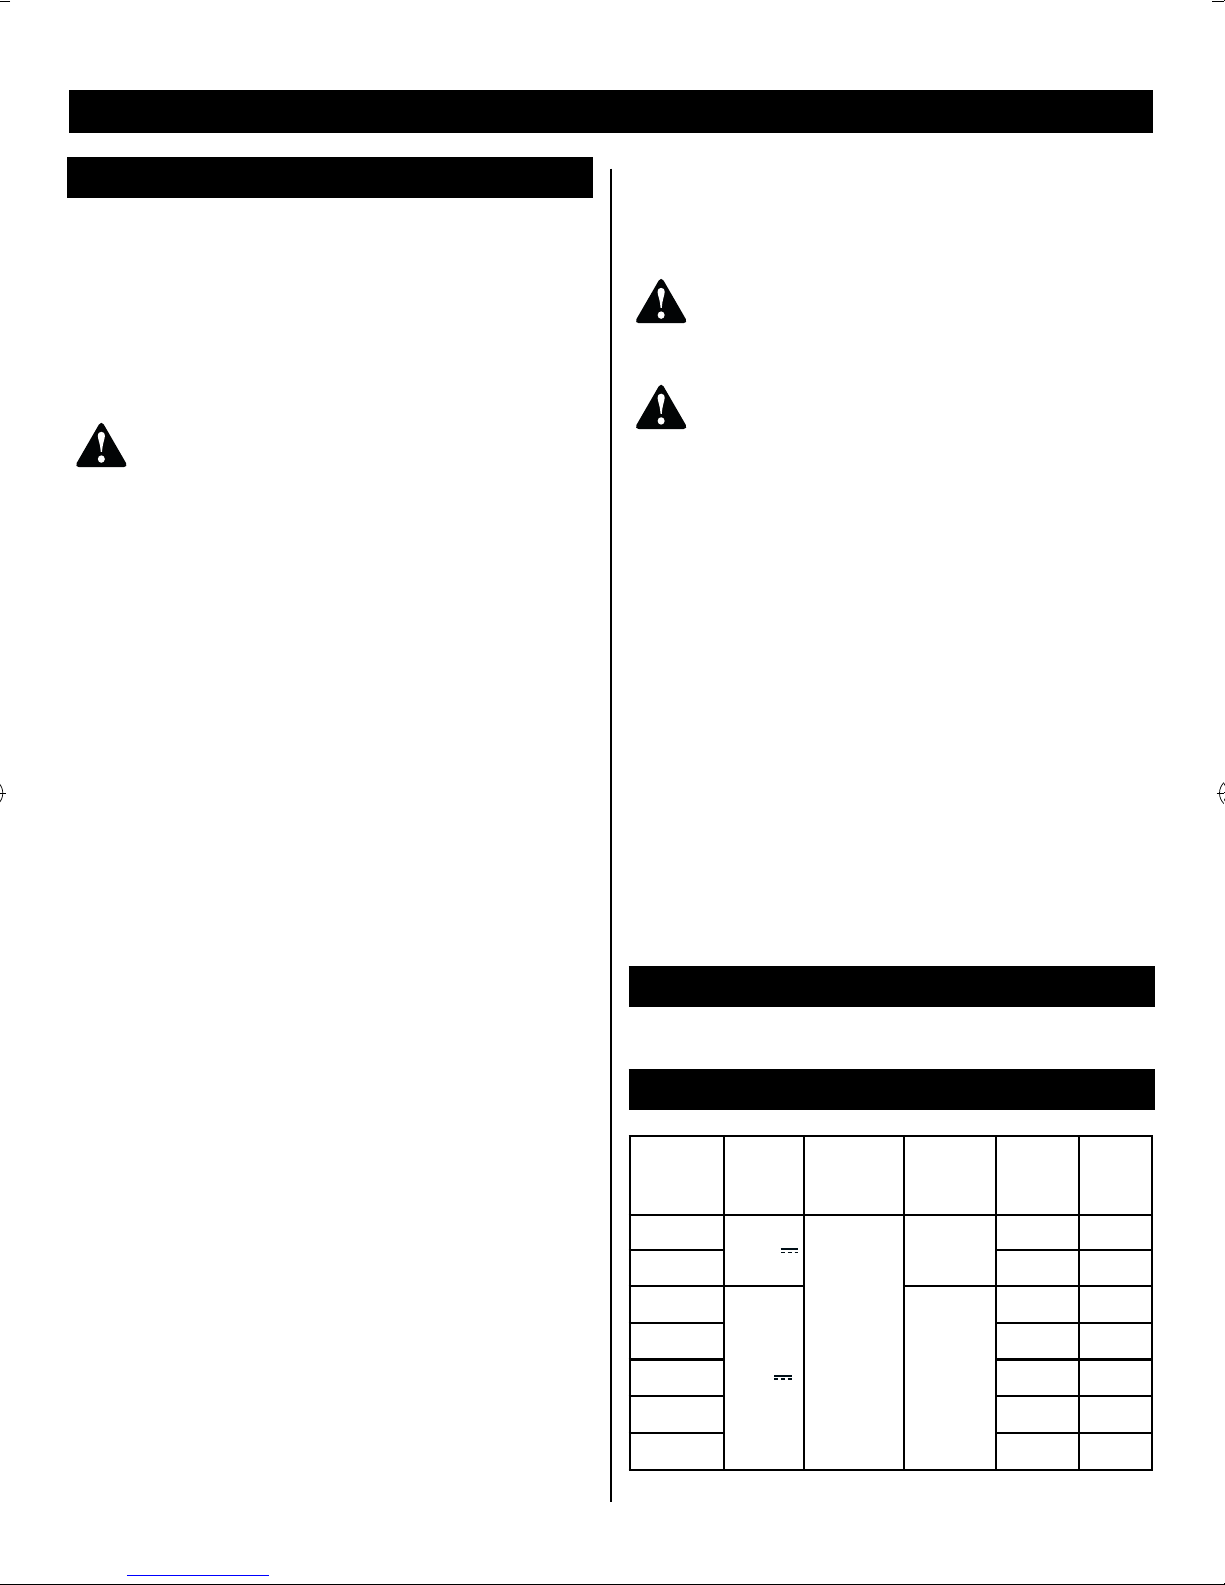
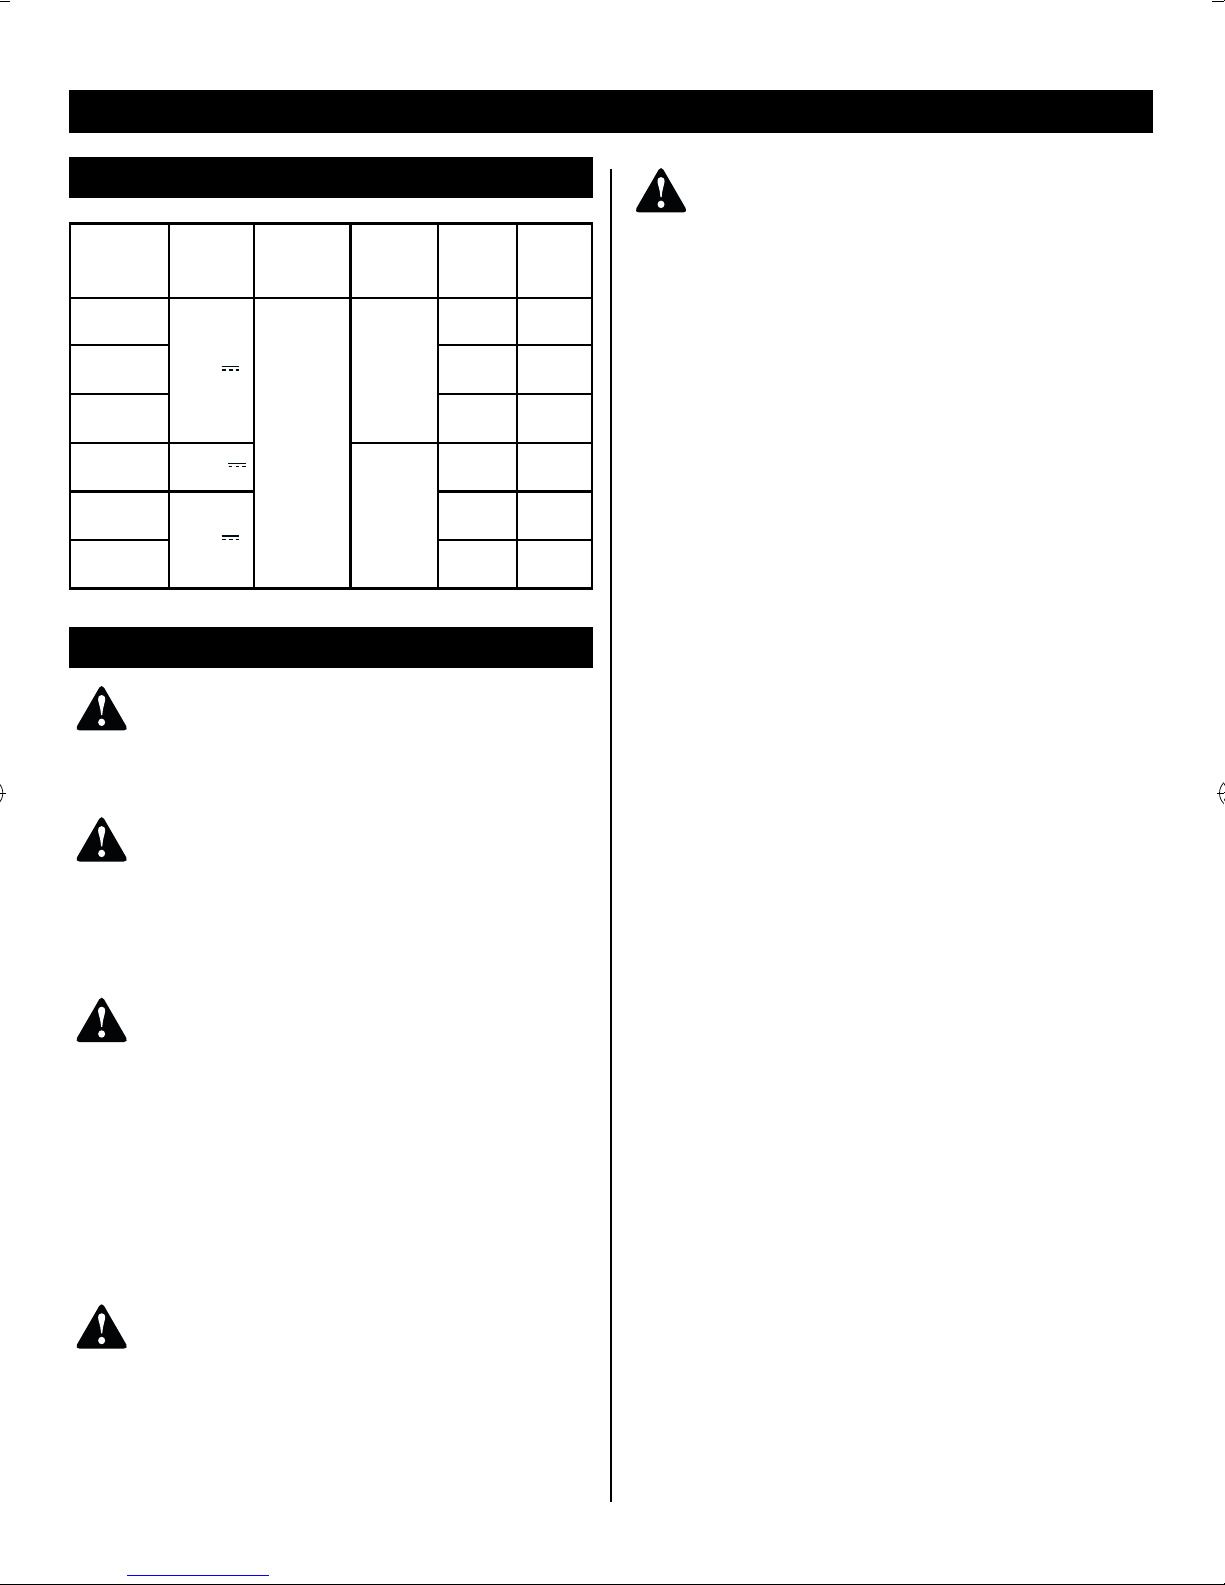
SPECIFICATIONS
Battery
Pack Voltage Charger
Input Chemistry Battery
Capacity
No. of
Cell per
Battery
130224024
14.4 V
220V-240V,
50Hz-60Hz
AC only
Ni-cd
1.3 Ah 12
130111073 1.5 Ah 12
ABP1817
18 V Ni-cd
1.7 Ah 15
ABP1813 1.3 Ah 15
130109021 1.5 Ah 15
130109022 1.5 Ah 15
ABP1817 1.7 Ah 15
BCL1418_SAA-v6.indd 1 11/27/09 5:14:45 PM

2
English
SPECIFICATIONS
Battery
Pack Voltage Charger
Input Chemistry Battery
Capacity
No. of
Cell per
Battery
130239010
18 V
220V-240V,
50Hz-60Hz
AC only
Ni-cd
1.5 Ah 15
130240011 1.5 Ah 15
ABP1801 1.7 Ah 15
BPL-1414 14.4 V
Li-ion
1.4 Ah 4
BPL-1815
18 V
1.4 Ah 5
BPL-1820 2.4 Ah 10
OPERATION
WARNING
Do not allow familiarity with products to make
you careless. Remember that a careless fraction
of a second is sufficient to inflict serious injury.
WARNING
Always wear safety goggles or safety glasses
with side shields when operating products.
Failure to do so could result in objects being
thrown into your eyes, resulting in possible
serious injury.
WARNING
Do not use any attachments or accessories not
recommended by the manufacturer of this product.
The use of attachments or accessories not
recommended can result in serious personal injury.
APPLICATIONS
You may use this product for the following purposes:
nCharging compatible Ryobi 14.4 Volt and 18 Volt
battery packs.
CAUTION
If at any point during the charging process none
of the LEDs are lit, remove the battery pack
from the charger to avoid damaging the product.
DO NOT insert another battery. Return the
charger and battery to your nearest service
center for service or replacement.
CAUTION
Charge in a well ventilated area. Do not block
charger vents. Keep them clear to allow proper
ventilation.
BATTERY PROTECTION FEATURES
Ryobi One+ 18 V and 14.4 V lithium-ion batteries are
designed with features that protect the lithium-ion cells
and maximise battery life.
If the tool stops during use, release the trigger to reset
and resume operation. If the tool still does not work, the
battery needs to be recharged.
LED FUNCTIONS OF CHARGER
See Figure 2.
CHARGER LED WILL BE ON TO INDICATE STATUS OF
CHARGER AND BATTERY PACK:
n Red LED on, Green LED off = Power to charger is on.
n Red LED flashing, Green LED off = Battery is being
tested.
n Red LED flashing, Green LED flashing = Battery is
defective.
n Red LED on, Green LED flashing = Battery is
charging.
n Red LED off, Green LED on = Battery is fully
charged.
CHARGING THE BATTERY PACK
Use only Ryobi One+ 18 V and 14.4 V battery packs
with this charger:
Battery packs for this tool are shipped in a low charge
condition to prevent possible problems. Therefore, you
should charge them until the green LED on the front of
the charger comes on.
NOTE: The charger will also charge Ryobi One + 18V and
14.4V Ni-Cd and Li-ion battery packs.
CHARGING A COOL BATTERY PACK
If the charger does not charge the battery pack under
normal circumstances, return both the battery pack and
charger to your nearest Authorised Service Center for
electrical check.
n Charge the battery pack only with the charger
provided.
n Make sure the power supply is normal household
voltage, 220V-240V, 50-60Hz, AC only.
BCL1418_SAA-v6.indd 2 11/27/09 5:14:46 PM

3
English
OPERATION
n Make sure the latches on each side of the battery
pack snap into place and the battery pack is secured
in the charger before beginning operation.
n Connect the charger to the power supply.
n Place the battery pack in the charger aligning raised
rib on the battery pack with the groove in the charger.
n Press down on the battery pack to be sure contacts
on the battery pack engage properly with contacts in
the charger.
NOTE: After charging is complete, the green LED will
remain on until the battery pack is removed from the
charger or charger is disconnected from the power
supply.
n
The battery pack will become slightly warm to the
touch while charging. This is normal and does not
indicate a problem.
n Do not place the charger and battery pack in an
area of extreme heat or cold. They will work best
at normal room temperature.
NOTE: The charger and battery pack should be
placed in a location where the temperature is
more than 10°C but less than 38°C.
n When batteries become fully charged, unplug the
charger from the power supply and remove the
battery pack.
n To remove the battery pack from the charger, depress
the latches on each side of the battery pack.
CHARGING A HOT BATTERY PACK
When using a tool continuously, the batteries in the
battery pack will become hot. You should let a hot battery
pack cool down for approximately 30 minutes before
attempting to recharge.
NOTE: This situation only occurs when continuous use
of a tool causes the batteries to become hot. It does not
occur under normal circumstances. Refer to "CHARGING
A COOL BATTERY PACK" for normal recharging of
batteries. If the charger does not charge your battery
pack under normal circumstances, return both the battery
pack and charger to your nearest Authorised Service
Center for electrical check.
LED FUNCTION
LED INDICATOR BATTERY
PACK
RED
LED
GREEN
LED ACTION
Power
Without
battery
pack
ON OFF Ready to charge
battery pack.
LED INDICATOR BATTERY
PACK
RED
LED
GREEN
LED ACTION
Evaluate Hot battery
pack Flashing OFF
When battery pack
reaches cooled
temperature,
charger begins
fast charge mode.
Evaluate
Cold
battery
pack
Flashing OFF
When battery pack
reaches warmed
temperature,
charger begins
fast charge mode.
Evaluate Deeply
discharged Flashing OFF
Charger pre-
charges battery
until nomal voltage
is reached, then
begins fast charge
mode.
Defective Defective Flashing Flashing
Battery pack
or charger is
defective.
• If defective, try to repeat the conditions a second time by
removing and reinstalling the battery pack. If the LED status
repeats a second time, try charging a different battery.
• If a different battery charges normally, dispose of the
defective pack (see Maintenance section).
• If a different battery also indicates "Defective," the charger
may be defective.
Charging Fast
charging ON Flashing —
Full — OFF ON
Fast charging is
complete; charger
maintains charge
mode.
MAINTENANCE AND REPAIRS
Risk of injury
Service, testing and repairs should only be
carried out by authorised service centres.
We recommend our customer service department or
authorised service centres.
STORAGE
Store your charger in a cool dry place between 10 &
25°C. It is not recommended to leave it in a cold works
van overnight. Ensure no metal filings or swarf can fall
into the vents during storage, as this may cause serious
injury when it is next used.
BCL1418_SAA-v6.indd 3 11/27/09 5:14:46 PM

BCL1418_SAA-v6.indd 4 11/27/09 5:14:47 PM
This manual suits for next models
1
Table of contents
Other Ryobi Batteries Charger manuals

Ryobi
Ryobi Tek4 AP4800 User manual

Ryobi
Ryobi RC18240 User manual

Ryobi
Ryobi RC18180 User manual

Ryobi
Ryobi CH120L User manual

Ryobi
Ryobi P117 User manual

Ryobi
Ryobi P131 User manual

Ryobi
Ryobi RY36C60A User manual

Ryobi
Ryobi BCS618 Assembly instructions

Ryobi
Ryobi BCL14181H User manual

Ryobi
Ryobi BCS618 Assembly instructions
Popular Batteries Charger manuals by other brands

Nordelettronica
Nordelettronica NE143-P instruction manual

Lindy
Lindy 73399 user manual

Humanscale
Humanscale NeatCharge WE9012C-X Assembly instructions

Alpitronic
Alpitronic Hypercharger HYC 150 Operation Instructions and Installation Guide

Shido
Shido DC 8.0 Instructions for use

Robitronic
Robitronic R01001 instruction manual