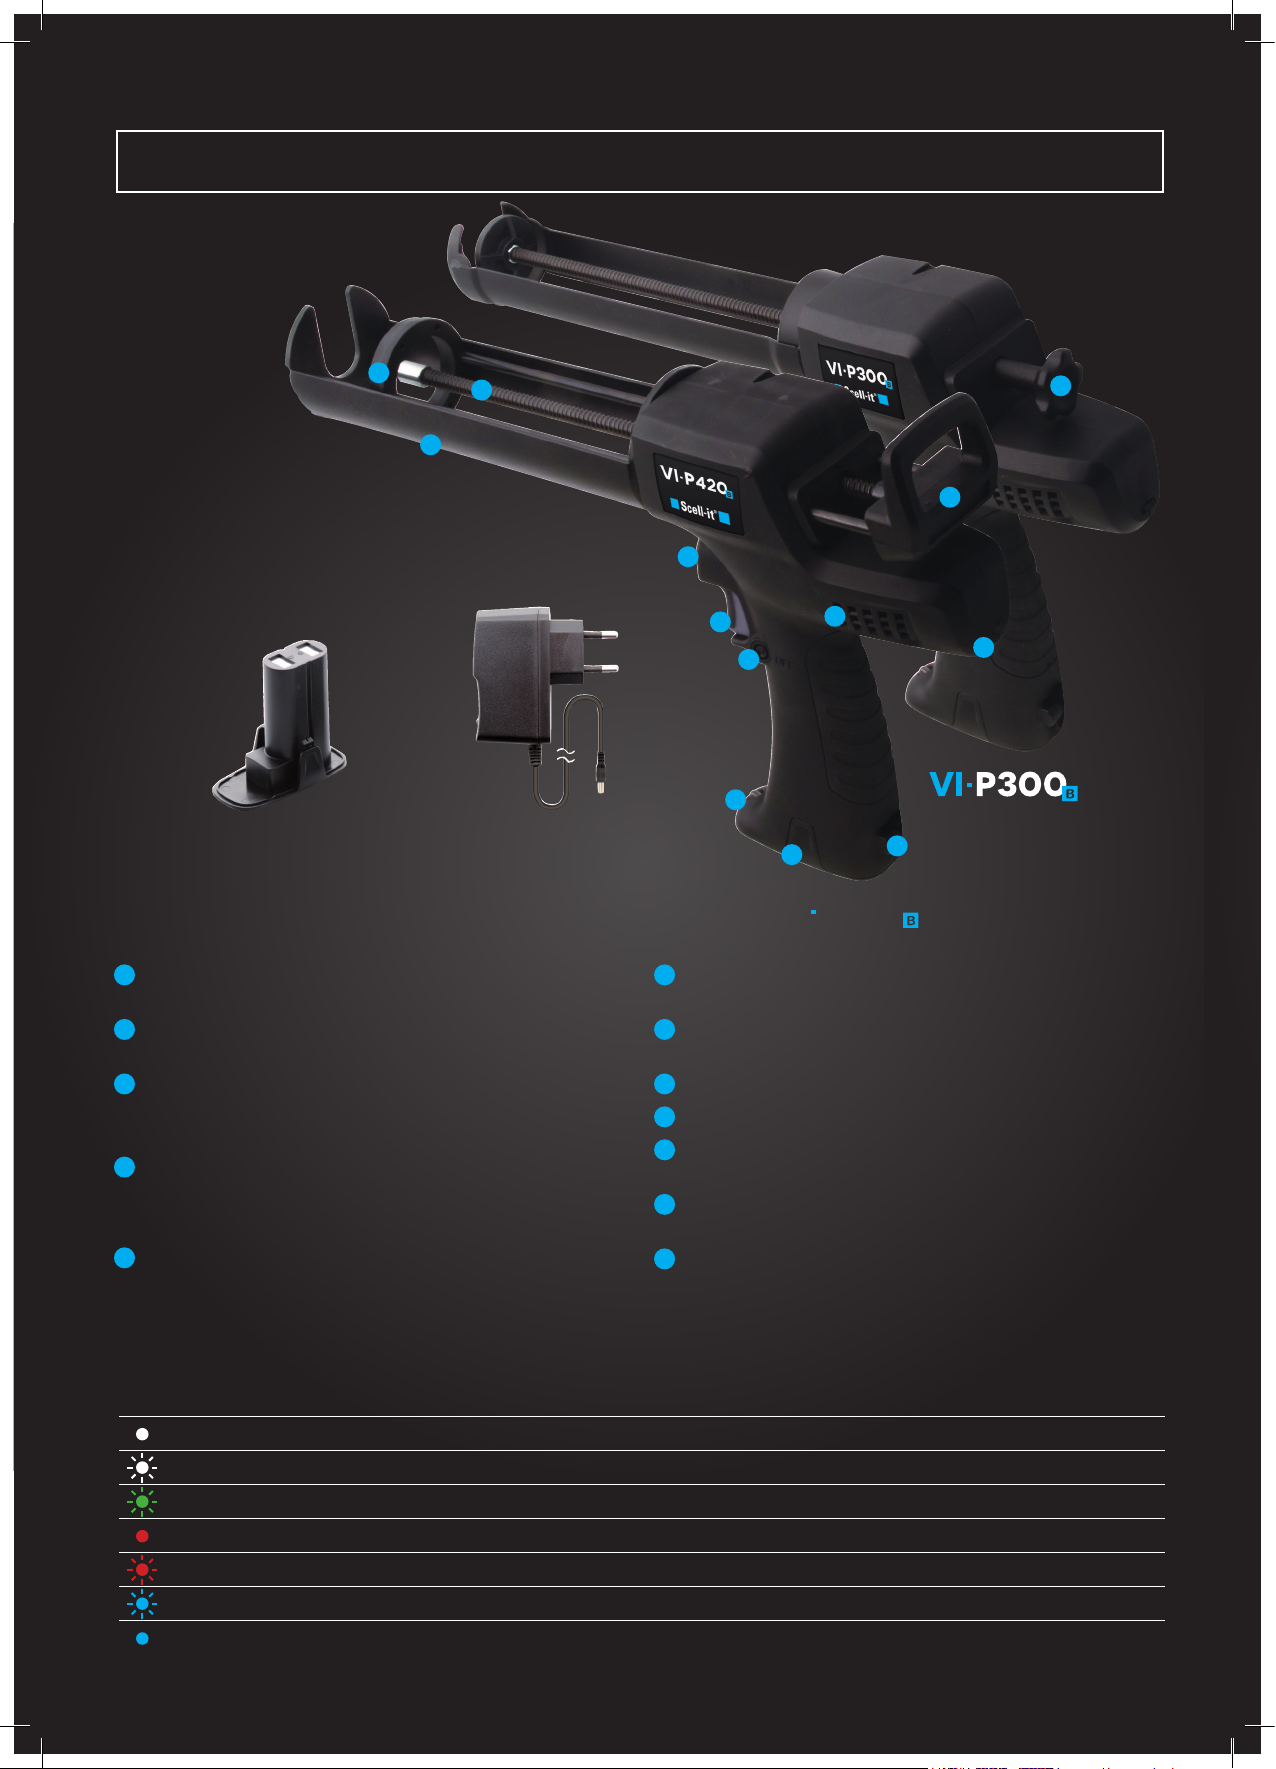
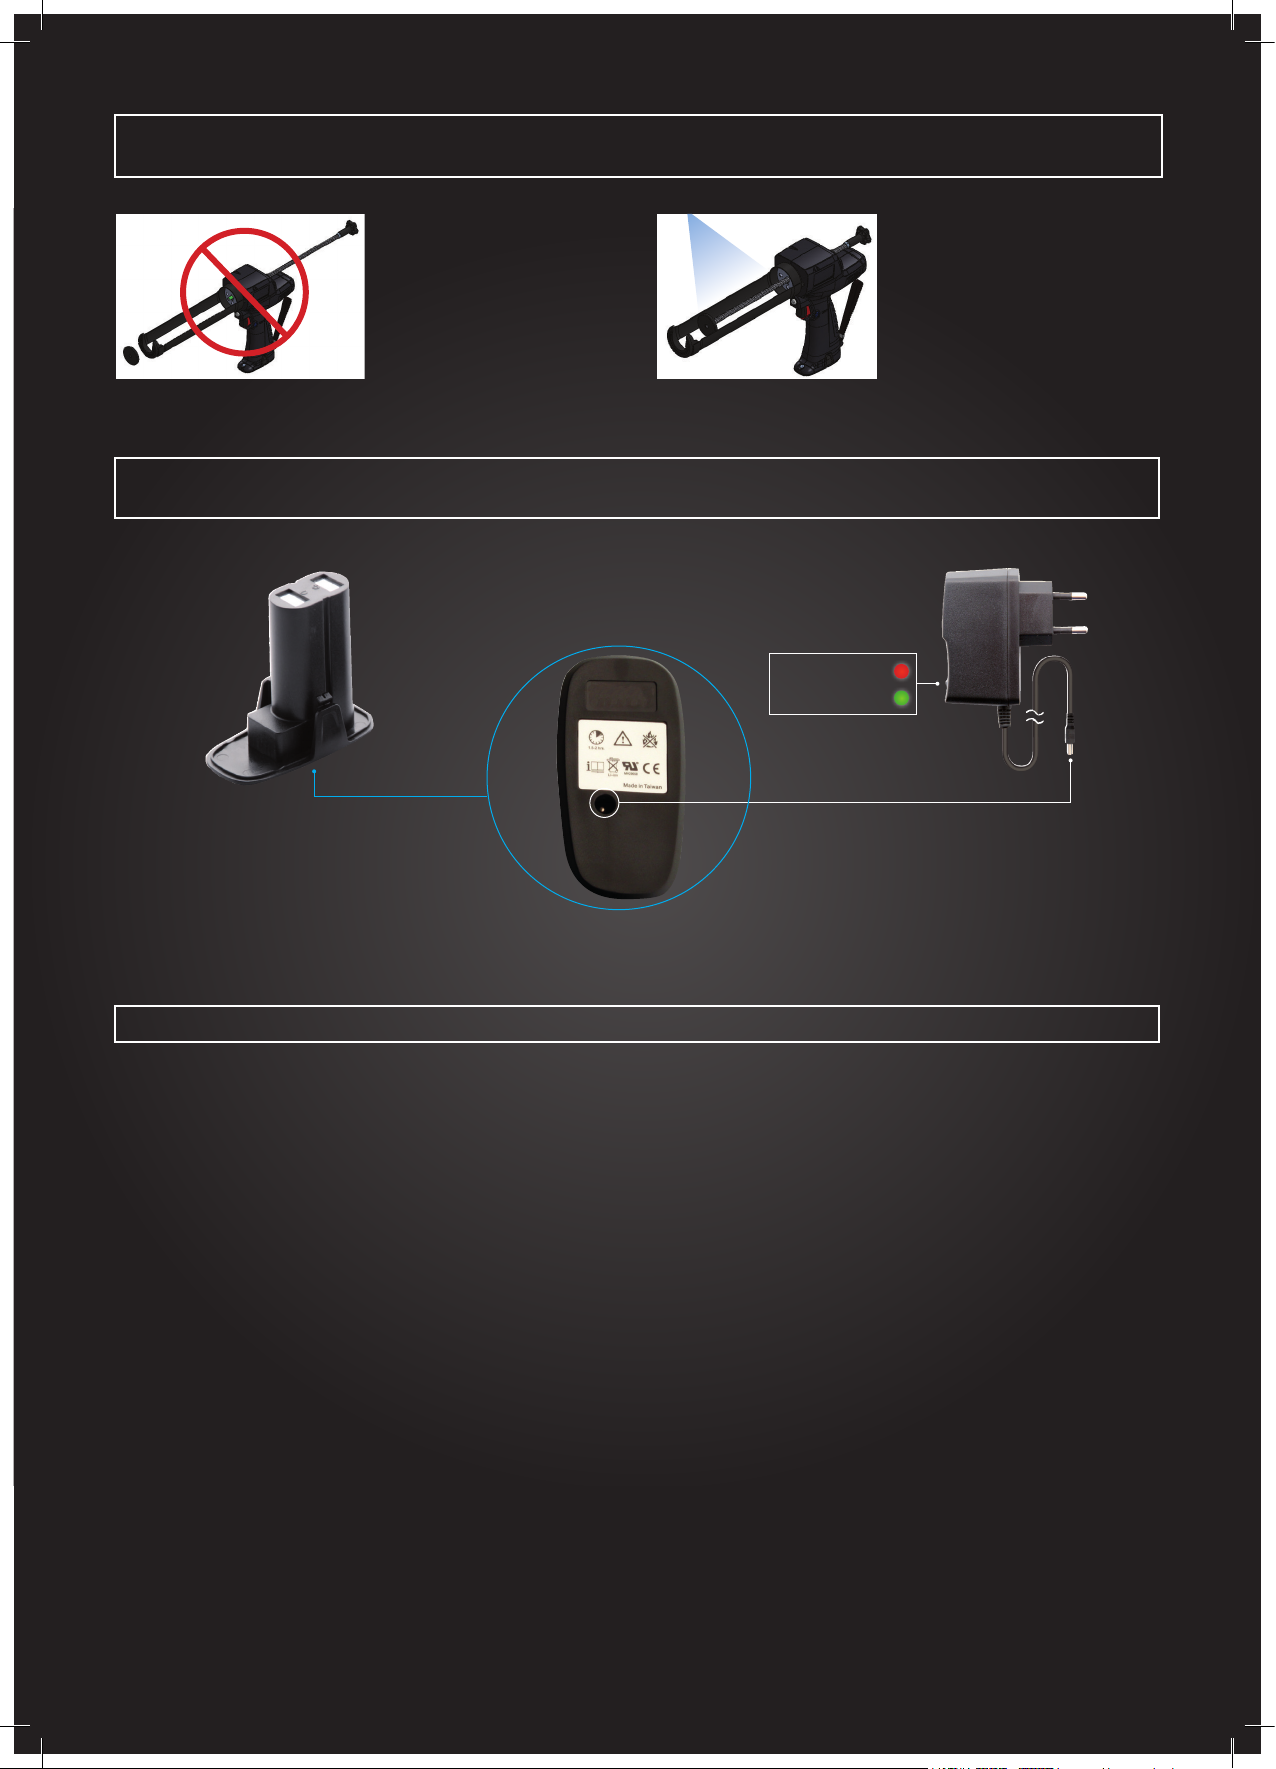
manuals.online logo
Brands
  1. Home
  2. •
  3. Brands
  4. •
  5. Scell-it
  6. •
  7. Power Tools
  8. •
  9. Scell-it VI-P300B User manual

Scell-it VI-P300B User manual

VI P420
CAULKING GUN
BATTERY 7.2V - 1.5Ah
INSTRUCTION MANUAL
EN
4
2
1
3
4
6
7
8
9
10
11
5
12
1Carriage
Cartridge holder
2Push plate
Parts contact and squeeze with the cartridge plunger.
3Plunger rod
The forward movement of the plunger rod applies pressure to the
bottom of an open cartridge tube, causing caulk to be dispensed.
4Pull knob
The pull knob is used to retract the plunger rod, allowing caulk pack
to be loaded. The plunger rod can only be moved while the plunger
rod release button is pressed.
5Rod release button
Pressing the plunger rod release button allows you to pull the plunger
rod backward.
6Trigger
Pressing the trigger starts the forward motion of the plunger rod.
7Trigger lock
The trigger lock prevents depression of trigger.
8Ventilation holes
9LED indicator
10 Speed adjustment wheel
Adjusts the extraction speed
11 Wrist belt
Worn on the wrist for safety purpose.
12 Battery pack release buttons
To release the battery back.
Battery pack
7.2V - 1.5Ah Transformer
(Charger)
OVERVIEW
Gun
Gun
VI P420
Indicateur LED
LED Color LED Signal Function Operation Status
WHITE light Rod goes forward Normal operation
Flash WHITE light Rod goes backward Normal operation
Flash GREEN light Over Voltage Protection (OVP) Automatically Power off when the status occurs.
RED light Battery Low Voltage Alarm Please charge the Li-ion Battery.
Flash RED light Battery Low Voltage Protection (LVP) Automatically Power off when the status occurs.
Flash BLUE light Overcurrent Protection (OCP) Automatically Power off when the status occurs.
BLUE light Over Temperature Protection (OTP) Automatically Power off when the status occurs.
Load the cartridges into
carriage. 1
Release and remove the
coaxial cartridges cap.
Check up on the battery
pack to be fully charged
and firmly loaded.
Tighten the static
mixer.
Pull the trigger for
operation. 6
GETTING STARTED
To remove the battery pack, press
the battery release buttons and
pull. 12 .
To load the battery pack, slightly
push the battery pack upward to
the handle housing.
Battery loading and removal Loading caulk material
Press the rod release button. 5Hold the pull knob and pull it back
4.
MAINTENANCE & CLEANING
Lock the trigger 6when the tool
is not in use. To lock the trigger,
push trigger lock 7at OFF site,
the tool will not operate.
Turn unit off and disconnect
battery pack before installing
and removing accessories or
performing maintenance.
Press trigger 6to dispense
caulk .
Locking the trigger Start and stop
Turn the disk from Left (Low) to
Right (High) for desired dispensing
speed.
Maximum achievable speed on the
trigger once the desired speed is
set on the disk.
Don’t start the tool from the lowest
point. The speed sometimes is too
slow to be noticed. 10
Stepless speed control disk
[DS series only]
Trouble Shooting
If the release button is stuck,
please gently pull and release
the trigger, this will retract the
ball screw automatically and
release the pressure. Then the
release button is functional.
• If the tool does not start or operate at full power with a
fully charged battery pack, clean the contacts on the battery
pack. If the tool still does not work properly, return the tool,
charger and battery pack to service facility for repairs.
• Clean dust and debris from charger and tool vents. Keep
tool handles clean, dry and free of oil or grease. Use only
soap and a damp cloth to clean the tool, battery pack and
charger since certain cleaning agents and solvents are
harmful to plastics and other insulated parts. Some of these
include gasoline, turpentine, lacquer thinner, paint thinner,
chlorinated cleaning solvents, and ammonia, which may
consist in household detergent.
• Never use flammable or combustible solvents on tools.
• After daily application or continuous
several hours usage, please grease the
plunger rod and bearings located on the
plunger rod connector.
ABCD
1
5
12
E
6
10
7
6
6
BATTERY CHARGING
IMPORTANT
Connect the power core to the DC terminal at bottom of
the battery first, and then plug the compact transformer
into the A.C. power outlet.
It takes approximately 1~1.5 hours to get fully charged
battery.
Charging
Complete charge
RECHANGABLE BATTERY POWER
TOOL USE AND CARE
• Ensure the lock switch is in « off « position
before inserting battery pack.
• Use only original manufacturer supplied
charger to charge original manufactured
battery.
• Use of any other battery packs may cause
damage or fire.
• When battery pack is not in use, keep it
away from other metal objects like paper clips,
coins, keys, nails, screws or other small metal
objects that can make a connection from
one terminal to another. Shorting the battery
terminals may cause burns or a fire.
• Under abusive conditions, liquid may be
ejected from the battery, please avoid contact.
If contact accidentally occurs, flush and clean
with water. If liquid contacts eyes, look for
medical help immediately. Liquid ejected from
the battery may cause irritation or burns.
• If the performance of the battery diminishes
substantially even it has been fully charged,
the life of battery is terminated, please replace
a new one.
• Do not keep the battery in recharge for more
than 2 hours. This could reduce battery life.
• Wet or overheat condition will reduce
battery life.
• When discarding batteries, environmental
issues must be considered. The local rules or
laws governing the disposal of battery must
be followed strictly.
Maintaining battery pack
The battery packs will operate for years and/or
hundreds of cycles when they are maintained
and used according to these instructions.
• A battery pack that is stored for six months
without using will discharge itself. Batteries
discharge at a rate of about 1% per day.
Charge the battery every six months even it is
unused to maximize battery life. Replace this
battery pack until it no longer performs the
power needed for your application.
• Store your battery pack in a cool, dry place.
Do not store at place where the temperature
may exceed 50°C such as in a vehicle or metal
storage during the summer. High temperature
will overheat the battery pack, and reduce
battery life. If it is stored for several months,
the battery pack will gradually lose its power.
During the life of the battery pack, the
operating time between charges becomes
shorter. If the operating time becomes
extremely short after a proper charge, the life
of the battery pack has been terminated and it
should be replaced.
GENERAL SAFETY RULES
Work area safety
Keep work area clean and well lit. Cluttered or
dark areas cause accidents easily.
• Do not operate power tool in explosive
atmospheres, such as in the presence of
flammable liquids, gases or dust. Power tools
create sparks which may ignite the dust or
fumes.
• Keep children and bystanders away while
operating a power tool. Distractions can cause
you to lose control.
Electrical safety
Power tool plugs must match the outlet. Never
modify the plug in any way. Do not use any
adapter plugs with earthed (grounded) power
tools. Correct plugs and matching outlets will
reduce risk of electric shock.
• Avoid body contact with grounded
surfaces such as pipes, radiators, ranges
and refrigerators. There is an increased risk of
electric shock if your body is grounded.
• Do not expose power tools to rain or wet
conditions. Water entering a power tool will
increase the risk of electric shock.
• Do not abuse the cord. Never use the cord
for carrying, pulling or unplugging the power
tool. Keep cord away from heat, oil, sharp
edges or moving parts. Damaged or entangled
cords increase the risk of electric shock.
• When operating a power tool outdoors, use
an extension cord suitable for outdoor use.
Use of a cord suitable for outdoor use reduces
the risk of electric shock.
Personal safety
• Stay alert, watch what you are doing and
use common sense when operating a power
tool. Do not use a power tool while you are
tired or under the influence of drugs, alcohol
or medication. A moment of inattention while
operating power tools may result in serious
personal injury.
• Use safety equipment. Always wear eye
protection. Safety equipment such as dust
mask, non-skid safety shoes, hard hat or
hearing protection used for appropriate
conditions will reduce personal injuries.
• Avoid accidental starting. Ensure the switch
is in the off-position before plugging in.
Carrying tools with your finger on the switch
or plugging in power tool that have the switch
on invites accidents.
• Do not overreach. Keep proper footing and
balance at all times. This enables better control
of the power tool in unexpected situations.
• Dress properly. Do not wear loose clothing
or jewelry. Keep your hair, clothing and gloves
away from moving parts. Loose clothes,
jewelry or long hair can be caught in moving
parts.
• If devices are provided for the connection of
dust extraction and collection facilities, ensure
these are connected and properly used. Use
of these devices can reduce dust-related
hazards.
• Working at high place with this caulking gun,
please notice working environment safety.
WARNING
Never remove the plunger rod off the tool in
any case, otherwise it will cause failure of
spheres locating which makes the gun fail to
work. Keep the plunger rod clear and neat at
all times. A plunger rod covered with adhesive
may damage the whole mechanism. The
warranty expires when adhesive goes into the
mechanism; in addition, any maintenance fee
occurred will be charged by the repair service
facility.
In case of that residual material left on the
plunger rod, please clean it up thoroughly
before pulling the rod to the backward
position. The purpose is to prevent the
material from entering the inner mechanism
and keeping the tool in good condition.
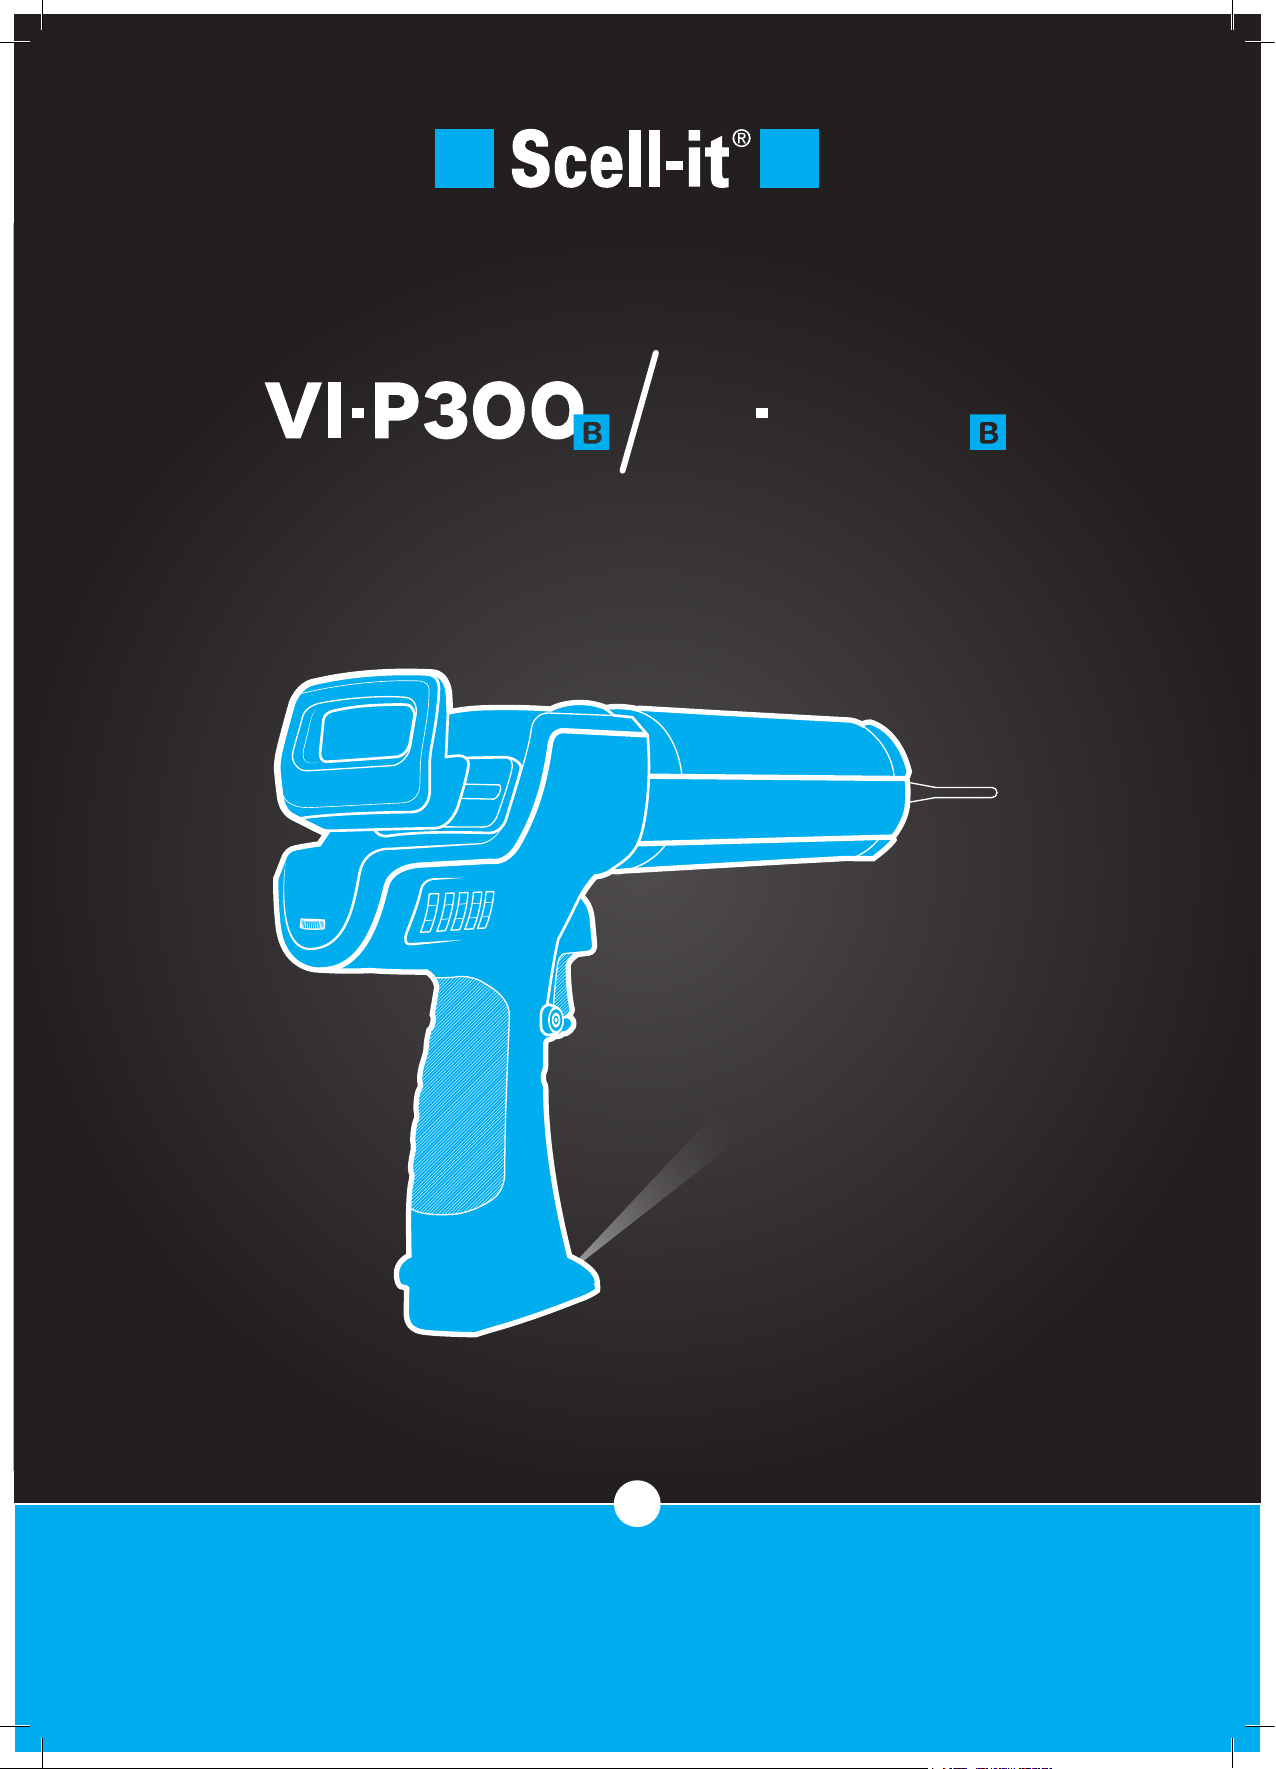
7.2V - 1.5Ah Li-Ion Battery

This manual suits for next models

1

Other Scell-it Power Tools manuals

Scell-it ELEMENT 8 User manual

Scell-it

Scell-it ELEMENT 8 User manual

Scell-it ELEMENT FIVE User manual

Scell-it

Scell-it ELEMENT FIVE User manual

Scell-it PR500 User manual

Scell-it

Scell-it PR500 User manual

Scell-it ELEMENT SIX User manual

Scell-it

Scell-it ELEMENT SIX User manual

Scell-it ELEMENT 5 User manual

Scell-it

Scell-it ELEMENT 5 User manual

Scell-it VI-P300B User manual

Scell-it

Scell-it VI-P300B User manual

Scell-it E-308NP User manual

Scell-it

Scell-it E-308NP User manual

Scell-it ELEMENT 007 User manual

Scell-it

Scell-it ELEMENT 007 User manual

Scell-it VI-P300 User manual

Scell-it

Scell-it VI-P300 User manual

Popular Power Tools manuals by other brands

OMERA OPI M-400 Operation and maintenance manual

OMERA

OMERA OPI M-400 Operation and maintenance manual

Staubli MA251 operating instructions

Staubli

Staubli MA251 operating instructions

Metabo SSD 18 LT 200 BL Original instructions

Metabo

Metabo SSD 18 LT 200 BL Original instructions

CUISINEART DBM8U manual

CUISINEART

CUISINEART DBM8U manual

Hilti DD 150?U operating instructions

Hilti

Hilti DD 150?U operating instructions

Casals CT2200VCE operating instructions

Casals

Casals CT2200VCE operating instructions

Holmatro DR200 manual

Holmatro

Holmatro DR200 manual

Challenge Xtreme CXMT 135 operating instructions

Challenge Xtreme

Challenge Xtreme CXMT 135 operating instructions

Hilti SFC 22-A operating instructions

Hilti

Hilti SFC 22-A operating instructions

Schmalz FQE Series Assembly instructions

Schmalz

Schmalz FQE Series Assembly instructions

Facom J.307-50D Original instructions

Facom

Facom J.307-50D Original instructions

Clarke CPSB200 Operation & maintenance instructions

Clarke

Clarke CPSB200 Operation & maintenance instructions

Iso-Tip QUICK CHARGE 7740 quick start guide

Iso-Tip

Iso-Tip QUICK CHARGE 7740 quick start guide

Parkside PSTD 800 A1 Operation manual

Parkside

Parkside PSTD 800 A1 Operation manual

Fein AMM 500 Plu manual

Fein

Fein AMM 500 Plu manual

General International DP2006 Setup and operation manual

General International

General International DP2006 Setup and operation manual

Makita DTR180 instruction manual

Makita

Makita DTR180 instruction manual

Hilti NURON TE 6-22 manual

Hilti

Hilti NURON TE 6-22 manual

manuals.online logo
manuals.online logoBrands
  • About & Mission
  • Contact us
  • Privacy Policy
  • Terms and Conditions

Copyright 2025 Manuals.Online. All Rights Reserved.