Sealey SAC125 User manual

COMMERCIAL PORTABLE AIR COOLER
MODEL NO: SAC125
Thank you for purchasing a Sealey product. Manufactured to a high standard, this product will, if used according to these
instructions, and properly maintained, give you years of trouble free performance.
IMPORTANT: PLEASE READ THESE INSTRUCTIONS CAREFULLY. NOTE THE SAFE OPERATIONAL REQUIREMENTS, WARNINGS & CAUTIONS. USE
THE PRODUCT CORRECTLY AND WITH CARE FOR THE PURPOSE FOR WHICH IT IS INTENDED. FAILURE TO DO SO MAY CAUSE DAMAGEAND/OR
PERSONAL INJURY AND WILL INVALIDATE THE WARRANTY. KEEP THESE INSTRUCTIONS SAFE FOR FUTURE USE.
1. SAFETY
ELECTRICAL SAFETY
WARNING! It is the user’s responsibility to check the following:
Check all electrical equipment and appliances to ensure that they are safe before using. Inspect power supply leads, plugs and all
electrical connections for wear and damage. Sealey recommend that an RCD (Residual Current Device) is used with all electrical
products. If the product is used in the course of business duties, it must be maintained in a safe condition and routinely PAT
(Portable Appliance Test) tested.
Electrical safety information: it is important that the following information is read and understood.
1.0.1. Ensure that the insulation on all cables and on the appliance is safe before connecting it to the power supply.
1.0.2. Regularly inspect power supply cables and plugs for wear or damage and check all connections to ensure that they are secure.
1.0.3. Important: Ensure that the voltage rating on the appliance suits the power supply to be used and that the plug is tted with the
correct fuse - see fuse rating in these instructions.
8DO NOT pull or carry the appliance by the power cable.
8DO NOT pull the plug from the socket by the cable.
8DO NOT use worn or damaged cables, plugs or connectors. Ensure that any faulty item is repaired or
replaced immediately by a qualied electrician.
1.0.4. This product is tted with a BS1363/A 3 pin plug.
If the cable or plug is damaged during use, switch the electricity supply and remove from use.
Ensure that repairs are carried out by a qualied electrician.
Replace a damaged plug with a BS1363/A 3 pin plug. If in doubt contact a qualied electrician.
A) Connect the GREEN/YELLOW earth wire to the earth terminal ‘E’.
B) Connect the BROWN live wire to the live terminal ‘L’.
C) Connect the BLUE neutral wire to the neutral terminal ‘N’.
Ensure that the cable outer sheath extends inside the cable restraint and that the restraint is tight.
Sealey recommend that repairs are carried out by a qualied electrician.
1.1. GENERAL SAFETY
9Only use as described in this manual.
8DO NOT immerse the unit , plug or cord in water or spray with liquids. DO NOT place vases or similar objects lled with liquids near
the unit.
8DO NOT use the unit within the immediate vicinity of water, such as bathtubs, wash bowls, swimming pools etc. where the
likelihood of immersion or splashing could occur.
9Children should be supervised to ensure that they do not play with the appliance.
9 Turn the unit o and unplug it from the mains when: not in use; when moving the unit from one location to another and before
Maintenance or Cleaning.
9DO NOT operate in the presence of explosive and/or ammable liquids or plugs.
8DO NOT use the unit near an open ame, cooking or other heating appliance.
8DO NOT operate the unit with a damaged cord or plug, or if the product malfunctions or is damaged in any way.
9Avoid contact with moving parts. DO NOT insert anything through the grill when the unit is operating.
9The use of attachments is not recommended and may be hazardous.
9Place the unit on a dry level surface to avoid overturning.
8DO NOT operate if the housing is damaged.
8DO NOT cover the grill, or operate in close proximity to curtains etc. Ensure there is adequate ventilation around the unit.
9 If the mains lead needs to be replaced, ensure it is carried out by a suitably qualied person.
9 If the unit is not working properly contact a qualied technician for repair. Never attempt to dismantle the unit.
9Never install or store the unit where it could be subject to:
a. Heat sources such as radiators, heat registers, stoves or other products that produce heat
b. Direct sunlight
c. Mechanical vibration or shock
d. Excessive dust
e. Lack of ventilation, such as a cabinet or bookcase
f. Uneven surfaces
8DO NOT leave the product running unattended.
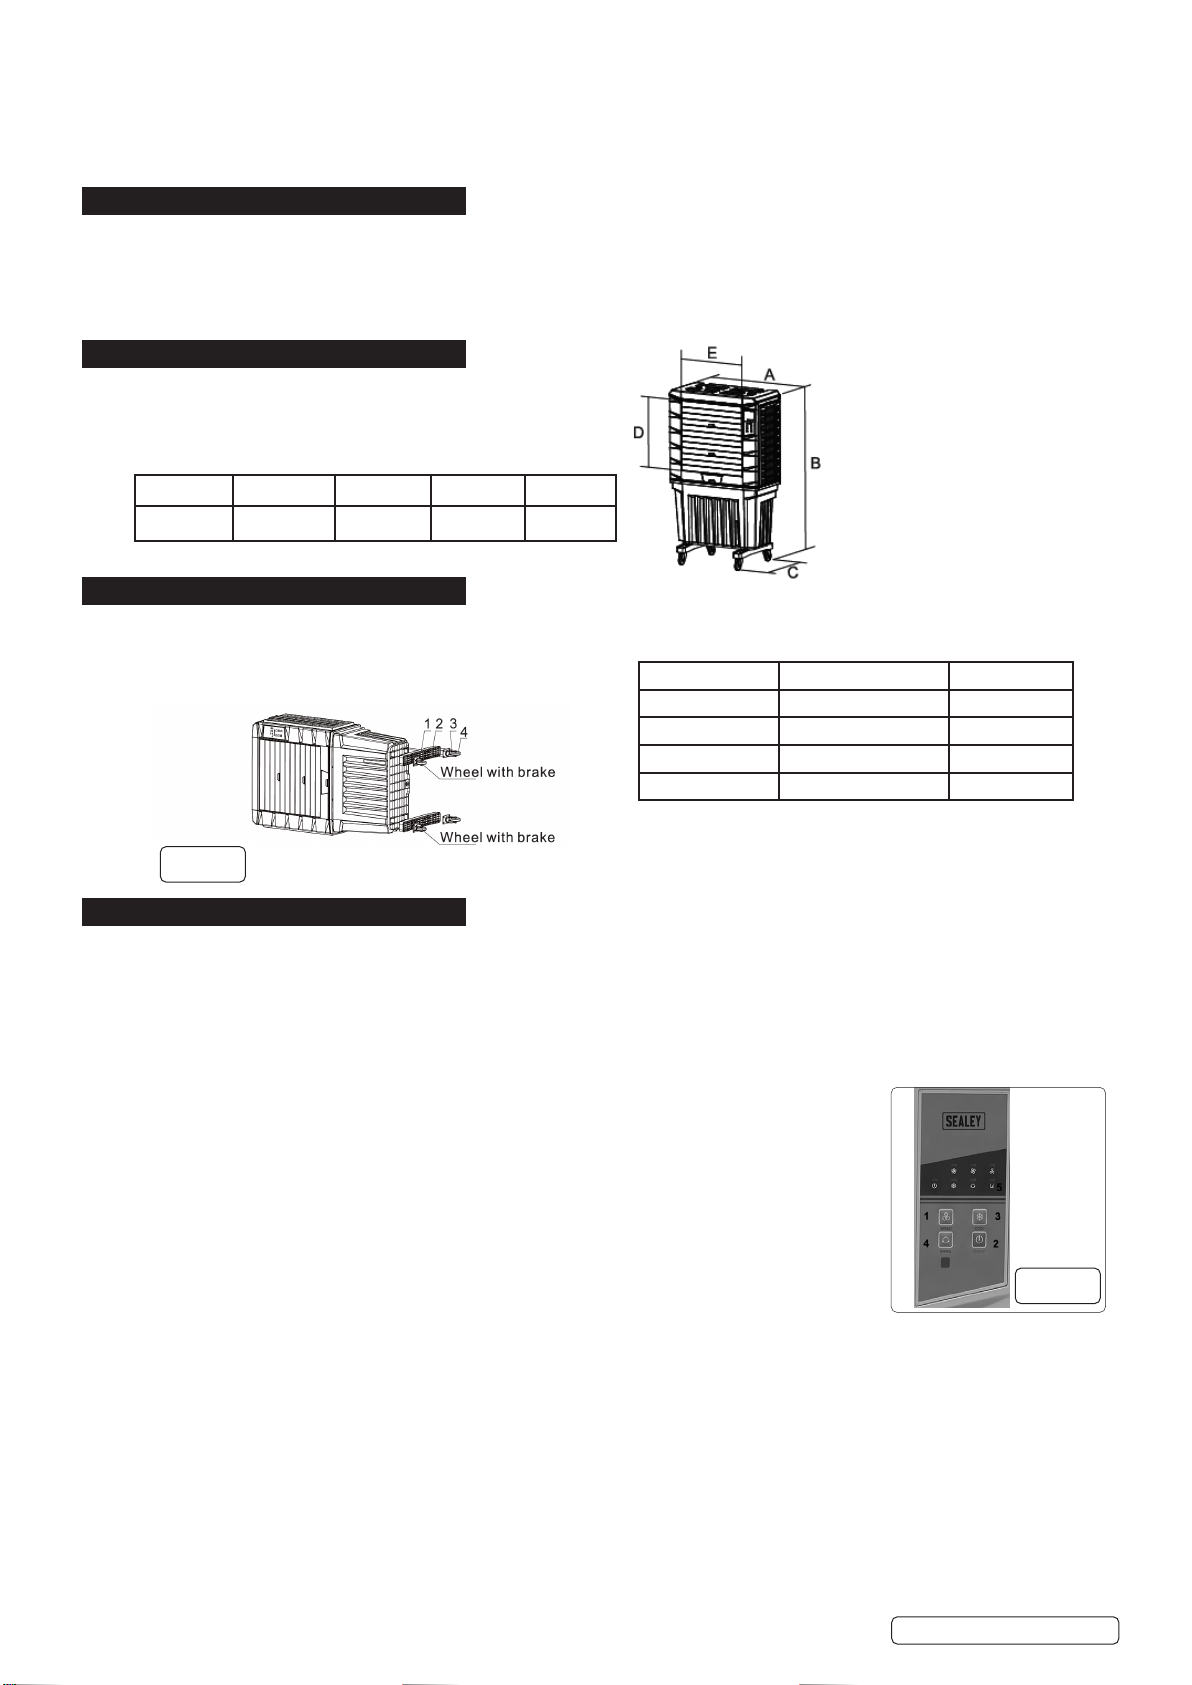
Replacement fuse
rating:13Amp
SAC125 Issue 1 12/01/23
Original Language Version
© Jack Sealey Limited
Refer to
instructions

9The castor wheels must be attached before use.
NOTE: This appliance can be used by children aged from 8 years and above and persons with reduced physical, sensory or
mental capabilities or lack of experience and knowledge if they have been given supervision or instruction concerning use of the
appliance in a safe way and understand the hazards involved. Children shall not play with the appliance. Cleaning and
user maintenance shall not be made by children without supervision.
2. INTRODUCTION
Portable, robust commercial air cooling unit. The cooler uses water evaporation technology with air movement to provide more
economical cooling without refrigerants. Three easy touch wind speeds for desired air ow as well as three dierent modes.
Fully closable louvres and auto vertical louvre with long distance air throw. Large 125L water tank with inlet oat value and
shortage alarm. Easy clean with removable high quality dust lters and honeycomb cooling pads on all three sides. Large
wheels make it easily transportable to any indoor or outdoor application.
3. SPECIFICATION
Model no............................................................SAC125
Power.....................................................................250W
Max. airow......................................................9000m³/h
Supply.....................................................................230V
Sizes shown are Inches (mm)
4. ASSEMBLY
Take out unit carefully from package, check the product to see if any part is damaged, if so contact your Sealey stockist
immediately. Before use of the product, the product needs to be assembled as in the g.1
5. OPERATION
5.1. FILL WATER TANK
WARNING! disconnect from mains supply before lling the water tank.
IMPORTANT! DO NOT use water with any chemical additives added. Water must be cold or lukewarm. DO NOT use water above
40°C.
NOTE: Make sure that the water level in the tank does not go above the ‘MAX’ level indicated on the sight window located in the
front bottom tank near lling point.
5.1.1. Once water is lled, take extra care to ensure that you don’t tilt the cooler. Push the unit gently if you wish to move it to a new
position.
5.1.2. Keep the unit on a at, stable ground without any obstacles near it.
5.1.3. Connect to the mains supply.
5.2. LIGHT (LED) INDICATORS:
High / Middle / Low (Fig.2.1): light shows the currently set airspeed level.
Power (Fig.2.2): light is on when the unit is powered.
Cool (Fig.2.3): light is on when the unit is working in cooling mode.
Swing light (Fig.2.4) is on when the vertical louvres are oscillating.
Shortage of Water (Fig.2.5):The light will icker if the water goes below the minimum requirement.
If the water level is not brought up to normal after 15 seconds the light will remain on and the pump
and cooling will shut o.
5.3. PUSH-BUTTON (KEYS)
5.3.1. ON/OFF: Press the ON/OFF button to start the unit Press the ON/OFF button again if the “Standby” mode is needed.
5.3.2. Wind Speed: Set the desired air ow speed of the Evaporative Cooler by pressing the “Wind Speed” button, the indicator light will
show.
5.3.3. “High”, “Middle” or “Low” accordingly. Cool: Press the COOL key during the “Standby” mode. The cooling indicator light will
stay on, then ash, the pump will start and then the machine will start. This will take approximately 30 seconds.
5.3.4. SWING: Press the SWING button to start or stop the vertical louvres from oscillating.
5.4. ALARMSSee also lights 5.2
5.4.1. WATER SHORTAGE ALARM: If the water level in the tank goes below minimum the Evaporative Cooler will beep and the
“SHORTAGE
OF WATER” light will icker. If the water level is not brought back up to the normal level after 15 seconds, the “SHORTAGE OF
WATER” light will keep on, the pump and the cooling will shut o.
Note: The Fan and Swing will still remain operable when the Cooling is shut o.
Original Language Version
© Jack Sealey Limited SAC125 Issue 1 12/01/23
ABC D E
33.9 (860) 56.1 (1425) 20.9 (530) 22.8 (580) 22.4 (570)
g.1
NO Description Quantity
1Wheel with brake 2
2Water tank bracket 2
3 Screws ST5*25 32
4Wheel without brake 2
g.2 g.2

5.5. ATTACH WATER PIPES
Water inlet (g.3) Water inlet (g.4) Alternative ll point
G 1/2” Internal thread soft pipe
6. MAINTENANCE AND CLEANING
WARNING! shut down and unplug the cooler before performing maintenance or cleaning.
6.1. Completely drain the tank by removing the drainplug from the base and opening the drain valve. Fig.6
WARNING! Stagnant water may cause bacterial growth and serious health problems. Do not allow stagnant water to remain in
the tank.
6.1.1. During regular use, fully drain the tank and renew the water each day.
6.1.2. Drain and clean the water tank before storage, after seasonal use and whenever the unit is not used for more than one week.
6.1.3. Maintenance is key for cooler to have an eective and long service life. Keep unit in good condition to avoid unnecessary
parts replacement.
6.1.4. Weekly Remove the two screws on the top of the cooling pad panel and gently pull o the panel. Use a soft cloth or soft plastic
bristle brush and water only, remove the accumulated dust and debris,(g.5,g.6,g.7).
6.1.5. Wash the cooling pad with fresh running water. (g.7) Do not use high pressure water. Do not use acid or alkaline chemicals. Clean the
inlet air lters every week or more often in dusty conditions. Cleaning Inner parts.
6.1.6. The evaporative cooler pad should be rinsed with gently running water only.
6.1.7. Close the drain valve and reinstall drain plug and the cooling pad set after nishing maintenance.
6.1.8. Cleaning the cooling pad:
A. Pull out lter net. (g.5) B. Lift the cooling pad gently and remove it. (g.6) .
Original Language Version
© Jack Sealey Limited SAC125 Issue 1 12/01/23
g.3 g.3 g.4 g.4
g.5 g.5 g.6 g.6 g.7 g.7

6.2. INSIDE CLEANING TASKS
Clean the fan blades, oat ball valve, water tank, water level sensor, water pump and drainage plug.
7. TROUBLESHOOTING
© Jack Sealey Limited Original Language Version SAC125 Issue 1 12/01/23
g.8 g.8

Original Language Version
© Jack Sealey Limited SAC125 Issue 1 12/01/23
Sealey Group, Kempson Way, Suffolk Business Park, Bury St Edmunds, Suffolk. IP32 7AR
01284 757500 sales@sealey.co.uk www.sealey.co.uk
ENVIRONMENT PROTECTION
Recycle unwanted materials instead of disposing of them as waste.All tools, accessories and packaging should be sorted,
taken to a recycling centre and disposed of in a manner which is compatible with the environment. When the product
becomes completely unserviceable and requires disposal, drain any fluids (if applicable) into approved containers and
dispose of the product and fluids according to local regulations.
WEEE REGULATIONS
Dispose of this product at the end of its working life in compliance with the EU Directive on Waste Electrical and Electronic Equipment
(WEEE). When the product is no longer required, it must be disposed of in an environmentally protective way. Contact your local solid
waste authority for recycling information.
BATTERY REMOVAL: SEE SECTION 6.5.3
Under the Waste Batteries and Accumulators Regulations 2009, Jack Sealey Ltd are required to inform potential purchasers of products
containing batteries (as defined within these regulations), that they are registered with Valpak’s registered compliance scheme. Jack
Sealey Ltd Batteries Producer Registration Number (BPRN) is BPRN00705.
Note: It is our policy to continually improve products and as such we reserve the right to alter data, specifications and component parts without prior
notice.
Important: No Liability is accepted for incorrect use of this product.
Warranty: Guarantee is 12 months from purchase date, proof of which is required for any claim.
REGISTER YOUR
PURCHASE HERE
Table of contents
Other Sealey Air Conditioner manuals

Sealey
Sealey SAC04 User manual

Sealey
Sealey SAC7000.V2 User manual

Sealey
Sealey SAC41.V2 User manual

Sealey
Sealey SAC9000 User manual

Sealey
Sealey SAC9002.V3 User manual

Sealey
Sealey SAC12000.V2 User manual

Sealey
Sealey SAC41 User manual

Sealey
Sealey SAC9002 User manual

Sealey
Sealey SAC12000.V3 User manual

Sealey
Sealey Sac9001 User manual

Sealey
Sealey SAC41.V3 User manual

Sealey
Sealey SAC12000 User manual

Sealey
Sealey SAC7000 User manual

Sealey
Sealey SAC13 User manual

Sealey
Sealey SAC9002.V2 User manual

Sealey
Sealey SAC9000.V2 User manual

Sealey
Sealey SAC12000.V4 User manual

Sealey
Sealey SAC12000.V5 User manual

Sealey
Sealey sac9000.V3 User manual