Sealey SAC41.V3 User manual

AIR COOLER/HEATER/AIR PURIFIER/HUMIDIFIER
WITH REMOTE CONTROL
MODEL NO: SAC41.V3
Thank you for purchasing a Sealey product. Manufactured to a high standard, this product will, if used according to these instructions,
and properly maintained, give you years of trouble free performance.
IMPORTANT: PLEASE READ THESE INSTRUCTIONS CAREFULLY. NOTE THE SAFE OPERATIONAL REQUIREMENTS, WARNINGS & CAUTIONS. USE
THE PRODUCT CORRECTLY AND WITH CARE FOR THE PURPOSE FOR WHICH IT IS INTENDED. FAILURE TO DO SO MAY CAUSE DAMAGE AND/OR
PERSONAL INJURY AND WILL INVALIDATE THE WARRANTY.
1. SAFETY
1.1. ELECTRICAL SAFETY
WARNING! It is the user’s responsibility to check the following:
Check all electrical equipment and appliances to ensure that they are safe before using. Inspect power supply leads, plugs and
all electrical connections for wear and damage. Sealey recommend that an RCD (Residual Current Device) is used with all electrical
products. You may obtain an RCD by contacting your local Sealey stockist.
If the product is used in the course of business duties, it must be maintained in a safe condition and routinely PAT (Portable
Appliance Test) tested.
Electrical safety information, it is important that the following information is read and understood.
1.1.1. Ensure that the insulation on all cables and on the appliance is safe before connecting it to the power supply.
1.1.2. Regularly inspect power supply cables and plugs for wear or damage and check all connections to ensure that they are secure.
1.1.3. Important: Ensure that the voltage rating on the appliance suits the power supply to be used and that the plug is tted with the
correct fuse - see fuse rating in these instructions.
8DO NOT pull or carry the appliance by the power cable.
8DO NOT pull the plug from the socket by the cable. Remove the plug from the socket by maintaining a rm grip on the plug.
8DO NOT use worn or damaged cables, plugs or connectors. Ensure that any faulty item is repaired or replaced immediately by a
qualied electrician.
1.1.4. This product is tted with a BS1363/A 13 Amp 3 pin plug.
If the cable or plug is damaged during use, switch o the electricity supply and remove from use.
Replace a damaged plug with a BS1363/A 13 Amp 3 pin plug. If in doubt contact a qualied electrician.
Class II products are wired with live (brown) and neutral (blue) only are marked with the
Class II symbol;
A) Connect the BROWN live wire to the live terminal ‘L’.
B) Connect the BLUE neutral wire to the neutral terminal ‘N’.
C) After wiring, check that there are no bare wires and ensure that all wires have been correctly
connected.
Ensure that the cable outer sheath extends inside the cable restraint and that the restraint is tight.
8DO NOT connect either wire to the earth terminal.
Sealey recommend that repairs are carried out by a qualied electrician.
1.2. GENERAL SAFETY
9Check that the unit is in sound condition and good working order. Take immediate action to repair or replace damaged parts.
9 Use recommended parts only. Unauthorised parts may be dangerous and will invalidate the warranty.
8DO NOT stand or place any object less than 20cm from the front of the unit, 20cm from the rear and sides of the unit, and 60cm
above the unit.
8DO NOT obstruct the air intakes or outlets of the unit, and do not cover with washed clothes.
8DO NOT place any object into the outlets - the unit has a fan running at high speed, contact with this will cause injury.
8DO NOT operate the unit when you are tired or under the inuence of alcohol, drugs or intoxicating medication.
8DO NOT switch the unit o by disconnecting it from the mains. ALWAYS switch to the “OFF” position rst.
8DO NOT remove the oat lever from the water collection tank.
8DO NOT connect or disconnect the plug from the mains with wet hands.
9Always discard the water from the collection tank, DO NOT use it for any other purpose.
9Place the unit on a level and stable surface.
9To prevent water from freezing, DO NOT use the unit at ambient temperatures below 0°C.
8DO NOT use the unit outside.
9 Ensure that heating appliances are not exposed to the ow of air from the unit.
9 Before attempting to move the unit, empty the contents of the water tank. Use side carrying handles when moving unit.
9 Switch o and disconnect unit from the mains before attempting any cleaning or other maintenance work.
9 Ensure that the unit is correctly turned o when not in use, and stored in a safe, dry area, out of reach of children.
.
Recommended fuse rating
13 Amp
Refer to
instruction
manual
Original Language Version
© Jack Sealey Limited
Indoor Use Only
SAC41.V3 Issue 1 10/12/21
Do Not Cover

2. INTRODUCTION
4-in-1 Air cooler, heater, air purier and humidier. Remote control and panel control. Large 12L water tank supplied with ice pack. Generates
negative ions to purify and sterilise output air. Hi-tech PTC heating element assures safer and rapid heating with two power options
(1000/2000W). Adjustable airow direction. Three selectable fan speeds. Up to 12 hour timer. Easy to operate and move around on castors.
3. SPECIFICATION
Model No.: ............................................................ SAC41.V3
Cooler: ............................................................................80W
Cooling Water Tank: ......................................................... 12L
Heater: ...............................................................1000/2000W
Maximum Airow:.....................................................485m³/hr
Supply:...........................................................................230V
Maximum Flow Rate (F): ........................................ 7.5m³/min
Fan Power Input (P):.......................................................80W
Service Value (SV): .......................................0.09 (m³/min)/W
Standby Power Consumption (Psb): .............................0.0W
Fan Sound Power Level (Lwa): ................................. 65dB(A)
Maximum Air Velocity (c):............................................. 10m/s
4. OPERATION
4.1. Select either Cooling or Heating by use of the lever (Fig.1) on the side of the machine.
4.1.1. Use the rocker switch on the rear of the unit to turn the power on.
4.1.2. The LED display will light up and show the current ambient temperature.
4.2. ON/OFF
4.2.1. Pressing the ON/OFF button the unit will start the unit running in whichever mode you have selected (See below). Pressing the
button a second time will cause the unit to stop working after approximately 30 seconds. The LED display will show the
current ambient temperature.
4.3. COOLING MODE
4.3.1. The unit produces a cooling eect by evaporating water which is contained in a tank in the base of the unit. Before using as a
cooler, the water tank must be lled. Ensure that the unit is unplugged from the mains supply before topping up with water.
4.3.2. Pull the tank from the unit and pour water into the tank. Check the level of water in the tank is between ‘min’ and ‘max’. For an
increased cooling eect, additionally place ice freezer blocks directly into the tank checking that the water level is still below
the maximum mark when immersed.
4.3.3. Press the On/O button and machine will start running.
4.3.4. If Cooling is selected, the unit starts running and displays the low fan speed symbol and the low level indicator
for Wind/Heat .
4.3.5. When Cooling mode is selected, press Cooler button and the Cooling symbol will illuminate .
4.3.6. In cooling mode, the fan speed can be adjusted using the Speed button. There are three speed settings and can be cycled
through by pressing the Speed button. Low speed is indicated by , medium speed , and high speed .
4.3.7. The cooling eect has three settings, On , intermittent (long interval) and intermittent (short interval) .
Press the Wind/Heat button to cycle though the options.
4.4. HEATING MODE
4.4.1. Press the On/O button and machine will start running.
4.4.2. If Heating is selected, the unit starts running and displays a single power symbol indicating low power , and the
medium fan speed symbol .
4.4.3. To set the heating to use full power, press the Wind/Heat button and a second power will display alongside the rst.
NOTE: In Heating mode, the fan speed cannot be altered.
Ion Wind
Heat
Cooler Swing Timer Speed On/O
Fig.1
Original Language Version
© Jack Sealey Limited SAC41.V3 Issue 1 10/12/21

4.5. ION(AirPurier)
This feature works in both Heating and Cooling modes.
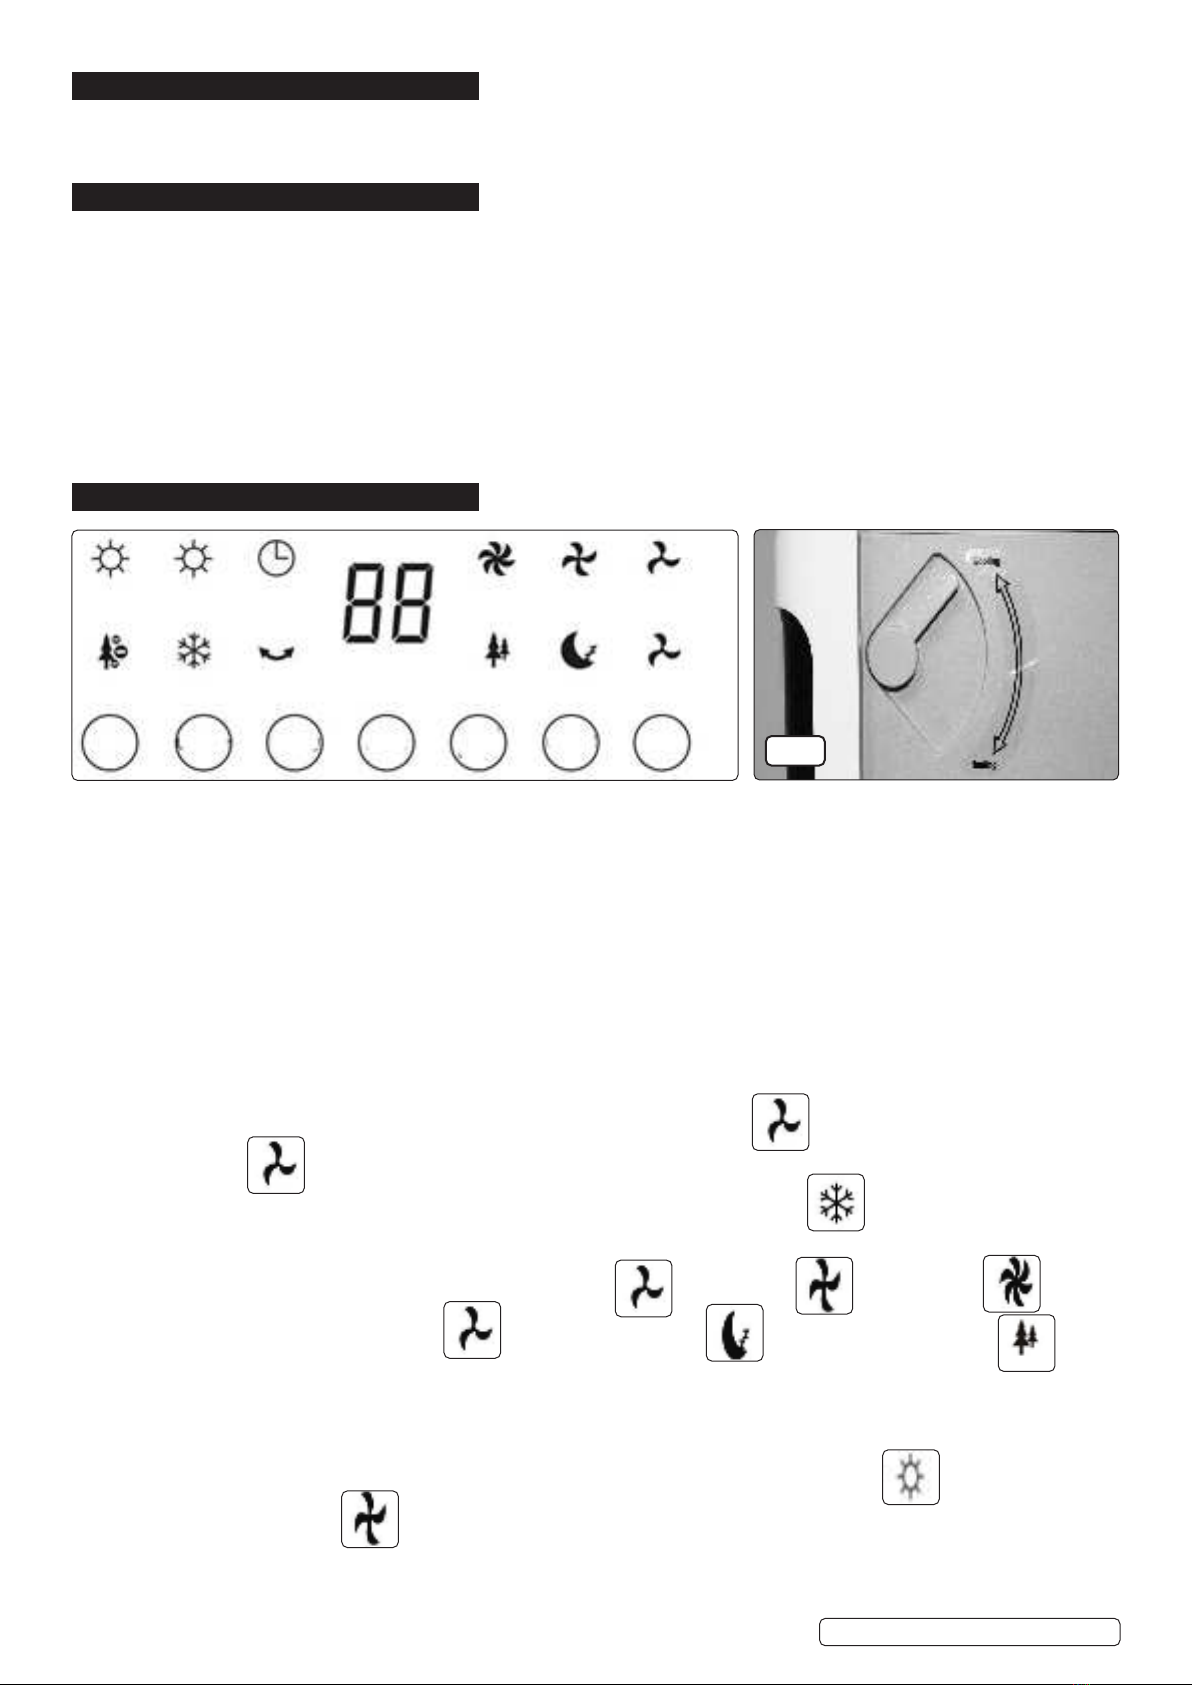
4.6. SWING
Press this button to start or stop the motorised louvres in either mode.
4.7. TIMER
This function allows the user to specify the running time for the unit. The range of times is from 1 to 12 hours and each successive
press of the button will cycle through the option. Once the required time is displayed stop pressing the button. The time symbol will be
illuminated.
4.8. REMOTE CONTROL OPERATION
4.8.1. The remote control handset provides the same functionality as the main control panel on the unit.
NOTE: The Heating/Cooling control lever must still be moved manually on the unit.
4.8.2. Insert one CR2025 battery into the compartment in the back of the handset, ensuring it is correctly inserted (g.2).
4.8.3. Ensure that the unit is plugged into the mains supply.
4.8.4. Set the Warm/Cool Air Flow Control lever on the unit to the desired position.
4.8.5. Point the handset at the main control panel on the unit.
4.8.6. Turn the unit on by pressing the ON/OFF button on the handset, and then control from the handset as per the normal settings above.
4.9. CHANGING THE REMOTE CONTROL BATTERY(FIG.2)
4.9.1. Open the back cover and take o the isolating lm on the battery.
4.9.2. Put the battery (CR2025) inside the slot, with positive and negative in the right
directions;
4.9.3. Put on the back cover.
5. MAINTENANCE
WARNING! Turn the unit OFF and disconnect it from the mains power
supply before cleaning or performing any maintenance.
NOTE: Inspect the unit on a regular basis and replace or repair any damaged parts.
Use recommended parts and an authorised service agent. Unauthorised parts may be dangerous and will invalidate the warranty.
8DO NOT use any solvents or abrasive material to clean the plastic exterior of the unit. Use only a damp soft cloth for cleaning and dry
the unit afterwards with a clean, dry, soft cloth.
5.1. AIR FILTER.
5.1.1. Clean the air lter monthly for optimum performance. The lter is situated at the rear of the unit, and is held in place by a plastic
frame which in turn is held in place by a cross head screw and two clips.
5.1.2. Remove the screw and unclip the top two retaining clips of the frame and pull the frame upwards and outwards to remove it. Remove
the lter from the frame and tap it gently to remove dust, or vacuum it gently if it is very clogged with dirt. If the lter is heavily soiled, it
can be washed in warm water containing a mild, neutral detergent. Ensure that the lter is completely dry before re-installing it.
5.1.3. To replace the lter, rst insert the two bottom tags of the lter frame into the bottom edge of the lter frame recess in the unit. Lay the
lter into the lter frame and hinge the frame forwards into the recess. Push the top of the frame inwards until the two clips snap into
place and replace the cross head screw.
5.2. STORAGE
5.2.1. If the unit is not to be used for a long period of time, empty any water remaining in the tank.
5.2.2. Clean the unit and air lter as above, and store in a safe, dry area, out of the reach of children.
g.2
Original Language Version
© Jack Sealey Limited SAC41.V3 Issue 1 10/12/21
Sealey Group, Kempson Way, Suffolk Business Park, Bury St Edmunds, Suffolk. IP32 7AR
01284 757500 01284 703534 sales@sealey.co.uk www.sealey.co.uk
ENVIRONMENT PROTECTION
Recycle unwanted materials instead of disposing of them as waste. All tools, accessories and packaging should be sorted, taken to
a recycling centre and disposed of in a manner which is compatible with the environment. When the product becomes completely
unserviceable and requires disposal, drain any fluids (if applicable) into approved containers and dispose of the product and fluids
according to local regulations.
WEEE REGULATIONS
Dispose of this product at the end of its working life in compliance with the EU Directive on Waste Electrical and Electronic Equipment
(WEEE). When the product is no longer required, it must be disposed of in an environmentally protective way. Contact your local solid
waste authority for recycling information.
BATTERY REMOVAL: SEE SECTION 4.16
Under the Waste Batteries and Accumulators Regulations 2009, Jack Sealey Ltd are required to inform potential purchasers of products
containing batteries (as defined within these regulations), that they are registered with Valpak’s registered compliance scheme. Jack
Sealey Ltd Batteries Producer Registration Number (BPRN) is BPRN00705.
Note: It is our policy to continually improve products and as such we reserve the right to alter data, specifications and component parts without prior
notice. Please note that other versions of this product are available. If you require documentation for alternative versions, please email or call
our technical team on technical@sealey.co.uk or 01284 757505.
Important: No Liability is accepted for incorrect use of this product.
Warranty: Guarantee is 12 months from purchase date, proof of which is required for any claim.
Table of contents
Other Sealey Air Conditioner manuals

Sealey
Sealey SAC12000.V3 User manual

Sealey
Sealey SAC12000 User manual

Sealey
Sealey SAC7000.V2 User manual

Sealey
Sealey SAC04 User manual

Sealey
Sealey SAC12000.V2 User manual

Sealey
Sealey SAC9002.V3 User manual

Sealey
Sealey SAC12000.V4 User manual

Sealey
Sealey SAC41.V2 User manual

Sealey
Sealey SAC7000 User manual

Sealey
Sealey SAC9002 User manual
Popular Air Conditioner manuals by other brands

Samsung
Samsung AQV12NSA Service manual

Midea
Midea PD series manual

Trane
Trane Packaged TerminalAir Conditioners & Heat... Installation operation & maintenance

GREE ELECTRIC
GREE ELECTRIC GWH09TA-S3DNA1C Service manual

Gree
Gree GWH09AB-D3DNA1D/I Service manual

Roller
Roller DHN 401 N EC Mounting instructions