manuals.online logo
Brands
  1. Home
  2. •
  3. Brands
  4. •
  5. Sealey
  6. •
  7. Jack
  8. •
  9. Sealey Super Rocket Lift User manual

Sealey Super Rocket Lift User manual

This manual suits for next models

2

Other Sealey Jack manuals

Sealey 500GTA User manual

Sealey

Sealey 500GTA User manual

Sealey 20QJ User manual

Sealey

Sealey 20QJ User manual

Sealey 10Q User manual

Sealey

Sealey 10Q User manual

Sealey 3015CXD User manual

Sealey

Sealey 3015CXD User manual

Sealey RJA2500.V2 User manual

Sealey

Sealey RJA2500.V2 User manual

Sealey AS12000 User manual

Sealey

Sealey AS12000 User manual

Sealey 3200CXQP User manual

Sealey

Sealey 3200CXQP User manual

Sealey 3000ES User manual

Sealey

Sealey 3000ES User manual

Sealey Quality MACHINERY TJ1000F User manual

Sealey

Sealey Quality MACHINERY TJ1000F User manual

Sealey 2000ESLE User manual

Sealey

Sealey 2000ESLE User manual

Sealey 1050CXLE User manual

Sealey

Sealey 1050CXLE User manual

Sealey 2001LE.V2 Series User manual

Sealey

Sealey 2001LE.V2 Series User manual

Sealey 1250CX.V2 User manual

Sealey

Sealey 1250CX.V2 User manual

Sealey YAJ15-30F User manual

Sealey

Sealey YAJ15-30F User manual

Sealey 57M.V2 User manual

Sealey

Sealey 57M.V2 User manual

Sealey 3000CXD.V6 User manual

Sealey

Sealey 3000CXD.V6 User manual

Sealey AJS10000 User manual

Sealey

Sealey AJS10000 User manual

Sealey 3000CXd.V2 User manual

Sealey

Sealey 3000CXd.V2 User manual

Sealey 2200HL.V4 User manual

Sealey

Sealey 2200HL.V4 User manual

Sealey 10QJ.V3 User manual

Sealey

Sealey 10QJ.V3 User manual

Sealey 20CT User manual

Sealey

Sealey 20CT User manual

Sealey Quality MACHINERY 2010S User manual

Sealey

Sealey Quality MACHINERY 2010S User manual

Sealey 800GTA User manual

Sealey

Sealey 800GTA User manual

Sealey 3040AG User manual

Sealey

Sealey 3040AG User manual

Popular Jack manuals by other brands

Pittsburgh 62590 Owner's manual & safety instructions

Pittsburgh

Pittsburgh 62590 Owner's manual & safety instructions

Powerbuilt 640405 Operating and maintenance instruction manual

Powerbuilt

Powerbuilt 640405 Operating and maintenance instruction manual

Clarke STRONG-ARM CTJ3000G quick start guide

Clarke

Clarke STRONG-ARM CTJ3000G quick start guide

Clarke CTJ2500QLG Operating & maintenance instructions

Clarke

Clarke CTJ2500QLG Operating & maintenance instructions

Omega Lift Equipment 18122C Operating instructions & parts manual

Omega Lift Equipment

Omega Lift Equipment 18122C Operating instructions & parts manual

Pittsburgh 58816 Owner's manual & safety instructions

Pittsburgh

Pittsburgh 58816 Owner's manual & safety instructions

Unimec TP Assembly instructions

Unimec

Unimec TP Assembly instructions

Sonic 4800703 instructions

Sonic

Sonic 4800703 instructions

Pfaff Merkur M0 Operating	 instruction

Pfaff

Pfaff Merkur M0 Operating instruction

BGS technic 70039 instruction manual

BGS technic

BGS technic 70039 instruction manual

TradeQuip 1128T owner's manual

TradeQuip

TradeQuip 1128T owner's manual

VEVOR TJD-12000SP-F quick start guide

VEVOR

VEVOR TJD-12000SP-F quick start guide

ULTIMATE SPEED URW 2 A1 HYDRAULIC TROLLEY JACK operating instructions

ULTIMATE SPEED

ULTIMATE SPEED URW 2 A1 HYDRAULIC TROLLEY JACK operating instructions

Stels 51131 user manual

Stels

Stels 51131 user manual

Beta 3050/K Operation manual and instructions

Beta

Beta 3050/K Operation manual and instructions

Valex 1650520 Translation of the original instructions

Valex

Valex 1650520 Translation of the original instructions

SW-Stahl 20700L instruction manual

SW-Stahl

SW-Stahl 20700L instruction manual

Jung JH Series operating instructions

Jung

Jung JH Series operating instructions

manuals.online logo
manuals.online logoBrands
  • About & Mission
  • Contact us
  • Privacy Policy
  • Terms and Conditions

Copyright 2025 Manuals.Online. All Rights Reserved.

INSTRUCTIONS FOR
TROLLEY JACK 3TONNE SUPER ROCKET LIFT
MODEL NO: 3015CXD.V2
Thank you for purchasing a Sealey product. Manufactured to a high standard, this product will, if used according to these instructions,
and properly maintained, give you years of trouble free performance.
IMPORTANT: PLEASE READ THESE INSTRUCTIONS CAREFULLY. NOTE THE SAFE OPERATIONAL REQUIREMENTS, WARNINGS & CAUTIONS. USE
THE PRODUCT CORRECTLY AND WITH CARE FOR THE PURPOSE FOR WHICH IT IS INTENDED. FAILURE TO DO SO MAY CAUSE DAMAGE AND/OR
PERSONAL INJURY AND WILL INVALIDATE THE WARRANTY. KEEP THESE INSTRUCTIONS SAFE FOR FUTURE USE.
1. SAFETY
9Ensure the jack is in sound condition and good working order. Take action for immediate repair or replacement of damaged parts.
Use genuine parts only. The use of improper parts may be dangerous and will invalidate the warranty.
9Locate the jack in a suitable, well lit working area. Keep working area clean and tidy and free from unrelated materials.
9Use jack on level/solid ground, preferably concrete. Avoid tarmacadam as jack may sink in.
9Place wedges under wheels of vehicle, but ensure the jack wheels are free to move and that there are no obstructions.
9Ensure the vehicle handbrake is engaged, engine is switched off and transmission is in gear (or “PARK” if automatic).
9Ensure minimum distance of 0.5m between vehicle and static objects such as doors, walls, etc., to allow for vehicle tilting.
9Ensure there are no passengers in the vehicle and that all non-essential persons keep a safe distance whilst the jack is in use.
9Place jack under lifting points recommended by vehicle manufacturer (see vehicle hand book). Ensure lifting point is stable and centred
on saddle.
▲DANGER: Use the jack for lifting only, NOT for supporting the lifted load.
9Use suitable capacity axle stands under the vehicle before proceeding with any task.
9Ensure there are no persons or obstructions beneath the vehicle before lowering.
8DO NOT operate the jack if damaged.
8DO NOT work under the vehicle until axle stands have been correctly positioned.
8DO NOT exceed the rated capacity of the jack (3tonne/3000kg). When lifting a load of maximum capacity or close to it, it is
recommended that the effort be reduced by the use of assistance during this operation.
8DO NOT adjust the safety overload valve.
8DO NOT jack vehicle if there is a risk of spillage of fuel, battery acid, or other dangerous substances.
8DO NOT allow the vehicle to move while supported by the jack, or use the jack to move the vehicle.
8DO NOT top up hydraulic system with brake fluid. Use hydraulic jack oil only and use a qualified person to maintain jack hydraulic
system.
8DO NOT allow untrained persons to operate the jack.
8DO NOT use jack for purposes other than which it is designed.
8DO NOT allow persons to ride on the jack.
9When not in use store jack, fully lowered, in a safe, dry, childproof area.
2. SPECIFICATION
Model no: .......................................................... 3015CXD.V2
Minimum saddle height: ............................................. 132mm
Maximum saddle height: ............................................ 472mm
Minimum chassis height:............................................ 158mm
Length:....................................................................... 620mm
Weight:........................................................................... 31kg
3. ASSEMBLY
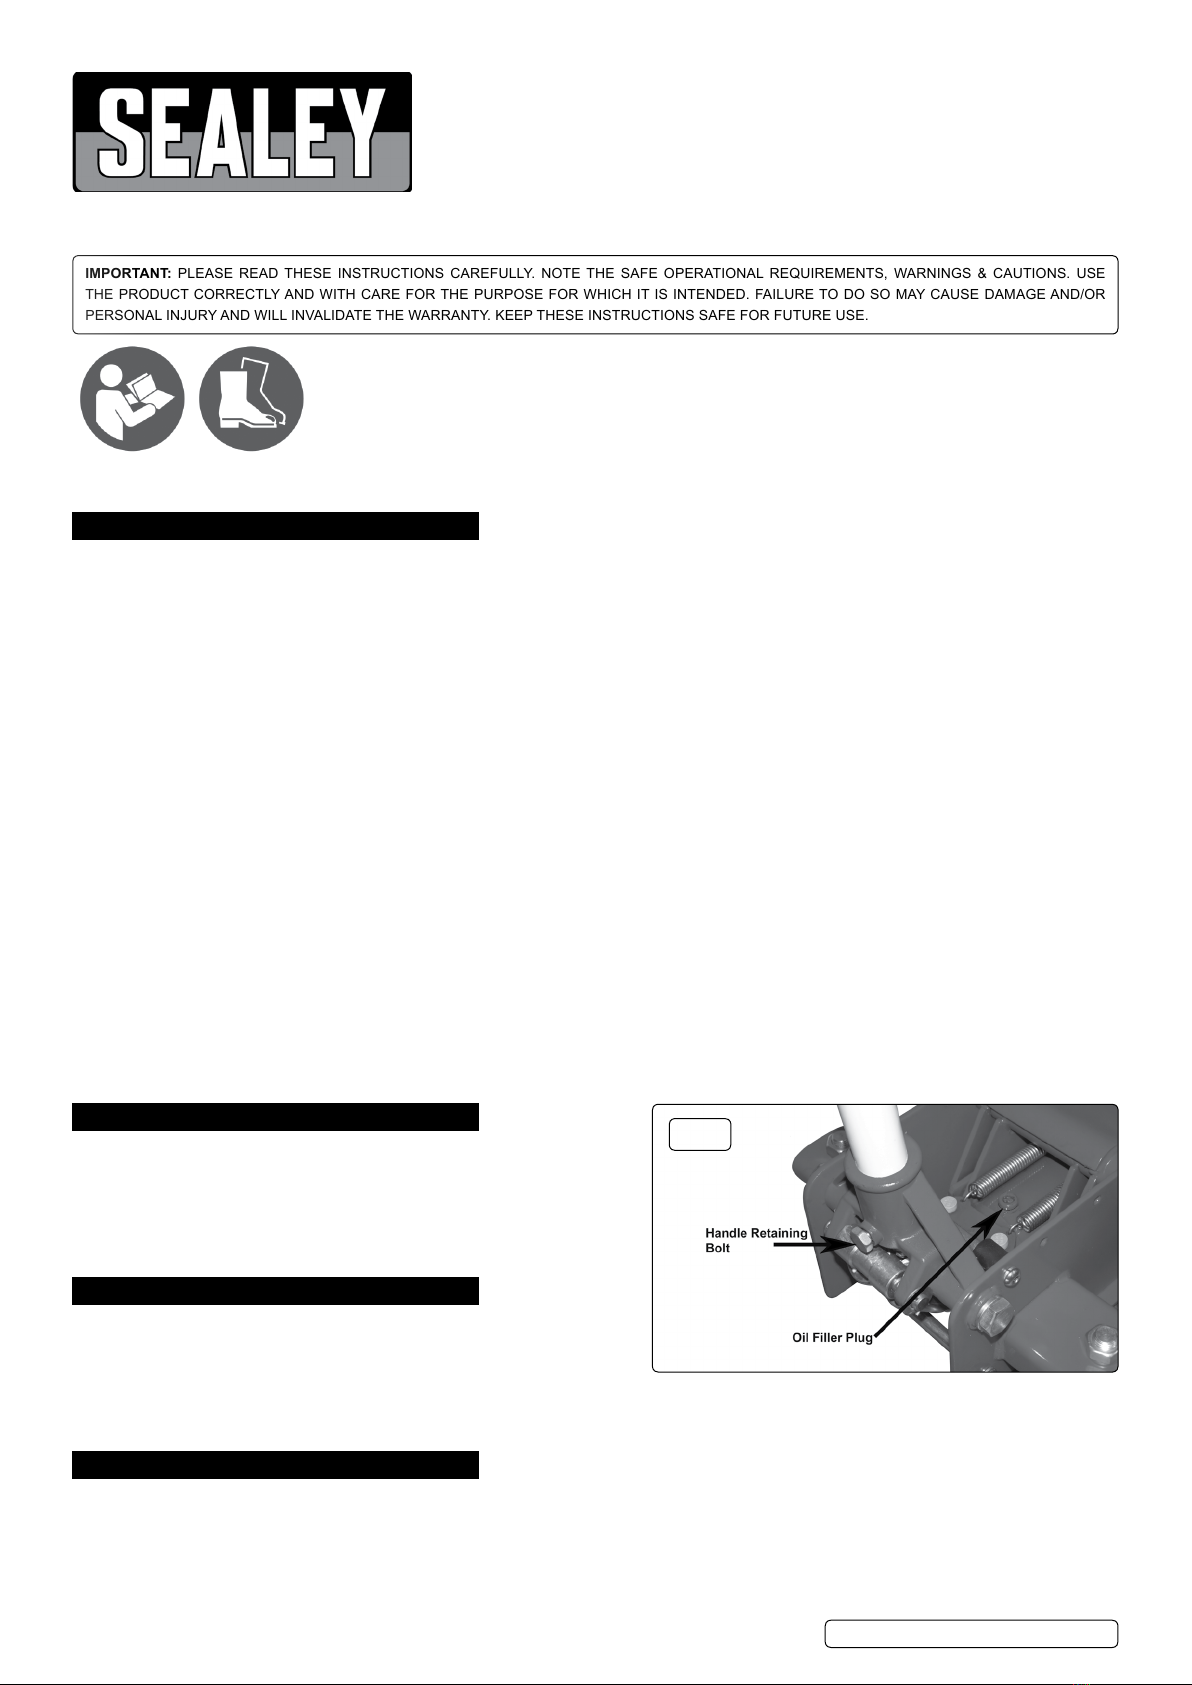
3.1. Assemble the two-piece handle, using the bolt provided.
3.2. Insert the handle into the socket, taking care to ensure that the square
indentation at the base of the handle fits correctly over the square
head of the central release shaft.
3.3. Secure the handle using the bolt provided (see fig.1).
Do not over-tighten.
4. BEFORE USE
4.1. Check the oil level.
4.1.1. Ensure the jack is resting on level ground and that the ram is fully retracted. Open the release valve by turning the handle
anticlockwise.
4.1.2. Remove the cover plate by unscrewing the four screws.
4.1.3. Remove the filler plug with an 8mm hex key (see fig.1) The oil level should be level with the bottom of the hole.
4.1.4. If necessary, top up with hydraulic oil. Use only Sealey hydraulic jack oil (see your authorised Sealey stockist). Refit filler plug.
Refer to
instruction
manual
Wear safety
footwear
g.1
3015CXD.V2 | Issue:1 27/04/17
Original Language Version
© Jack Sealey Limited
4.1.5. Pump the handle 20-30 times to purge the hydraulic system.
4.1.6. Close the release valve by turning the handle clockwise.
4.1.7. Remove the filler plug before pumping the jack up to its full height. Now reinstall the filler plug and replace the cover plate.
5. seOPERATION
5.1. Lifting
5.1.1. When raising a vehicle, be sure to set the parking brake and chock the wheels. Perform jacking operations only on solid ground
(eg: concrete), free from spillages and debris.
5.1.2. Position the lifting saddle of the jack under the desired lifting point (check vehicle manufacturer’s recommendations).
5.1.3. The Super Rocket Lift will raise the saddle rapidly to the vehicle lifting point with the minimum of handle strokes.
5.2. Lowering
5.2.1. Before lowering the jack, be sure that the area beneath the vehicle is clear of any persons/obstructions.
5.2.2. SLOWLY open the release valve by turning the handle anticlockwise. When the lifting arm is in its lowest position, remove the jack from
under the vehicle.
6. eMAINTENANCE
6.1. When the jack is not in use, keep the ram fully retracted and the release valve closed.
6.2. Clean the jack regularly and oil/grease all pivoting sections every 3 months (more often if using jack in extremely dry/dusty conditions).
6.3. Check the oil level frequently (see section 4.1).
6.4. Check the piston and piston rod periodically for signs of rust/corrosion.
6.5. Should you suspect the jack to be damaged or in any way unsafe, remove from service immediately and contact your authorised Sealey
dealer for advice and repairs.
6.6. At the end of the jack’s serviceable life, drain the oil from it and dispose of according to local authority guidelines.
7. t eTROUBLESHOOTING
PROBLEM POSSIBLE CAUSE REMEDY
Jack will not lift the load 1) Overloaded
2) Oil level low
3) Release valve not correctly closed
4) Air in system
5) Piston rod not functioning
6) Packing worn or defective
1) Be sure to use jack with adequate capacity
2) Top up oil level
3) Check and close release valve
4) Open release valve and pump the handle a few times.
Close valve and re-try
5) Clean and replace oil
6) Replace packing
Jack does not lift high enough
or feels “spongy”
1) Oil level too high or too low
2) Worn seals
3) Air in system
4) Release valve not closed
1) Fill or remove excess oil
2) Return jack to local service agent
3) Open release valve and pump the handle a few times.
Close valve and re-try
4) Check and close release valve
Jack lifts poorly 1) Pump packing or valves malfunctioning
2) Oil is dirty
3) Air in the system
1) Replace packing and/or clean valves
2) Replace oil
3) Open release valve and pump the handle a few times.
Close valve and re-try
Jack lifts but will not hold load 1) Release valve partially open
2) Dirt on valve seats
3) Air in system
4) Faulty seals
5) Packing worn or defective
1) Check and close release valve
2) Lower jack, close release valve. Place foot on front wheel
and pull up lifting arm to it’s full height by hand.
Open the release valve to lower arm
3) Open release valve and pump the handle a few times.
Close valve and re-try
4) Replace packing or contact local service agent
5) Replace packing
Jack will not lower completely 1) Unit requires lubrication
2) Piston rod bent or damaged
3) Jack frame/link system distorted due to
overloading/poor positioning
4) Air in system
5) Release valve partially closed
6) Jack spring damaged or unhooked.
1) Oil all external moving parts
2) Replace rod or contact local service agent
3) Replace damaged parts or contact local service agent
4) Open release valve and pump the handle a few times.
Close valve and re-try
5) Check and fully open release valve
6) Replace spring or contact local service agent
Jack does not lower at all 1) Release valve closed 1) Check and fully open release valve
3015CXD.V2 | Issue:1 27/04/17
Original Language Version
© Jack Sealey Limited
NOTE: It is our policy to continually improve products and as such we reserve the right to alter data, specications and component parts without prior notice.
IMPORTANT: No liability is accepted for incorrect use of this product.
WARRANTY: Guarantee is 12 months from purchase date, proof of which will be required for any claim.
Sole UK Distributor, Sealey Group.
Kempson Way, Suffolk Business Park,
Bury St. Edmunds, Suffolk.
IP32 7AR
www.sealey.co.uk
sales@sealey.co.uk
01284 757500
01284 703534
Web
Environmental Protection
Recycle unwanted materials instead of disposing of them as waste. All tools, accessories and packaging should be
sorted, taken to a recycling centre and disposed of in a manner which is compatible with the environment.
When the product becomes completely unserviceable and requires disposal, drain off any fluids (if applicable)
into approved containers and dispose of the product and the fluids according to local regulations.
3015CXD.V2 | Issue:1 27/04/17
Original Language Version
© Jack Sealey Limited