4.3. HANDLE (fig.3)Placethehandleintothecentralbracketsituatedonrearedge.AligntheholesandpasstheØ8mmx40boltthrough
bothpartsandsecurewiththeM8nutprovided.
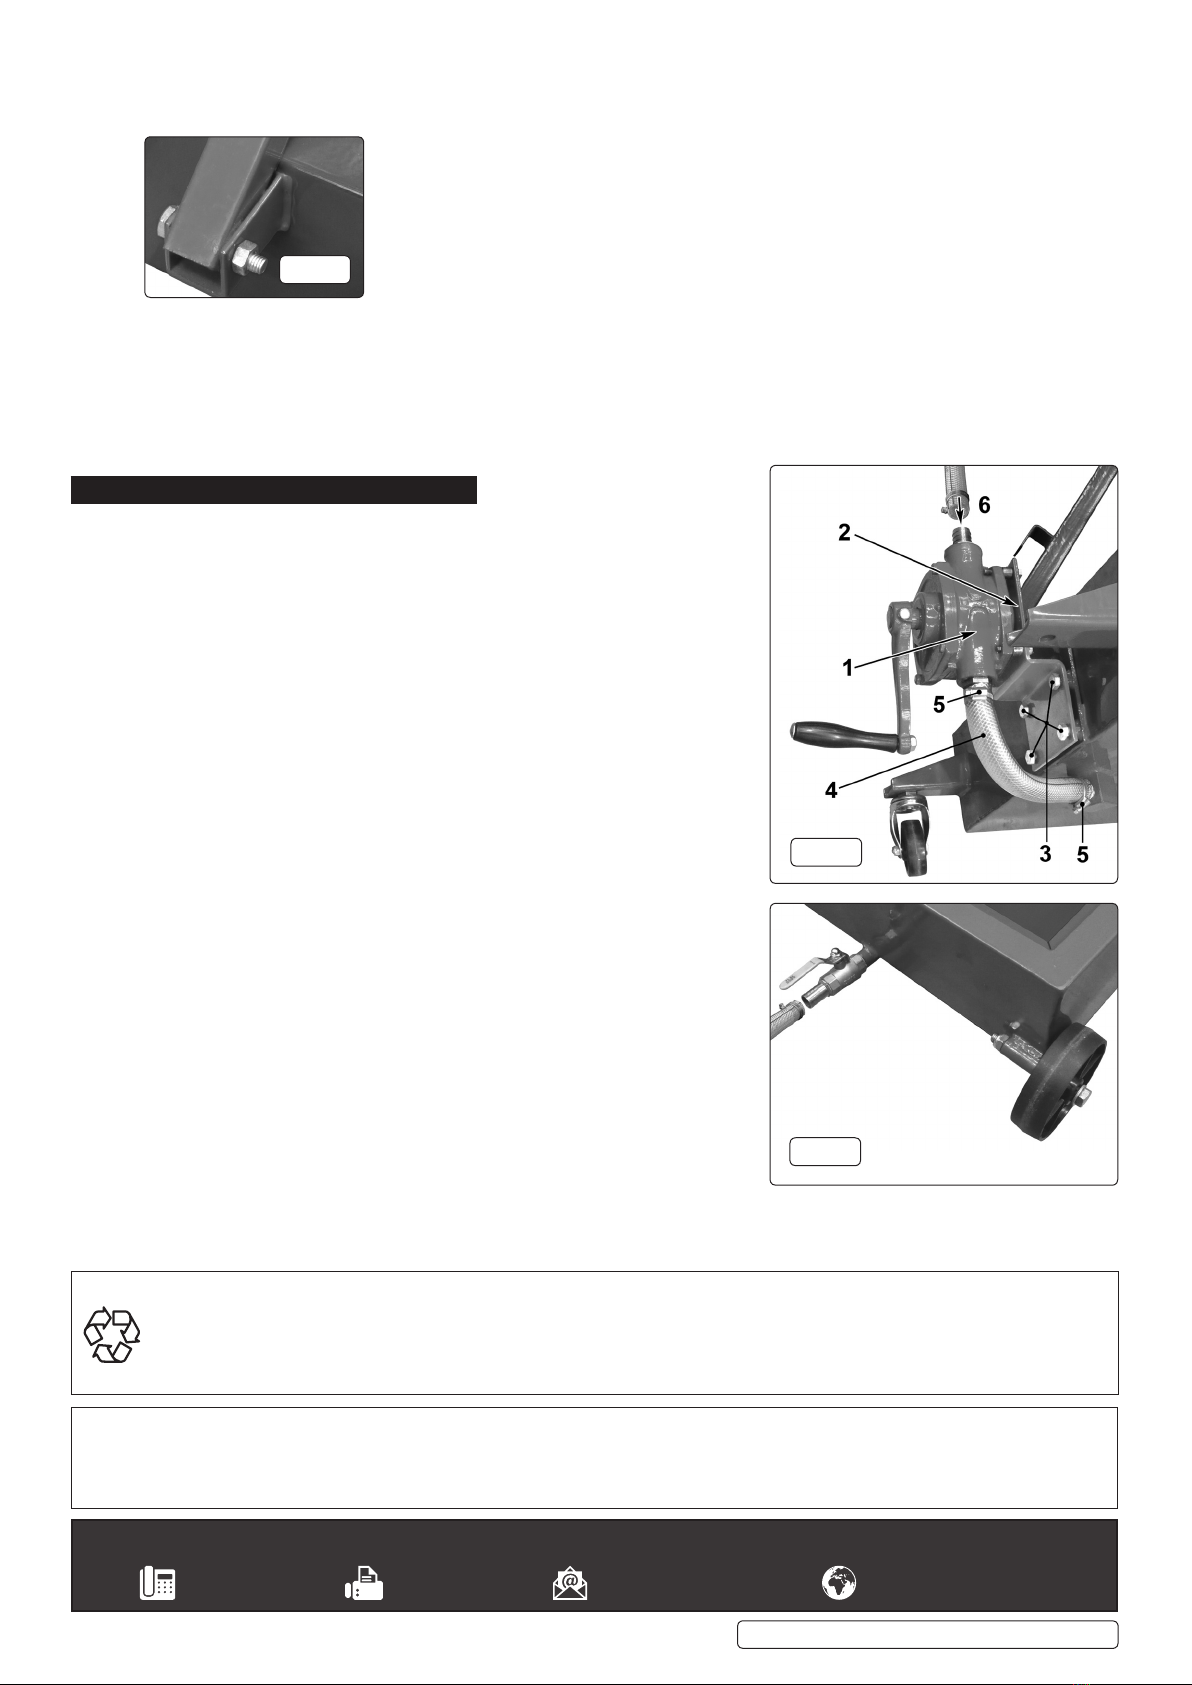
4.4. PUMP (AK467dxp only) fig.4 Thepump(1)comesattachedtothepumpbracket(2).Attachthepumpbrackettothecastorend
oftheoildrainerinthepositionindicatedaboveusingthefourM8x16mmbolts(3)provided.Eachboltmusthaveasplitlockwasher
undertheheadandshouldbetightenedusinga14mmspanner.
4.5. Connect the sump outlet to the underside of the pump using the short length of tube provided. Slide the worm drive clips provided over the
tube first then push the tube onto the fittingsandsecurewiththewormdriveclips(fig.4.6).
Placetheblackfilterscreenintotheshallowrecessinthetopofthepan.
ASSEMBLY
5. OPERATION
5.1. PREPARATION
5.1.1. Whenpositioningthedrainerensurethattherearenospillsofoilontheoorboth
prior to draining and afterwards. All spills should be cleaned up immediately to
prevent them becoming a slipping hazard.
5.1.2. When positioning the drainer beneath the vehicle consideration should be given to
accessing the sump plug. If necessary loosen the plug before siting the drainer.
Remember that once the sump plug has been removed the escaping oil may be hot.
5.2. COLLECTION OF WASTE OIL
5.2.1. If unit has been used to drain a previous vehicle check to ensure that there is
sufficient spare capacity within the pan before you drain the next vehicle.
5.2.2. Placethepanunderthevehicle’ssump,removethesumpplugandputtooneside.
5.2.3. Allow the engine to drain.
5.2.4. When draining is complete, remove the pan and wipe up any spillage. Remember to
replace and tighten the sump plug using a new sump washer.
5.3. EMPTYING OF WASTE OIL FROM PAN UNIT
WARNING! Dispose of all waste in accordance with local regulations.
5.3.1. GRAVITY DISCHARGE (AK467D) Attach the discharge hose to the outlet valve
at the rear end of the drainer and secure it with the worm drive clip provided.
Seeg.5.Placetheotherendofthepipeintoasuitablecontainersetatalower
level than the drainer pan and open the outlet valve. When the drainer pan is
empty close the valve.
5.3.2. MANUAL PUMP DISCHARGE (AK467DXP)Attachthedischargehose(seeg.4)to
the outlet connection on the top of the pump and secure it with the worm drive clip
provided.Placetheotherendofthepipeintoasuitablecontainerandproceedto
turn the pump handle clockwise until empty.
5.4. After use thoroughly clean the exterior of the drainer and clear up any spills in the
work area. Store the drainer in a suitable clean dry place where it will not be a hazard.
Original Language Version
© Jack Sealey Limited
fig.3
Sealey Group, Kempson Way, Suffolk Business Park, Bury St Edmunds, Suffolk. IP32 7AR
01284 757500 01284 703534 sales@sealey.co.uk www.sealey.co.uk
Note: It is our policy to continually improve products and as such we reserve the right to alter data, specifications and component parts without prior
notice.
Important: No Liability is accepted for incorrect use of this product.
Warranty:Guaranteeis12monthsfrompurchasedate,proofofwhichisrequiredforanyclaim.
ENVIRONMENT PROTECTION
Recycle unwanted materials instead of disposing of them as waste. All tools, accessories and packaging should be sorted, taken to
a recycling centre and disposed of in a manner which is compatible with the environment. When the product becomes completely
unserviceableandrequiresdisposal,drainanyfluids(ifapplicable)intoapprovedcontainersanddisposeoftheproductandfluids
according to local regulations.
fig.5
fig.4
AK467D,AK467DXPIssue3(H,3,F)26/02/19


