4. MOUNTING THE HOSE REEL
WARNING! Ensure that the hose is disconnected from the air supply. DO NOT position the reel in direct sunlight, in areas of
extreme heat or cold or where it will be a hazard.
4.1. MOUNTING
4.1.1. Ensure that the wall, floor, ceiling or other structure to which the air hose reel is to be fixed is of sound construction and will hold the
workingstrainofthehosewheninuse.
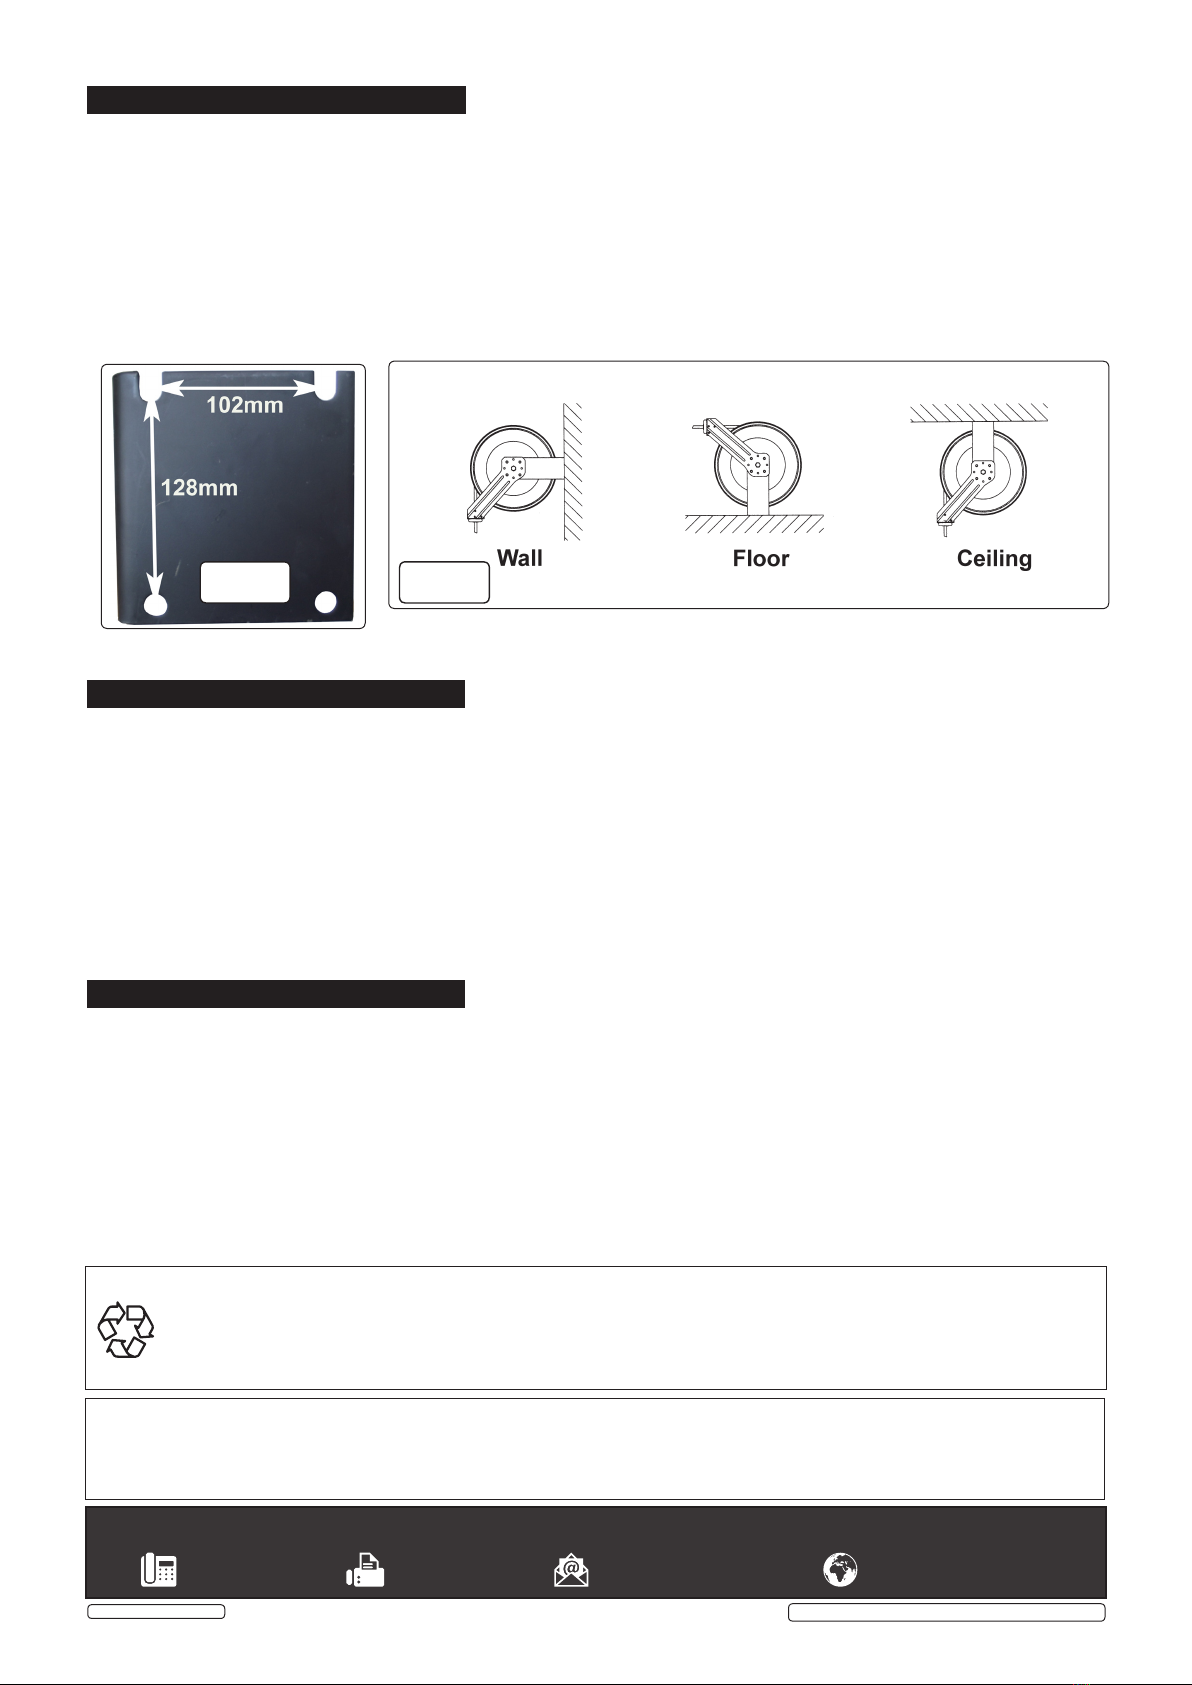
4.1.2. Screworboltthereeltothemountingsurface(seefig.1formountingholedimensions).Adjusttheguidearm(7)tosuitthe
installation.Removethefourclampingnuts(42),washers(41)andbolts(40),repositionthearmandthenreplacethe bolts,
washersandscrews.Typicalexamplesareshowninfig.2.
4.1.3. Fittheinlethose(provided)totheinletfitting(24)usingthreadsealerorPTFEtape.The free end of the inlet hose should be
connectedtotheairsupply.
4.1.4. Beforeuse,checkthatallfixingsaresafeandsecure,andthatthehose extends andretractswithease.
5. OPERATION
5.1. Pullthehoseoutward.Anintermittentclickingnoisewillbenoticedasthehoseextends.
5.2. Ifyoustoppullingthehosewhilsttheclickingnoisecanbehearditwillremainlockedatthatlength.
5.3. Toextendthehosefurther,pullandagainstopwhilsttheclickingnoisecanbeheardtolockthehose.
5.4. To unlock the hose and allow it to automatically rewind, extend the hose a little further and release during a quiet stage between
theperiodsofclicking.DO NOTallowthereeltorewindinanuncontrolledmanner,alwaysfeedthehosetothereel.
5.5. Re-tensioning the hose reel
WARNING!Ensurethattheairsupplyisdisconnected.
5.5.1. Pullapproximately2mtrofhosefromthedrumandallowthedrumtolock.
5.5.2. Removethehosebumperblocks(55)anddrawthe2mtrofhosebackthroughthehoseguide.
5.5.3. Wrapthehoseoneturnaroundthedrumtoincreasethetensionorunwraponeturntodecreasethetension.
5.5.4. Feedtheendofthehosebackthroughthehoseguideandretthebumperblocks.
5.5.5. Checkthetensionandadjustfurther,asabove,ifnecessary.
6. MAINTENANCE
WARNING!Beforeattemptingmaintenanceorinspection,ventanypressureremaininginthehose.
6.1. Toensurereliableoperation,cleanthehoseandcasingregularly.DO NOTsprayorwettheproduct,butcleanwithadampcloth.
DO NOTusesolventsordetergents,asthesemaycausepermanentdamage.
6.2. Thehosereeldoesnotrequirespecialmaintenanceasitislubricatedforlife.Iftheproductneedsattention,consultyour
nearestauthorisedserviceagent.
WARNING: DO NOT attempt to loosen, or remove, any casing nuts or bolts yourself, other than to reposition the hose
guide (see 4.1.2.).
6.3. Replacement of the supply hose should be carried out by skilled personnel only, consult your nearest authorised service
agent.
6.4. Shouldyouwishtostoretheairhosereel,ensurethatitiscleananddry.Placeinadark,safe,dry,childprooflocation,wherethe
temperaturewillremainreasonablystable.DO NOTstoreinanylon,orplastic,bagasthiswillencouragecondensation.
fig.2fig.1
Sealey Group, Kempson Way, Suffolk Business Park, Bury St Edmunds, Suffolk. IP32 7AR
01284 757500 01284 703534 sales@sealey.co.uk www.sealey.co.uk
Note: It is our policy to continually improve products and as such we reserve the right to alter data, specifications and component parts without
priornotice.
Important:NoLiabilityisacceptedforincorrectuseofthisproduct.
Warranty:Guaranteeis12monthsfrompurchasedate,proofofwhichisrequiredforanyclaim.
ENVIRONMENT PROTECTION
Recycleunwantedmaterialsinsteadofdisposingofthemaswaste.Alltools,accessoriesandpackagingshouldbesorted,takento
arecyclingcentreanddisposedofinamannerwhichiscompatiblewiththeenvironment.Whentheproductbecomescompletely
unserviceable and requires disposal, drain any fluids (if applicable) into approved containers and dispose of the product and fluids
accordingtolocalregulations.
SA84.V2SA841.V2/HV.V2SA85.V3Issue:1-07/11/17
© Jack Sealey Limited Original Language Version


