Seaory R300 User manual

2021
Shenzhen Seaory Technology Co., Ltd.
Model:Seaory R300
Excellent Quality
Perfect Service
Desktop Retransfer Dual-sided Card Printer

Seaory R300 Desktop Retransfer Dual-sided Card Printer
卓越品质 完美服务
www.seaory.com
Copyright© Shenzhen Seaory Technology Co.,Ltd. All rights reserved.
Copyright
Users shall respect the latest regulations on copyright of their own countries. This manual,
no matter in E-file, text version, or other formats, can never be partially or totally copied,
translated or spread in any way for any reason, without the writing authorization fromShenzhen
Seaory Technology Co., Ltd. Please forgive that any change of this manual will not be further
noticed. Shenzhen Seaory Technology Co., Ltd. shall take no responsibility for any errors (if
any) in this manual, accidental damage of printer, or losses caused by this manual contents.
All the pictures and specifications in this manual are made to help description, while the
actual specifications shall be subject to order. If any query, please refer to the products
specifications on the website of Shenzhen Seaory Technology Co., Ltd.
With respect to warranty conditions and restrictive clauses, please refer to the Warranty
Card enclosedin the printer package. Thanks for choosing Seaory R Series card printer, to start
a successful cooperation between us. A variety of high quality personalization of identification
cards, visa cards, and membership cards etc. can be realized through simply operation of these
card printers. You shall make sure that printer consumables you bought are from original
manufacturer. To know more information, please visit our website: www.seaory.com. If any
errors found, please let us know by mailing to: info@seaory.com.
Sign Indicates
Warning Sign
Label meaning: The equipment with with the logo is only designed and evaluated for
safety at an altitude of 2000m. Therefore, it is only suitable for safe use at an altitude
of 2000m. When used at an altitude of 2000m, there may be safety hazards.
Label meaning: The equipment with the logo is only designed and evaluated in
accordance with the non-tropical climatic conditions. Therefore, it is only suitable
for safe use in non-tropical climatic conditions. When used in tropical climatic
conditions, there may be safety risks.
Declaration
Warning:This is a Class A product. In a domestic environment this product may cause radio
interference in which case the user may be required to take adequate measures.
Special Warning Message
More In-depth Information Notice

Seaory R300 Desktop Retransfer Dual-sided Card Printer
卓越品质 完美服务
www.seaory.com
Catalogue
1. ............................................1
1.1 ..........................................1
1.2 ....................................................1
2. ..........................................2
3. Product Introduction..........................................3
3.1 Product Size ..............................................3
3.2 Roof ...........................................................3
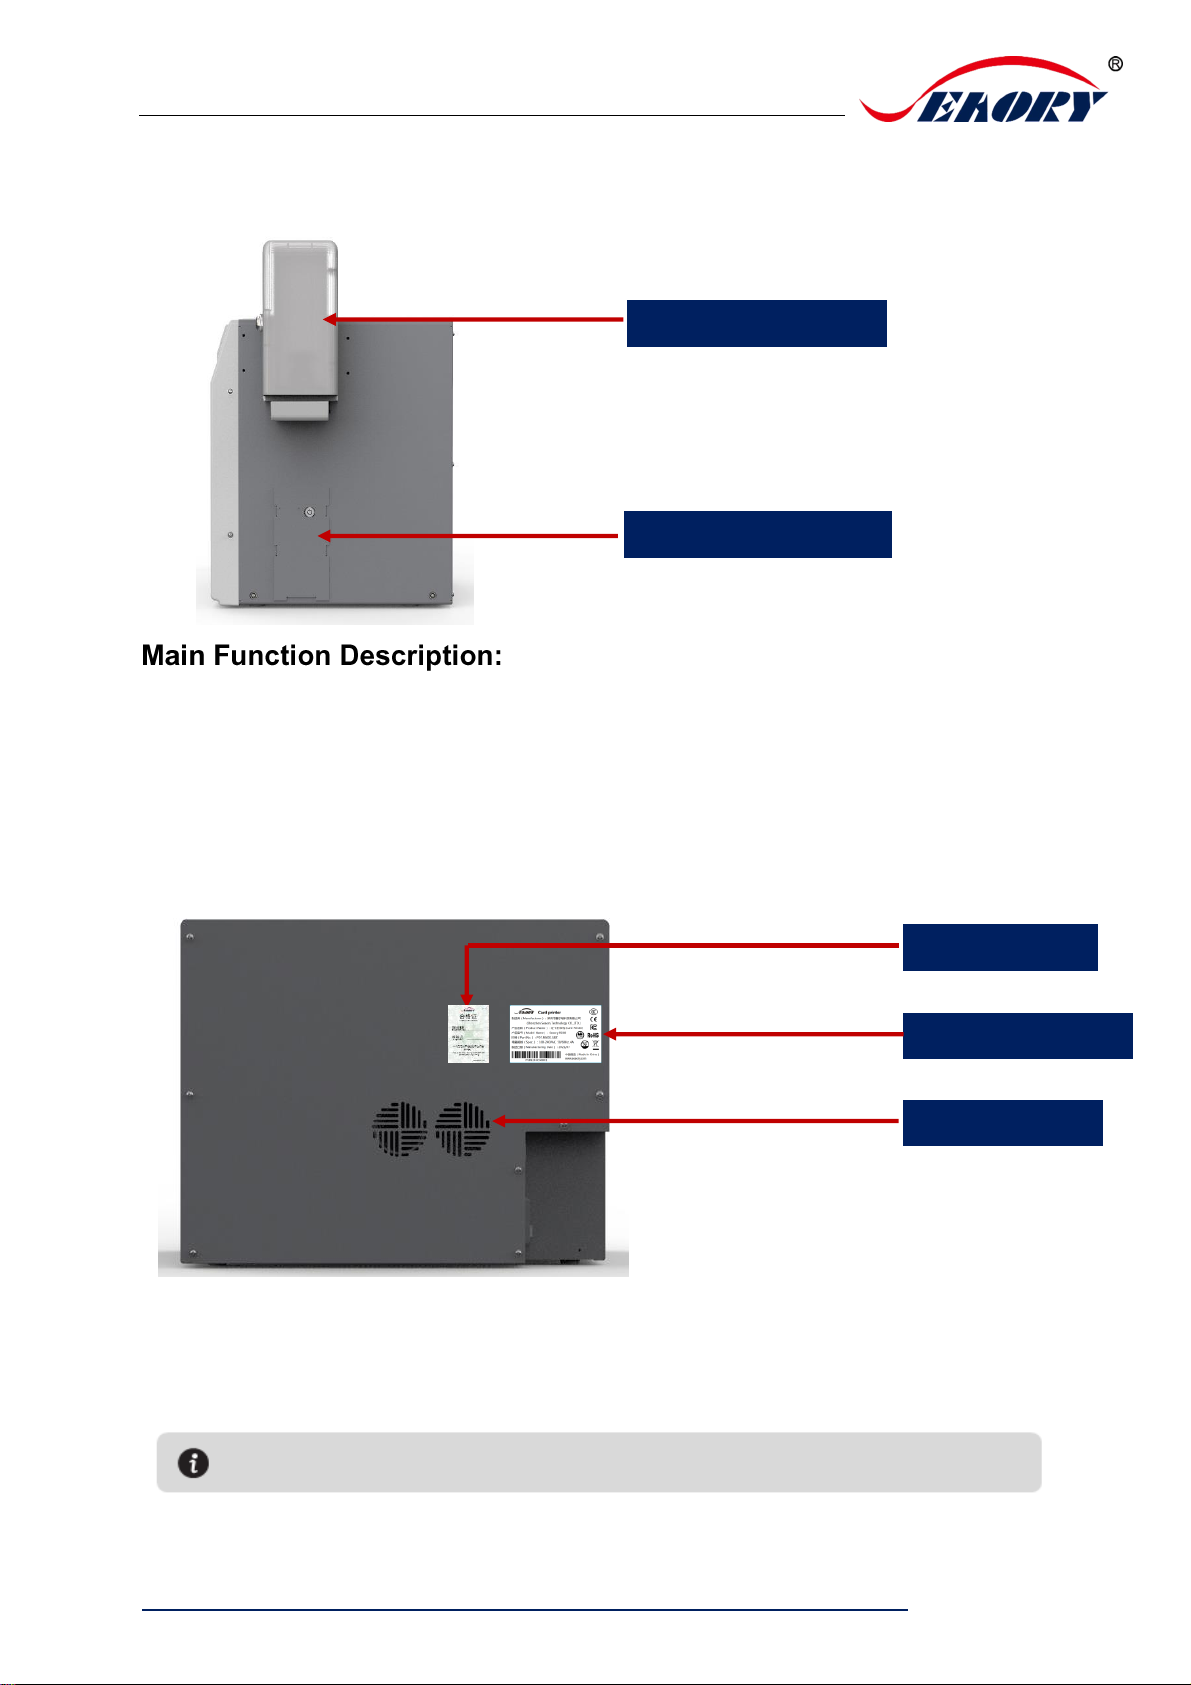
3.3 Back-end....................................................4
3.4 Front-end ...................................................5
3.5 Backside ....................................................5
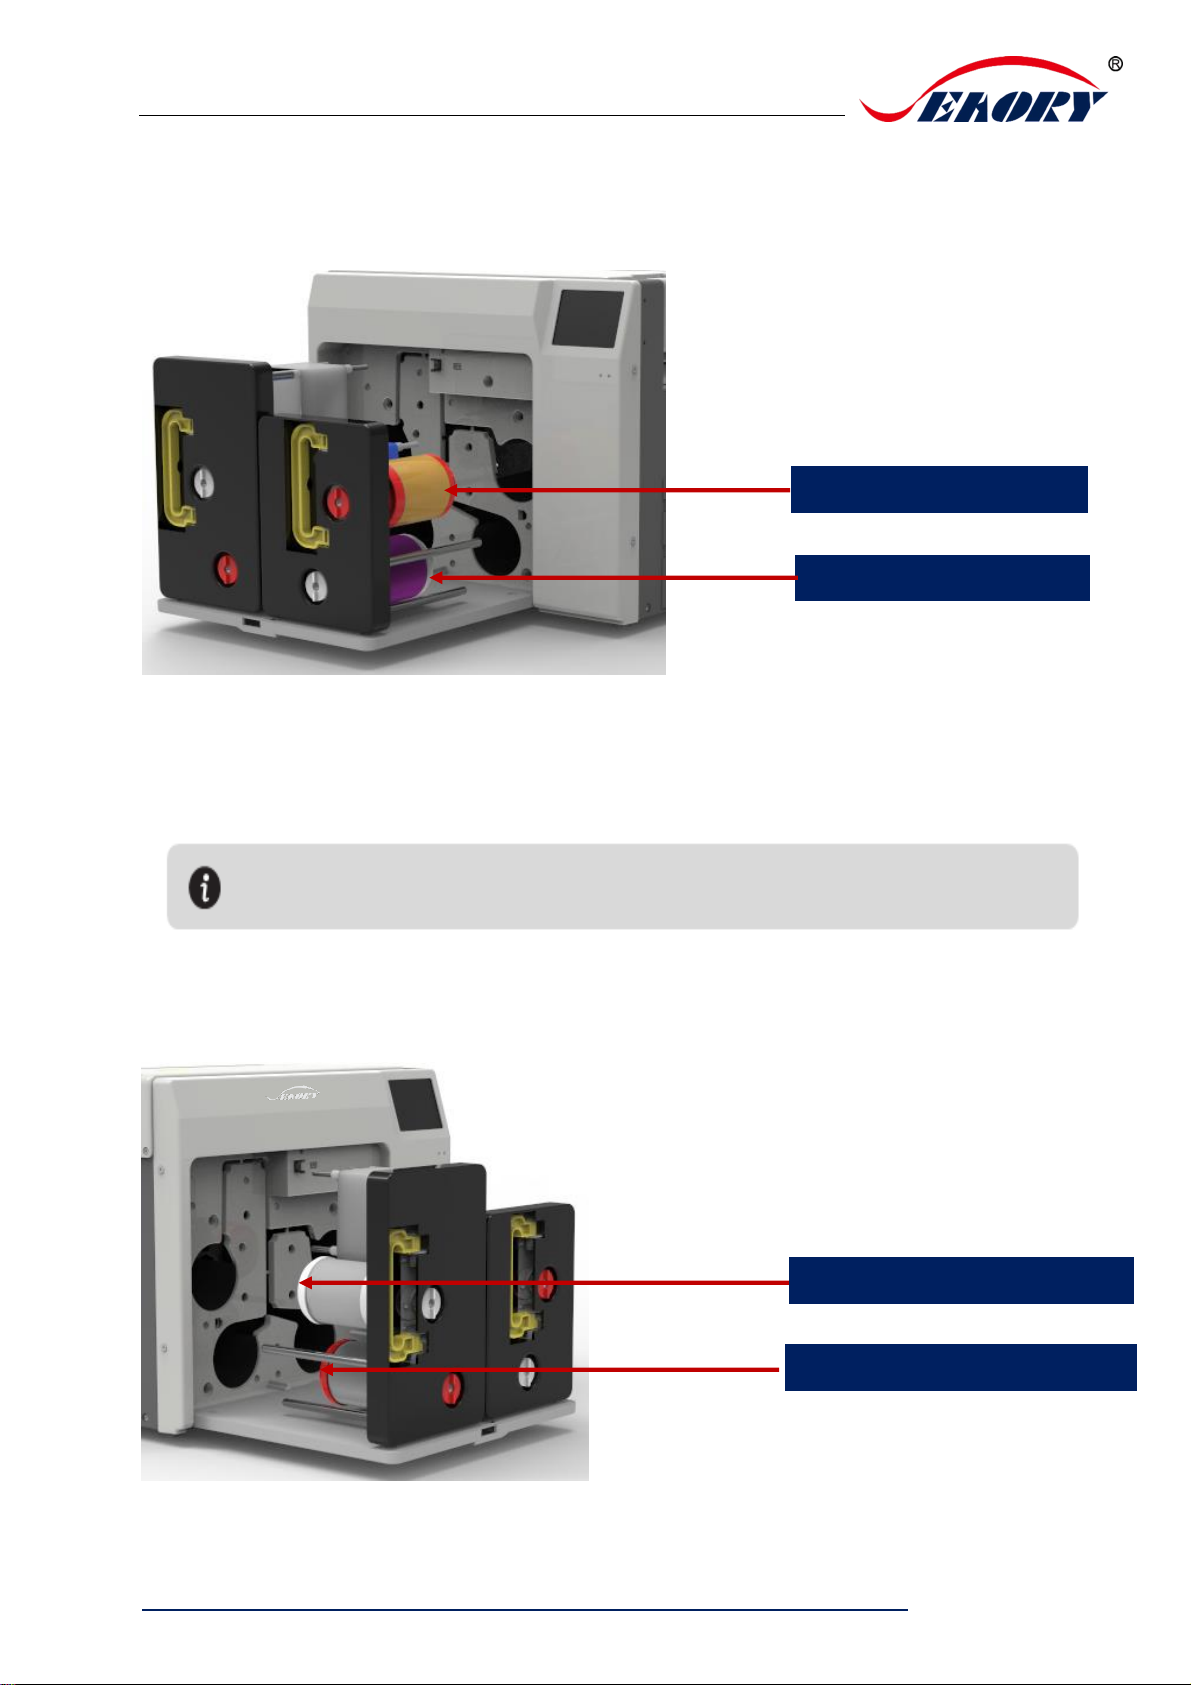
3.6 Internal Structures .....................................6
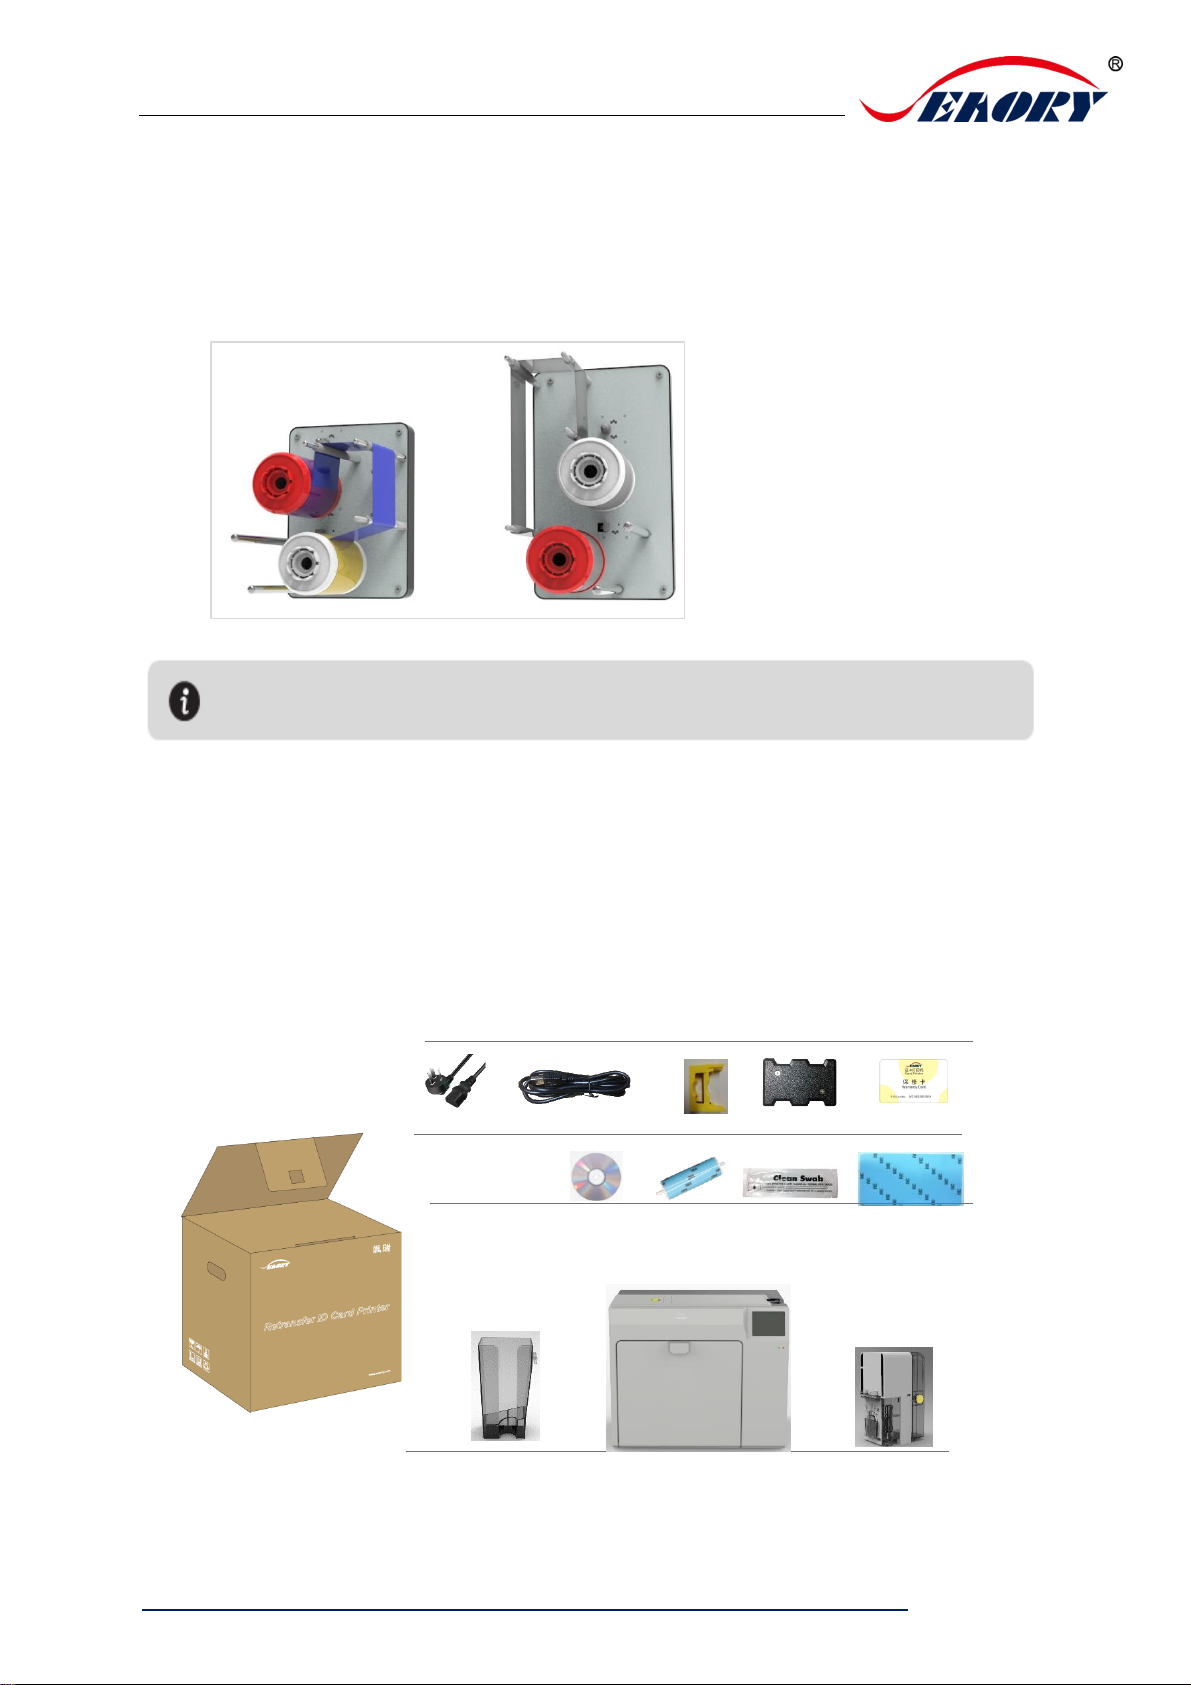
4. Accessories Included ........................................7
4.1 Open-case Inspection................................7
5. Installation and Usage ......................................9
5.1 Install Cleaning Roller................................9
5.2 Consumables Installation ........................ 11
5.2.1 Consumables Preparation ................ 11
5.2.2 Remove the Consumables Holder.... 11
5.2.3 Install the Ribbon and Transfer Film. 12
5.2.4 Install the Consumables Holder........ 13
5.3 Install the Input Hopper ...........................14
5.4 Install the Output Hopper.........................14
5.5 Adjust the Card Thickness.......................15
5.6 Install Cards and Place the Counterweight
Card.................................................................15
5.6.1 Front-end Automatic Input Hopper.... 15
5.6.2 Front-end Manual Single Input Card. 17
5.6.3 Back-end Manual Single Input Card . 18
5.7 Hardware Connections ............................19
6. Printer Driver Installation and Uninstallation ..20
6.1 Operating System....................................20
6.2 Preparation Before Installation ................20
6.3 Driver Installation Steps (USB Interface) 21
6.4 Network Setting .......................................24
6.5 Driver Installation (Ethernet Interface)......25
6.6 Driver Uninstallation..................................26
7. Printer Driver Setting.......................................29
7.1 Printer Driver Preferences.......................29
7.2 Ribbon Type Setting..................................30
7.3 Printing Orientation Setting ......................31
7.4 Printing Page Rotate Setting .................... 32
7.5 Card Input Mode Setting...........................33
7.6 Card Output Mode Setting........................34
7.7 Discarded Card Mode Setting .................. 35
7.8 Image Color Setting.................................. 36
7.9 Magnetic Stripe Encoding Setting ............ 37
7.10 Heating Energy Setting...........................38
7.11 Tool Setting .............................................39
7.12 Magnetic stripe tool ................................ 41
7.13 Ribbon tension adjustment.....................42
7.14 Tool ......................................................... 43
8. Print Test ......................................................... 44
8.1 Driver Test Page .......................................44
8.2 Seaory iCARDE Card Design Software ... 45
9. Cleaning and Maintenance............................. 46
9.1 Replace Cleaning Roller...........................46
9.2 Cleaning Card Moving Path ..................... 46
10. Touch Screen Operation Instructions ............. 49
10.1 Main Interface Introduction.....................49
10.2 Menu.......................................................50
10.2.1 Printer Information...........................50
10.2.3 Ribbon Information..........................51
10.2.4 Module Information..........................51
10.2.5 Printer Setting .................................52
10.2.6 Printer Test......................................53
10.2.7 Cleaning Tool..................................54
11. Common Fault Codes and Solutions .............55
11.1 No Action Occurred .................................55
11.2 Blank Card Printed ..................................55
11.3 Partial or Wrong Printing ......................... 55
11.4 Printing Defects.......................................55
11.5 White Horizontal Lines Appear in the Print
56
11.6 White Vertical Lines or Color Lines Appear
in the print ....................................................... 56
11.7 Blurred Image in Printing......................... 56

Seaory R300 Desktop Retransfer Dual-sided Card printer
Exellent quality, Perfect service
www.seaory.com 1 / 56
1.
1.1
A. Dual-sided printing
B. Automatic batch feeding card
C. Manual feeding card on the back end
D. Alarm for no card, defective slot
E. Combine feeding card mode and recycling pending card
F. Perfectly over edge-to-edge printing of the entire card.
G. With card bending correction function
H. Multi-function optional modules:
①Dual interface card encoding module;
②Contactless card encoding module;
③UHF chip card encoding module;
④Magnetic stripe card encoding module;
I. Supslot YMCK, YMCKK, YMCKI, YMCKHs and other colored
ribbons, YMCUvK fluorescent anti-counterfeiting ribbons,
monochrome black ribbons
1.2
Adopt high resolution transfer dye sublimation print
method
Standard 300dpi × 300dpi high resolution and dual-
sided printing
Higher image quality and clear text, professional-level
printing effects
Perfectly realize the entire card over-edge printing
High printing speed
All-metal movement, more stable continuous printing
ability of card
Supslot PVC, composite PVC, ABS, PET, PC and
other materials to print high-quality cards
With a 3.5-inch color touch-screen, the operation is
more intuitive and convenient

Seaory R300 Desktop Retransfer Dual-sided Card printer
Exellent quality, Perfect service
www.seaory.com 2 / 56
2.
Product Name
Desktop Retransfer Dual-sided Card Printer
Print Method
Dye Sublimation (Retransfer-to-card)
Power Supply
100-240VAC,50/60Hz,4A
Print Dimension
ISO CR80(53.98mm×85.60mm)edge-to-edge printing
Print Resolution
300dpi × 300dpi
Print Speed
Monochrome printing:12-16s per card(single-sided), 30-34s per
card(dual-sided),using ribbon saving technology
Full-color YMCK Printing:20s per card(single-sided),38s per
card(dual-sided)
Card Material
PVC, composite PVC, ABS, PET and PC materials
Card Thickness
0.3-1.05mm
Memory
256M
Input hopper
capacity
200 cards (standard thickness card 0.76mm)
Output hopper
capacity
200 cards (standard thickness card 0.76mm)
Defective card slot
capacity
25 cards (standard thickness card 0.76mm)
Operation system
Supslot 32-bit and 64-bit Windows® XP, 7, 8, 10, Windows®
Server 2003/2008/2012/2016/2019; 32-bit and 64-bit Linux.
Supslot Chinese operating systems, such as the NeoKylin,
Kylin and UnionTech UOS.
LCM Display
3.5 inch color touch-screen
Operating
condition
Regular running temp.:
15℃-30℃ (59-86℉), 20%-65%,RH non-condensing
Lowest / Highest running temp.:
0℃(32℉)/40℃(104℉), 20%-65% RH non-condensing
Storage condition
Temp.: -5℃-70℃(23-158℉),20%-70% RH non-condensing

Seaory R300 Desktop Retransfer Dual-sided Card printer
Exellent quality, Perfect service
www.seaory.com 3 / 56
3. Product Introduction
3.1 Product Size
R600 card printer size: 568mm × 272mm × 398mm,
Net weight:20.3Kg.
3.2 Roof
272mm
398mm
Ribbon door button
Input hopper
LMC Display
Switch of leveling
module door
Output hopper
Door of upper
cover

Seaory R300 Desktop Retransfer Dual-sided Card printer
Exellent quality, Perfect service
www.seaory.com 4 / 56
1.Input hopper: Card placement area to be printed (can hold 200 0.76mm
standard cards).
2.Output hopper: Put the printed cards temporarily (can hold 200 0.76mm
standard cards).
3.Switch of leveling module door: To open and inspect the leveling module.
4.Door of upper cover: Open the upper cover door to observe its internal
working status and install the cleaning module.
5.LMC Display: Show printer parameter information and status information.
3.3 Back-end
1. Ethernet Interface: RJ45 interface, TCP/IP protocol, through this
interface can achieve PC and card printer network connection.
2. USB Interface: USB-B type interface, connect directly to PC side.
3. Power slot: 100-240VAC, 50/60Hz,4A.
4. Power switch: connect or disconnect power.
5.Back-end card output slot, the printed card is ejected from here, support
the back-end manual feeding card and recycling pending card.
The communication interface supslots USB and Ethernet, It’s recommend that to choose one of them.
Interface: USB
Interface: Ethernet
Output hopper
Power switch
Power slot
Back-end card
output slot

Seaory R300 Desktop Retransfer Dual-sided Card printer
Exellent quality, Perfect service
www.seaory.com 5 / 56
3.4 Front-end
Input hopper: Blank card storage area, capacity: 200pcs standard
card(0.76mm).
Defective card slot: Defective cards storage area, capacity: 25pcs
standard card(0.76mm).
3.5 Backside
Main function description:
Open the backside cover to install the IC card encoding module.
Input hopper
Card printer nameplate: Barcode information on nameplate is needed when you need technical services
from us..
Defective card slot
Card Printer Nameplate
Certification
Cooling Fan

Seaory R300 Desktop Retransfer Dual-sided Card printer
Exellent quality, Perfect service
www.seaory.com 6 / 56
3.6 Internal Structures
(1)Right View
Main Function Description:
Ribbon supply roller: unused ribbon ends.
Ribbon pickup roller: recycle used ribbon.
(2)Left view
When purchasing the printer, the ribbon and transfer film are not installed in the equipment
as standard. Generally, it needs to be purchased separately.
Ribbon pick up roller(white)
Ribbon supply roller(red)
)
Transfer film pick up roller (white)
Transfer film supply roller (red)

Seaory R300 Desktop Retransfer Dual-sided Card printer
Exellent quality, Perfect service
www.seaory.com 7 / 56
Main function description:
Transfer film pick up roller: unused ribbon ends.
Transfer film supply roller: recycle used ribbon.
(3)Consumables View
4. Accessories Included
4.1 Open-case Inspection
After opening the box, first check whether the appearance is in good
condition, and check whether the accessories are complete according to
the product instruction manual (prevailed by the sales contract). If there is
any missing, please contact the dealer to communicate and solve.
When purchasing the printer, the ribbon and transfer film are not installed in the
equipment as standard. Generally, it needs to be purchased separately.

Seaory R300 Desktop Retransfer Dual-sided Card printer
Exellent quality, Perfect service
www.seaory.com 8 / 56
Main Function Description:
Input hopper: Card placement area to be printed (can hold 200
0.76mm standard cards).
Output hopper: Put the printed cards temporarily (can hold 200
0.76mm standard cards).
Power cable: connect to power adapter.
USB cable: communication connection between PC and card printer.
Counterweight card: Apply gravity to the card to increase the contact
area between the card and the card feed wheel, ensuring stable card feed
when the number of cards in the card feed slot is small.
Cleaning module and cleaning roller: indirectly stick to the dust on the
card surface to improve the printing effect.
Cleaning card: double-sided 3M standard card, cleaning card printer
internal card passing channel dust.
Warranty card: need to use it while supply technical service, please
keep it properly.
Cleaning stick: cleaning the print head.
CD: storage ICARDE software, card printer driver, Operation
instruction etc.

Seaory R300 Desktop Retransfer Dual-sided Card printer
Exellent quality, Perfect service
www.seaory.com 9 / 56
5. Installation and Usage
5.1 Install Cleaning Roller
Step1: Take out the cleaning module and cleaning roller from the
accessory box, and assemble them as required by the following picture.
After tearing off the 3M adhesive layer on the surface of the cleaning
roller, hold the two ends of the cleaning roller with hands, push them to
the installation position and gently press down to lock until the ends do
not fall off.

Seaory R300 Desktop Retransfer Dual-sided Card printer
Exellent quality, Perfect service
www.seaory.com 10 / 56
Step 2: Press the red frame part of the upper cover door in the lower
left picture, and open the upper cover door by hand after the upper cover
lock pops out
Step 3: Install the above assembled cleaning module into the card
printer as shown in the picture below:
The function of the cleaning roller is to absorb the dust and foreign matter entering the card
roller, indirectly stick to the dust on the card surface to improve the printing effect.

Seaory R300 Desktop Retransfer Dual-sided Card printer
Exellent quality, Perfect service
www.seaory.com 11 / 56
5.2 Consumables Installation
5.2.1 Consumables Preparation
Take out the ribbon and transfer film from the consumable packaging box,
open the corresponding blister boxes respectively and take out the ribbon
and transfer film.
5.2.2 Remove the Consumables Holder
Pull the ribbon door ring as shown below, open the ribbon door, turn the
handle of the consumable holder, and take out the consumable holder.
In order to ensure the normal use of the printer, please use the original Seaory ribbons.
Transfer film
YMCK ribbon

Seaory R300 Desktop Retransfer Dual-sided Card printer
Exellent quality, Perfect service
www.seaory.com 12 / 56
5.2.3 Install the Ribbon and Transfer Film
Install the transfer film and ribbon into the consumable holder as shown
below.
Supply shaft: the red end is the supply shaft, unused consumables (ribbon
or transfer film);
Pick up shaft: the white end is the pick up shaft, used consumables (ribbon
or transfer film);
Pay attention to the installation direction,
the gear is facing up!
Transfer film pick-up shaft (white shaft)
Transfer film supply shaft (red shaft)
ribbon supply shaft (red shaft)
ribbon pick-up shaft (white shaft)

Seaory R300 Desktop Retransfer Dual-sided Card printer
Exellent quality, Perfect service
www.seaory.com 13 / 56
5.2.4 Install the Consumables Holder
Install the consumable rack with the ribbon and transfer film installed into
the card printer.
(1)Align the post of the transfer film holder with the hole as shown in the
picture below and gently push it into the card printer.
(2) Align the post of the ribbon holder with the hole as shown in the picture
below, and gently push it into the card printer.
(3) Close the ribbon door and complete the installation of the
consumables supslot.

Seaory R300 Desktop Retransfer Dual-sided Card printer
Exellent quality, Perfect service
www.seaory.com 14 / 56
5.3 Install the Input Hopper
First take out the card slot from the accessory box, turn 90° to open the
card slot, and then press the slot to the end vertically as shown in the figure
below
5.4 Install the Output Hopper
Take out the card slot from the accessory box. There are two holes under
the card outlet at the back of the card printer. Insert the card slot hooks
into the two holes below the card outlet as shown in the picture below.
Output hopper
The printed card is temporarily stored in the card output slot, please keep it properly.
Input hopper

Seaory R300 Desktop Retransfer Dual-sided Card printer
Exellent quality, Perfect service
www.seaory.com 15 / 56
5.5 Adjust the Card Thickness
Take out the card slot from the accessory box or take out the card slot from
the card printer front end. According to the card thickness, turn the yellow
control button to adjust the card thickness.
The factory default thickness of the Input hopper is 0.8mm (30Mil), user
can adjust it according to the actual thickness of the card.
5.6 Install Cards and Place the Counterweight Card
5.6.1 Front-end Automatic Input Hopper
(1) Introduction of using the card slot
Press the yellow button into the card slot, and turn the door cover 90° to
open the card slot door as shown in the picture below.
Card input roller
No card sensor

Seaory R300 Desktop Retransfer Dual-sided Card printer
Exellent quality, Perfect service
www.seaory.com 16 / 56
(2) Install cards
You can put cards into the card slot after the card printer installation is
completed.
There is no requirement for the direction of contactless IC cards
and ordinary white cards, the card insertion direction can be
customized according to needs.
The contact IC card should be inserted strictly in accordance
with the card direction in the picture below, which is consistent
with the ATM card insertion rules. If you only need to print and
don't need to encode chip data, there is no requirement for the
direction of the card. The card insertion direction can be
customized according to needs.
ISO7811 standard magnetic stripe card should be inserted
strictly in accordance with the card direction in the picture below,
which is consistent with the ATM card insertion rules. If you only
need to print and don't need to encode chip data, there is no
requirement for the direction of the card. The card insertion
direction can be customized according to needs.
As shown in the figure,
the chip position is facing
forward and upward.
As shown in the figure, the
magnetic stripe is facing the
lower right.

Seaory R300 Desktop Retransfer Dual-sided Card printer
Exellent quality, Perfect service
www.seaory.com 17 / 56
(3) Place counterweight card
Take out the counterweight card from the accessory box after installing the
card and place it in the card slot.
5.6.2 Front-end Manual Single Input Card
After taking out the card out slot, the front end can be manually inserted
and ejected by rotating the card base. When the card printer is ready, put
the card into the front input/output slot, the machine will automatically
swallow the card into the internal track of the device after detecting the
card.
The card inserting direction of contactless IC card, ordinary white card,
contact IC card, and magnetic stripe card is the same as the requirements
for automatic front-end card slot insertion in 5.6.1
Counterweight card: Apply gravity to the card to ensure stable card insertion when the number of
cards in the card slot is small.
Counterweight card
Other manuals for R300
1
Table of contents
Other Seaory Printer manuals

Seaory
Seaory S22F Technical manual

Seaory
Seaory S26 Technical manual

Seaory
Seaory R600M Technical manual

Seaory
Seaory R600 Operating manual

Seaory
Seaory S22 Instruction manual

Seaory
Seaory S25 Instruction manual

Seaory
Seaory R300 Operating manual

Seaory
Seaory S28 Instruction manual

Seaory
Seaory R600 Technical manual

Seaory
Seaory S20R Instruction manual

Seaory
Seaory S21 Technical manual

Seaory
Seaory S20 Instruction manual

Seaory
Seaory S20 User manual

Seaory
Seaory S20R Technical manual

Seaory
Seaory S22K Technical manual

Seaory
Seaory S22 Technical manual

Seaory
Seaory S21 User manual

Seaory
Seaory S20 Technical manual

Seaory
Seaory R600M Operating manual

Seaory
Seaory S21 Instruction manual