Seizmik 50-50222KIT User manual
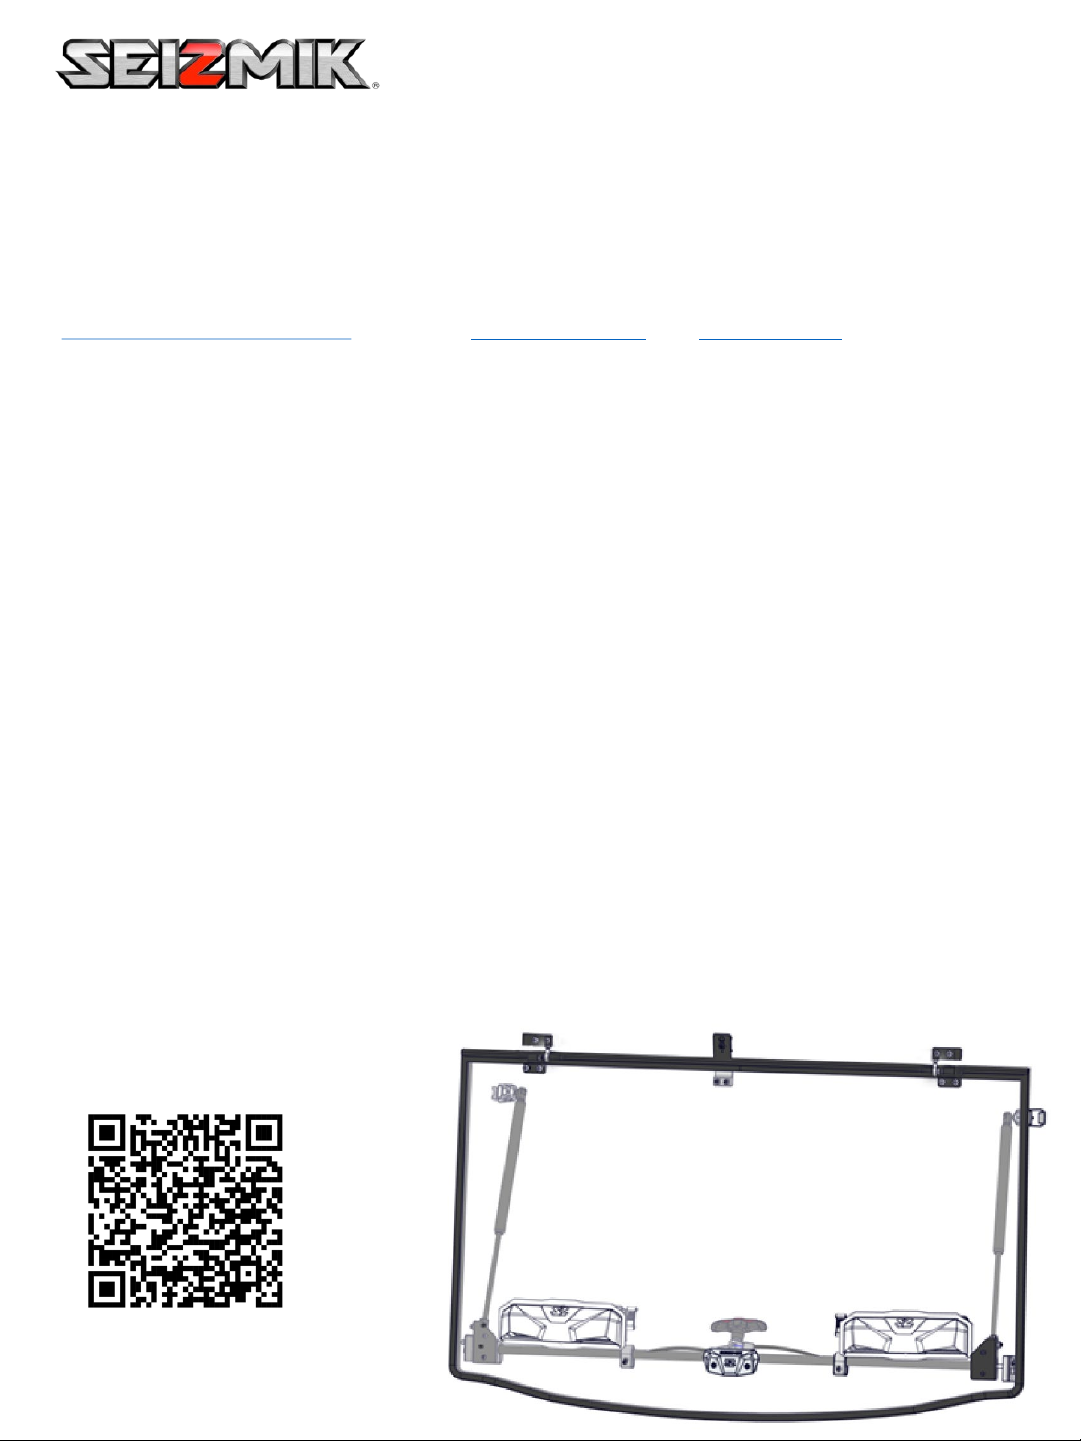
Installation & Operations Manual : SZ Flip-Up Windshield, Polaris Mid-Size Pro-Fit Ranger
Part Number 50-50222KIT
Installation Information:
This product does not require any modifications to your vehicle. Please familiarize yourself with all the steps before
beginning assembly.
Seizmik makes Windshields, Mirrors, Door Kits, Light Bars, Hood Racks, and other great accessories for UTV’s to
maximize the vehicles usefulness. To help you do what you do better.
If you have any questions, comments, need assistance, or are missing parts, please visit our website
http://seizmik.com/customer-support Or email us at service@seizmik.com. Visit www.seizmik.com for more
information on our product or call 1-866-838-3366 between 9:00AM and 5:00PM EST.
Parts List:
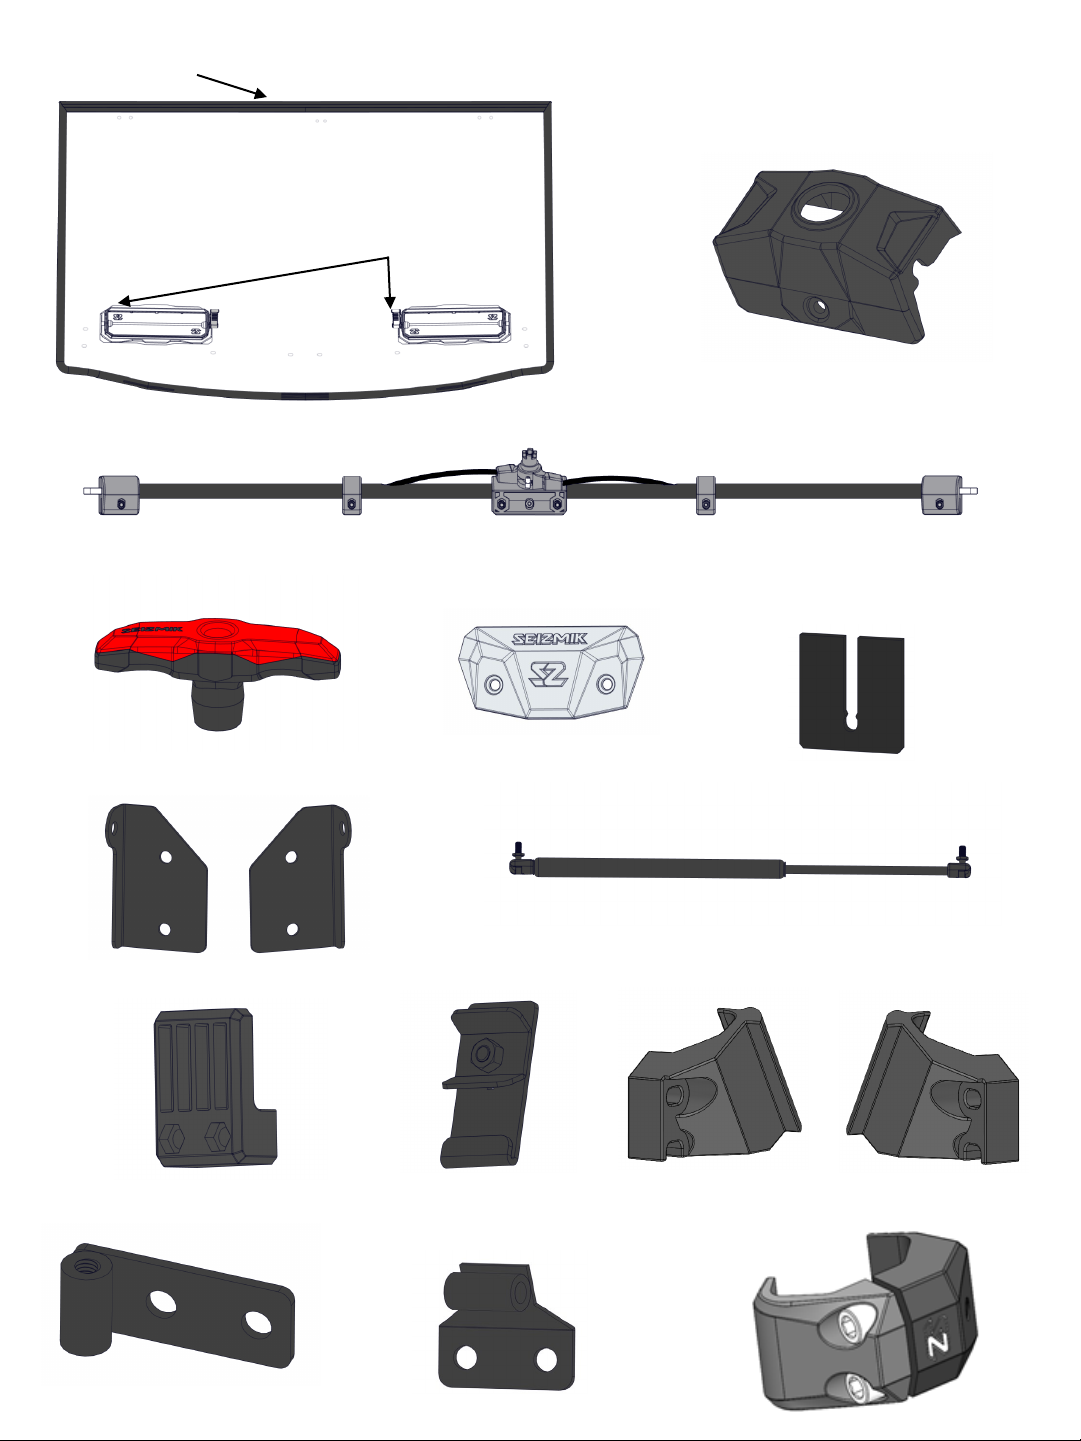
1. 50-50222 MS Ranger Windshield
2. 54-91033 Gasket
3. 54-96020 Vent Pair
4. 54-96049 Tube Assembly
5. 54-96061 Brace Mounting Block Cover
6. 54-96065 T Handle
7. 54-96073 Badge
8. 54-96058 Shim (2)
9. 54-96080 Ball Bracket, Driver
10. 54-96081 Ball Bracket, Passenger
11. 54-96086 Gas Spring (2)
12. 54-96071 Center Retainer
13. 54-96072 Rub Plate
14. 54-96089 Strike Plate, Driver
15. 54-96090 Strike Plate, Passenger
16. 54-96085 Hinge Half, Upper (2)
17. 54-96084 Hinge Half, Lower (2)
18. 54-96054 Ball Stud Clamp (2)
19. 54-96053 MS Ranger Hardware Bag
1
Tools Needed:
•4mm, 5mm, 6mm Allen Wrenches
•10mm, 12mm, 13mm Open End Wrenches
•Socket Wrench with 13mm Socket
•Small Flathead Screwdriver
•T40 Torx Socket
Installation Video
Scan code with your phone’s
camera and follow the link
1
2
3
16
4
910
8
67
11
12 13
17
Brace Mounting Block Small Mounting Block End Mounting Block
5
Parts
2
x 2 x 2 x 2
x 2
x 2
14 15
18
In Tube Assembly:
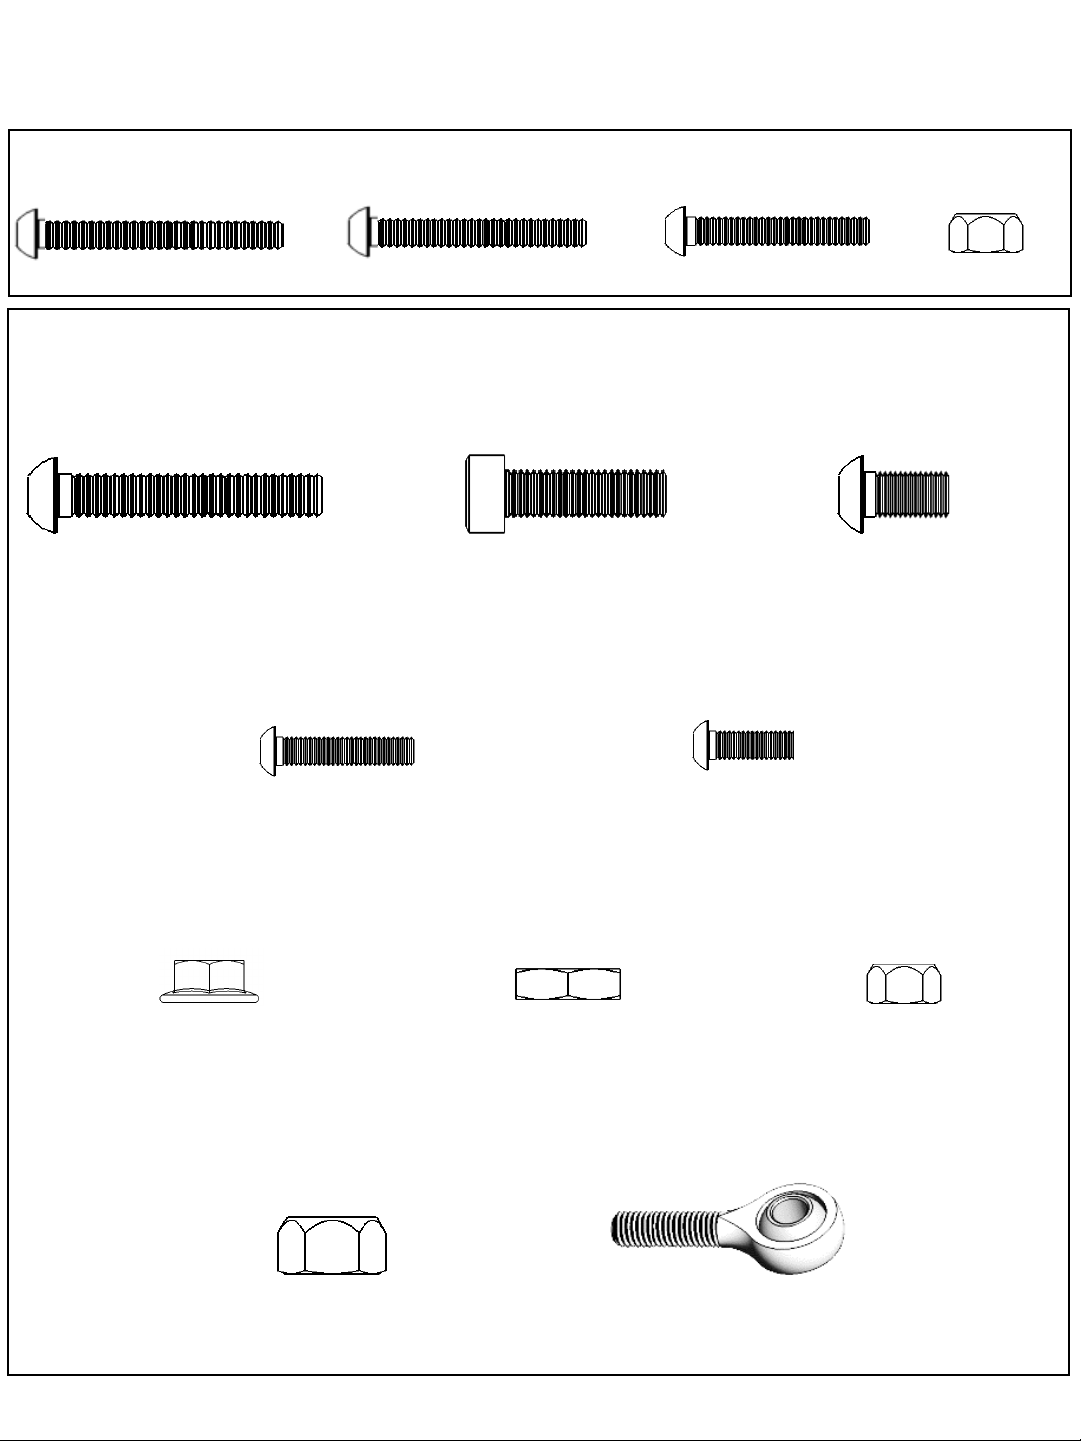
M6x50 Button Head M6x45 Button Head M6x40 Button Head
M8x50 Button Head M8x30 Socket Head M8x16 Button Head
M6x30 Button Head M6x18 Button Head
M6 Flange Nylon Lock Nut M8 Jam Nut M6 Nylon Lock Nut
M6 Nylon Lock Nut
M8 Nylon Lock Nut M8 Rod End
x 2 x 2
x 1 x 8
x 3
x 2
x 6
x 2 x 7
x 2 x 2 x 2
x 2
x 16
Hardware
In Hardware Bag:
3
Brace Mounting Block Small Mounting Block
End Mounting Block
M6x40
M6x45
M6x50
9
Repeat for the other half of windshield so that the
windshield looks like this. Make sure the fasteners are
tight, but you can still rotate the ball brackets by hand
with some resistance.
Take the Tube Assembly out of its box. Using a 4mm
Allen wrench, remove all the bolts and nuts from the
mounting blocks except the M6x45 Button Head Bolt
in the middle of the Brace Mounting Block. Use
picture above to remember which size bolt goes with
each mounting block.
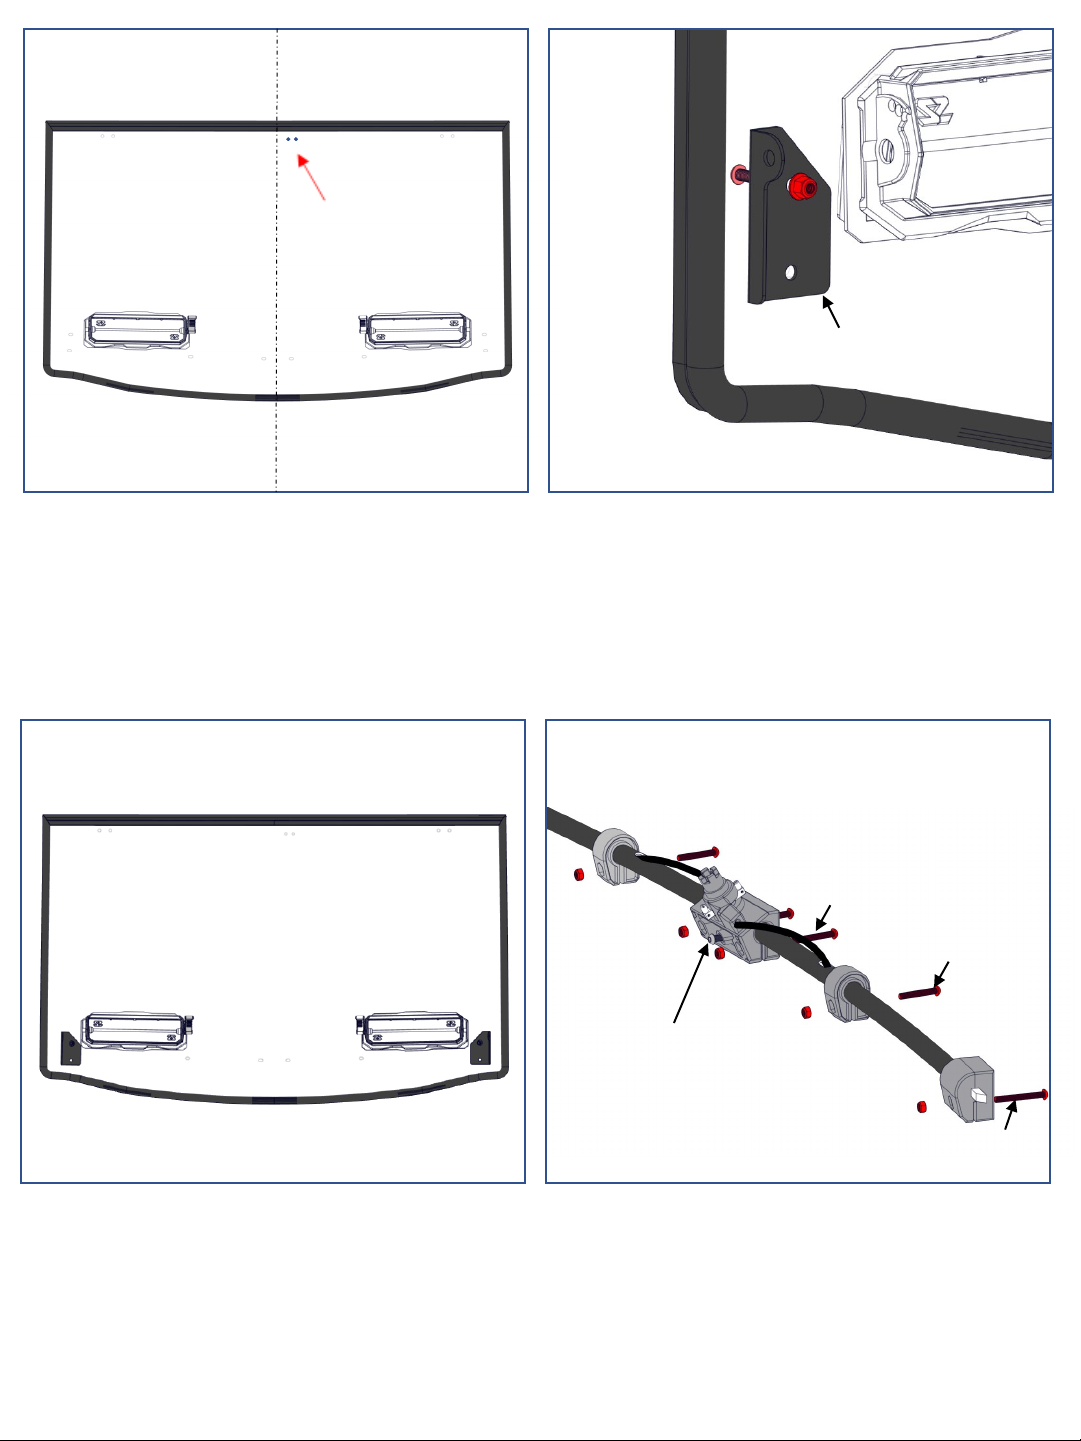
Place the windshield down on a large flat surface with
something under it to prevent scratching. It should be
oriented with Vent Pair lever-side up and Gasket
bulb-side up. This is the inside of the windshield. Slide
the windshield towards you so the vents are off the
edge of the work surface. There are two holes about
1.5” apart in the middle of the top of the windshield.
Make sure they are slightly right of center.
Take the Ball Brackets (9 & 10) and orient them on
the inside of the windshield as shown. Shown above
is Ball Bracket, Driver (9). Gather a 4mm allen
wrench and a 10mm open wrench. Fasten an
M6x18mm Button Head Bolt through top hole in each
ball bracket with a M6 Flange Nylon Insert Lock Nut
on the inside of the windshield
.
Leave this middle
bolt fastened
1 2
3 4
4
..

Place the Tube assembly on the inside of the
windshield with the pockets for captive nuts in each of
the mounting blocks facing upwards.
Insert two M6x45 Button Head Bolts through the
Badge (7), through the windshield, and then through
the Brace Mounting Block. Put the outer two M6
Nylon Lock Nuts in their captive pockets to fasten
until just a few threads engage. At this point just
tighten by hand or finger-tight using a 4mm Allen
wrench.
Use a M6x40mm Button Head Bolt and a M6 Nylon
Lock Nut to repeat this process for each Small
Mounting Block.
The hole alignment of the mounting
blocks to the holes in the windshield can be adjusted
at any time by rotating the tube within the mounting
blocks.Because of this, it is important to leave all
fasteners loose during steps 6-9.
Check the alignment on the End Mounting Blocks and
rotate the tube if needed. Now gently flex the
windshield towards the tube so that you can insert a
M6x50 Button Head Bolt through the other side of the
windshield, through the bottom hole of the Ball
Bracket, and then through the End Mounting Block.
Use an M6 Nylon Lock Nut in the captive pocket to
fasten the bolt. Only engage about 2-3 threads.
Repeat for other side.
5 6
7 8
7
5
..
Other Seizmik Automobile Accessories manuals

Seizmik
Seizmik 05007 User manual

Seizmik
Seizmik 90049 User manual

Seizmik
Seizmik 18011 User manual

Seizmik
Seizmik RZR PRO XP User manual

Seizmik
Seizmik 25037 User manual

Seizmik
Seizmik 76-10163 User manual

Seizmik
Seizmik 76-10166 User manual

Seizmik
Seizmik 25023 User manual

Seizmik
Seizmik 08072 User manual

Seizmik
Seizmik 23017 User manual


Popular Automobile Accessories manuals by other brands


ULTIMATE SPEED
ULTIMATE SPEED 279746 Assembly and Safety Advice

SSV Works
SSV Works DF-F65 manual

ULTIMATE SPEED
ULTIMATE SPEED CARBON Assembly and Safety Advice

Witter
Witter F174 Fitting instructions

WeatherTech
WeatherTech No-Drill installation instructions

TAUBENREUTHER
TAUBENREUTHER 1-336050 Installation instruction