Maintenance
Batteries
This register displays a low battery warning
message“LOWBATTERY”whenthebatteriesare
low, and displays a no battery warning message
“NOBATTERY”whenbatteriesareextremelylow
or batteries are not installed.
Ifnobatteriesareinstalled,installtwonewalkaline
batteriesLR6(“AA”size)atonce.Ifbatteries
are already installed, replace them with new
onesassoonaspossible.IftheACpowercord
is disconnected or a power failure occurs when
the batteries are dead or not installed, all the
programmed settings will be reset to the default
settings and any data stored in memory will be
cleared.
CImproper use of batteries could cause them
toburstorleak,whichmightdamagethe
interioroftheregister.Pleasetakethe
following precautions:
•Besurethatthepositive(+)andnegative
(-)polesofeachbatteryareoriented
properly.
•Nevermixbatteriesofdifferenttypes.
•Nevermixoldbatteriesandnewones.
•Neverleavedeadbatteriesinthebattery
compartment.
•Removethebatteriesifyouplannotto
use the register for long periods.
•Shouldabatteryleak,cleanoutthe
batterycompartmentimmediately,taking
carenottoletthebatteryuidcomeinto
directcontactwithyourskin.
•If an incorrect battery is used, it may
explodeorleak.
•Forbatterydisposal,followtherelevant
law or regulation in your country.
Replacement
1. Be sure the register is plugged in.
2. Remove the printer cover.
Reading and Resetting Sales
List of All Available Report
•Usethereadingfunction(X)whenyouneedto
takethereadingofsalesinformationenteredafter
thelastresetting.Youcantakethisreadingany
number of times. It does not affect the register’s
memory.
•Usetheresettingfunction(Z)whenyouneedto
cleartheregister’smemory.Resettingprintsall
sales information and clears the entire memory
exceptfortheGT1throughGT3,resetcount,and
consecutive number.
•X1andZ1reportsshowdailysalesinformation.
YoucantakethesereportsintheX1/Z1mode.
•X2andZ2reportsshowperiodic(monthly)
consolidationinformation.Youcantakethese
reportsintheX2/Z2mode.
•IntheOPX/Zmode,aclerkcantakehisorher
report.
•Ifyouwanttostoptheprintingreport,pressthe
akey.
Item
Mode
OPX/Z X1/Z1 X2/Z2
XZXZXZ
Generalreport ○○○○
PLU report by designated
range ○ ○
PLU report by associated
department ○ ○
Individualclerkreport ○○○○
Allclerkreport ○ ○
Hourly report ○ ○
Flashreport ○
D•Whenbothsalesquantitiesandsales
amountsarezero,printingisskipped.
Ifyoudonotwanttoskip,changethe
programming. Details can be freely
downloadedfromtheURL.
•“X”representsreadsymboland“Z”
represents reset symbol in the reports.
•Thedrawerdoesnotopenwhenyoutake
X/Zreports.
•When printing is performed continuously,
the printing may be intermitted for several
seconds.Aftertheintermission,the
printing will be restarted.
3. Open the battery cover and remove the old
batteries.
4. Install two new LR6(“AA” size) batteries into
the battery compartment.
5. Close the battery cover.
6. Replace the printer cover.
Paper Roll
When colored dye appears on the edges of the
paper roll, it is time to replace the paper roll. Use
paperof57.5±0.5mminwidth.Toprevent
jammingbesuretousepaperspeciedbySHARP.
Replacement
1.ConrmthattheREGmodehasbeen
selected.
2. Remove the printer cover.
3. Lift up the print roller arm.
4. Remove the remaining paper roll.
5. Install a new paper roll correctly by following
the steps in “Installing a Paper Roll”.
Removing a Paper Jam
CThe paper cutter is mounted on the printer
cover.Becarefulnottocutyourself.Never
touch the printer head immediately after
printing, as the head may still be hot.
1. Remove the printer cover.
2. Lift up the print roller arm.
3. Remove the paper jam. Check for and
remove any shreds of paper that may remain
in the printer.
4. Reset the paper roll correctly by following
the steps in “Installing a Paper Roll”.
Drawer Handling
Locking the Drawer
Developthehabitoflockingthedrawerwhennot
usingtheregisterforanyextendedperiodoftime.
To lock: Insertthekeyintothedrawerlockand
turnit90degreescounter-clockwise.
To unlock: Insertthekeyintothedrawerlockand
turnit90degreesclockwise.
Lock Unlock
Removing the Drawer
To detach the drawer, pull the lever fully out, and
while holding the lever out, lift the drawer slightly and
remove.
Coin case
Drawer
Lever
D•To prevent burglary, it is a good idea to
emptythedrawerafterworkandleaveit
open at the end of the day.
•Coin case is detachable.
Main Functional Overview
The register has the following main functions. Details
canbefreelydownloadedfromtheURL.
Item Entries
Single item entries
Repeatentries
Multiplication entries
Split-pricingentries
Single item cash sale (SICS) entries
PLU Entries
PLU code entries
Display of Subtotals
Subtotal
Finalization of Transaction
Cash entries
Checkentries
Credit entries
Computation of VAT (Value Added Tax)/Tax
VAT/taxsystem
VATsurchargesystem
Auxiliary Entries
Refundentries
Percentage discount
Amountdiscount
Non-addcodeentry
Payment Treatment
Currencyexchange
Received-on-accountentries
Paid-outentries
No-sale(exchange)
Cashingacheck
How to take a X1/Z1 or X2/Z2 report
[To take an X1 or X2 report:]
1. Press the key.
2. Select the “4 X1/Z1 MODE” or “5 X2/Z2 MODE”
by using the key, and press the Akey.
3. Select “2 READING” in the X1/Z1 mode or
select “1 READING” in the X2/Z2 mode menu
window and press in both cases the Akey to
display the items list.
4. Select the appropriate report title.
5. Press the Akey.
[To take a Z1 or Z2 report:]
1. Press the key.
2. Select the “4 X1/Z1 MODE” or “5 X2/Z2 MODE”
by using the key, and press the Akey.
3. Select “3 RESETTING” in the X1/Z1 mode
or select “2 RESETTING” in the X2/Z2 mode
menu window and press in both cases the A
key to display the items list.
4. Select the appropriate report title.
5. Press the Akey.
Flash report
Youcantakeashreports(displayonly)intheX1
mode for department sales, cash in drawer (CID)
andsalestotalatthepointyoutakethereport.
1. Press the key.
2. Select the “4 X1/Z1 MODE” by using the °key,
and press the Akey.
3. Select “1 FLASH READ” in the X1/Z1 mode
menu window and press the Akey to display
the items list.
4.Select“DEPT.SALES”totakeaashreportof
departmentsales,“CID”totakeaashreport
of cash in drawer, or “SALES TOTAL” to take a
ashreportofsalestotalbyusingthe°key.
5. Press the Akey.
Correction
Correction of the last entry (direct void)
Correctionofthenext-to-lastorearlierentries
(indirect void)
Subtotal void
Correctionafternalizingatransaction
Special Printing Function
Copy receipt printing
Guestcheckreceipt(billprint)
Manager Mode
Managersign-on
Override entries
Other Functions
Training mode
SD card mode
Electronicjournal
Electronicjournaldataviewfunction
Reports
Generalreport
(Departmentreport+Transactionreport)
PLU report
Hourly report
Clerkreport(All/Individual)
ElectronicJournal(Search)
Flashreports
Eurochange
Basic Sales Entry
Listedbelowisabasicsalesentryexample
when selling items by cash. Details can be freely
downloadedfromtheURL.
1. Enter the clerk code and press the Lkey.
Bydefault,theclerk1issignedon.
2. Enter the unit price and press the appropriate
department key.
For details, refer to the item below.
3. Repeat step 2 for all department items.
4. When the item entry is completed, press the
zkey. The total amount due is displayed.
5. Receive the amount from your customer, and
enter the amount by the numeric keys.
6. Press the Akey. The change due is
displayed, and the drawer is opened.
7. Close the drawer.
z
4000
A
Item entries
Clerk assignment
Displaying subtotal
Amount tendered
Finalizing the transaction
Key operation example
*!": indicate department keys.
1 L
1500 !*
2300 "*
Entries
Correction
Correction of Entered Number
When you enter an incorrect number, delete it by
pressing the Lkeyimmediatelyaftertheentry.
Correction of the Last Entry
Ifyoumakeamistakewhenmakingadepartment
entry, PLU entry, percentage (0) and discount (J),
you can correct this entry by pressing the ~key
immediately.
Correction of Earlier Entries
Youcancorrectanyincorrectentrymadeduring
atransactionifyounditbeforenalizingthe
transaction by pressing the Akey.
Move the cursor to the item to be voided and press
the ~key.
Subtotal Void
Youcanvoidanentrytransaction.Oncesubtotal
voidisexecuted,thetransactionisabortedandthe
register issues an receipt.
Press the ~keyimmediatelyafterpressingthez
key.
Andthenpressthezkeyagain.
Correction after Finalizing a
Transaction
When you need to void incorrect entries that are
foundafternalizingatransactionorcannotbe
corrected by direct, indirect or subtotal void, the
followingstepsshouldbetaken.
1. Select the VOID mode in the mode selection
window.
2. Repeat the entries that are recorded on an
incorrect receipt.
Department Entries
The register providesamaximumof99departmentsforamerchandiseclassication.Groupattributes,suchas
taxablestatus,areapplied to items when they are entered to the departments.
A) Forthedepartment1to16,entertheunitpriceandpressthedepartmentkey.Ifyouusetheprogrammedunit
price,pressthedepartmentkeyonly.
B) Fordepartment17to32,entertheunitprice,pressthedkeyandpressthedepartmentkey.Ifyouusethe
programmed unit price, press the dkeyandpressthedepartmentkey.
Department keyUnit price (max. 8 digits)
When using a programmed unit price
d
C) Fordepartment33andabove,enterthedepartmentcodeusingthenumerickeysandpressthedkey,then
enter the unit price and press the Akey.
If you use the programmed unit price, enter the department code and press the dkey.
Dept. code
(1 to 99)
Unit price (max. 8 digits)
When using a programmed unit price
(In case only preset price entry is allowed.)
d A
Setting the Mode Pass Code
1. Select the mode to set the pass code using
the For Ikeys.
2. Enter the code in 4 digits using the numeric
keys.
3. Press the Akey to set the mode pass code.
If no pass code is set, press the Akey.
Setting the Manager Pass Code
1. Enter the code in 4 digits using the numeric
keys.
2. Press the Akey to set the manager pass
code.
If no pass code is set, press the Akey.
Setting the Receipt Logo
1. To change the default logo text, press the D
key to delete the texts in each line.
Enter the text using the character keys to
print on the receipt.
2. Press the Akey to set the receipt logo.
Text entry method
Therearetwowaysforprogrammingtext;using
characterkeysonthekeyboardorentering
charactercodeswithnumerickeysonthekeyboard.
Youcanentercharactersaccordingtothesmall
guresprintedinthelowerpositionofthenumeric
keys.Forthelayout,pleasereferto“keyboard
Layout”.
Forexampletoenter“A”,pressthe8key.Toenter
“B”,pressthe8keytwice.
D•Details can be freely downloaded from the
URL.
•TheHELPfunctioninstructsyouhowto
setthelogomessage.Afterentering“13”,
press the
HELP
keytoaccesstheHELP.
Initializing the Cash Register
Foryourcashregistertooperateproperly,youmust
initializeitbeforeprogrammingforthersttime.
Followthisprocedure.
1. Remove the register from its packing carton.
2. Insert the plug into the AC outlet.
IMPORTANT: This operation must be performed
without batteries loaded.
Neverinstallthebatteriesintothecashregister
beforeinitializingit.Beforeyoustartoperatingthe
cashregister,youmustrstinitializeit,theninstall
twonewalkalinebatteriesLR6(“AA”size)onthe
register. Otherwise, distorted memory contents and
malfunction of the cash register will occur.
Language Selection
1. Display the “Language Selection” after turning
on the power.
2. Press the numeric key for the number of your
language.
Afterselectingthelanguage,theregisterisinitialized.
Accordingtothedisplayedinstruction,performthe
setting.
Setting the Date and Time
1. Display the “DATE/TIME setting”.
2. Enter the date in 6 digits. For example, enter
“050115” for January 5, 2015.
3. Press the key to select the time setting.
4. Enter the time in 4 digits. For example, enter
“1430” for 2:30pm.
5. Press the Akey to set the date and time.
Setting the Tax Rate
1. Select the tax number (1 to 4) to set the tax rate.
2. Enter the tax rate in 7 digits (leading zeros may
be omitted). For example, press the “7” key to
set 7%.
3. To set the second and later tax rates, press the
Ikey.
4. Press the Akey to set the tax rate.
Fordetails,referto“FULLDETAILEDINSTRUCTION
MANUAL”.
Calculation of VAT rate
VATisincludedintheenteredprice,andthetax
amount is calculated when tendered according to the
VATrateprogrammed.
Bydefault,VAT1isassignedtoallitems.
TheHELPfunctioninstructsyouhowtoassignVATto
department.Afterpressingthe“7”key,pressthe
HELP
keytoaccesstheHELP.
Getting Started
Installing Batteries
Batteries must be installed in the cash register
to prevent data and programmed contents from
being lost from the memory in case of accidental
disconnectionoftheACcordorpowerfailure.Please
installtwonewLR6(“AA”size)batteriesbefore
programming and operating the cash register.
1. Remove the printer cover.
2. Open the battery cover next to the paper roll
cradle.
3. Install two new LR6 (“AA” size) batteries.
4. Close the battery cover.
5. Replace the printer cover.
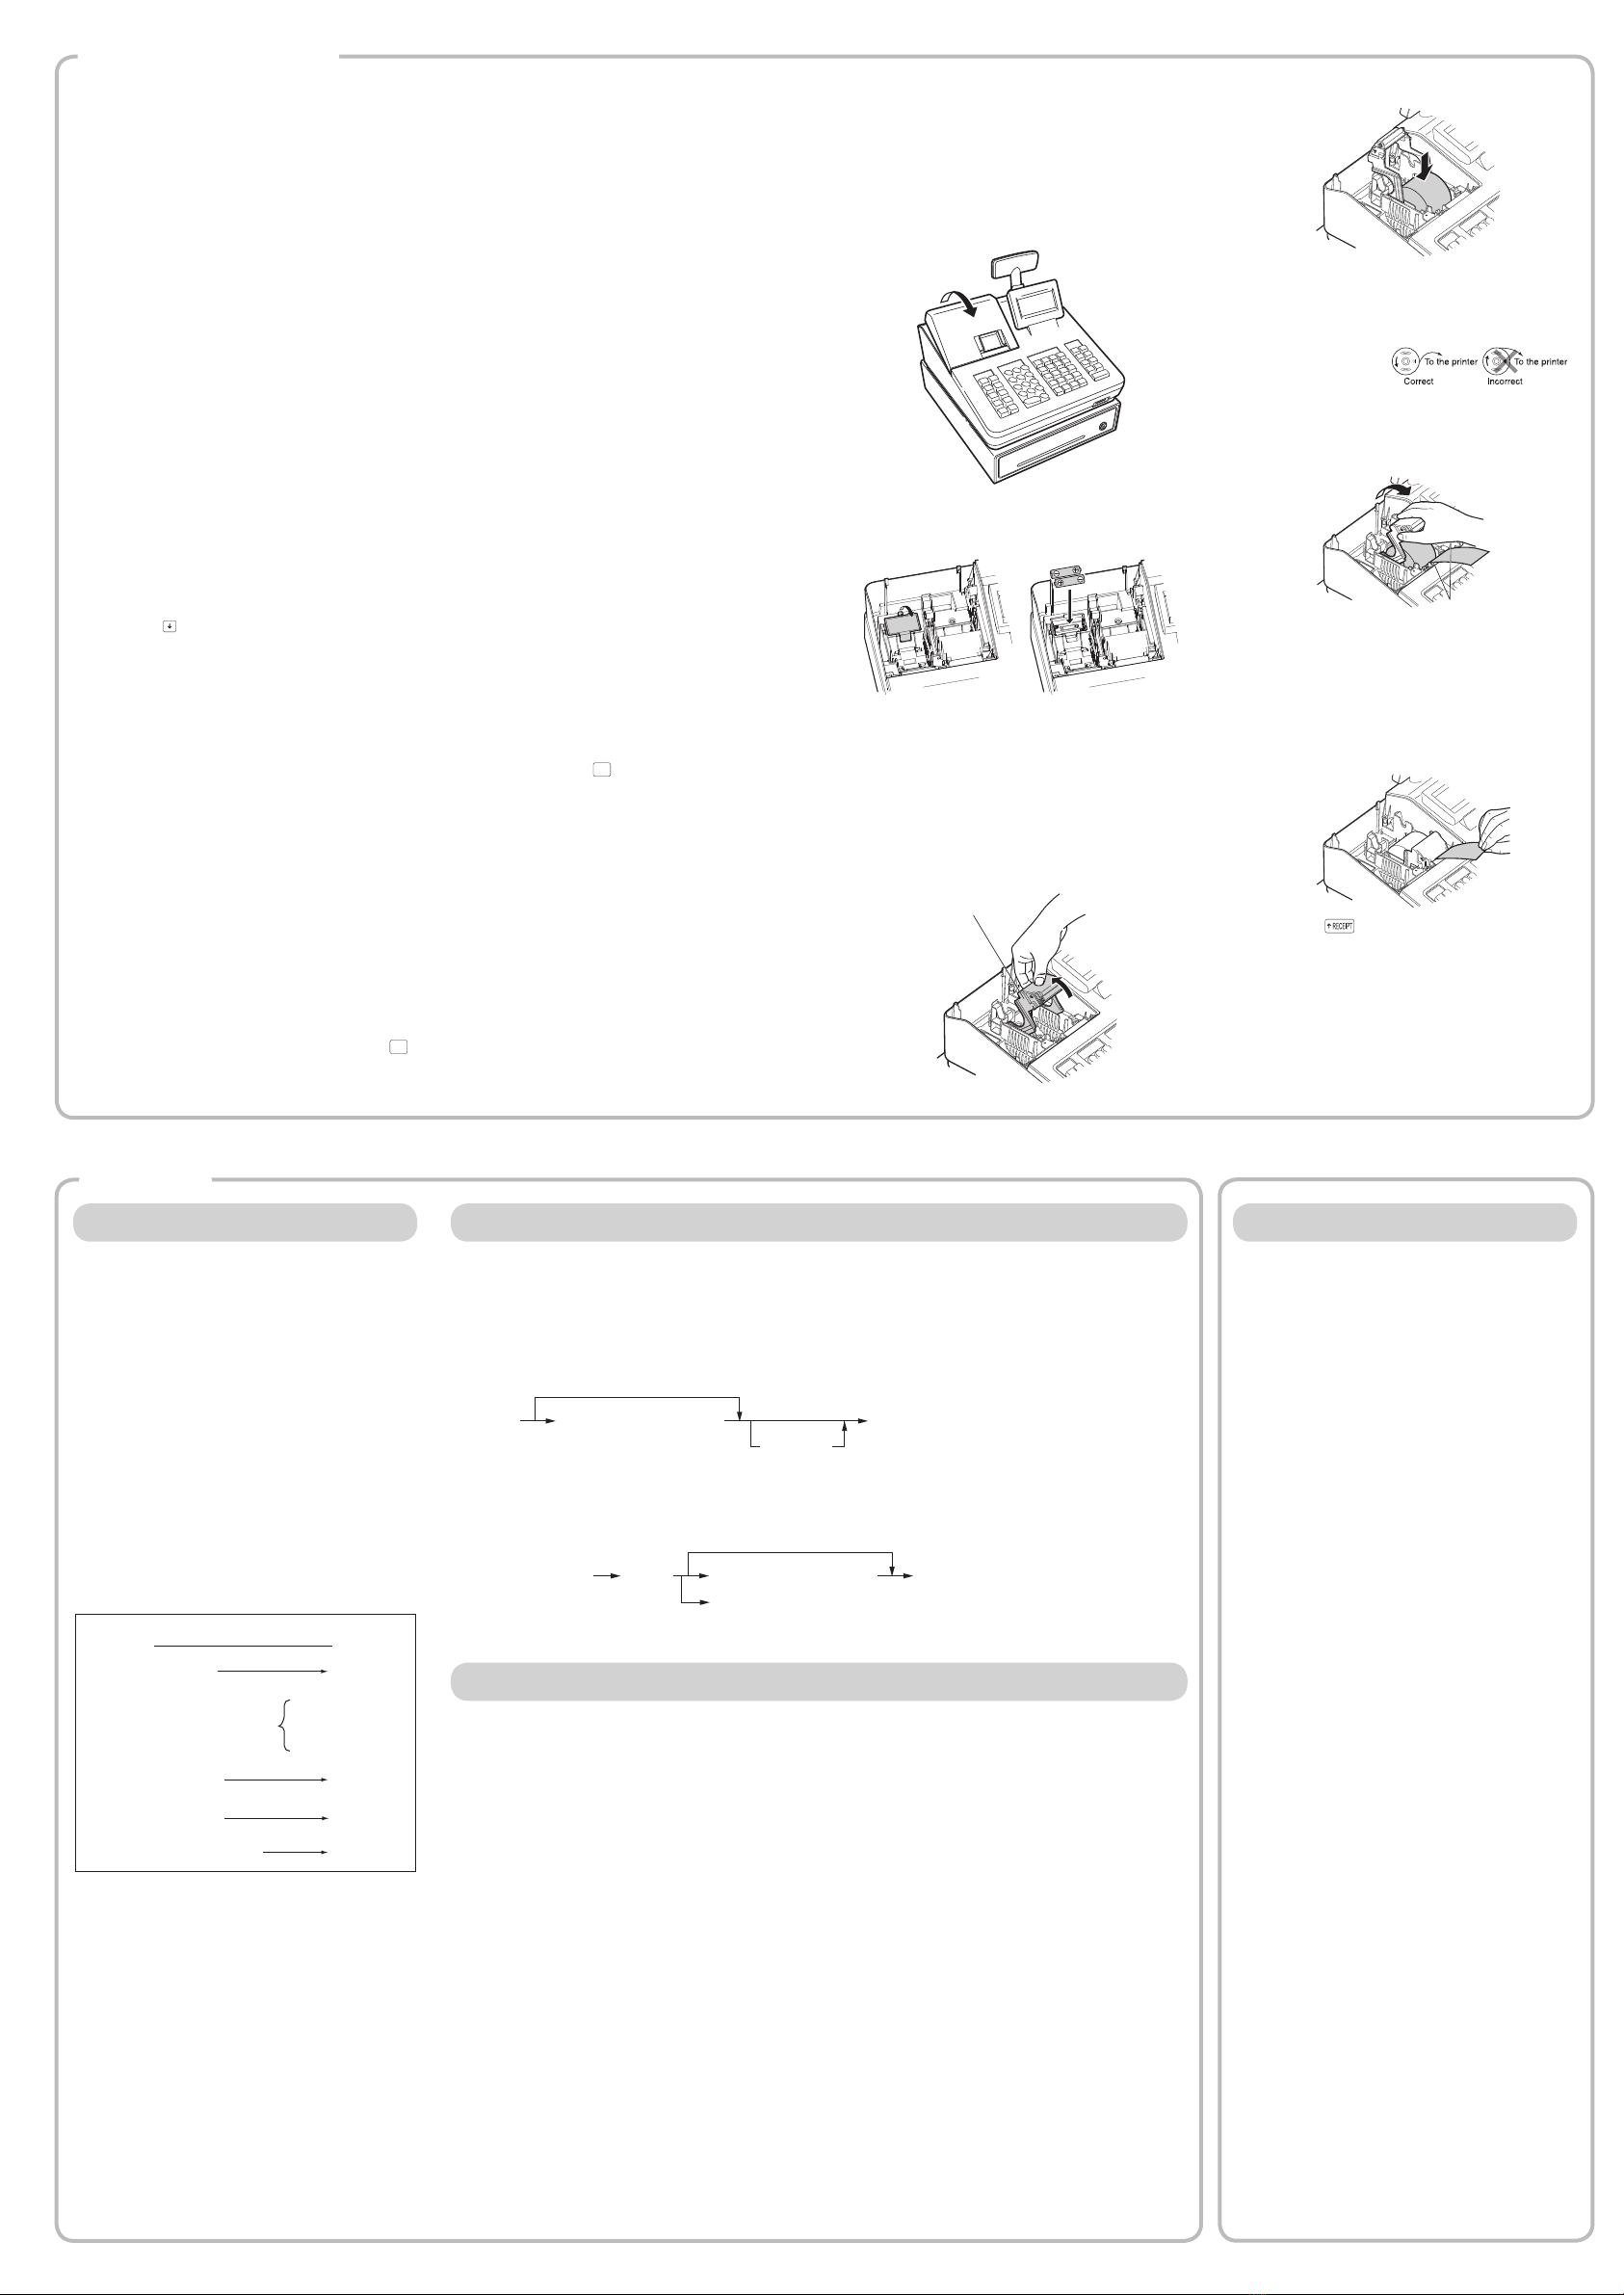
Installing a Paper Roll
Alwaysinstallthepaperrollevenwhenyousetthe
registerfornotprintingreceiptinREGmode.
1. Remove the printer cover.
2. Lift up the print roller arm.
Print roller arm
3. Set the paper correctly in the paper roll cradle.
DBefore placing a new paper roll in the paper
roll cradle, cut off the pasted (taped) part of
thepaperandconrmthatthecutendof
the paper is straight.
4. Feed the end of the paper along with the paper
positioning guides as per the diagram.
5. While holding down the paper, slowly close
the print roller arm.
Paper positioning
guides
DIftheprintrollerarmisnotsecurelylocked,
printing is not done right. If this problem
occurs, open the arm, and close the arm as
instructed above.
6. Cut off the excess paper and replace the
printer cover.
7. Press the key to make sure the paper end
comes out of the printer cover and clean paper
appears.
DIf the paper end does not come out, open
the printer cover, and pass the paper end
between the paper cutter and the paper
guide of the printer cover, and replace the
printer cover.
PLU (Price Look Up) Entry
ThePLUfunctionallowsspeedykeyentries.ThecashregisterallowsyouthefollowingwayofenteringPLUs;PLU
CodeEntry.
PLU Code Entry
EnterthePLUcodeusingthenumerickeys,andpressthepkey.Forexample,enter“10”andpressthep
keyfor“PLU00010”.
Error Warning
Inthefollowingexamples,yourregisterwillgointoanerrorstateaccompaniedwithawarningbeepandtheerror
message on the display. Clear the error state by pressing the Lkeyandthentaketheproperactiontoremedy
the problem.
- Whenyouexceeda32-digitnumber(entrylimitoverow):
Canceltheentryandre-enteracorrectnumber.
- Whenyoumakeanerrorinkeyoperation:
Clear the error and try the entry again.
- Whenyoumakeanentrybeyondaprogrammableamountentrylimit:
Checktoseeiftheenteredamountiscorrect.Ifitiscorrect,itcanberungupintheMGRmode.Contact
your manager.
- Whenanincluding-taxsubtotalexceedseightdigits:
Clear the error message by pressing the Lkeyandthenpressamediakeytonalizethetransaction.
Manually Opening the Drawer
In case of a power failure or if the machine is out of
order, locate the lever at the bottom of the machine
and move it in the direction of the arrow to open the
drawer.Thedrawerwillnotopenifitislockedwith
thedrawerlockkey.
Lever


