Sharp AJ-2105 User manual

Page
●GETTING STARTED
●
SETTING UP THE PRINTER
●
LOADING PAPER
●
SETTING UP FOR Windows
●
SETTING UP FOR Macintosh
●
APPENDIX
3
5
16
20
34
38
MODEL
COLOUR INKJET PRINTER
SETUP GUIDE AND
OPERATION MANUAL
AJ-2105

This equipment complies with the requirements of Directives 89/336/EEC and 73/23/EEC as amended by
93/68/EEC.
Dieses Gerät entspricht den Anforderungen der EG-Richtlinien 89/336/EWG und 73/23/EWG mit Änderung
93/68/EWG.
Ce matériel répond aux exigences contenues dans les directives 89/336/CEE et 73/23/CEE modifiées par la
directive 93/68/CEE.
Dit apparaat voldoet aan de eisen van de richtlijnen 89/336/EEG en 73/23/EEG, gewijzigd door 93/68/EEG.
Dette udstyr overholder kravene i direktiv nr. 89/336/EEC og 73/23/EEC med tillæg nr. 93/68/EEC.
Quest’ apparecchio è conforme ai requisiti delle direttive 89/336/EEC e 73/23/EEC, come emendata dalla
direttiva 93/68/EEC.
Este equipamento obedece às exigências das directivas 89/336/CEE e 73/23/CEE, na sua versão corrigida
pela directiva 93/68/CEE.
Este aparato satisface las exigencias de las Directivas 89/336/CEE y 73/23/CEE, modificadas por medio de
la 93/68/CEE.
Denna utrustning uppfyller kraven enligt riktlinjerna 89/336/EEC och 73/23/EEC så som kompletteras av
93/68/EEC.
Dette produktet oppfyller betingelsene i derektivene 89/336/EEC og 73/23/EEC i endringen 93/68/EEC.
Tämä laite täyttää direktiivien 89/336/EEC ja 73/23/EEC vaatimukset, joita on muutettu direktiivillä
93/68/EEC.
FOR CUSTOMERS IN U.K.
IMPORTANT
The wires in this mains lead are coloured in accordance with the following code:
BLUE:
Neutral
BROWN:
Live
As the colours of the wires in the mains lead of this apparatus may not correspond
with the coloured markings identifying the terminals in your plug, proceed as follows.
The wire which is coloured BLUE must be connected to the terminal which is marked
with the letter Nor coloured black.
The wire which is coloured BROWN must be connected to the terminal which is
marked with the letter Lor coloured red.
The apparatus must be protected by a 3A fuse in the mains plug or distribution board.
CAUTION: DO NOT CONNECT THE LIVE (BROWN) WIRE OR THE NEUTRAL (BLUE)
WIRE TO THE EARTH TERMINAL OF YOUR 3-PIN MAINS PLUG.
The CE mark logo label is affixed to any equipment to which the above directives apply to.
(This sentence is not applicable in any country where the above directives are not
required.)

Cautions
Follow the cautions below when using this unit.
zThe unit is affected by the environment in which it is installed. Do not install your unit
in the following area.
−Dusty areas
If dust enters the internal parts of the unit, damage or poor-quality output can
result.
−Areas in direct sunlight
Direct sunlight can distort the plastic parts of the unit and result in poor-quality
output.
−Excessively hot, cold, humid, or dry areas (for example, near heaters, humidifiers,
or air conditioners)
This may result in damp paper, condensation within the internal mechanisms,
misfeeds, and dirty output.
zOperating Conditions
Temperature : 10-35 degrees Celsius (50-95 degrees Fahrenheit)
Relative humidity : 20%-85%
Note : When the temperature reaches 30 degrees Celsius (86 degrees Fahrenheit),
the relative humidity must be 60% or less.
zThe power outlet should be installed near the equipment, and should be easily
accessible.
zWhen moving the unit, be sure to first turn the power switch off, and then remove the
power cord from the outlet.
zPlace the unit on a firm, level surface.
zBe sure to use only ink tanks of SHARP genuine supplies.
zIf you get ink spots on your skin, wash them with water as soon as possible.
zStore the spare ink tanks out of the reach of children.

2
CONTENTS
GETTING STARTED
MAIN FEATURES.........................................................................................................3
USER'S MANUAL.........................................................................................................3
SETTING UP THE PRINTER
CONFIRMING THE CONTENTS..................................................................................5
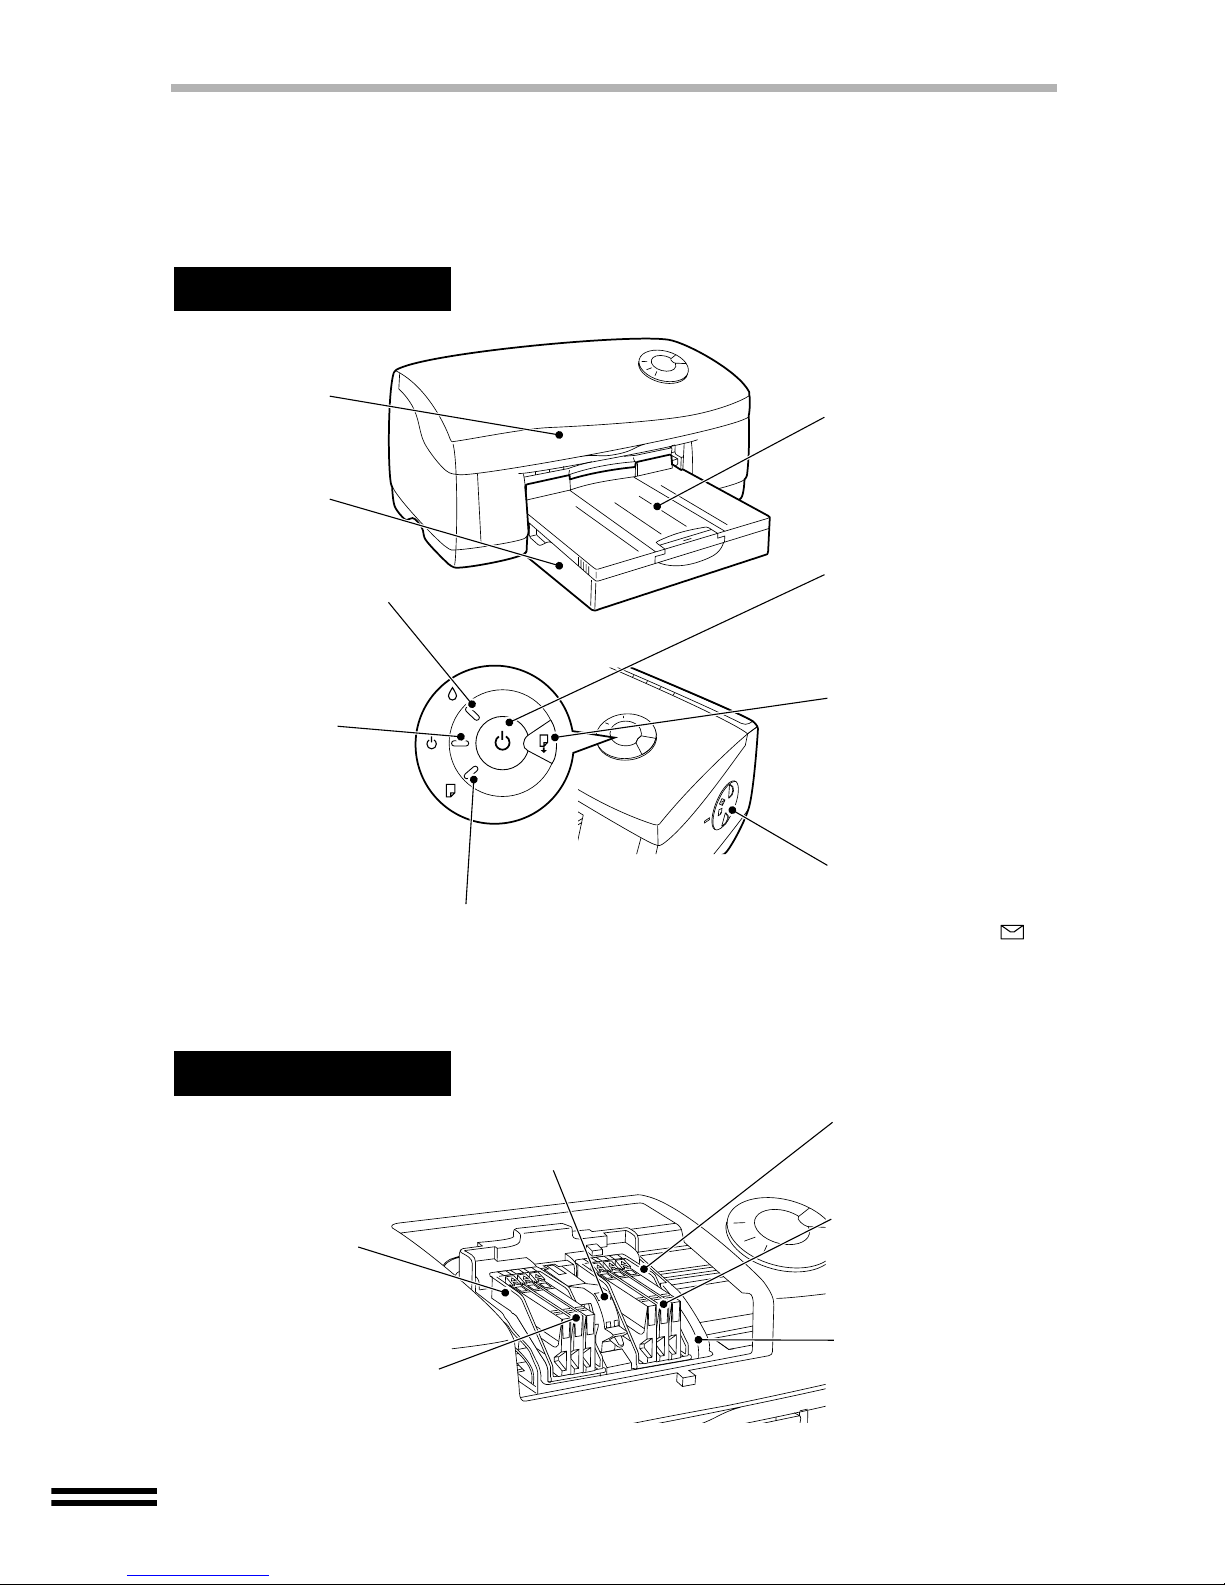
PART NAMES AND FUNCTIONS................................................................................6
UNPACKING.................................................................................................................8
ATTACHING THE TRAYS............................................................................................8
CONNECTING THE INTERFACE CABLE ...................................................................9
CONNECTING THE POWER CORD .........................................................................11
INDICATOR LIGHTS..................................................................................................11
INSTALLING THE PRINT HEADS AND INK TANKS.................................................12
LOADING PAPER
LOADING PAPER INTO THE PAPER TRAY.............................................................16
LOADING THE BYPASS TRAY WITH PAPER ..........................................................19
SETTING UP FOR Windows
HARDWARE AND SOFTWARE REQUIREMENTS...................................................20
BEFORE INSTALLATION...........................................................................................20
INSTALLING THE PRINTER DRIVER .......................................................................21
ALIGNING THE PRINT HEAD....................................................................................30
HOW TO USE THE ONLINE MANUAL......................................................................32
HOW TO PRINT .........................................................................................................33
BONUS SOFTWARE..................................................................................................33
SETTING UP FOR Macintosh
HARDWARE AND SOFTWARE REQUIREMENTS...................................................34
INSTALLING THE PRINTER DRIVER .......................................................................34
ALIGNING THE PRINT HEAD....................................................................................36
HOW TO USE THE ONLINE MANUAL......................................................................36
HOW TO PRINT .........................................................................................................37
APPENDIX
SPECIFICATIONS OF THE PRINTER.......................................................................38
SUPPLIES ..................................................................................................................39
PAPER TYPE .............................................................................................................39
INTERFACE CABLE...................................................................................................39
INDEX.........................................................................................................................40
SOFTWARE LICENSE ...............................................................................................41

3
GETTING STARTED
GETTING STARTED
MAIN FEATURES
zHigh speed printing of 8ppm both in colour and in monochrome.
zSix colours of ink permit the unit to print photo-level super fine quality images.
z1200dpi printing with smoothing produces outstanding quality images.
zEach ink tank is independent, they can be used until completely spent, ensuring
minimum waste. The print head is also fully detachable, requiring no special tools for
replacement.
zThe printer is equipped with a 150 sheet capacity paper tray, allowing the user to print
big jobs without constantly refilling the tray.
zUSB interface*1 enables simple connections with Hotplug*2. A parallel interface is
also provided as standard.
zThis printer can be used with Windows Me, Windows 98, Windows 95, Windows
2000, Windows NT 4.0, and Mac OS 8.5 or later version.
*1 USB is available with a PC/AT compatible computer that was originally equipped
with USB and had Windows Me, Windows 98 or Windows 2000 preinstalled. As for
Macintosh, USB is available with Mac OS 8.5 or later and a computer that was
originally equipped with USB.
*2 Peripherals can be plugged or unplugged while the computer and they are
connected to a power source.
USER'S MANUAL
The contents of each manual for the printer is as follows.
Setup Guide and Operation Manual (this manual)
Explains what steps and warnings need to be followed before printing.
Getting Started
Provides you with information on how to use this manual and the Online Manual, a list
of cautions, an introduction to the printer, and other useful tips that will help you set up
the printer.
Setting up the Printer
Lists the setup procedures including how to connect the printer to a computer and to a
power source.
Loading Paper
Explains how to insert paper into the printer, and other requirements for printing.
Setting up for Windows
Setting up for Macintosh
Explains how to install the printer driver into a computer.
Appendix
Provides you with information on printer specifications and printer supplies.

4
USER'S MANUAL
Online Manual
After preparing the printer as shown in this manual, check the Online Manual for information
on preference requirements for printing and troubleshooting.
How to Use the Online Manual
Explains how to use the Online Manual.
Printer Properties
Explains how to configure items in the printer driver.
Print
Provides information on how to print a document.
Print Status Window (Windows only)
Explains the function of the print status window.
Sharing Printer (Windows only)
Explains how to share the printer, and setup procedures for sharing the printer through
a network.
Maintenance
Provides information on how to align and change printer supplies. Instructions for
cleaning the printer is also provided.
Troubleshooting
Provides instructions for how to solve problems.
Conventions used in this manual and Online Manual
In this manual, the following icons are used to provide the user with information pertinent to
the use of the printer.
Trademark acknowledgements
Microsoft and Windows are trademarks of Microsoft Corporation in the U.S.A. and other countries.
IBM and PC/AT are trademarks of International Business Machines Corporation.
Apple, Macintosh and ColorSync are trademarks of Apple Computer, Inc.
Adobe and Acrobat are trademarks of Adobe Systems Incorporated.
All other trademarks and copyrights are the property of their respective owners.
Warns the user that injury may result if the contents of the warning are
not properly followed.
Cautions the user that damage to the machine or one of its
components may result if the contents of the caution are not properly
followed.
Notes provide information relevant to the machine regarding
specifications, functions, performance, operation and such, that may
be useful to the user.

5
SETTING UP THE
PRINTER
SETTING UP THE PRINTER
Here we explain how to connect the printer to a computer, and a power source, after
removing the printer from its packaging.
Read this chapter carefully before use.
CONFIRMING THE CONTENTS
The following items are packed with the printer in the box.
After opening the box, please check if the following are included with the printer.
If any of the following items are missing, please contact your point of purchase.
zInterface cables for connecting the printer to your computer are not included.
Please purchase the appropriate cable for your computer (page 39).
z
Do not unpack the print heads and the ink tanks until installing them in the printer.
zThe box and protective materials will be needed for transportation. Do not throw
them away.
Power cord Paper tray
Output tray
Setup Guide and
Operation Manual
(this manual)
Software CD-ROM
Printer Driver
Online Manual
MGI PhotoSuite III SE *
Lift the printer carefully
holding at the bottom when
taking it out from the box.
Ink tanks
magenta, yellow, cyan, photo magenta,
photo cyan, photo black
Photo print head Colour print head
*
Only for Windows.
For the information about
this program, refer to
their instructions.

6
PART NAMES AND FUNCTIONS
The following illustration lists the part names and function. Before operating, it is advisable
to familiarise yourself with the printer.
The illustration below shows the printer with all the parts installed.
Print head latch
Secures the print head into
position for operation.
Cyan ink tank
Yellow ink tank
Magenta ink tank
Carriage
Photo print head
Applies ink to the
paper.
Internal Part
Colour print head
Applies ink to the paper.
Photo cyan ink tank
Photo magenta ink tank
Photo black ink tank
Front Side
Front cover
Open this cover to
change the ink tanks
or print heads.
Paper tray
Adjustable to suit a
variety of paper sizes.
Output tray
The document is deposited
onto the tray after printing.
Extend the tray when
printing long documents.
Power button
Press to turn the printer
on or off.
Ink lamp
The light blinks when the
ink is empty, or the ink
tank is not inserted
correctly.
Power lamp
The indicator is lit when
the printer is ready to print.
* If the printer has been
kept idle for more than
20 minutes, the power
will go off and so will the
power lamp.
The printer can be
restarted when the
power button is pressed,
or any print job is sent
from your computer.
Paper knob
When printing onto an
envelope or thick paper,
adjust the knob to
setting. (Return the knob
to its original setting
after printing.)
Paper lamp
The light blinks when the
printer is out of paper, or a
misfeed has occurred.
Paper button
Press this button after
rectifying a paper jam or
paper empty condition.
Depressing the button
for a few seconds will
activate the test print.

7
SETTING UP THE
PRINTER
PART NAMES AND FUNCTIONS
HOW TO SHUT OFF POWER
1Turn off the power by pressing the power button and ensure
that the power lamp is extinguished.
2Unplug the power cord from the outlet.
zBe sure that the plug in the outlet is readily accessible to all persons. Power is
present in the product even if the power button is off in order to maintain good
print quality.
zTo completely shut off the power, first turn off the power using the power button.
Then unplug the power cord, after first ensuring that the carriage has returned to
its home position on the right side of the printer and the green power lamp has
been extinguished. However, the printer should be turned on promptly,
otherwise blocking of the print heads or drying out of the ink tanks may occur.
Bypass tray
Use this tray to print on a single page.
When printing large banners, make sure to
use this tray. Insert paper into the tray print
side up. When printing onto thick paper,
open the tray until it reaches position 2.
(The tray has two stop positions.)
Power socket
Plug the power cord *
into the socket.
Parallel interface
connector (36pin)
Use a parallel interface cable
(IEEE1284) to connect the
printer to your computer.
USB interface connector (B type)
Use a USB cable to connect the printer
to your computer. It is possible to insert
the cable after the printer has been
switched on.
Jam cover
Open this cover to remove
jammed paper.
Rear Side
* When the power cord is connected to the outlet, power for the printer is turned on automatically.

8
UNPACKING
1Remove the tape - shown in the illustrations.
2Open the front cover, and remove the protective material
shown in the illustration.
ATTACHING THE TRAYS
Attach the paper tray and output tray to the front of the printer.
Follow the steps shown below.
1Attach the paper tray by firmly pushing down both edges.
Make sure that the paper tray has been
securely attached to the printer.
Push here to fix the paper tray securely.

9
SETTING UP THE
PRINTER
ATTACHING THE TRAYS
2Attach the output tray as shown in the illustration.
CONNECTING THE INTERFACE CABLE
This printer includes both USB and parallel interface connectors.
Interface cables for connecting the printer to your computer are not included with this printer.
Please purchase the appropriate cable for your computer.
Connecting the Parallel Interface Cable
1Obtain an IEEE1284 shielded parallel interface cable.
2Ensure that your computer and printer are turned off.
3Insert the cable into the parallel interface connector located on
the rear of the printer, and fasten with clasps.
4Insert the other end of the cable into the interface connector of
your computer.
Do not connect both the USB interface cable and the parallel interface cable to this
printer at the same time.
Place this projection
toward the printer.

10
CONNECTING THE INTERFACE CABLE
Connecting the USB Interface Cable
1Obtain a shielded USB interface cable.
2Insert the cable into the USB interface connector located on the
rear of the printer.
3Insert the other end of the cable into the interface connector of
your computer, or the USB hub connected to your computer.
USB is available with a PC/AT compatible computer that was originally equipped
with USB and had Windows Me, Windows 98 or Windows 2000 preinstalled. As for
Macintosh, USB is available with Mac OS 8.5 or later and a computer that was
originally equipped with USB.

11
SETTING UP THE
PRINTER
CONNECTING THE POWER CORD
1Insert the power cord into the socket on the rear of the printer.
2Connect the other end of the power cord to an outlet.
Power for the printer is turned on automatically.
INDICATOR LIGHTS
When only the green power lamp is lit, the printer is working properly.
When a printer error occurs, a light will indicate what problem has occurred, as explained
below.
Do not connect the printer to other than a local voltage outlet. Plugging the printer
into an incompatible power supply may cause extensive damage.
zBe sure that the plug in the outlet is readily accessible to all persons. Power is
present in the product even if the power button is off in order to maintain good
print quality.
zTo completely shut off the power, first turn off the power using the power button.
Then unplug the power cord, after first ensuring that the carriage has returned to
its home position on the right side of the printer and the green power lamp has
been extinguished.
......lit ......blinking ......fast blinking ......extinguished (lamp is off)
Light condition Problem and Solution
Paper tray is empty, or a paper jam has occurred.
Loadmore paper orremove the jammed paper and press the
paperbutton.
No ink, or a print head is not installed.
Change the ink tank, or install a print head.
Front cover is open.
Close the front cover.
The printer is warming up, or receiving data.Please wait.
The carriage is not operating normally, or some errors may
have occurred inside the printer.
For more details on solving a problem,refer to the Troubleshooting sectionintheOnline Manual.
Power Paper
Ink

12
INSTALLING THE PRINT HEADS AND INK TANKS
Follow the steps below for installation.
Installing the Print Heads
1Make sure that the power lamp is lit, and the ink lamp is blinking
rapidly.
If the power lamp is not lit, press the power button.
2Open the front cover.
3Raise the print head latch.
Raise the latch until it comes to a complete halt.
This section describes how to install the print heads and ink tanks when you install
them for the first time after purchasing this printer. Refer to "Changing the Ink
Tank" or "Changing the Print Head" in your online manual when you change ink
tank or print head after installing.
Do not try to move the carriage manually by force.

13
SETTING UP THE
PRINTER
INSTALLING THE PRINT HEADS AND INK TANKS
4Remove the print heads from their protective cases.
5Insert the print heads.
Insert the photo print head into the left carriage opening, and a colour print head
into the right carriage opening.
6Lower the print head latch.
Lower the latch until it clicks into the latched position.
Be careful not to damage the print heads. If any of them is damaged, the printer
may not work properly.
Do not touch the metal portion of
the print head directly. Doing so
may lead to improper printing.
Photo print head Colour print head

14
INSTALLING THE PRINT HEADS AND INK TANKS
Inserting the ink tanks
1Unpack the ink tanks from their protective wrapping and slowly
remove the tape.
2Turn the ink tanks upside down.
3Insert each of the ink tanks to the print head of the
corresponding number.
zHold the ink tank upright when removing the tape. Do not touch the uncovered
opening on the ink tank, as ink will get on your hands.
zEnsure that there are no pieces of tape remaining on the ink tank.
Make sure that the numbers on the ink tanks correspond to the numbers on the
print heads. If they do not correspond to each other, print problems will occur. In
this case, replace the ink tanks to the correct positions, and then print a test page
referring to "Test Print Head" in the Online Manual.
Do not touch this portion.
The printer may not print
if it is dirty.
Properly align the tab
when inserting.
2
3
1
Make sure that each tab securely
fixes the ink tank by pressing here.
Match the ink tank number to the
print head number.

15
SETTING UP THE
PRINTER
INSTALLING THE PRINT HEADS AND INK TANKS
4Close the front cover.
After closing the cover the carriage will return to its home position, and the ink will
be fed to the print head (this could take a while).
5Confirm the ink lamp is not blinking.
If the ink lamp continues to blink, open the front cover, return to step 5 of "Installing
the Print Head" and follow the procedures once more.
To keep good print head quality, keep all the ink tanks installed to the corresponding
print head.
During ink tank replacement, if the cover is left open for more than 8 minutes, the
carriage will automatically return to its home position.

16
LOADING PAPER
Follow the steps below to load paper into the paper tray or bypass tray.
You can load plain paper and other special paper. For detailed information of paper type,
see page 39.
LOADING PAPER INTO THE PAPER TRAY
1
Remove the output tray , and open the front lid of paper tray .
2Adjust the guides and shown in the illustration to the width
of the paper.
3Load the paper.
Load the paper print side down into the paper tray. Make sure to push the paper to
the right side and the rear side of the tray.

17
LOADING PAPER
LOADING PAPER INTO THE PAPER TRAY
4Move the guides ( , ) to touch the edges of the paper.
When loading envelopes
Set the paper knob to the "Thick Paper ( )" setting.
Load the envelope face down with the flap to the right, and then adjust the paper
guides to the width of the envelope.
When loading index cards, postcards or birthday cards
Set the paper knob to the "Thick Paper ( )" setting.
Set guide up, and then fit guide and against the loaded cards.
5Close the front lid of paper tray by firmly pushing on its right
edge.
Notes for loading envelopes
zLoad envelopes in portrait direction into the paper tray.
z
Do not use non-standard envelopes, envelops with clasps, or window envelopes.
zBe sure to select each of Com10, DL, C6, and Invitation A2 on the paper size
setting of the printer driver. (For detailed information on printer driver, refer to
the online manual.)
Most paper and envelopes will be fed correctly from the paper tray. However, if
paper or envelopes are particularly stiff or heavy, they should be fed one at a time
through the bypass tray. This will avoid wrinkling or misfeeding.
With some sizes of paper, guide may stick out of the paper tray. In this case,
print with the front lid of the paper tray open.
Be sure to load in
portrait direction.

18
LOADING PAPER INTO THE PAPER TRAY
6Attach the output tray.
7Pull out the output tray extension to the proper position, and
then raise the paper stop guide.
zBe sure that paper is free of rips, dust, wrinkles, and curled or bent edges.
zMake sure all the paper in the stack is the same size and type.
zFan the paper and tap it against a flat surface to ensure it is even before loading
into the printer.
zThe paper tray can hold up to 150 sheets of 75g/m2(20lbs.) plain paper. Be sure
to keep the total thickness of the loaded paper stack below 15mm.
zWhen loading postcard size paper into the paper tray, load it in portrait direction.
zWhen loading paper, ensure there is no space between the paper and the guide,
and check if the guide is not set too narrow causing the paper to bend. Loading
paper in these ways will result in document skew or a paper jam.
zThe paper knob should always be set to the "Normal Paper ( )" setting except
while printing on thick paper or envelopes.
zWhen not using the printer for an extended period, remove all paper from the
paper tray and store it in a dry place. If paper is left in the printer for an extended
period, the paper will absorb moisture from the air, resulting in paper jams.
zWhen adding new paper to the paper tray, remove the old paper already
contained in the tray, place it on top of the new paper. Then load it all into the
paper tray. Placing new paper on top of the paper already contained in the tray
may result in feeding two sheets at one time.
Place this projection
toward the printer.
This manual suits for next models
2
Table of contents
Other Sharp Printer manuals

Sharp
Sharp MX-C400P Installation and operating manual

Sharp
Sharp AR-235 User manual

Sharp
Sharp AR-C265P User manual

Sharp
Sharp MX-B557P User manual

Sharp
Sharp AR-M280 User manual

Sharp
Sharp JX-9500E User manual

Sharp
Sharp AJ-2200 Setup guide

Sharp
Sharp AR-CF2 User manual

Sharp
Sharp MX-M182 User manual

Sharp
Sharp JX-9300 User manual

Sharp
Sharp MX-B400P User manual

Sharp
Sharp MX-B427PW User manual

Sharp
Sharp MX-B380P Installation and operating manual

Sharp
Sharp AR-M351N User manual

Sharp
Sharp JX-735 User manual

Sharp
Sharp CE-515P User manual

Sharp
Sharp DX-B350P User manual

Sharp
Sharp DM-3500 User manual

Sharp
Sharp AR-M355N User manual

Sharp
Sharp MX-C528P User manual