Siemens Gigaset SL75 WLAN User manual

cyan magenta yellow black 140 LIEBREICH, Medienproduktion
SL75
ss
Designed for life
issued by
BenQ Mobile GmbH & Co.OHG
Haidenauplatz 1
D-81667 Munich
BenQ Mobile GmbH & Co.OHG
All rights reserved. Subject to availability.
Rights of modification reserved.
Manufactured by BenQ Mobile GmbH & Co.OHG
under trademark license of Siemens AG
www.siemens.com/sl75
BA Cover SL75 + arab 140er.QXD 13.09.2005 18:36 Uhr Seite 1

Table of Contents 1
This is a summarised version of the User Guide. The complete
version can be found on the Internet at this address:
www.siemens.com/sl75
right page (1) of SL75 HYDRA SUG, w/o ptt, en A31008-H3300-A1-1-7619 (01.09.2005, 20:46)
© Siemens AG 2003, C:\Siemens\DTP-Satz\Produkte\SL75_Hydra_1\out-
Template: X75, 140x105, Version 2.2; VAR Language: en; VAR issue date: 050822
Safety precautions ..................... 2
Phone overview ......................... 5
Display symbols ......................... 7
Getting started ........................... 8
Switching on/off, PIN entry ...... 10
General instructions ................ 11
Security .................................... 15
Text input ................................. 17
Calling ...................................... 19
Contacts ................................... 21
Call records .............................. 24
Camera ..................................... 25
SMS/MMS ................................. 27
E-mail ....................................... 32
WAP push ................................. 33
Voice mailbox/CB services ....... 34
Internet .................................... 35
Settings .................................... 37
Organiser .................................. 48
Extras ........................................ 50
Alarm clock ............................... 53
Media player .............................54
My stuff .................................... 55
Mobile Phone Manager ............ 58
Customer Care .......................... 59
Care and maintenance ............. 61
Product data ............................. 62
SAR ...........................................63
Guarantee certificate (UK) ....... 64
Guarantee certificate (IRL) ....... 65
Licence Agreement .................. 67
Index ......................................... 70
Table of
Contents
This is a sum-
marised ver-
sion of the
User Guide.
The complete
version can be
found on the
Internet at
this address:
www.sie-
mens.com/sl7
5

Safety precautions2
© Siemens AG 2003, C:\Siemens\DTP-Satz\Produkte\SL75_Hydra_1\out-
left page (2) of SL75 HYDRA SUG, w/o ptt, en, A31008-H3300-A1-1-7619 (13.09.2005, 10:30)
Template: X75, 140x105, Version 2.2; VAR Language: en; VAR issue date: 050822
Safety precautions
Information for parents
Please read the operating instructions and safety precautions carefully before use.
Explain the content and the hazards associated with using the phone to your children.
Remember to comply with legal
requirements and local restric-
tions when using the phone.
For example in aeroplanes,
petrol stations, hospitals or
while driving.
Mobile phones can interfere
with the functioning of medical
devices such as hearing aids or
pacemakers. Keep at least
20 cm/9 inches between phone
and pacemaker. When using
the mobile phone hold it to the
ear which is further away from
the pacemaker. For more infor-
mation consult your doctor.
The ringtones (page 37), mes-
sage tones (page 43) and
handsfree (page 20) talking are
reproduced through the loud-
speaker. Do not hold the phone
to your ear when it rings or
when you have switched on the
handsfree function. Otherwise
you risk serious permanent
damage to your hearing.
Only use original Siemens bat-
teries (100 % mercury-free)
and charging devices. Other-
wise you risk serious damage
to health and property. The bat-
tery could explode, for
instance.
Do not look at the LED (e.g. ac-
tivated infrared port, flash LED)
with optical magnifiers because
of radiation.
This product complies with
IEC/EN 60825-1 “Safety of La-
ser Products” for LED Class 1M
products; such products are
safe under reasonably foresee-
able operating conditions.
Do not place the phone near to
electromagnetic data carriers
such as credit cards and floppy
disks. Information stored on
them could be lost.
Small parts such as the SIM
card, sealing stop, lens ring
and lens cap can bedismantled
and swallowed by small chil-
dren. The phone must there-
fore be stored out of the reach
of small children.
The mains voltage specified on
the power supply unit (V) must
not be exceeded. Otherwise
the charging device may be
destroyed.
The power supply must be
plugged into an easily accessi-
ble AC mains power socket
when charging the battery. The
only way to turn off the charging
device after charging the bat-
tery is to unplug it.

3Safety precautions
right page (3) of SL75 HYDRA SUG, w/o ptt, en A31008-H3300-A1-1-7619 (13.09.2005, 10:30)
© Siemens AG 2003, C:\Siemens\DTP-Satz\Produkte\SL75_Hydra_1\out-
Template: X75, 140x105, Version 2.2; VAR Language: en; VAR issue date: 050822
Bluetooth®
Your phone has a Bluetooth interface. This
makes it possible to establish a wireless
connection of your phone with a headset of a
car kit, or with other Bluetooth-enabled
devices.
In order to establish a secure link between
the devices and to prevent a third party from
having access to your phone, you should
observe the following points:
• The initial connection between two devic-
es, what is called "pairing", should take
place in familiar surroundings.
• Both devices must be able to identify
themselves once by using a pass-
word/PIN. To ensure sufficient security,
you should choose a 16-digit number
combination for a password that would be
difficult to guess (if a PIN has not been
assigned).
• An automatic connection acceptance
("connection without confirmation") should
only be used in exceptional cases.
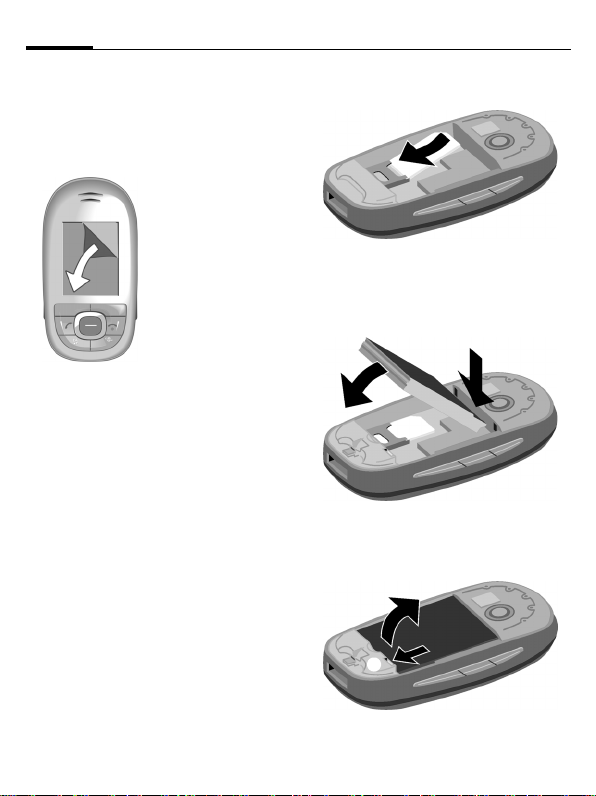
You may only open the phone
to replace the battery
(100 % mercury-free) or SIM
card. You must not open the
battery under any circumstanc-
es. All other changes to this de-
vice are strictly prohibited and
will invalidate the guarantee.
All electrical and electronic
products should be disposed of
separately from the municipal
waste stream via designated
collection facilities appointed
by the government or the local
authorities.
This crossed-out wheeled bin
symbol on the product means
the product is covered by the
European Directive
2002/96/EC.
The correct disposal and sepa-
rate collection of your old appli-
ance will help prevent potential
negative consequences for the
environment and human health.
It is a precondition for reuse and
recycling of used electrical and
electronic equipment.
For more detailed information
about disposal of your old ap-
pliance, please contact your
city office, waste disposal serv-
ice or the shop where you pur-
chased the product.
The phone may cause interfer-
ence in the vicinity of TV sets,
radios and PCs.
Use only Siemens original ac-
cessories. This will avoid po-
tential risks to health or
property and ensure compli-
ance with all relevant
regulations.
Improper use will invalidate the guarantee!
These safety instructions also apply to
Siemens original accessories.
As mobile devices offer a range of func-
tions, they can be used in positions other
than the head, such as on the body. In this
case, at data transfer (GPRS) a separation
distance of 1.5 cm is required.

Safety precautions4
© Siemens AG 2003, C:\Siemens\DTP-Satz\Produkte\SL75_Hydra_1\out-
left page (4) of SL75 HYDRA SUG, w/o ptt, en, A31008-H3300-A1-1-7619 (13.09.2005, 10:30)
Template: X75, 140x105, Version 2.2; VAR Language: en; VAR issue date: 050822
• In general, only trustworthy devices should
be linked in order to minimize security
risks.
• You should restrict the "visibility"of your
phone if possible. This will make it much
more difficult for unknown devices to es-
tablish a connection with your phone. To
do this, in the Bluetooth menu, set the op-
tion Visib.to others of Always visible to
Not visible (see page 40).
• The name of your phone is transmitted in a
Bluetooth connection. The factory default
is the "Bluetooth ID". The first time
Bluetooth is activated, or later in the
Bluetooth menu, you can change this
name (My BT name, page 40).
• If Bluetooth is not needed, this function
should be deactivated.
Before using Bluetooth accessories, or a
mobile phone inside a vehicle, check the ve-
hicle user guide for any limitations on the use
of these products.

5Phone overview
right page (5) of SL75 HYDRA SUG, w/o ptt, en A31008-H3300-A1-1-7619 (13.09.2005, 10:15)
© Siemens AG 2003, C:\Siemens\DTP-Satz\Produkte\SL75_Hydra_1\out-
Template: X75, 140x105, Version 2.2; VAR Language: en; VAR issue date: 050822
Phone overview
1ACall key
Dial displayed/highlighted phone
numbers/names, take calls. In standby
mode, show last phone numbers
dialled.
2BOn/Off/End key
• Switched off: press to switch on.
• During a conversation or in an appli-
cation: press briefly to end.
• In menus: return to standby mode.
• In standby mode, Slider closed:
Press to lock keypad. Press and con-
firm with §OK§ to unlock the keypad.
3Media player key
Direct number for the media player.
4Wildcard key
Key for Internet access unless other-
wise preconfigured.
5Softkeys
The current functions of these keys are
shown as §text§/symbol (e.g.p).
6Centre key
íPress the centre key to open
the main menu and to start an
application or function
(page 13).
7Navigation keys
In standby mode:
GOpen user profiles.
HOpen contacts.
EOpen inbox.
DStart the camera.
In lists, messages and menus:
IScroll upwards/downwards.
During the conversation:
HOpen contacts.
á£ß
01.10.2005 10:10
Service provider
Inbox íNew SMS

Phone overview6
© Siemens AG 2003, C:\Siemens\DTP-Satz\Produkte\SL75_Hydra_1\out-
left page (6) of SL75 HYDRA SUG, w/o ptt, en, A31008-H3300-A1-1-7619 (13.09.2005, 10:15)
Template: X75, 140x105, Version 2.2; VAR Language: en; VAR issue date: 050822
1Loudspeaker
2XCamera key
3ZMedia Player active: Play/Pause.
Media Player not active: Start playing.
4Display
5[/ \Volume control
6 *Ringtone
•Pressandhold in standby mode:
switch all acoustic signals on/off
(except alarm clock).
• Press and hold on incoming call:
switch off ringtone for this call only.
7#Key lock
Press and hold in standby mode:
activate/deactivate key lock.
8Plug socket
9Flash/torch
XPress and holdXkey:
switch torch on/off.
=Camera lens
!Mirror
á£ß
01.10.2005 10:10
Service provider
Inbox íNew SMS

7Display symbols
right page (7) of SL75 HYDRA SUG, w/o ptt, en A31008-H3300-A1-1-7619 (13.09.2005, 10:16)
© Siemens AG 2003, C:\Siemens\DTP-Satz\Produkte\SL75_Hydra_1\out-
Template: X75, 140x105, Version 2.2; VAR Language: en; VAR issue date: 050822
Display symbols
Display symbols (selection)
áSignal strength
ÞBattery charge level, e.g. 50 %
LContacts
PCall records
OInternet/Service provider portal
WGames
QOrganiser
MMessages
RCamera
SExtras
VMedia player
NMy stuff
UAlarm clock
TSetup
ÇAll calls are diverted
½Ringer (beep) off
¹Alarm set
ÄKeypad locked
£Activated and available
²Browser is being connected
Events (selection)
åSMS memory full
æMMS memory full
çPhone memory full
ÆNo network access
¿Inbox
Message symbols (selection)
mUnread
nRead
pSent
rMMS notification received
tMMS with DRM contents
(page 12)
uE-mail forwarded
vE-mail with attachment
lVoice mail received

Getting started8
© Siemens AG 2003, C:\Siemens\DTP-Satz\Produkte\SL75_Hydra_1\out-
left page (8) of SL75 HYDRA SUG, w/o ptt, en, A31008-H3300-A1-1-7619 (13.09.2005, 10:21)
Template: X75, 140x105, Version 2.2; VAR Language: en; VAR issue date: 050822
Getting started
Your phone's display is covered with
a protective film. Remove this before
using the phone.
Inserting SIM card/
battery
The service provider supplies you
with a SIM card on which all the im-
portant data for your line is stored. If
the SIM card has been delivered in
credit-card size, snap the smaller
segment out and remove any
rough edges.
• Place the SIM card in front of the
slot with the contacts facing
downwards. Then push the SIM
card fully into the holder using
gentle pressure 1. Ensure that
the chamfered corner is in the
correct position.
• Insert the battery into the phone
with the retaining lugs beneath
the camera lens 2and then press
down 3until it clicks into place.
• To remove, press the catch
down 4until the battery springs
out a little, and then remove 5.
In rare cases static
discharge can
cause temporary
discoloration in
the display.
However, this
will disappear
within approx.
10 minutes.
1
3
2
5
4

9Getting started
right page (9) of SL75 HYDRA SUG, w/o ptt, en A31008-H3300-A1-1-7619 (13.09.2005, 10:21)
© Siemens AG 2003, C:\Siemens\DTP-Satz\Produkte\SL75_Hydra_1\out-
Template: X75, 140x105, Version 2.2; VAR Language: en; VAR issue date: 050822
• Position the battery cover on the
device, slightly offset at the
top 6, and then push in the direc-
tion of the arrow until it clicks into
place 7.
• To remove, press the locking but-
ton 8, push the battery cover for-
wards slightly, and then lift it up
and out 9.
Charging the battery
Charging
The battery is not fully charged
when delivered. Plug the charger
cable into the bottom of the phone,
plug the power supply unit into a
mains power socket and charge
for at least two hours (for charging
via USB, see page 47). Do not
interrupt the charging procedure
prematurely.
àDisplay when charging is
in progress.
Charging time
An empty battery is fully charged af-
ter about 2 hours. Charging is only
possible within a temperature range
of +5 °C to +45 °C. If the tempera-
ture rises/falls 5 °C above/below this,
the charge symbol flashes a warn-
ing. The mains voltage specified on
the power supply unit must not be
exceeded.
Additional information
Please switch off your phone before
removing the battery!
1.8 and 3 volt SIM cards are supported.
Please contact your service provider if
you have a different card.
6
7
9
8

Switching on/off, PIN entry10
© Siemens AG 2003, C:\Siemens\DTP-Satz\Produkte\SL75_Hydra_1\out-
left page (10) of SL75 HYDRA SUG, w/o ptt, en, A31008-H3300-A1-1-7619 (13.09.2005, 10:21)
Template: X75, 140x105, Version 2.2; VAR Language: en; VAR issue date: 050822
Operating time
The operating time depends upon
the respective conditions of use. Ex-
treme temperatures considerably re-
duce the phone’s standby time. You
should therefore avoid leaving the
phone in the sun or on a radiator.
Talktime: up to 300 minutes
Stand-by time: up to 300 hours
Charge icon not visible
If the battery has been discharged
fully, the charge icon is not immedi-
ately visible when the power supply
is plugged in. It will appear after up
to two hours. In this case the battery
is fully charged after 3 to 4 hours.
Only use the plug-in power supply unit
included in delivery!
Display during operation
Charge level display during
operation (empty–full):
ÝÞß
A beep sounds when the battery is
nearly empty. The charge level of the
battery is only displayed correctly af-
ter an uninterrupted charging/dis-
charging cycle. You should therefore
not remove the battery unnecessarily
and where possible not terminate the
charging process before completion.
Switching on/off,
PIN entry
Switching on/off
BPress and hold the On/Off/
End key.
Entering PIN
The SIM card can be protected with
a 4 to 8-digit PIN.
JOpen Slider. Enter the PIN
using the number keys.
The characters **** ap-
pear in the display to en-
sure nobody can read
your PIN. Correct with ].
§OK§ Press the left softkey to
confirm. Logging on to
the network will take a
few seconds.
Additional information
The power supply unit heats up when used
for long periods. This is normal and not
dangerous.
If the battery is removed for longer than
30 seconds, the clock must be reset.
Additional information
Changing the PIN .........................page 15
Clearing SIM card barring.............page 16

11General instructions
right page (11) of SL75 HYDRA SUG, w/o ptt, en A31008-H3300-A1-1-7619 (13.09.2005, 10:21)
© Siemens AG 2003, C:\Siemens\DTP-Satz\Produkte\SL75_Hydra_1\out-
Template: X75, 140x105, Version 2.2; VAR Language: en; VAR issue date: 050822
Emergency number
(SOS)
Only to be used in real emergencies!
By pressing the left softkey §SOS§ you
can make an emergency call on any
network without a SIM card and with-
out entering a PIN (not available in
all countries).
Switching your phone on
for the first time
Time/date
Set the clock correctly once when
getting started (see also page 13).
ìConfirm.
ñStart entry.
JFirst enter the date
(day/month/year), then
the time (24 hours,
including seconds).
ìConfirm. The time and
date are updated.
Time zones
ISelect the city in the
desired time zone.
ìConfirm.
General instructions
User guide
The following symbols are used to
explain operation:
JEnter numbers, letters.
BOn/Off/End key
ACall key
<> Softkeys
§Menu§ Displays a soft-key
function.
íPress the centre key, e.g.,
to call up the menu.
DFE
H I G
Press the navigation key
on the side marked with a
triangle.
=Function dependent on
the service provider.

General instructions12
© Siemens AG 2003, C:\Siemens\DTP-Satz\Produkte\SL75_Hydra_1\out-
left page (12) of SL75 HYDRA SUG, w/o ptt, en, A31008-H3300-A1-1-7619 (13.09.2005, 10:21)
Template: X75, 140x105, Version 2.2; VAR Language: en; VAR issue date: 050822
Slider
Open slider completely
•Lighton.
• Keypad unlocked.
• Opening melody on (if set).
• The call is accepted.
• Alarm sound off
(appointment, alarm).
Close slider completely
• Prompt to decide whether applica-
tion should be continued or
returned to standby status.
• Keypad locked in standby mode
if no application except
Media Player is running (if set).
• Closing melody on (if set).
• The call is ended (only if headset is
not connected).
• The call is rejected.
• Alarm sound off (appointment,
alarm).
Receiving signal
áStrong receiving signal.
âA weak signal reduces the
call quality and may lead
to loss of the connection.
Change your location.
Standby mode
The phone is in standby mode and is
ready for use when the name of the
service provider appears on the
display.
BPress the On/Off/End key
to return to standby mode
from any situation.
Tabs
The handy tabs offer you fast access
to information and functions.
FSwitch between the
individual tabs.
If an input field is activated on a tab,
it is only possible to navigate within
the field using the navigation key.
Digital Rights Mgmt.
(DRM)
Remember that your phone has Dig-
ital Rights Management. The use of
downloaded pictures, sounds or ap-
plications can be restricted by the
suppliers, e.g., copy protection, use
for a limited period of time only,
number of times it can be used etc.
23
131 2

13General instructions
right page (13) of SL75 HYDRA SUG, w/o ptt, en A31008-H3300-A1-1-7619 (13.09.2005, 10:21)
© Siemens AG 2003, C:\Siemens\DTP-Satz\Produkte\SL75_Hydra_1\out-
Template: X75, 140x105, Version 2.2; VAR Language: en; VAR issue date: 050822
Main menu
The applications are shown with
symbols in the main menu:
íCall up from standby
mode using the
centre key.
F/ISelect application with
the navigation key.
ìStart application.
Main menu options
§Options§ Open menu.
Menu controls
The steps needed to reach a function
are shown in a condensed form in the
user guide, e.g. to display record of
missed calls in condensed form:
í¢P¢Calls dialled
This comprises the following steps:
íPressing the centre key
opens the main menu in
standby mode.
GSelect the record
application P.
ìConfirm with the
centre key.
HSelect the function
Calls dialled.
ìConfirm with the centre
key.
Centre key
The symbol in the centre of the low-
er line of the display shows the cur-
rent function when the centre key is
pressed.
Search List output of the menu.
You can use the search op-
tion to directly access any
menu item just by browsing
for the keyword.
Big letters Select one of two font
sizes.
Illumination Set display light brighter/
darker.
íMain menu ýSend
ìOK, confirm öView
ñChange ûSave
ðCall òPlay
üEdit ôRecord
÷Insert óPause
úOptions õStop
ùCamera øZoom

General instructions14
© Siemens AG 2003, C:\Siemens\DTP-Satz\Produkte\SL75_Hydra_1\out-
left page (14) of SL75 HYDRA SUG, w/o ptt, en, A31008-H3300-A1-1-7619 (13.09.2005, 10:21)
Template: X75, 140x105, Version 2.2; VAR Language: en; VAR issue date: 050822
Standard functions
Functions which appear repeatedly
in the options menu are listed here.
§Options§ Open menu.
Printing via USB
This Mobile Printing Ready product is
designed to provide easy printing
from mobile phones by connecting
the mobile phone with a USB data
cable to the printer.
This product follows the guidelines
Version 1.0 for PictBridge from Mo-
bile Imaging and Printing Consorti-
um (MIPC).
Mark mode
For some applications (e.g. deleting
several SMS messages) you can mark
several entries on the tab in order to
perform multiple functions at once.
§Options§ Open menu.
Mark Activate mark mode.
ISelect entry/entries.
ñMark or unmark.
Additional mark mode functions:
§Options§ Open menu.
Edit Open the entry to edit.
View Display entry.
Delete Delete entry.
New entry Create new entry.
SendöSelect transmission service
and medium for sending.
PrintöPrintout on a suitable termi-
nal via Bluetooth or USB.
Reply/
Reply to all
The sender becomes the
recipient, "Re:"is placed
before the subject, and the
received text is transferred
into the new message.
Save Store entry.
Save to ªSave recipient in Contacts.
Sort Set sort criteria
(alphabetical, type, time).
Rename Rename selected entry.
Capacity Display memory capacity.
Import Device ready to receive
data (vcard, vcal, vnotes)
via Bluetooth.
Attributes Display properties of the
highlighted object.
Help Display help text.
Mark all Mark all entries.
Unmark all Unmark all marked entries.
Delete
marked All merked entries are
deleted.

15Security
right page (15) of SL75 HYDRA SUG, w/o ptt, en A31008-H3300-A1-1-7619 (13.09.2005, 10:21)
© Siemens AG 2003, C:\Siemens\DTP-Satz\Produkte\SL75_Hydra_1\out-
Template: X75, 140x105, Version 2.2; VAR Language: en; VAR issue date: 050822
Security
The phone and SIM card are protect-
ed against misuse by several security
codes.
PIN codes
í¢T¢Security
¢PIN codes
¢Select function.
PIN control
The PIN is usually requested each
time the phone is switched on. You
can deactivate this feature but you
risk unauthorised use of the phone.
Some service providers do not per-
mit deactivating the control.
ñEdit.
JEnter PIN.
ìConfirm entry.
Change PIN
You can change the PIN to any
4 to 8-digit number you find easier
to remember.
ñEdit.
JEnter current PIN.
ìConfirm.
J,ìEnter new PIN.
J,ìRepeat new PIN.
Keep these security codes in a safe
place where you can access them again
if required.
PIN Protects your SIM card
(personal identification
number).
PIN2 This is needed to set the
charge detail display and to
access additional functions on
special SIM cards.
PUK
PUK2 Key code. Used to unlock SIM
cards after the wrong PIN has
been entered repeatedly.
Phone
code Protects your phone. Must be
entered at the first security
setting.

Security16
© Siemens AG 2003, C:\Siemens\DTP-Satz\Produkte\SL75_Hydra_1\out-
left page (16) of SL75 HYDRA SUG, w/o ptt, en, A31008-H3300-A1-1-7619 (13.09.2005, 10:21)
Template: X75, 140x105, Version 2.2; VAR Language: en; VAR issue date: 050822
Change PIN2
Proceed as for Change PIN.
Chg. phonecode
(Change phone code)
You define the phone code (4-8 digit
number) the first time you call up a
phone-code protected function
(e.g. Direct call, page 45). It is then
valid for all phone-code protected
functions.
Following the third incorrect at-
tempt, access to the phone code and
the functions that use it is denied. If
this happens please contact Siemens
Service (page 59).
Clearing SIM card
barrings
If the PIN is entered incorrectly three
times, the SIM card is barred. Enter
the PUK (MASTER PIN) provided by
your service provider with the SIM
card in accordance with the instruc-
tions. If the PUK (MASTER PIN) has
been lost, please contact your
service provider.
Preventing accidental
activation
Even if PIN use is deactivated
(page 10) confirmation is required
to switch on the phone.
This prevents the phone from being
switched on accidentally, e.g. when
carried in a pocket or whilst you are
on an aircraft.
BPress and hold.
§OK§ Press. The phone
switches on.
§Cancel§ Press (or no further input)
to stop switch-on proce-
dure. The phone does not
switch on.
Connection with PCs
You can connect your phone to a PC
using Bluetooth or a data cable (ac-
cessories). The PC program MPM
(Mobile Phone Manager) enables
you to store data on your PC and, for
example, synchronise the Address-
book with Outlook®, Lotus Notes™
and other Siemens phones (includ-
ing Gigaset). You will find Mobile
Phone Manager on the CD-ROM
supplied or you can download it
from the Internet at:
www.siemens.com/sl75

17Text input
right page (17) of SL75 HYDRA SUG, w/o ptt, en A31008-H3300-A1-1-7619 (13.09.2005, 10:16)
© Siemens AG 2003, C:\Siemens\DTP-Satz\Produkte\SL75_Hydra_1\out-
Template: X75, 140x105, Version 2.2; VAR Language: en; VAR issue date: 050822
Text input
Text input without T9
Press the number key repeatedly un-
til the required character appears.
After a brief interval the cursor will
advance. Example:
2Press briefly once to write
the letter a, twice for b
etc.
Press and hold to write the
number.
]Press briefly to delete the
letter before the cursor,
press and hold to erase the
whole word.
FMove the cursor
(forward/back).
#Press briefly: swap be-
tween abc, Abc, T9abc,
T9Abc, 123.
Press and hold: all input
variants are displayed.
*Press and hold: open text
input menu.
0Press once/repeatedly:
. , ? ! ’ " 0 + - ( ) @ / : _
Press and hold: write 0.
1Inserts a space. Press
twice = line break.
Special characters
*Press briefly:
1) Line break
I/FScroll to a character.
ìConfirm.
Text input menu
*Press and hold:
Input language, Mark text,
Copy/Insert
Text input withT9
"T9" uses various key entries to
deduce the correct word.
#Activate/deactivate T9.
1)¿¡_;.,?!
+- "’ : */()
¤¥$£€@\ &#
[ ] { } %~<=>
|^` §Γ∆ΘΛΞ
ΠΣΦΨΩ

Text input18
© Siemens AG 2003, C:\Siemens\DTP-Satz\Produkte\SL75_Hydra_1\out-
left page (18) of SL75 HYDRA SUG, w/o ptt, en, A31008-H3300-A1-1-7619 (13.09.2005, 10:16)
Template: X75, 140x105, Version 2.2; VAR Language: en; VAR issue date: 050822
Writing with T9
It is best if you finish a word without
looking at the display.
Simply press the keys where the
relevant letter is located once.
1/EA blank space or moving
to the right ends a word.
Do not use special characters such as
Ä. Use standard characters only,
e.g. A. T9 will do the rest.
T9 word suggestions
If several options are found in the
dictionary for a word, the most
probable is displayed first.
^Press. If this word is
incorrect, press again.
^Keep pressing until the
correct word is displayed.
To enter a word in the dictionary:
§Spell§ Select and enter the word
without T9, then §Save§.
Correcting a word
FMove left or right, word
by word, until the
required word is
§highlighted§.
^Scroll through the T9
word suggestions again.
]Deletes the character to
the left of the cursor and
displays a new possible
word.
Text modules
í¢M¢Templates
¢Text modules
Text modules can be stored in the
phone for adding to your messages
(SMS, MMS, e-mail).
Additional information
#Press briefly: swap between:
abc, Abc, T9abc, T9Abc,
123. Status shown in top line
of the display.
Press and hold: all input
variants are displayed.
*Press briefly: select special
characters (page 17).
Press and hold: opens text
input menu (page 17).
T9®Text Input is licensed under one or more
of the following: U.S. Pat. Nos. 5,187,480,
5,818,437, 5,945,928, 5,953,541, 6,011,554,
6,286,064, 6,307,548, 6,307,549, 6,636,162 and
6,646,573; Australian Pat. Nos. 727539, 746674
and 747901; Canadian Pat. Nos. 1,331,057,
2,302,595 and 2,227,904; Japan Pat. No.
3532780, 3492981; United Kingdom Pat. No.
2238414B; Hong Kong Standard Pat. No.
HK1010924; Republic of Singapore Pat. No.
51383, 66959 and 71979; European Pat. Nos.
0 842 463 (96927260.8), 1 010 057
(98903671.0), 1 018 069 (98950708.2); Republic
of Korea Pat. Nos. KR201211B1 and
KR226206B1. People's Republic of China Pat.
Application Nos. 98802801.8, 98809472.X and
96196739.0; Mexico Pat. No. 208141; Russian
Federation Pat. No. 2206118; and additional pat-
ents are pending worldwide

19Calling
right page (19) of SL75 HYDRA SUG, w/o ptt, en A31008-H3300-A1-1-7619 (13.09.2005, 10:16)
© Siemens AG 2003, C:\Siemens\DTP-Satz\Produkte\SL75_Hydra_1\out-
Template: X75, 140x105, Version 2.2; VAR Language: en; VAR issue date: 050822
Calling
JEnter number (always
with area/international
dialling code).
] A short press clears
the last digit, a long press
clears the phone number.
APress the Call key. The dis-
played phone number is
dialled.
Ending a call
BPress briefly or close slider.
Setting the volume
[/\Adjust the volume with
the plus/minus keys.
Last number redial
APress twice. The phone
number last called is
redialled.
Call from the redial list:
APress once; choose phone
number.
ADial phone number.
Auto last number redial
§Options§ Open, then Auto dial. The
phone number is dialled
ten times at increasing
time intervals.
Reminder
§Options§ Open, then Reminder.A
beep reminds you to
redial the displayed
phone number after
15 minutes.
Accepting a call
APress or open slider.
Rejecting a call
BPress briefly or close slider.
Call options
Functions which are only available
during the call are offered in the call
menu.
Additional information
Accept the call before bringing the tele-
phone to your ear in order to avoid ear
damage caused by the ringtones.
Handsfree
§Options§ Open, then activate/deacti-
vate Handsfr. Always switch
off "handsfree talking"before
holding the phone to your ear.
Otherwise, you will damage
your hearing!
International dialling codes
0Press and hold until a "+"is
displayed.
§Options§ Open, then select Country.
Other manuals for Gigaset SL75 WLAN
3
Table of contents
Other Siemens Cell Phone manuals

Siemens
Siemens CX65 User manual

Siemens
Siemens MC60 User manual

Siemens
Siemens ST55 User manual

Siemens
Siemens S35i User manual

Siemens
Siemens Controller User manual

Siemens
Siemens M65 User manual

Siemens
Siemens C75 Setup guide

Siemens
Siemens S6 GSM User manual

Siemens
Siemens C61 User manual

Siemens
Siemens Gigaset S100 User manual

Siemens
Siemens Mobile User manual

Siemens
Siemens A52 User manual

Siemens
Siemens S2588 User manual

Siemens
Siemens CX75 User manual

Siemens
Siemens A56 User manual

Siemens
Siemens S6 User manual

Siemens
Siemens A55 User manual

Siemens
Siemens M46 User manual

Siemens
Siemens AP75 User manual

Siemens
Siemens S65 Setup guide