manuals.online logo
Brands
  1. Home
  2. •
  3. Brands
  4. •
  5. Siemens
  6. •
  7. Smoke Alarm
  8. •
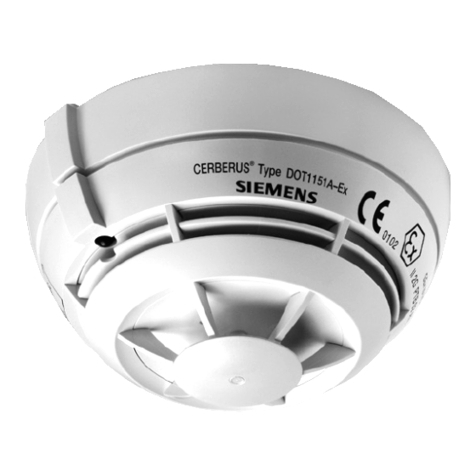
  9. Siemens 5TC1292-6 User manual

Siemens 5TC1292-6 User manual

-4- -5-
EN SMOKE ALARM
User manual
5TC1292-6
Siemens AG
Siemensstr. 10
D93055 Regensburg (Germany)
www.siemens.com
Type of mounng Ceiling
Baery duraon of the
main power supply 5 years
Individual alarm indicator Yes
Essenal cerfied features covered by the NF mark
20 5TC1292-6
0333 Smoke Alarm
EN 14604:2005 + AC:2008
DoP: 70781A-WA-DoP
hps://support.industry.siemens.com
Idenficaon
Main power supply Internal to the device (baery)
Low baery mode
When the baery is running low, the smoke alarm will indicate this with a
repeve beep and flash for approximately 30 days. Replace the baeries by
one of the recommended baery types described in chapter “Product
specificaons” on page 1. Take the smoke alarm from the mounng plate by
turning it counter clockwise and remove the empty baery. Install the new
baery as illustrated in chapter “Acvaon“ on page 3. Make sure that the
baery is properly connected. Test the alarm for correct operaon using the
test facility, whenever the baery is replaced.
Fault warning mode
When the smoke alarm is not funconing properly, it will turn into the fault
warning mode. Try cleaning the smoke alarm (see paragraph “Maintenance“)
or replace the smoke alarm!
Maintenance
•Test this smoke alarm weekly for correct operaon using the test facility. If
the smoke alarm funcons correctly, it will generate a loud beep. Due to
the loudness of the alarm, make sure that you always stand at arm's length
distance from the unit when you are tesng. If the smoke alarm does not
generate an acousc signal, the smoke alarm must be replaced
immediately!
•Clean the smoke alarm at least once per month to remove dirt, dust or
debris. Use a vacuum cleaner with a so brush and vacuum all sides and
covers of the smoke alarm. Do not remove the top cover of the smoke
alarm to clean it inside.
•Do not aempt to repair this smoke alarm. If the smoke alarm shows a
damage related to its funconality, it must be replaced!
•Trouble shoong: False alarm is oen caused by dust or steam.
Recycling and disposal
The WEEE symbol means that this product and baeries must be
disposed separately from other household waste. When they reach
their end of life, take them to a designated waste collecon point in
your area to guarantee a safe disposal or recycling. Baeries must be r emoved
from the product. Protect the environment, human health and natural
resources!
Transport
Product is not classified as a dangerous good, however observe transportaon
informaon concerning dangerous goods regulaons!
Note: During the transport, the product must be deacvated. Remove the
baery and insulate the baery poles.
Service
Cerfied by AFNOR Cerficaon (www.afnor.org). For advise from experts and
firefighters, go to: hps://cerficaon.afnor.org/securite/nf- securite-
incendie-domesque
The CE mark affixed to this product confirms its compliance with the
European Direcves which apply to the product and, in parcular, its
compliance with the harmonized specificaons of standard EN 14604:2005
relang to Construcon Products Regulaon 305/2011.
The NF – DOMESTIC FIRE SAFETY mark provides assurance as to safety and
consistent quality inspected by experts. Through its rigorous and exhausve
inspecons (holder's quality management system, product inspecons, audits
and monitoring tests, etc.), the NF mark represents a comprehensive
guarantee for consumers that the cerfied products are compliant. The NF –
DOMESTIC FIRE SAFETY mark confirms the product's compliance with
cerficaon rules NF 292.
ESSENTIAL CHARACTERISTICS: PASS
Nominal acvaon condions / sensivity / response delay (response me)
and performance under fire condions - Operang reliability - Tolerance to
supply voltage - Durability of operaonal reliability and response delay,
temperature resistance, vibraon resistance, humidity resistance, corrosion
resistance, electrical stability.
Operang mode Visual signal (flash) Acousc signal (beep) Descripon mode
Normal 1 x per 32 seconds None Device is funconing properly
Test 1 x per second (3 x), pause of 1,5 seconds 1 x per second (3 x), pause of 1,5 seconds Device is being tested
Alarm 1 x per second (3 x), pause of 1,5 seconds 1 x per second (3 x), pause of 1,5 seconds Device has detected smoke
Low baery 1 x per 32 seconds 1 x per 32 seconds Baery is running low
Fault warning 1 x per 32 seconds 1 x per 32 seconds Device is not funconing properly
http://www.siemens.com/lowvoltage/dangerousgood
hps://support.industry.siemens.com
Overview visual & acousc signals
R0
-1- -2- -3-
Thank you for purchasing our smoke alarm!
Please read these instrucons carefully and store them in a safe place during
the enre lifeme of the product.
Product descripon and intended use
This is a smoke alarm (delivered with baery) with an opcal sensor for
installaon in residenal buildings, apartments and rooms with residenal-
like use. Smoke alarms are designed to provide an early warning of fire smoke
and fires to persons present, so that these persons can react appropriately to
the hazardous event. Always consult local regulaons for smoke alarms.
Product specificaons
Detecon method : Opcal
Power supply : Replaceable baery (9 V DC)
Baery lifeme : 5 years
Recommended baeries : Raymax - 6LR61 (Aenon:
proper funconing of the detector Duracell - MN1604
is ensured through the use of one of Gold Peak - GP1604A
the following baeries)
Alarm volume : > 85 dB (A) at 3 meters
Alarm sensivity : 0.10 - 0.16 dB/m
Monitored area : max. 40 m²
Operang temperature : 0 °C - 40 °C
Operang humidity : < 93 %
Date of replacement : See product label
Individual alarm indicator : Yes
Alarm silence facility : No
Low baery warning : Yes
Low baery silence facility : No
Installaon in leisure
accommodaon vehicles : No
Mounng locaon : Ceiling
Interconnectable : No
Warnings
•To prevent injury, this apparatus must be securely aached to the ceiling in
accordance with the installaon instrucons.
•Baeries should not be exposed to excessive heat such as sunshine, fire or
the like.
•Do not paint or cover the smoke alarm.
Where to install a smoke alarm
Smoke alarms must be installed in such a way that they can be reached
unhindered by the fire smoke so that fires can be reliably detected during the
development phase.
•Install at least in sleeping areas (especially children's rooms).
•Install at least in escape routes.
•In the middle of the ceiling of a room.
•At least 50 cm away from the wall and other objects.
•Maximum installaon height of 6 meters.
Where to install a smoke alarm in rooms
with special geometries
•Corridors with a maximum width of 3 m: Max. 15 m between 2 smoke
alarms. Max. 7,5 m to the front side of the gallery and smoke alarms at
edges/crossings of corridors.
•Rooms with sloping ceilings:
- If the ceiling inclinaon is > 20° to the horizontal: Smoke alarms must be
installed at least 0.5 m and at most 1 m from the ceiling top.
- Paral roof slopes: If the flat ceiling is ≤ 1 m wide, consider as ceiling
inclinaon is of > 20°. If the flat ceiling is >1 m wide, consider as flat
ceiling.
•Rooms with subdivided ceilings:
- Height of the subdivisions is ≤ 0.2 m: Beams without consideraon:
smoke alarm may be installed on the beams as well as on the ceiling.
- Height of subdivisions is > 0.2 m and if one of the ceiling panels > 36 m2:
a smoke alarm device should be installed in this ceiling panel and
addionally a smoke alarm device in the room, preferably in the middle
of the other ceiling panel
- Height of subdivisions > 0.2 m and area of ceiling panels ≤ 36 m²:
Individual ceiling panels are without consideraon. A smoke alarm must
be installed in a ceiling panel or on the joist, preferably in the middle of
the room.
Ceiling
Hobby roomBoiler room
Kitchen
Children’s roomBedroom
Ac
Escape
Escape
Escape
Livingroom
Opmal Restricted
Where not to install a smoke alarm
•In an environment with a high risk of draught (e.g. close to air condioning,
fans and venlaon outlets). The movement of air can impair the
penetraon of fire smoke into the smoke alarm.
•Areas where combusons regularly occurs, such as kitchens.
•Areas with high humidity such as bathrooms, or close to devices such as
dish washers or washing machines.
Acvaon
Before commissioning the smoke alarm, it is important to acvate it and test
it for correct operaon.
•Connect the baery as shown below and place the baery in the baery
compartment. Place the mounng plate on the smoke alarm and secure it
by turning it clockwise.
•Test the correct baery connecon and acvaon of your smoke alarm by
pressing the test buon unl a beep is generated. If no sound is generated,
the smoke alarm is not acvated properly and should not be used!
For a reliable test, press test buon for around 10 seconds, unl two
sequences of 3 beeps are generated, and release.
•It's recommended to write the replacement date (10 years) on the label, in
a calendar or anywhere easy to review.
Mounng
•Remove the mounng plate from the smoke alarm.
•Place the mounng plate on the desired installaon locaon and mark
where the holes should be drilled.
•Drill two holes with a diameter of 5 millimetres. Push the plasc plugs into
the holes.
•Insert the screws into the mounng plate, and ghten them firmly into the
plugs.
•Place the smoke alarm on the mounng bracket and secure it by turning it
clockwise.
•Test the correct operaon of your smoke alarm by pressing the test buon.
If no sound is generated, the smoke alarm is not funconing properly and
should not be used!
Mounng plateMounng plateMounng plate
Test buon
LED indicator
Sound output
Other Siemens Smoke Alarm manuals

Siemens BH17 7ER User manual

Siemens

Siemens BH17 7ER User manual

Siemens AD1-C11 User manual

Siemens

Siemens AD1-C11 User manual

Siemens AD2-C11 User manual

Siemens

Siemens AD2-C11 User manual

Siemens OP921 User manual

Siemens

Siemens OP921 User manual

Siemens DOW1171 User manual

Siemens

Siemens DOW1171 User manual

Siemens TITANUS 3000 User manual

Siemens

Siemens TITANUS 3000 User manual

Siemens OP121 User manual

Siemens

Siemens OP121 User manual

Siemens PE-11C User manual

Siemens

Siemens PE-11C User manual

Siemens DM1101 User manual

Siemens

Siemens DM1101 User manual

Siemens 5TC1292-7 User manual

Siemens

Siemens 5TC1292-7 User manual

Siemens DI-3 User manual

Siemens

Siemens DI-3 User manual

Siemens DOW1171 User manual

Siemens

Siemens DOW1171 User manual

Siemens FDOT421 User manual

Siemens

Siemens FDOT421 User manual

Siemens Cerberus DLO1191 Guide

Siemens

Siemens Cerberus DLO1191 Guide

Siemens DELTA reflex 5TC1 290 Service manual

Siemens

Siemens DELTA reflex 5TC1 290 Service manual

Siemens FCI2016-U1 Guide

Siemens

Siemens FCI2016-U1 Guide

Siemens Sinteso Cerberus PRO FDA221 User manual

Siemens

Siemens Sinteso Cerberus PRO FDA221 User manual

Siemens DELTA reflex SD230N Service manual

Siemens

Siemens DELTA reflex SD230N Service manual

Siemens FDA2 Series Technical manual

Siemens

Siemens FDA2 Series Technical manual

Siemens Synco living AP260 User manual

Siemens

Siemens Synco living AP260 User manual

Siemens OH921 User manual

Siemens

Siemens OH921 User manual

Siemens FDA241 Technical manual

Siemens

Siemens FDA241 Technical manual

Siemens ILP-1 User manual

Siemens

Siemens ILP-1 User manual

Siemens Cerberus DO1101A-Ex Parts list manual

Siemens

Siemens Cerberus DO1101A-Ex Parts list manual

Popular Smoke Alarm manuals by other brands

Polon-Alfa DOR-4043 Installation and maintenance manual

Polon-Alfa

Polon-Alfa DOR-4043 Installation and maintenance manual

First Alert SA88B user manual

First Alert

First Alert SA88B user manual

System Sensor Innovair DH200PL Installation and maintenance instructions

System Sensor

System Sensor Innovair DH200PL Installation and maintenance instructions

Jalo Helsinki Kupu Series Installation

Jalo Helsinki

Jalo Helsinki Kupu Series Installation

BRK electronic First Alert P1010 quick start guide

BRK electronic

BRK electronic First Alert P1010 quick start guide

Eldes EWF1 user manual

Eldes

Eldes EWF1 user manual

Ziton ZP2 Series installation manual

Ziton

Ziton ZP2 Series installation manual

LST GO-55000-317 Specification sheet

LST

LST GO-55000-317 Specification sheet

Nexa MSA-866/10Y Instruction leaflet

Nexa

Nexa MSA-866/10Y Instruction leaflet

System Sensor 2WTR-B Installation and maintenance instructions

System Sensor

System Sensor 2WTR-B Installation and maintenance instructions

Brooks EIB605C Photoelectric quick start guide

Brooks

Brooks EIB605C Photoelectric quick start guide

Ningbo Siterwell Electronics GS522C user manual

Ningbo Siterwell Electronics

Ningbo Siterwell Electronics GS522C user manual

Silent Call Communications SD4-SS Installation and operation manual

Silent Call Communications

Silent Call Communications SD4-SS Installation and operation manual

detectomat RCP 3500 quick start

detectomat

detectomat RCP 3500 quick start

Dahua DHI-HY-SAV849HAP-E quick start guide

Dahua

Dahua DHI-HY-SAV849HAP-E quick start guide

First Alert OneLink SA500 user manual

First Alert

First Alert OneLink SA500 user manual

Nemaxx WL 10 Original operating instructions

Nemaxx

Nemaxx WL 10 Original operating instructions

System Sensor BEAM1224SA Installation and maintenance instructions

System Sensor

System Sensor BEAM1224SA Installation and maintenance instructions

manuals.online logo
manuals.online logoBrands
  • About & Mission
  • Contact us
  • Privacy Policy
  • Terms and Conditions

Copyright 2025 Manuals.Online. All Rights Reserved.