manuals.online logo
Brands
  1. Home
  2. •
  3. Brands
  4. •
  5. SIGE
  6. •
  7. Indoor Furnishing
  8. •
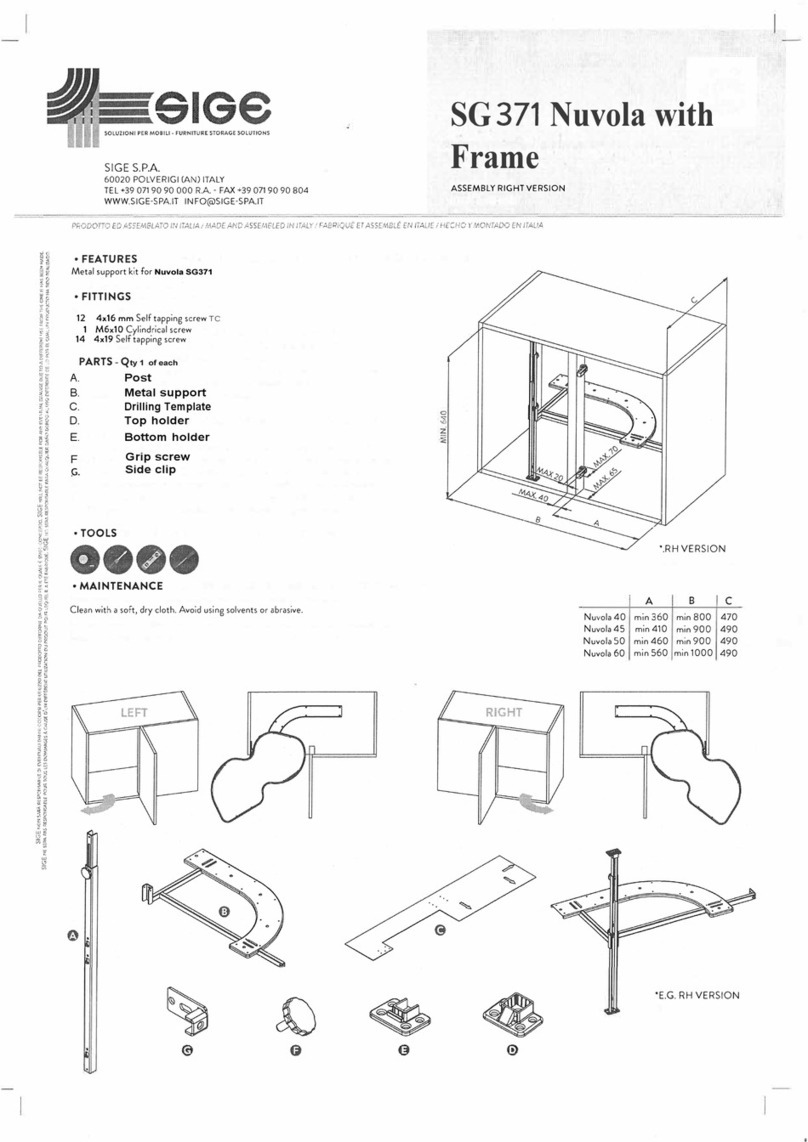
  9. SIGE INFINITY LINE User manual

SIGE INFINITY LINE User manual

REV. 01.2016
F0IST00015 - depth 470
SIGE S.p.A.
60020 Polverigi (AN) ITALY
tel +39 071 90 90 000 r.a. - fax +39 071 90 90 804
www.sige-spa.it [email protected]
INFINITY LINE - INFINITY PLUS
Art 371i 371+
montaggio versione dx . assembly right version
montage version droite . montaje versi ón dereche
Prodotto ed assemblato in Italia / Made and assembled in Italy / Fabriqué et assemblé en Italie / Hecho y montado en Italia
PASSIONE
PASSION
DESIGN
Certified Integrated Systems
ISO 9001 • ISO 14001 - OHSAS 18001 • SA 8000
SIGE non sarà responsabile di eventuali danni occorsi per utilizzo del prodotto diorme da quello per il quale è stato concepito. SIGE will not be responsible for any eventual damage due to a dierent use from the one it has been made.
SIGE ne sera pas responsable pour tous les dommages à cause d’un diérent utilization du produit pour lequel il a été fabriqué. SIGE no sera responsable para cualquier daño debido al uso diferente de lo por el cual un producto ha sido realizado.
UTENSILERIA • TOOLS
OUTILS • INSTRUMENTOS
A371i
A371+
B
CG
MIN.470
A
B
MAX.40
MAX.65
MAX.70
16-20
MAX.20
10
kg 10
kg
10
10
kg
kg
371i
10
kg 10
kg
10
10
kg
kg
371+
H
F
E
D
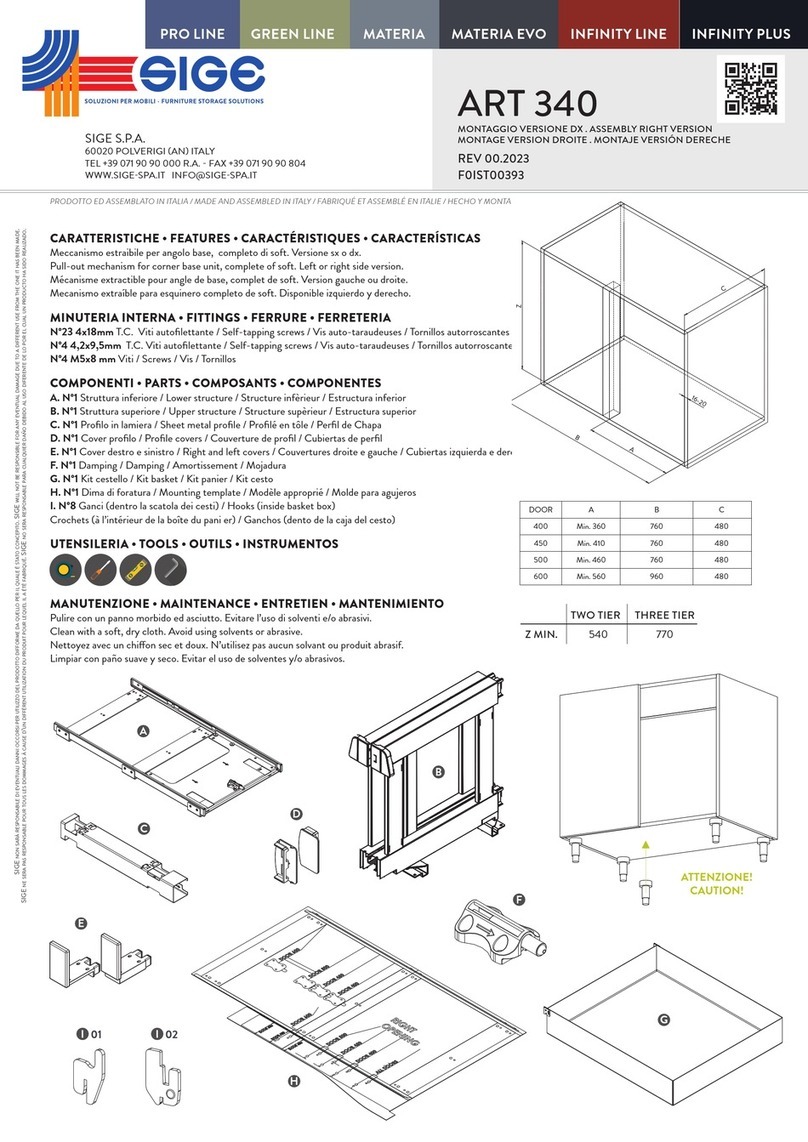
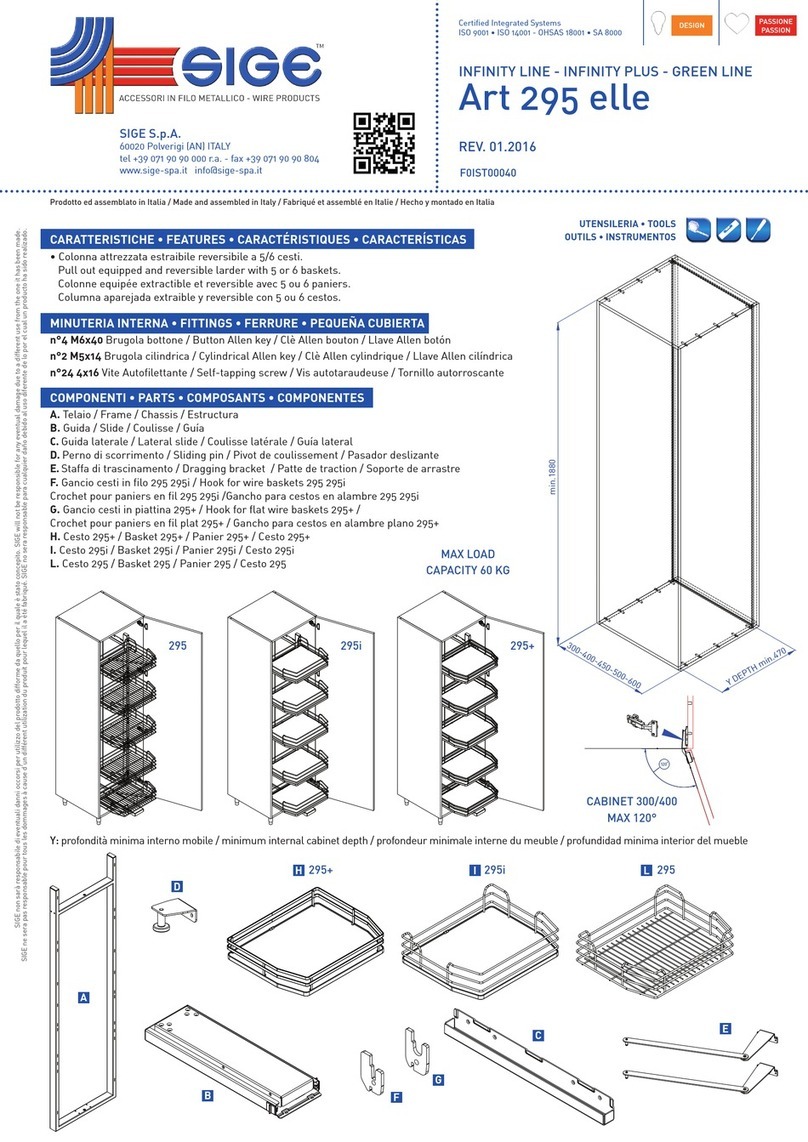
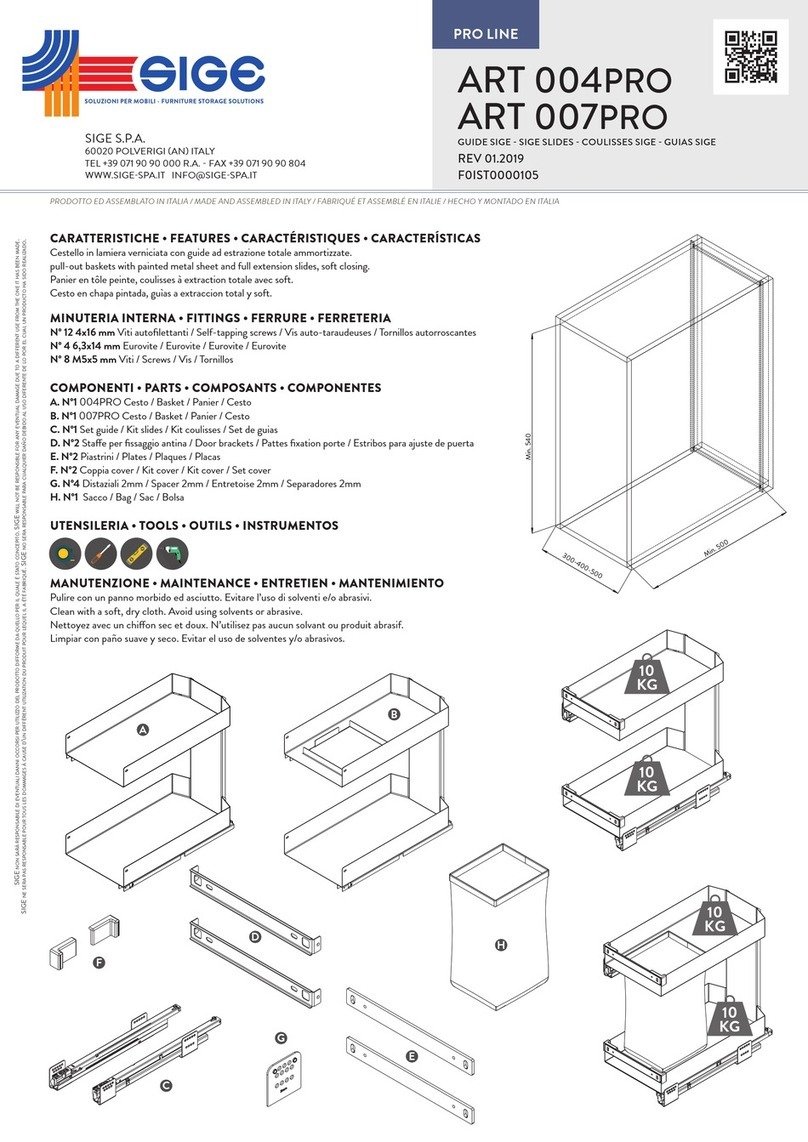
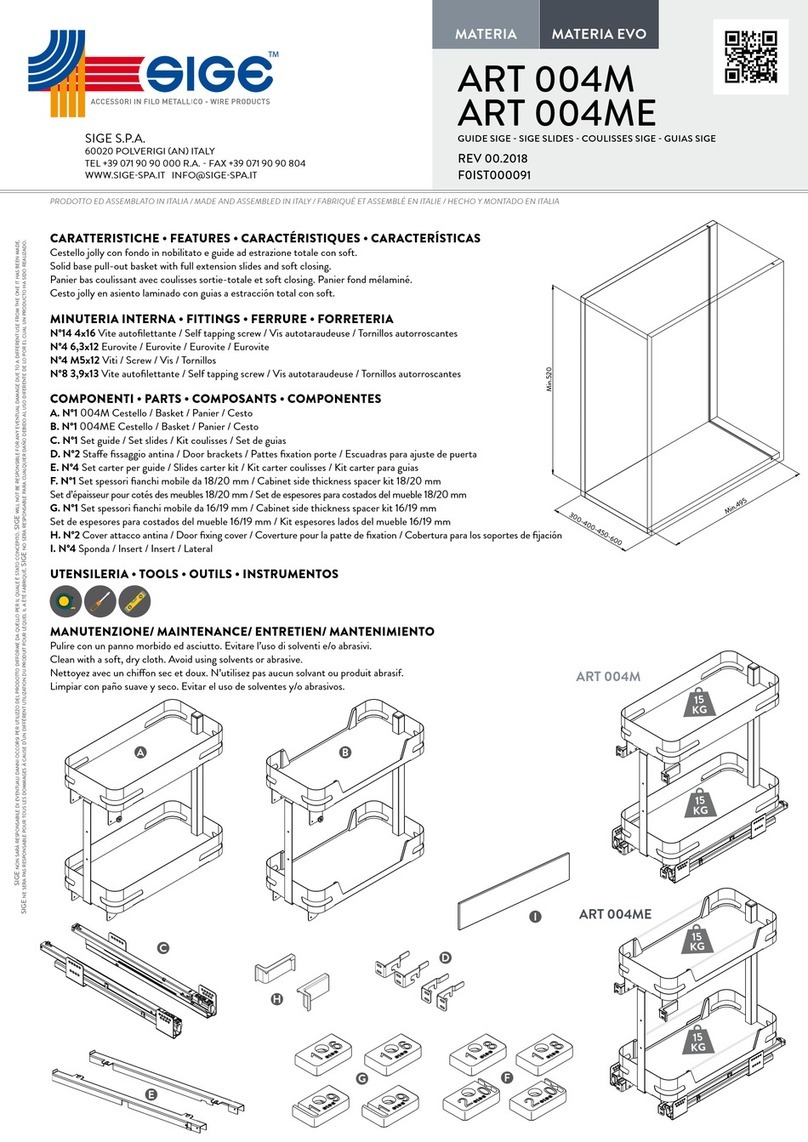
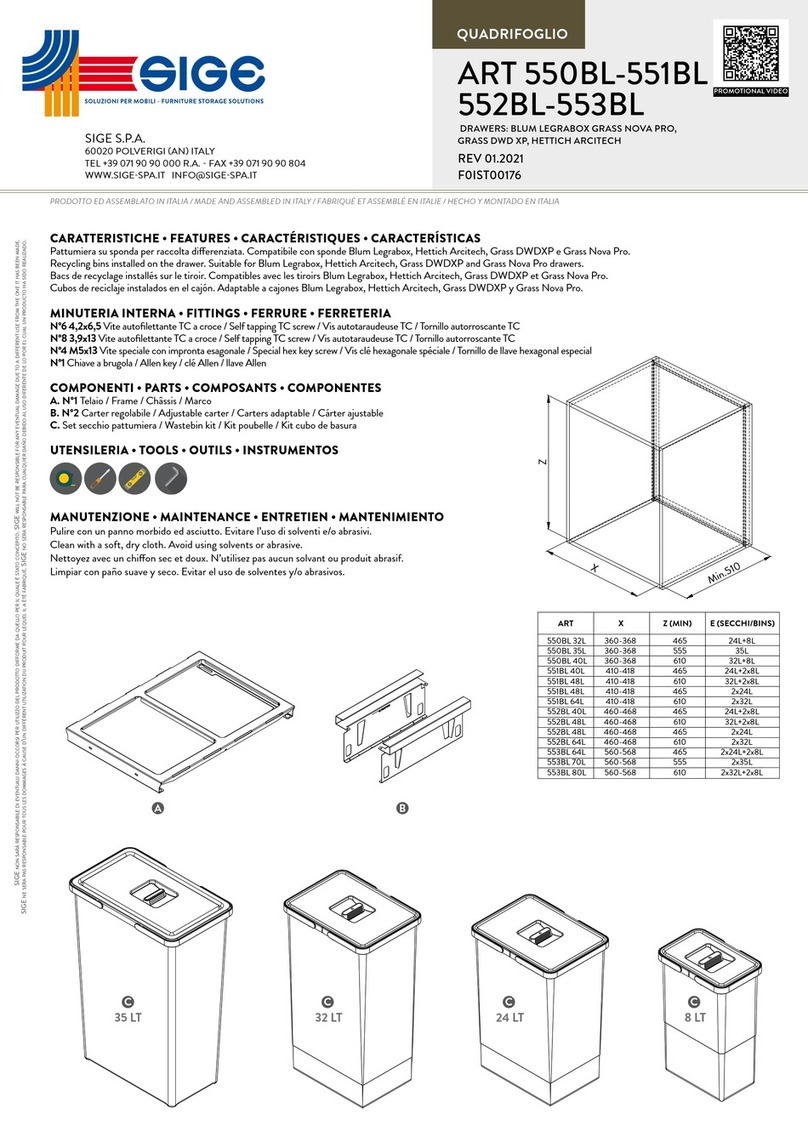
CARATTERISTICHE • FEATURES • CARACTÉRISTIQUES • CARACTERÍSTICAS
Due Ripiani separati / Two indipendent shelves / Deux étagères séparés / Dos estantes separados
Ripiano con ringhieretta cromata / Shelf with chrome-plated rail / Étagère avec galerie fil chromé / Estante con varilla cromada
20 kg per ripiano / 20 kg each shelf / 20 kg chaque étagère / 20 kg por estante
Cerniera max ingombro 20 mm / Maximum hinge protrusion from centre 20 mm
Charnière max espace 20 mm / Resalte de bisagra max 20 mm
MINUTERIA INTERNA • FITTINGS • FERRURE • PEQUEÑA CUBIERTA
n° 12 6,3x16 mm Euroviti / Euroscrews / Eurovis / Tornillos euro
n° 28 4x25 mm Viti autofilettanti / Self tapping screws
Vis auto-taraudeuses / Tornillos autorroscantes
COMPONENTI • PARTS • COMPOSANTS • COMPONENTES
A. n°2 Ripiani / Shelves / Etagères / Estantes
B. n°2 Guide / Slides / Glissières / Guías
C. n°2 Meccanismi / Mechanisms / Mécanismes / Mecanismos
D/I. n°1 Dima di montaggio / Mounting template / Modèle de montage / Plantilla de montaje
E. n°2 Bussola in plastica / Shelf safety ring / Anneau de sécurité étagère / Buje de plástico
F. n°4 Finecorsa / Stopper / Stopper / Topes
G. n°2 Supporti rotanti / Pivoting guide / Soutien par support / Soportes de rotación
H. n°5 Tappi / Caps / Casquettes / Conjunto de tapas
AB
Nuvola 40 min. 390 min. 900
Nuvola 50 min. 460 min. 900
Nuvola 45 min. 410 min. 900
Nuvola 60 min. 560 min. 1000
I
FITT_10406
Issue 1
2
1
Effettuare la preforatura sul fianco del mobile utilizzando
l’apposita dima D o rispettando le quote e fissare i meccanismi
C sul mobile utilizzando le euroviti in dotazione e inserire la
bussola in plastica E nel meccanismo C.
Pre-drill the side cabinet using the specific mounting template
D or respecting the quotes and then fix the mechanisms C on
the cabinet using the provided euroscrews and Insert the pla-
stic bushing E into the mechanism C.
Effectuer le pré-perçage sur le côté de l’armoire en utilisant
le gabarit de montage D ou en respectant les mesures et fixer
ensuite les mécanismes C sur l’armoire à l’aide des eurovis
fournies, insérer la bague en plastique dans le mécanisme C.
Efectue la preperforación sobre el lado del mueble utilizando
la plantilla D o respetando las medidas y fije los mecanismos
C en el mueble utilizando los tornillos euro,Coloque el buje de
plástico E en el mecanismo C.
Fissare le guide in plastica B seguendo la foratura precedente-
mente segnata con la dima I.
Fix the plastic slides B according to the holes previously
marked whit temèlate I.
Fixer les coulisses en plastique B selon les trous précédem-
ment marqués avec le modèle de montage I.
Fijar las guías plásticas B según los orificios marcados
anteriormente con la plantilla e montaje I.
N°28 4x25
N°12 6,3x16
42,35
50,27
103,49
258,08
342,01
370,50
97,83
218,06
283,34
305,50
137,68
202,20
197,51
201,37
248,73
302,08
330,06
433
563
693
35
44,50
64
10
41,50
65
73,50
93,50
all 5
71
15
79
46
96
5
34
12
44
12
30
90
10
50
22
10
10
10
OLD
NB.
Se usato il 371K procedere con l’apposita istruzione.
If you use the article 371K, please follow the related instruction.
Si utilisez l’article 371K, référez à l’instruction spécifique.
Si utiliza el artículo 371K, consultar la instrucción específica.
3
4
Inserire il perno di rotazione G e il finecorsa F nella guida B.
Put the rotation pin G along with the stopper F into the slide B.
Insérer la goupille de rotation G et le stopper F dans la coulisse B.
Introduzca el perno de rotación G y el tope F en la guía B.
Inserire il ripiano montato nel meccanismo C e nel supporto di
rotazione G precedentemente montati.
Put the shelf into the mechanism C and into the rotating support
G previously mounted.
Insérer le plateau monté dans le mécanisme C et dans le
support rotatif G précédemment montés.
Insertar el estante montado en el mecanismo C y en el soporte
de rotación G previamente montados.
371i
371+
NB.
Se usato il soft close procedere nella fase successiva.
If you use soft close kit proces directly in next step.
Si vous utilisez kit d’amortisseur passe directement à la phase suivante.
Si utiliza el kit soft, proceder con la fase siguiente.
La Sige Spa si riserva il diritto di apportare variazioni senza preavviso - Sige Spa has the right to make changes on it without notice
Sige Spa a le droit d’apporter des variations sans préavis - El Sige Spa se reserva el derecho de realizar cambios sin previo aviso.
LEFT RIGHT
SOFT CLOSE OPTIONAL
Installare il perno in metallo sotto il ripiano sui fori pre-forato
(fig.1). Installare il supporto in plastica del soft nel meccanismo
(fig.2). Installare il ripiano nel meccanismo e inserire il soft nei
perni precedentemente montati (fig.3).
Install the metal pin under the shelf using the pre drillid holes.
Attach the soft close support to the arm support (fig.1).
Attach the shelf to the track and support arm as shown (fig.2).
Install the soft close dampener to the pins (fig.3).
Installex la tige métallique sous le plateau en utilisant les trous
pré-percés. Fixez l’amortisseur au support de bras (fig.1).
Fixer le plateau sur le rail er le support,comme illustré (fig.2).
Installez le piston d’amortisseur sur les tiges (fig3).
Instalar el perno en métal bajo el estante en los orificios
pre perforados (fig.1). Instalar el soporte plástico del soft en
el mecanismo (fig.2). instalar el estante en el mecanismo y
insertar el soft en el perno ya montado (fig.3).
FIG.3
FIG.2
Inserire il perno in metallo nel supporto del soft close come figura.
Install the metal pin to the soft close support as shown.
Installez la tige de métal sur le support de l’amortisseur comme
indiqué.
Colocar el perno metálico en el soporte del soft close como se
ve en la imagen.
FIG.1
REMOVE

This manual suits for next models

3

Other SIGE Indoor Furnishing manuals

SIGE PRO 295PRO User manual

SIGE

SIGE PRO 295PRO User manual

SIGE 340 User manual

SIGE

SIGE 340 User manual

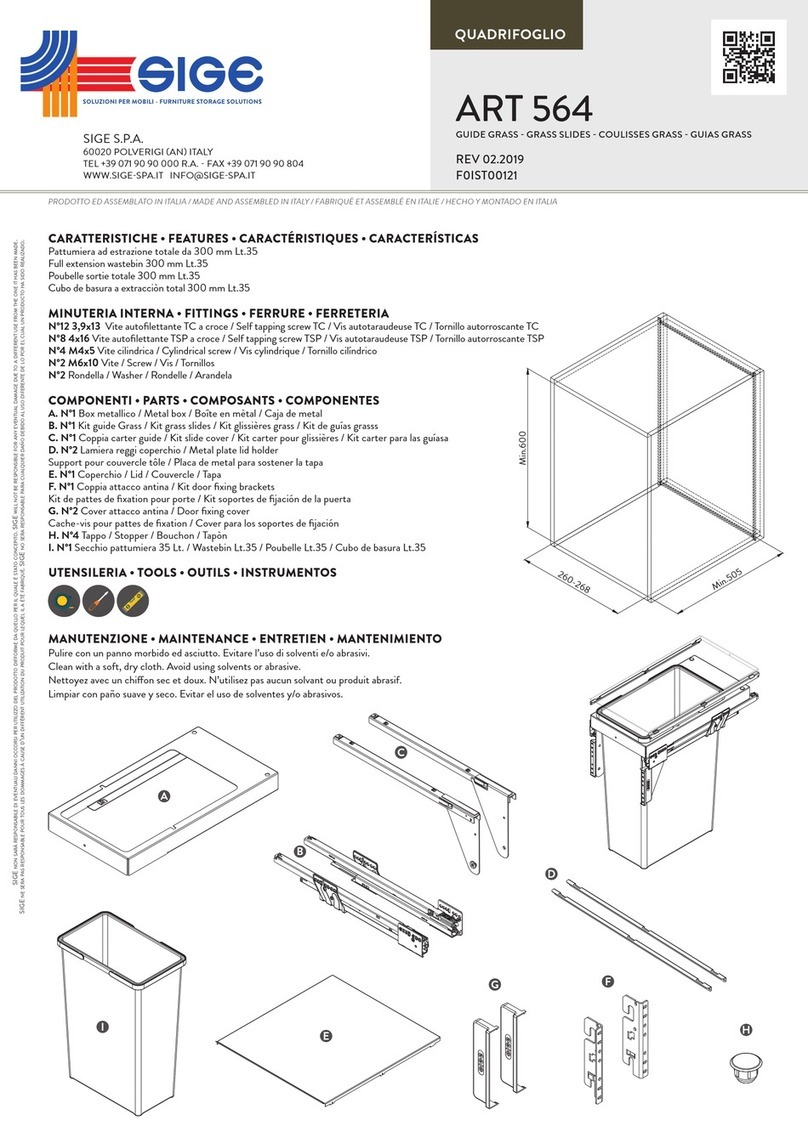
SIGE ART 564 Instruction Manual

SIGE

SIGE ART 564 Instruction Manual

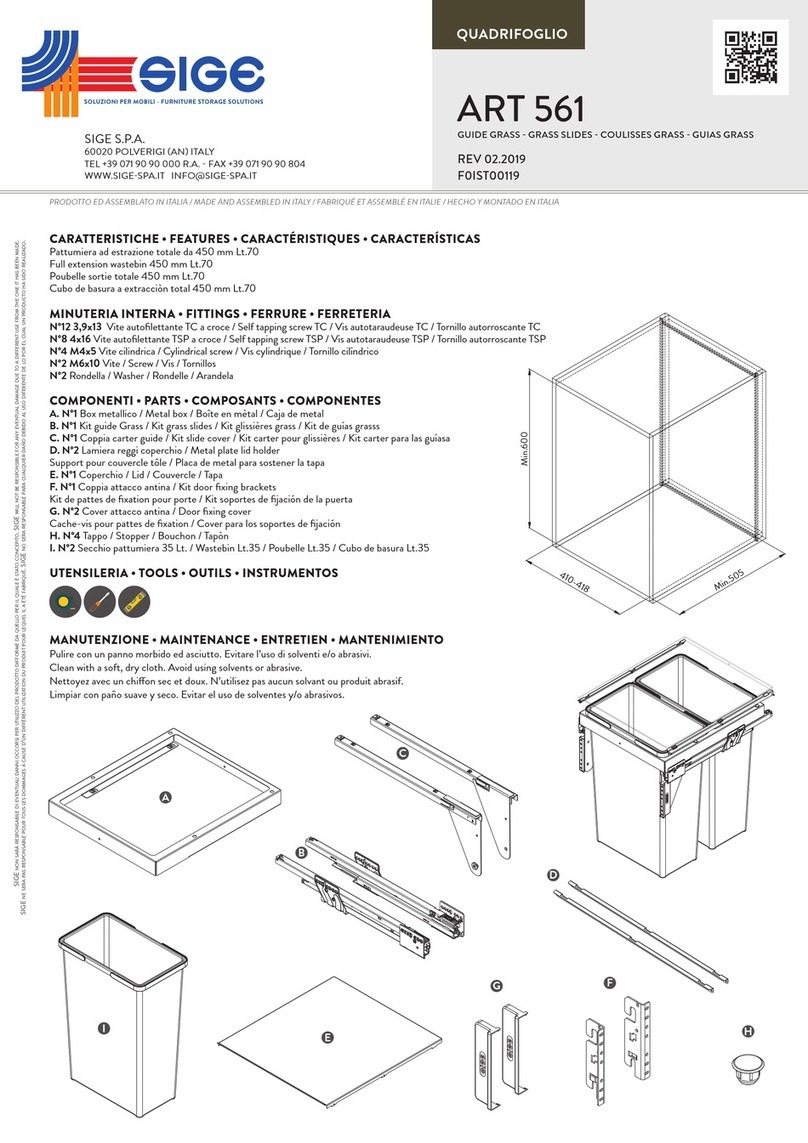
SIGE 561 User manual

SIGE

SIGE 561 User manual

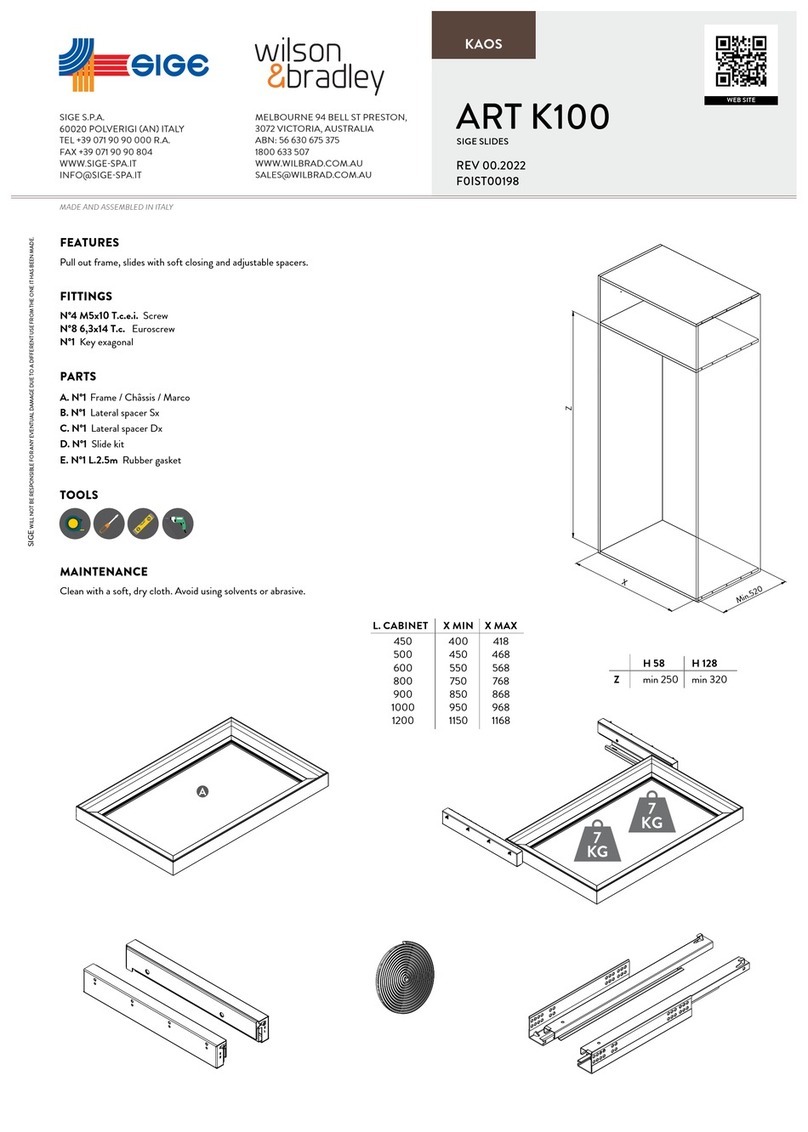
SIGE wilson & bradley KAOS ART K100 User manual

SIGE

SIGE wilson & bradley KAOS ART K100 User manual

SIGE wilson&bradley ART 511U-513U User manual

SIGE

SIGE wilson&bradley ART 511U-513U User manual

SIGE 295 elle User manual

SIGE

SIGE 295 elle User manual

SIGE 094C User manual

SIGE

SIGE 094C User manual

SIGE 002S User manual

SIGE

SIGE 002S User manual

SIGE INFINITY 350 User manual

SIGE

SIGE INFINITY 350 User manual

SIGE 002PRO User manual

SIGE

SIGE 002PRO User manual

SIGE PRO LINE 999PRO User manual

SIGE

SIGE PRO LINE 999PRO User manual

SIGE 700A BLUM User manual

SIGE

SIGE 700A BLUM User manual

SIGE PRO Series User manual

SIGE

SIGE PRO Series User manual

SIGE ART 004M User manual

SIGE

SIGE ART 004M User manual

SIGE 599 User manual

SIGE

SIGE 599 User manual

SIGE QUADRIFOGLIO 550BL User manual

SIGE

SIGE QUADRIFOGLIO 550BL User manual

SIGE WASTEBIN 300 User manual

SIGE

SIGE WASTEBIN 300 User manual

SIGE ART 700+A User manual

SIGE

SIGE ART 700+A User manual

SIGE Wilson & Bradley PRO LINE ART 002PRO User manual

SIGE

SIGE Wilson & Bradley PRO LINE ART 002PRO User manual

SIGE INFINITY PLUS User manual

SIGE

SIGE INFINITY PLUS User manual

SIGE Nuvola SG371 User manual

SIGE

SIGE Nuvola SG371 User manual

SIGE 594 User manual

SIGE

SIGE 594 User manual

SIGE 006G User manual

SIGE

SIGE 006G User manual

Popular Indoor Furnishing manuals by other brands

Regency LWMS3015 Assembly instructions

Regency

Regency LWMS3015 Assembly instructions

Furniture of America CM7751C Assembly instructions

Furniture of America

Furniture of America CM7751C Assembly instructions

Safavieh Furniture Estella CNS5731 manual

Safavieh Furniture

Safavieh Furniture Estella CNS5731 manual

PLACES OF STYLE Ovalfuss Assembly instruction

PLACES OF STYLE

PLACES OF STYLE Ovalfuss Assembly instruction

Trasman 1138 Bo1 Assembly manual

Trasman

Trasman 1138 Bo1 Assembly manual

Costway JV10856 manual

Costway

Costway JV10856 manual

moss DESIGN Caisson Credenza Assembly instructions

moss DESIGN

moss DESIGN Caisson Credenza Assembly instructions

Aquaglide FULL DECK 15.0 owner's manual

Aquaglide

Aquaglide FULL DECK 15.0 owner's manual

AREBOS AR-HE-SW30 user manual

AREBOS

AREBOS AR-HE-SW30 user manual

Till-Hilft Fulda 87005.330 Assembly instructions

Till-Hilft

Till-Hilft Fulda 87005.330 Assembly instructions

Twoey Outside 2010 quick start guide

Twoey Outside

Twoey Outside 2010 quick start guide

Hettich Easys 200 operating instructions

Hettich

Hettich Easys 200 operating instructions

The bedboss RELAX 404 Series owner's manual

The bedboss

The bedboss RELAX 404 Series owner's manual

Oeseder Möbelindustrie Bern 991 720 Assembly instructions

Oeseder Möbelindustrie

Oeseder Möbelindustrie Bern 991 720 Assembly instructions

Costway HW68469 user manual

Costway

Costway HW68469 user manual

Next ALIX A27743 Assembly instructions

Next

Next ALIX A27743 Assembly instructions

BROSA Hans Assembly guide

BROSA

BROSA Hans Assembly guide

Prodigg MINIKA PBA015T-FUR installation manual

Prodigg

Prodigg MINIKA PBA015T-FUR installation manual

manuals.online logo
manuals.online logoBrands
  • About & Mission
  • Contact us
  • Privacy Policy
  • Terms and Conditions

Copyright 2025 Manuals.Online. All Rights Reserved.