SIGE PRO LINE 999PRO User manual
600 - 800 - 900
Min.210
Min. 500
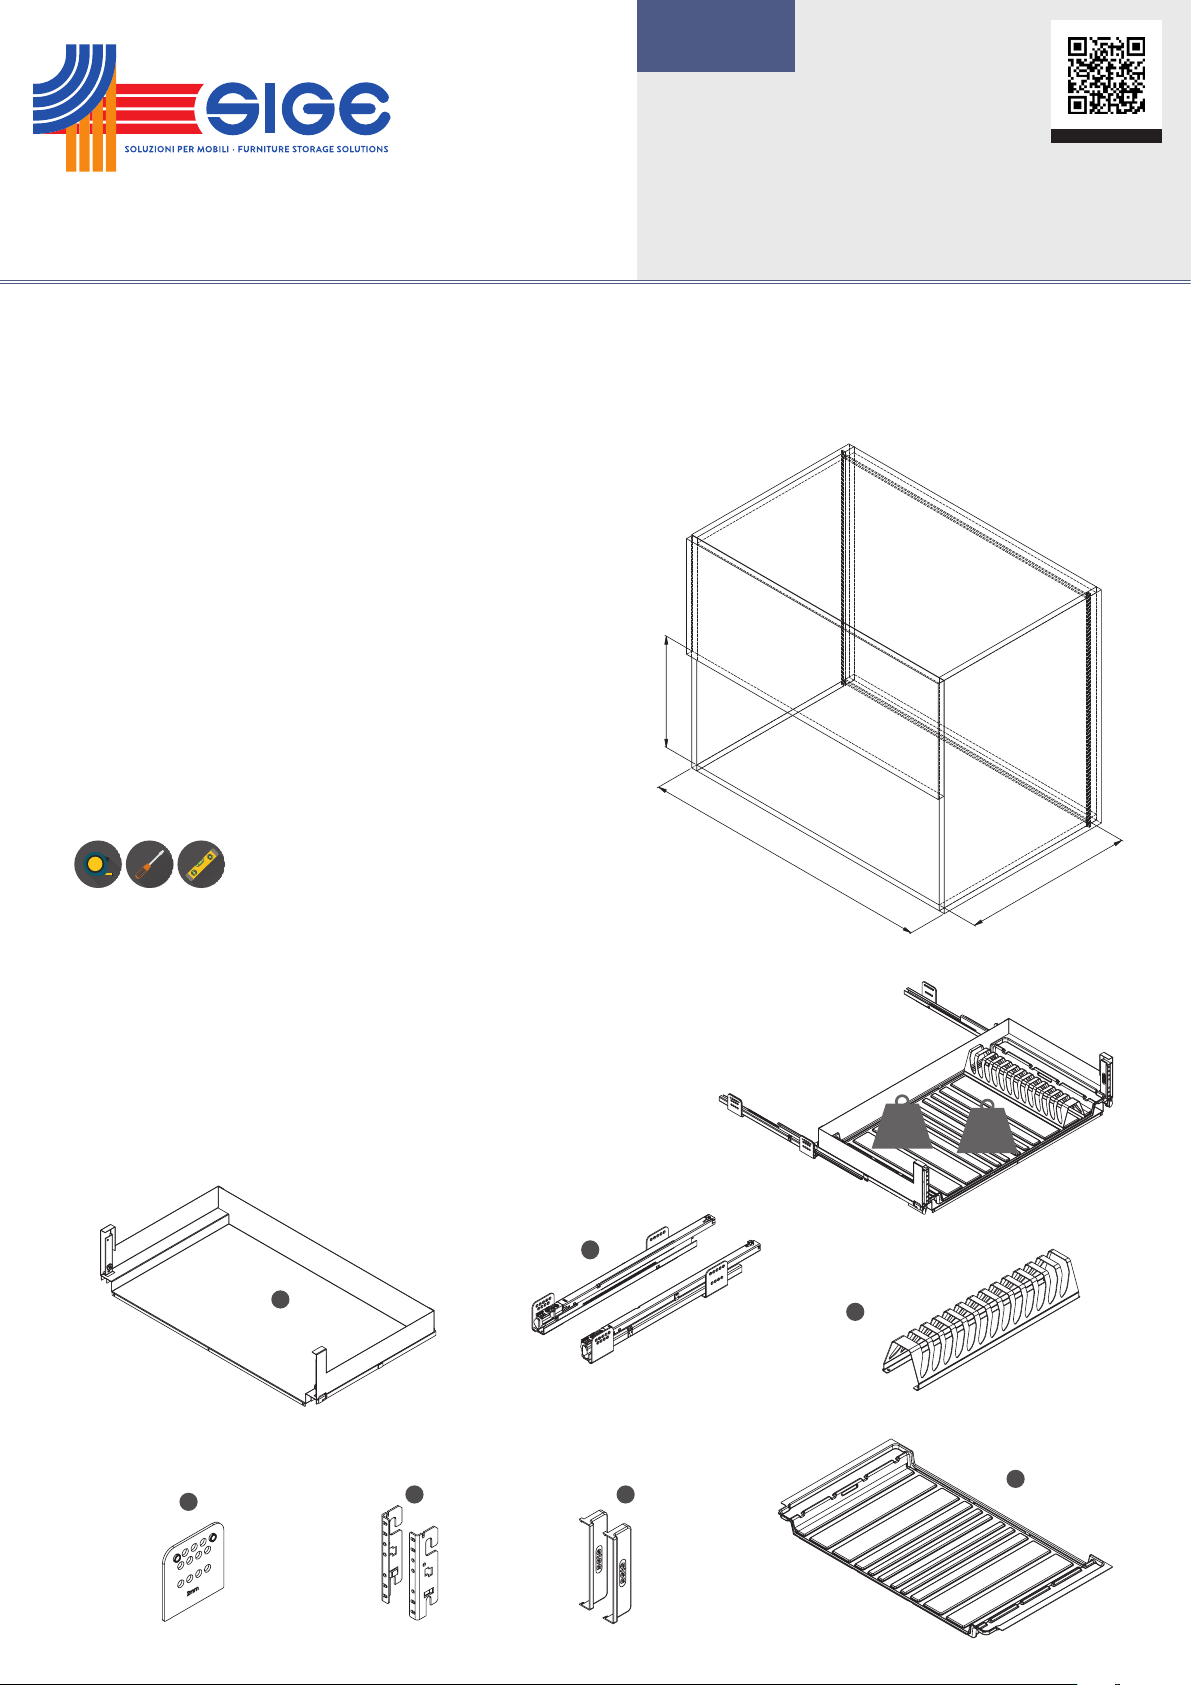
CARATTERISTICHE • FEATURES • CARACTÉRISTIQUES • CARACTERÍSTICAS
Cassetto estraibile in lamiera con guide ad estrazione totale e chiusura ammortizzata, completo di vaschetta e porta piatti.
Pull out metal dawer, full extension slides with soft closing, composed by plastic drainer and dishes holder.
Tiroir coulissant en tôle avec glissières sortie totale et amortisseur, complet de plateau d’égouttage et porte-plats.
Cajón extraíble en chapa con guías de extracción total y amortiguador, completo de bandeja recogegotas y porta platos.
MINUTERIA INTERNA • FITTINGS • FERRURE • FERRETERIA
N°8 3,9x13 Vite autofilettante TC a croce / Self tapping screw TC
Vis autotaraudeuse TC / Tornillo autorroscante TC
N°12 4x16 Vite autofilettante TSP a croce / Self tapping screw TSP
Vis autotaraudeuse TSP / Tornillo autorroscante TSP
COMPONENTI • PARTS • COMPOSANTS • COMPONENTES
A. N°1 Cesto / Basket / Panier / Cesta
B. N°1 Set guide Sige / Sige slides kit / Kit coulisses Sige / Kit guías Sige
C. N°4 Distanziali 2mm / Spacers 2mm / Entretoises 2mm / Distanciadores 2mm
D. N°1 Coppia attacco antina / Door fixing brackets kit
Kit de pattes de fixation pour porte / Kit soportes de fijación a la puerta
E. N°2 Cover attacco antina / Door fixing cover
Cache-vis pour pattes de fixation / Cover decorativas fijación
F.N°1 Vaschetta / Tray / Plateau / Bandeja
G.N°1 Portapiatti o Portaciotole / Dish rack or Bowl rack
Porte-plats ou porte-bols/ Portaplatos o porta tazones
UTENSILERIA • TOOLS • OUTILS • INSTRUMENTOS
MANUTENZIONE • MAINTENANCE • ENTRETIEN • MANTENIMIENTO
Pulire con un panno morbido ed asciutto. Evitare l’uso di solventi e/o abrasivi.
Clean with a soft, dry cloth. Avoid using solvents or abrasive.
Nettoyez avec un chion sec et doux. N’utilisez pas aucun solvant ou produit abrasif.
Limpiar con paño suave y seco. Evitar el uso de solventes y/o abrasivos.
REV 00.2020
F0IST00150
ART 999PRO
GUIDE SIGE - SIGE SLIDES - COULISSES SIGE - GUÍAS SIGE
PRODOTTO ED ASSEMBLATO IN ITALIA / MADE AND ASSEMBLED IN ITALY / FABRIQUÉ ET ASSEMBLÉ EN ITALIE / HECHO Y MONTADO EN ITALIA
SIGE non Sarà rESponSabIlE dI EvEntualI dannI occorSI pEr utIlIzzo dEl prodotto dIfformE da quEllo pEr Il qualE èStato concEpIto. SIGE wIll not bE rESponSIblE for any EvEntual damaGE duE to adIffErEnt uSE from thE onE It haS bEEn madE.
SIGE nE SEra paS rESponSablE pour touS lES dommaGES àcauSE d’un dIfférEnt utIlIzatIon du produIt pour lEquEl Il aété fabrIqué. SIGE no SEra rESponSablE para cualquIEr daño dEbIdo al uSo dIfErEntE dE lo por El cual un producto ha SIdo rEalIzado.
PRO LINE
10
KG 10
KG
B
A
SIGE S.P.A.
60020 POLVERIGI AN ITALY
TEL +39 071 90 90 000 R.A. FAX +39 071 90 90 804
WWW.SIGESPA.IT INFO@SIGESPA.IT
CD E
F
G
PROMOTIONAL VIDEO

65 112
48
Min. 33
425
720
28 28
H min. 210
37
TERZO FORO / THIRD HOLE
18
55
320
18
720
Min. 155
415
H min.210
Per fianchi mobile di 18 o 19mm (1.1), procedere con il montaggio delle guide,
(fase 2). Per fianchi mobile di 16 o 17mm (1.2), pre-installare gli spessori C sulle
guide B, come mostrato, quindi procedere con il montaggio delle guide (fase 2).
For side thichness of 18 or 19mm (1.1), proceed with the slides installation (phase
2). For side thickness of 16 or 17mm (1.2), pre-assemble the spacers C on the
slides B, as shown, then proceed with the slides installation (phase 2).
Pour meubles avec épaisseur 18mm ou 19mm, installer les coulisses (comme
par point n.2) Pour meubles avec épaisseur 16mm ou 17mm, pre-assembler les
épaisseurs C et ensuite installer les coulisses B (comme par point n.2).
Para costado del mueble de 18 o 19 mm (1.1), efectuar el montaje de las guías
(fase 2). Para costado del mueble de 16 o 17 mm (1.2), instalar previamente los
espesores C sobre las guías B, luego efectuar el montaje de las guías (fase 2).
1
600 - 800 - 900
18-19 18-19
600 - 800 - 900
16-17 16-17
1.1 1.2
Posizionare le guide B rispettando le quote ed avvitare con le apposite viti.
Place the slides B respecting the indicated measures and tighten with the
appropriate screws.
Positionner les coulisses B en respectant les mesures indiquées et serrez les vis.
Posicionar las guías B respetando las medidas y atornillar con sus debidos tornillos.
Fissare la coppia attacco antina D nell’anta, rispettando le quote.
Assemble the door fixing brackets kit D to the door, according to the dimentions.
Fixer le kit de pattes de fixation D sur la porte du meuble en respectant les dimensions.
Fijar el kit soportes de fijación de la puerta D en la puerta respetando las medidas.
N°12 4x16
N°4 3,9x13
2
3
65 112
48
Min. 33
425
720
28 28
H min. 210

Estrarre le guide B ed agganciare i cesti A nelle guide.
Pull out the slides B and hang the baskets A on the slides.
Sortir les coulisses B et monter les paniers A dans les coulisses.
Sacar las guías B y colgar los cestos A en las guías.
Pre-montare le viti M6x10 con le rondelle e montare l’antina sul cesto A come mostrato.
Pre-assemble the M6x10 screws and washers than mount the door on the basket A as shown.
Pré-assembler les vis M6x10 et les rondelles, monter selon indications la porte sur le panier A.
Montar previamente los tornillos M6x10 con las arandelas y montar la puerta sobre la cesta
A como se indica.
N°2 M6x10
4
5
N°4 3,9x13
6 7
Allentare le due viti M6x10, regolare l’inclinazione avanti ed in dietro
dell’anta.
Loosen the two 6x10 screws, adjust the door inclination to the front or to
the back.
Desserrer les deux vis &x10, ajuster l’inclinaison de la porte à l’avant ou à
l’arrière.
Aflojar los dos tornillos M6x10, Újuste la inclinación de la puerta hacia
delante o hacia ajustar.
CLICK!
CLICK!
Regolare l’antina su e giu tramite l’eccentrico, quindi serrare le due viti
M6x10.
Adjust the door up and down by turning the eccentric screw, than tighten
the two M6x10 screws.
Ajuster la porte de haut en bas en tournant la vis excentrique, puis serrer
les deux vis M6x10.
Ajustar la puerta hacia arriba y hacia abajo girando el tornillo excéntrico,
apretando los dos tornillos M6x10.

9
10
8Allentare le viti presenti sulla staffa attacco antina D per regolare l’anta a
destra e sinistra. quindi fissare tutto con le viti 3,9x13 come mostrato.
Loosen the screws on the door fixing brackets D to adjust the door on the
right and on the left. then fix everything with the 3,9x13 screws, as shown.
Desserrer les vis des pattes de fixation D pour régler la porte à droite et à
gauche. Ensuite fixerle tout avec les vis 3,9x13 comme illustré.
Aflojar los tornillos de los soportes de fijación de la puerta D para ajustar
la puerta a derecha e izquierda. luego arreglar todo con los tornillos 3,9x13
como se muestra.
Fissare la parte inferiore del cesto all’antina.
Fix the bottom of the basket to the door.
Fixer le bas du panier à la porte.
Fijar el fondo de la cesta a la puerta.
N°2 3,9x13
N°1 3,9x13
11
12
LA SIGE SPA SI RISERVA IL DIRITTO DI APPORTARE VARIAZIONI SENZA PREAVVISO SIGE SPA HAS THE RIGHT TO MAKE CHANGES ON IT WITHOUT NOTICE
SIGE SPA A LE DROIT D’APPORTER DES VARIATIONS SANS PRÉAVIS SIGE SPA SE RESERVA EL DERECHO DE REALIZAR CAMBIOS SIN PREVIO AVISO.
OPTIONAL
097P
097C
CLICK!
Other SIGE Indoor Furnishing manuals

SIGE
SIGE Nuvola SG371 User manual

SIGE
SIGE PRO 295PRO User manual

SIGE
SIGE wilson & bradley KAOS ART K100 User manual

SIGE
SIGE ART 004M User manual

SIGE
SIGE K100 User manual

SIGE
SIGE PRO Series User manual

SIGE
SIGE 295 elle User manual

SIGE
SIGE ART 564 Instruction Manual

SIGE
SIGE 561 User manual

SIGE
SIGE INFINITY 350 User manual


Popular Indoor Furnishing manuals by other brands


I-Semble
I-Semble 50479 installation instructions

Mecalux
Mecalux LONGSPAN M7 Assembly instructions

UBERHAUS DESIGN
UBERHAUS DESIGN 77735041 Assembly instructions

Sunset Trading
Sunset Trading DLU-BR-TP-3636-T Assembly instructions

STRASSER WOODENWORKS
STRASSER WOODENWORKS Simplicity Installation and setup

ICF
ICF UNA CHAIR introduction