SIHOO DORO-C300L-A3 User manual
PRODUCT
INSTALLATION
GUIDE
www.sihoooce.com
70*70*107(128)CM
Model:DORO-C300L-A3
Hello Friend,
Thank you for choosing SIHOO office chair.
If you need an installation video, you can go to our official website
sihoooffice.com.
The chair comes with product warranty service. If there is any problem
with the chair, please contact our after-sales service department on
SIHOO store immediately, and believe that they will provide you with a
satisfactory solution. If the chair meets your needs, welcome to share
your feelings.
Please feel free to contact us via the following email:
Thank you for being one of our customers. We love our customers, if you
need us, we will always be here.
SIHOO
CAUTION !
Work on gas springs only by
trained specialist personnel.
ACHTUNG !
Arbeiten an Gasfedern nur durch
eingewiesenes Fachpersonal.
Séparez les éléments avant de trier
BARQUETTE
ÉTUI
FILM
CONTENTS
1.User Manual..........................................
2.Benutzerhandbuch...............................
3.Manuel utilisateur..................................
5.Manual de usuario................................
4.Manuale utente......................................
6.組立説明書..............................................
7. ..............................................
P01-P02
P03-P04
P05-P06
P07-P08
P09-P10
P11-P12
P13-P14دﻟﯿﻞاﻻﺳﺘﺨﺪام

Model:DORO-C300L-A3
この度は、弊社製品をお買求めいただきまして誠に
あ り が と う ご ざ い ま し た 。
弊社の椅子は三年間品質保証を提供いたします。
本取扱説明書は保証書として扱い、大切に保管してくだ
さい。正しく安全にお使い頂く為、ご使用前に「組立説明
書」を必ずお読みください。お使い中に何か問題があれ
ば、弊社のカスタマーサポートにお問い合わせください
。ご満足頂けるように問題を解決いたします。
不都合な点やご不明な点がございましたら、お気
軽にご相談ください。24時間内に返事いたします。
(メールサポート)service@sihoooffice.com
ご注意:早速に対応いたす為、カスタマーサポートにご
連絡下さる時に、注文番号とご質問をご提供頂くようお
願いいたします。
SIHOO
Pls read the Safety
Instructions below
carefully.
User Manual
1.One chair can only bear one person's weight;
2.Please use on the flat floor;
3.Not allowing the child under 5 years old to sit on the chair alone;
4.Please don't sit on the armrest, in case cause some danger;
5.Do not stand on the chair or use it as a ladder or footsteps;
6.Please don’t put overweight on the chair, or used as trolley;
7.Don’t use sharp or hooked objects to scrape the chair and do not get it close to the fire;
8.For your safety, no disassembly to the gaslift is allowed.
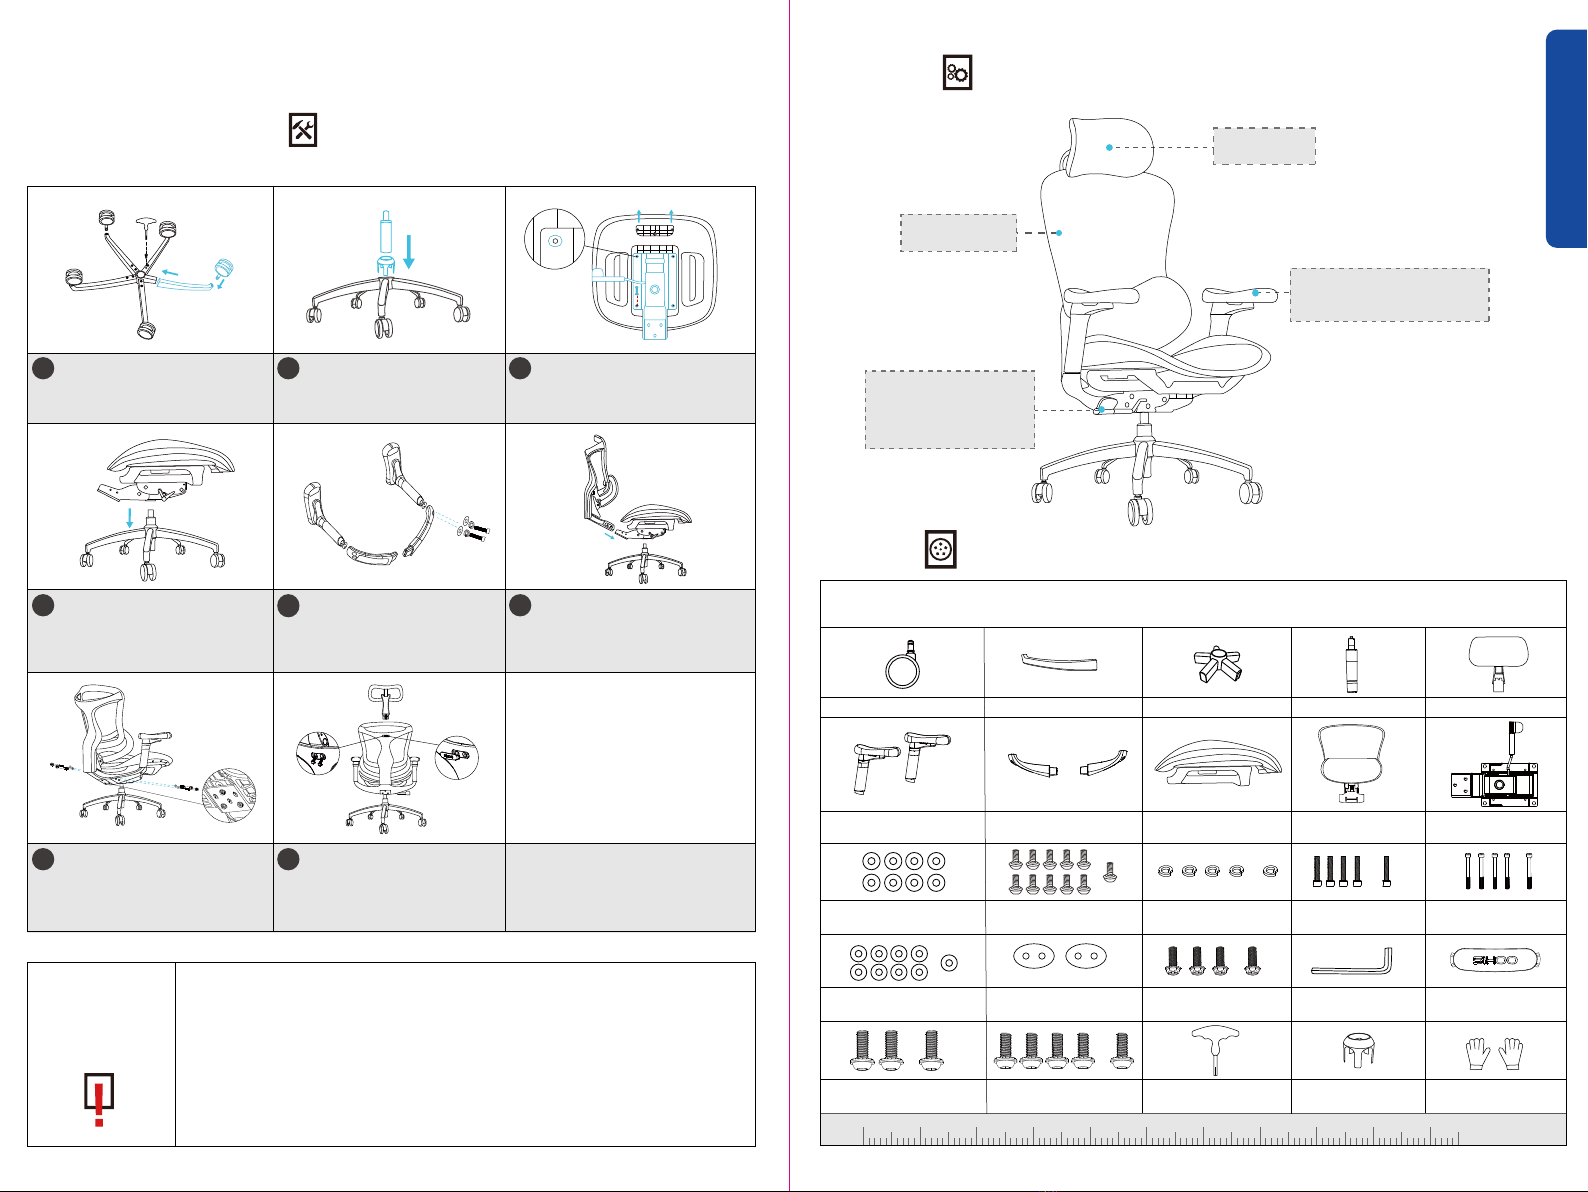
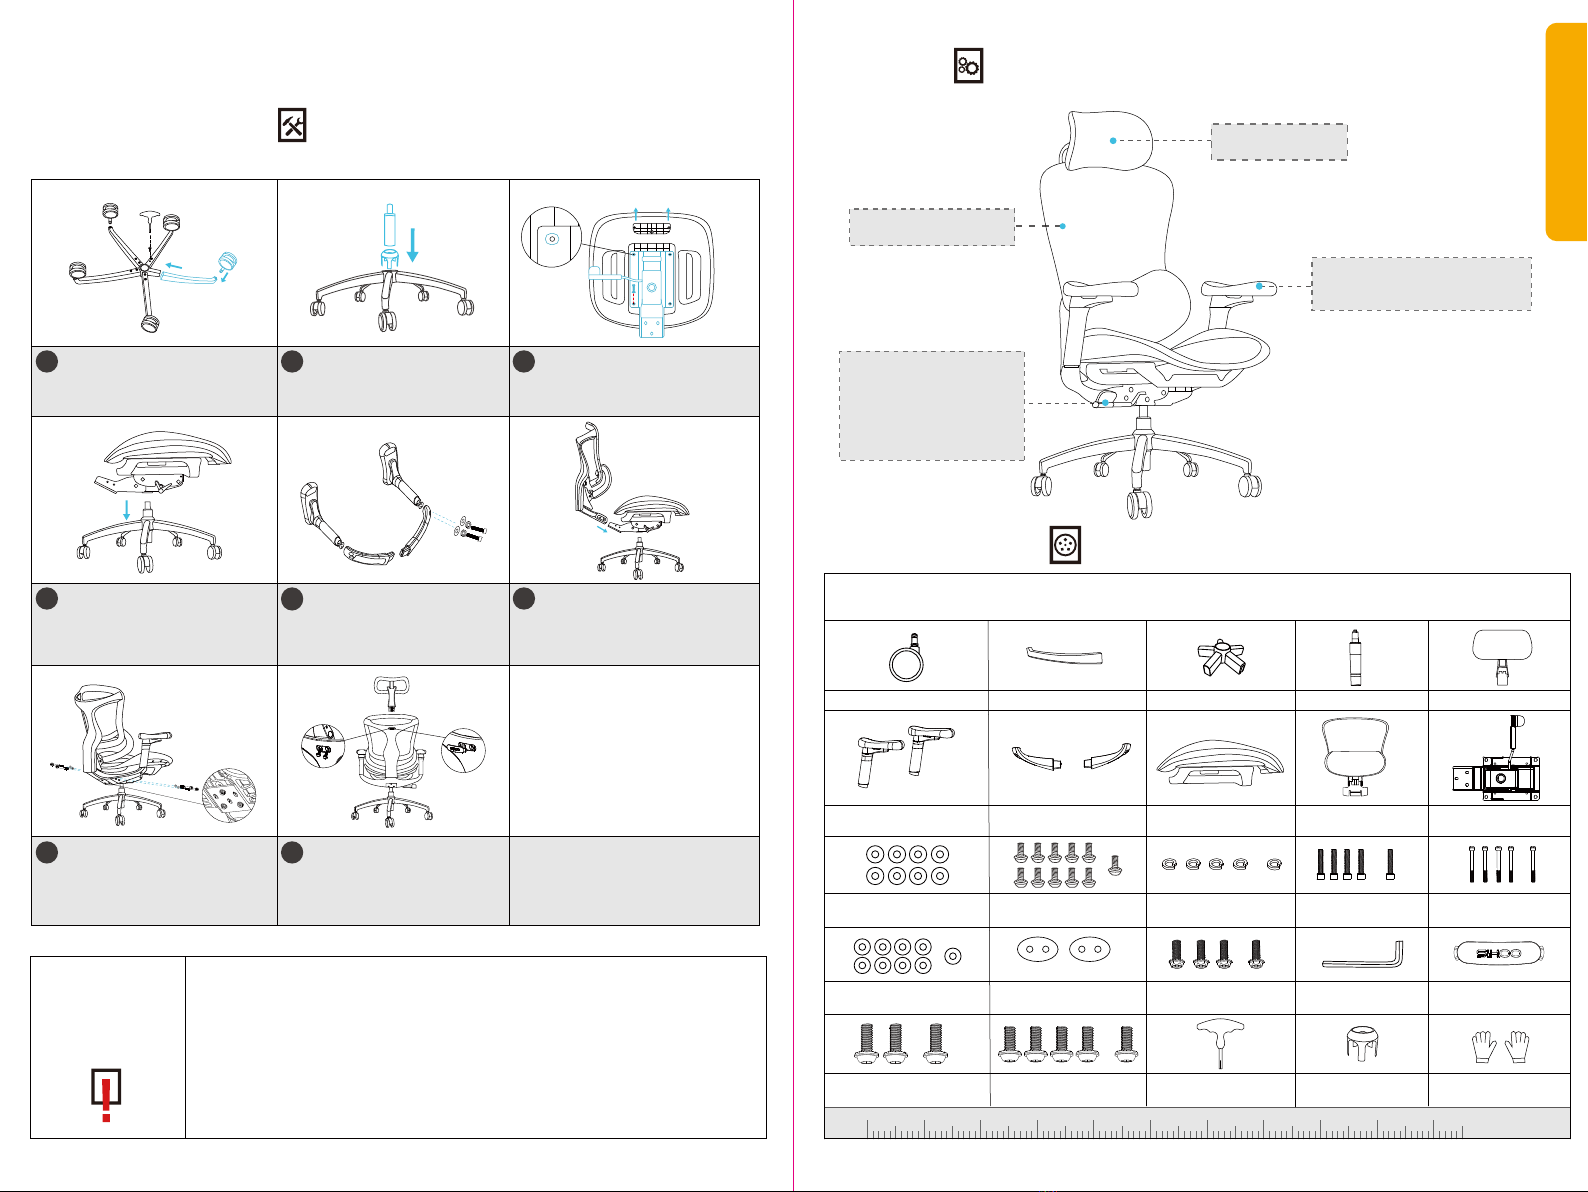
Assemble Introduction (The size will be according to regular measurements )
Functions (The size will be according to regular practice)
Parts list(The size will be according to regular measurements; One more as a backup )
Notice: Before installation, pls classify the screw, measure the screw lengh for easy assemble
Seat cushion*chassis
assembly: 1 pc
Chair leg tubes: 5pcs Base: 1pc
1 T-wrench Decorative cover
Chair leg screws
(M6*12):10+1 pcs
Wheels: 5 pcs Headrest: 1pc
Armrest bracket screws
(M8*78): 4+1pcs
Big shim:7+1pcs M6 spring spacer:
4+1 pcs
1 MechanismArmrests: 1 pair Seat back: 1 pc
Pneumatic bar: 1pc
Armrest screws
(M6*30): 4+1pcs
Armrest brackets: 1 pair
012345678910cm
Headrest screws:
M6*16 (2+1pcs)
Mechanism screws:
M6*14(4+1pcs)
Seat back fixing screws
(M8*20): 3+1 pcs
Armrest tube
spacers: 2 pcs
Seat back trim
cover: 1pc
Small shim:8+1pcs Hexagonal
spanner: 1pc
1Attaching the five chair leg tubes to the
base with ten chair leg screws before
inserting the wheels(Tap the screw
with a T-wrench and then tighten it);
Connect the mechanism and the cushion
with 4 mechanism screws(M6*14) with
small shims, be reminded to distinguish
the fronnt and rear of the merchansim
before tightening the screws.
Insert the headrest into the
back of the chair and attach it
with 2 M6*16 screws;
Put the back trim cover on and
the chair is complete.
The armrests are first attached to the
back linkage with four M8*78 screws
and four big shims, then the seat
back and chassis tail plate are
attached with three M8*20 screws and
three big shims;
2
46
7
3
5
8
Place the cushion, chassis and
footrest assembly in line with the
chassis holes and apply the air
pressure bar;
Insert the seat back into the
chassis tailpiece of the cushion,
chassis and footrest assembly
Attaching the handrail to the
handrail bracket with four
M6*30 screws, spring spacers
and small shims and handrail
tube spacers;
Place the gaslift and decorative
cover in the middle hole of the
feet of the chair;
General Accessories
01 02
User Manual
扶手可上下左右
调节
Raise up the handle to adjust
the up and down of the chair.
Pull out the handle to adjust
the three angles of recline,
push in to lock the recline angle
Backrest can be adjusted
up or down in 4 positions
Adjustable headrest
with lift and swivel
Armrests adjustable upwards,
inward/outward rotation of armrest angle,
forward/backward adjustment
A pair of gloves
Attach the
seat back
with 2 x M6*
16 screws
Put the seat
back trim
cover on
The front
Stuhlbeinschrauben
(M6*12) 10+1 St.
Schrauben der Armlehnen
halterung (M8*78): 4+1Stk
Große scheibe: 7+1 stück Federdistanzstück
M6: 4+1 St.
1 x Chassis
Schrauben der Armlehne
(M6*30): 4+1Stk
012345678910cm
Befestigungsschrauben der
Sitzlehne (M8*20): 3+1 St.
Abstandhalter für
Armlehnenrohr: 2 Stück
Abdeckung der Sitzleh
nenverkleidung: 1Stück
Kleine Scheibe: 8+1 stück Sechskant-
Schlüssel: 1Stück
1Befestigen Sie die fünf Stuhlbeinrohre mit
zehn Stuhlbeinschrauben an der Basis,
bevor Sie die Räder einsetzen;
Verbinden Sie das Sitzkissen mit 4 x M6*14
Mechanik-Schrauben und Kleine Scheibe
mit dem Chassis. Beachten Sie die vordere
und hintere Ausrichtung des Sitzes und die
Position des Loches des Schlosses.
Setzen Sie die Kopfstütze in die
Rückenlehne des Stuhls ein und
befestigen Sie sie mit 2 M6*16
Schrauben;
Bringen Sie die Rückenverkleidung
an und der Stuhl ist fertig.
Die Armlehnen werden zunächst mit vier
M8*78-Schrauben und vier Große scheibe
am Rückengestänge befestigt, dann werden
die Rückenlehne und die Chassis-Heckplatte
mit drei M8*20-Schrau_x005f_x0002_ben
und drei Große scheibe befestigt;
2
4 6
7
3
5
8
Platzieren Sie das Kissen, das
Chassis und die Fußstütze in einer
Linie mit den Chassislöchern und
bringen Sie den Luftdruckbalken an;
Einsetzen der Rückenlehne in
das Chassis-Endstück der
Kissen-, Chassis- und
Fußstützen-Baugruppe;
Befestigung des Handlaufs an der
Handlaufhalterung mit vier M6*30-
Schrauben, Federabstandshaltern
und Kleine Scheibe sowie
Handlaufrohr-Abstandshaltern;
Setzen Sie den Gaslift und die
dekorative Abdeckung in das
mittlere Loch der Stuhlfüße;
General Accessories
03 04
扶手可上下左右
调节
Ziehen Sie den Griff nach oben,
um die Höhe des Stuhls einzustellen.
Ziehen Sie den Griff heraus, um den
Stuhl rückwärts zu neigen. Drücken
Sie den Griff zurück, um den Winkel
zu verriegeln. Der Neigungswinkel
hat 3 Stufen zur Auswahl.
Benutzerhandbuch
Installationsanleitung (Die Größe entspricht den regulären Maßen )
Funktionen
(Die Größe basiert auf regelmäßigen Tests)
Liste der Einzelteile
(Die Größe basiert auf regelmäßigen Tests )
Benutzerhandbuch
Bitte lesen Sie die
folgenden
Sicherheitshinweise
sorgfältig durch.
1.Ein Stuhl kann nur das Gewicht einer Person tragent;
2.Bitte verwenden Sie es auf einem flachen Boden;
3.Bitte lassen Sie das Kind nicht allein auf dem Stuhl sitzen, wenn es unter 5 Jahren ist;
4.Bitte setzen Sie sich nicht auf die Armlehne, falls Gefahr besteht;
5.Stellen Sie sich nicht auf den Stuhl und benutzen Sie ihn nicht als Leiter oder Fußtritt;
6.Bitte legen Sie kein Übergewicht auf den Stuhl oder verwenden Sie ihn als Trolley;
7.Verwenden Sie keine scharfen oder hakenförmigen Gegenstände, um den Stuhl zu
zerkratzen. Gehen Sie nicht in die Nähe des Feuers;
8.Führen Sie die Finger beim Sitzen nicht in den Mechanismus ein, um Ihre Finger
nicht zu verletzen.
Befestigen Sie
die Rückenlehne
mit 2 x M6*16
Schrauben
Setzen Sie die
Rückenlehnen-
verkleidung auf
Armlehnen nach oben verstellbar,
Drehung des Armlehnenwinkels nach
innen/außen, Vorwärts-/Rückwärtsverstellung
Rückenlehne kann in 4 Positionen
nach oben oder unten verstellt werden
Verstellbare Kopfstütze
mit Hebe- und Drehfunktion
Stuhlbeinrohre: 5 Stück Sockel: 1Stück
Einen t-schraubenschlüssel Dekorative Abdeckung
Räder: 5 Stück Kopfstütze: 1 Stk.
Pneumatische Stange: 1Stück
Sitzkissen*Fahrgestell-
Baugruppe: 1 Stück
Armlehnen: 1 Paar Sitzlehne: 1 Stück
Armlehnen-Halter
ungen: 1 Paar
Hinweis: Klassifizieren Sie die Schraube vor dem Einbau anhand der Schraubenlänge, um die Montage zu erleichtern.
Vorderseite
Kopfstützenschrauben:
M6*16(2+1St.)
Schrauben des Mechanismus:
M6*14(4+1St.)Ein Paar Handschuhe

Vis du pied de la chaise
(M6*12) 10+1pc
Grande cale: 7+1pcs
1 châssis
012345678910cm
Petite cale: 8+1pcs
1Fixer les cinq tubes des pieds de la
chaise à la base avec dix vis pour
pieds de chaise avant d'insérer les
roues;
Utilisez 4 vis de châssis M6*14 et de
petites rondelles pour connecter le
coussin de siège et le châssis, veuillez
distinguer l'avant et l'arrière et verrouiller
le trou à l'arrière.
Insérez l'appui-tête dans le dossier
du fauteuil et fixez-le avec 2 vis
M6*16;Mettez le cache du dossier
et le fauteuil est complet.
Mettez le cache du dossier
et le fauteuil est complet.
2
46
7
3
5
8
Insertion du dossier du siège
dans la queue de châssis de
l'ensemble coussin, châssis
et repose-pieds ;
Placez le vérin à gaz et le
couvercle décoratif dans le trou
central des pieds du fauteuil;
Accessoires généraux
05 06
Manuel utilisateur
扶手可上下左右
调节
Relevez la poignée peut régler
le siège en haut ou en bas ;
tirez la poignée peut incliner
le dossier ; poussez la poignée
peut verrouiller l'inclinaison ;
trois niveaux de l'angle
d'inclinaison sont disponibles.
Fixez le
dossier du
siège avec 2
vis M6*16
Mettez le co-
uvercle de la
garniture du
dossier du siège.
Veuillez lire
attentivement les
consignes de
sécurité ci-dessous.
1.Une chaise ne peut supporter le poids d’une seule personne;
2.S'il vous plaît utiliser sur le plancher plat;
3.Veuillez ne pas laisser l’enfant seul sur la chaise s’il a moins de 5 ans;
4.Veuillez ne pas vous asseoir sur l’accoudoir, au cas où cela présenterait un danger;
5.Ne vous tenez pas sur la chaise et ne l'utilisez pas comme échelle ou comme
marchepied;
6.Veuillez ne pas mettre de poids excessif sur la chaise ou être utilisé comme chariot;
7.N’utilisez pas d’objets tranchants ou crochus pour gratter le fauteuil et ne
l’approchez pas près du feu;
8.Pour éviter tout dommage aux doigts, ne les insérez pas dans le mécanisme
en position assise.
Manuel utilisateur
Instructions d'installation (La taille sera selon des mesures régulières)
Fonctions
(la taille sera selon la pratique régulière)
Liste de pièces
(la taille sera conforme aux mesures habituelles; une de plus à titre de sauvegarde )
Les accoudoirs sont d'abord fixés à la
tringlerie arrière à l'aide de quatre vis
M8*78 et de quatre grandes rondelles,
puis le dossier du siège et la plaque
arrière du châssis sont fixés à l'aide de
trois vis M8*20 et de trois grandes
rondelles.
Placer l'ensemble coussin,
châssis et repose-pieds en ligne
avec les trous du châssis et
appliquer la barre de pression
d'air;
Fixer la main courante au support de
main à l'aide de quatre vis M6*30,
de rondelles à ressort, de petites
rondelles et des rondelles de tube
de main courante.
Accoudoirs réglables vers le haut, rotation
vers l'intérieur/extérieur de l'angle de l'accoudoir,
réglage vers l'avant/vers l'arrière.
Dossier réglable en 4
positions (haut et bas)
Appui-tête réglable avec
levage et pivotement
Vis du support d'accoudoir
(M8*78) : 4+1pcs
Entretoise de ressort
M6 : 4+1 pcs
Entretoises de tube
d'accoudoir : 2 pcs
Tubes pour pieds de
chaise : 5 pièces Base : 1 pièce
1 clé en T Couverture décorative
Roues : 5 pièces Appui-tête : 1 pc
Barre pneumatique : 1pc
Vis d'accoudoir
(M6*30) : 4+1pcs
Ensemble coussin de
siège*chassis : 1 pièce
Accoudoirs : 1 paire Dossier du siège : 1 pc
Supports
d'accoudoirs : 1 paire
Clé hexagonale : 1pc Couvercle de la garniture
du dossier du siège : 1pc
Vis de fixation du dossier
du siège (M8*20) : 3+1 pcs
Remarque: Avant l'installation, veuillez distinguer les vis par leur longueur pour faciliter l'assemblage.
Le front
Vis du mécanisme:
M6*14(4+1pcs)
Vis d'appui-tête:
M6*16 (2+1pcs) Une paire de gants

1 base
012345678910cm
Piccolo spessore: 8+1 pz
1Collegare il cuscino del sedile e la base
con 4 viti M6*14 e guarnizioni piccole,
attenzione a distinguere la parte
anteriore e la parte posteriore per
bloccare i fori posteriori.
2
46
7
3
5
8
07 08
扶手可上下左右
调节
Solleva il manico per regolare la
sedia in alto e verso il basso
Tira per potere far reclinare;
spingi per bloccare la reclinazione
L'angolo di reclinazione fornisce
tre marcie tra cui scegliere
Si prega di leggere
attentamente le
istruzioni di
sicurezza qui sotto.
1.Una sedia può sopportare solo il peso di una persona;
2.Si prega di utilizzare sul pavimento piatto;
3.Si prega di non lasciare che il bambino si sieda sulla sedia da solo se ha meno di 5 anni;
4.Si prega di non sedersi sul bracciolo, nel caso in cui causare qualche pericolo;
5.Non stare in piedi sulla sedia o usarlo come scala o passi;
6.Si prega di non mettere il sovrappeso sulla sedia, o usato come carrello;
7.Non usare oggetti appuntiti o agganciati per raschiare la sedia e non avvicinarla al fuoco;
8.Per evitare di danneggiare le dita, non inserirle nel meccanismo quando si è seduti.
Manuale utente
Assemblare Introduzione
(la dimensione sarà secondo le misure regolari )
Funzioni
(la dimensione sarà secondo la pratica regolare)
Elenco delle parti
(la dimensione sarà secondo le misure regolari, un'altra come backup)
Fissare i cinque tubi delle gambe della
sedia alla base con dieci viti delle
gambe della sedia prima di inserire le
ruote;
Fissare lo
schienale
con 2 viti
M6*16
Applicare il
rivestimento
del sedile
posteriore
Inserire il poggiatesta nello
schienale della sedia e fissarlo
con 2 viti M6*16;
Applicare il rivestimento dello
schienale e la sedia è completa.
I braccioli vengono prima fissati al leveraggio
posteriore con quattro viti M8*78 e quattro
guarnizioni grandi, quindi lo schienale e la
piastra di coda del telaio vengono fissati
con tre viti M8*20 e tre guarnizioni grandi;
Posizionare il gruppo cuscino,
telaio e poggiapiedi in linea con
i fori del telaio e applicare la barra
di pressione dell'aria;
Fissare il corrimano alla staffa del
corrimano con quattro viti M6*30,
guarnizioni a molla e guarnizioni
piccole e guarnizioni del tubo del
corrimano;
Inserimento dello schienale del
sedile nella coda del telaio del
gruppo cuscino, telaio e
poggiapiedi;
Posizionare l'elevatore a gas e
la copertura decorativa nel foro
centrale dei piedi della sedia;
Braccioli regolabili verso l'alto, rotazione
dell'angolo del bracciolo verso l'interno/esterno,
regolazione in avanti/indietro
Schienale regolabile in 4
posizioni verso l'alto o
verso il basso
Poggiatesta regolabile con
sollevamento e rotazione
Gruppo
cuscino*telaio: 1 pezzo
Tubi delle gambe della
sedia: 5 pezzi Base: 1pc
Una sola T chiave Coperchio decorativo
Viti per gambe di sedie
(M6*12) 10+1pz
Ruote: 5 pezzi Poggiatesta: 1 pz
Viti staffa bracciolo
(M8*78): 4+1pz.
Grande spessore: 7+1pz
Chiave esagonale: 1 pz
Distanziale a molla
M6: 4+1 pz
Distanziali per tubo
bracciolo: 2 pz
Braccioli: 1 paio Schienale: 1 pezzo
Barra pneumatica: 1pc
Viti bracciolo
(M6*30): 4+1 pz
Staffe per
braccioli: 1 coppia
Rivestimento del sedile
posteriore: 1 pezzo
Viti di fissaggio dello
schienale (M8*20): 3+1 pz
Accessori generali
Nota: prima dell'installazione, distinguere le viti in base alla lunghezza per facilitare il montaggio.
Manuale utente
La parte anteriore
Viti del meccanismo:
M6*14(4+1pz)
Viti poggiatesta:
M6*16 (2+1pz) Un paio di guanti

1 chasis
012345678910cm
8+1 juntas pequeñas
1Utilice cuatro tornillos de chasis M6*14 y
espaciadores pequeños para conectar el
asiento y el chasis. Tenga cuidado de
separar las secciones delantera y trasera
y bloquee el agujero trasero.
2
4 6
7
3
5
8
09 10
扶手可上下左右
调节
Levante el asa para subir
y bajar la silla. El usuario
puede acostarse tirando
hacia afuera del asa.
Hay tres opciones de
ángulo de inclinación.
Sección delantera
Por favor lea las
instrucciones de
seguridad a continuación
cuidadosamente.
1.Una silla solo puede soportar el peso de una persona;
2.Por favor, use en el piso plano;
3.No deje que el niño se siente solo en la silla si tiene menos de 5 años;
4.Por favor, no se siente en el reposabrazos, en caso de causar algún peligro;
5.No se pare en la silla ni la use como escalera o pasos;
6.Please don’t put overweight on the chair, or used as trolley;
7.Por favor, no coloque sobrepeso en la silla, o que se use como carro;
8.Para evitar cualquier daño a sus dedos, no los inserte en el mecanismo mientras
está sentado.
Reposabrazos ajustables hacia arriba,
rotación del ángulo de los reposabrazos
hacia adentro/hacia afuera, ajuste hacia
adelante/hacia atrás
Respaldo ajustable hacia
arriba o hacia abajo
en 4 posiciones
Reposacabezas ajustable
con elevación y giro
Funciones
(El tamaño será de acuerdo a la práctica regular)
Lista de piezas
(el tamaño será de acuerdo con las mediciones regulares; una más como respaldo )
Manual de usuario
Ensamblar Introducción (El tamaño será de acuerdo a las medidas regulares )
Fijación de los cinco tubos de las patas
de la silla a la base con diez tornillos
para patas de silla antes de insertar las
ruedas;
Fije el respaldo
del asiento con
2 tornillos M6*16
Coloca la cubierta
del embellecedor
del respaldo
del asiento
Introduzca el reposacabezas en
el respaldo de la silla y fíjelo con
2 tornillos M6*16;Coloca la cubierta
del embellecedor del respaldo y la
silla estará completa.
Los reposabrazos se fijan primero al enganche
del respaldo con cuatro tornillos M8*78 y
cuatro espaciadores grandes, luego se fijan
el respaldo del asiento y la placa de cada
del chasis con tres tornillos M8*20 y
tres espaciadores grandes;
Coloque el conjunto de cojín,
chasis y reposapiés en línea con
los orificios del chasis y aplique la
barra de presión de aire;
Fijar el pasamanos al soporte del
pasamanos con cuatro tornillos M6*30,
espaciadores de resorte y espaciadores
pequeños y espaciadores del tubo
del pasamanos;
Inserción del respaldo en la
pieza de cola del chasis del
conjunto de cojín, chasis y
reposapiés;
Coloque el elevador de gas y la
cubierta decorativa en el orificio
central de los pies de la silla;
Cojín del asiento*montaje
del chasis: 1 pieza
Tubos de las patas de la
silla: 5 piezas Base: 1pc
1 llave T
Tornillos de la pata de la silla
(M6*12) 10+1 uds
Ruedas: 5 piezas Reposacabezas: 1 ud
Tornillos del soporte del
reposabrazos (M8*78): 4+1uds
7+1 espaciadores grandes
Llave hexagonal: 1ud
Distanciador de muelle
M6: 4+1 uds
Separadores del tubo del
reposabrazos: 2 uds
Apoyabrazos: 1 par Respaldo del
asiento: 1 pieza
Barra neumática: 1ud
Tornillos del reposabrazos
(M6*30): 4+1uds
Soportes de
reposabrazos: 1 par
Cubierta del respaldo del
asiento: 1 pieza
Tornillos de fijación del respaldo
del asiento (M8*20): 3+1 uds
Accesorios generales
Nota: Antes de la instalación, distinga los tornillos por su longitud para facilitar el montaje.
Manual de usuario
Tornillos del mecanismo:
M6*14(4+1pcs)
Tornillos del reposacabezas:
M6*16(2+1pcs) Cubierta decorativa Un par de guantes

底板*1
012345678910cm
小さなスペーサー:8+1個
12
46
7
3
5
8
11 12
扶手可上下左右
调节
フロ ント
本品をご使用になる前、
「注意事項」をよくお
読みいただき、正しく
お使いください。
1.本製品は1人掛け用として設計されており、1人しか使用できませんのでご注意ください。
2人以上で使用すると、製品の安定性が損なわれ、危険があります。
2.製品機能の使用方法については、製品機能一覧の指示による操作してください。
3.ネジや部品がすべて固定されている場合のみ使用し、少なくとも3ヶ月に一度は締めたネ
ジや部品の点検を行ってください。
4.ご使用の際、平らな場所に置き、湿気がある場所や煙が多い場所で使用しないでください。
長時間に直射日光を避けてください。
5.5歳未満の子供に単独で本製品を使用させないでください。
6.本製品は乗用で使い、椅子の上に乗ったり、肘掛けに座ったりすると破損しやすく危険です
ので、ご注意ください。
7.組み立て完成した後、家具の表面についたほこりや汚れを柔らかい布で拭き、砂礫がある布
で拭かないでください。
8.安全のため、ガスシリンダーの分解をしないでください。
組立説明書
組立手順
(一般的なサイズに準拠する)
機能一覧 (実際のサイズに準拠する)
組立部品 (実際のサイズに準じる。各種のネジとスペーサーがそれぞれ予備品を用意されています)
肘掛けが上下昇降/前後調節/
奥と外が調節可能
レバーを上に引き上げて椅子の
昇降を調整でき、レバーを引き
出すとリクライニングができま
す。レバーを押し込んでロック
させます。リクライニングの
角度は三段階を調整できます。
背もたれが4段
階昇降可能
ヘッドレストの高さが昇
降可能、角度調整可能
10個の椅子脚用ネジで5個の椅子脚チ
ューブとベースを接 続してくだ さい 。そし
て 、キ ャ ス タ ー を 挿 入 し て く だ さ い 。( T レ
ンチでネジをたたいてから締める)
4個のM6*14底板用ネジと小さなスペーサー
で ク ッ シ ョ ン と 底 板 を 接 続 し 、後 ろ に
ある穴に押し込んでください。前と後ろ
の順 番を間 違えないでください。
2個M6*16
ネジで背も
たれを固
定します
背 裏 キャッ
プを背もた
れにはめ
込みます
ヘッドレストを背もたれの上部に
挿入して、2個M6*16ネジで固定し
てください,背裏キャップを背も
たれの背部にはめ込んで、椅子
の組立は完了します。
4個M8*78ネジと4個大きなスペーサーを
使用して肘掛けと背もたれを接続して
ください。そして、3個M8*20と3個大きな
スペーサーを使用して背もたれと底板
を接続してください。
座部裏側の中心穴に、脚部のガスシ
リンダーの先端を差し込みます。
4個M6*30ネジ、M6スペーサー、
小さなスペーサーと肘掛け接続用
スペーサーを使用し、肘掛けと肘
掛けスタンドを接続してください。
背もたれを座部のブラケットに
押し込んでください。
ガ スシリンダ ーと飾りカ バ ーを
椅子脚の真ん中の穴に差し込
んでください。
椅子脚チューブ:5個 ベ ー ス:1 個
Tレンチ1個
椅子脚用ネジ:
(M6*12)10+1本
キ ャ ス タ ー:5 個 ヘ ッ ド レ ス ト:1 個
肘掛けスタンド用ネジ
(M8*78):4+1個
大きなスペーサー:7+1個
六角スパナ:1個
M6スペーサー:4+1個
肘掛け接続用スペ
ー サ ー:2 個
肘掛け:1ペア 背 も た れ:1 個座部:1個
ガ ス シ リン ダ ー:1 個
肘掛け用ネジ
(M6*30):4+1個
肘掛けスタンド:1ペア
背 裏 キ ャッ プ:1 個
背もたれ用ネジ
(M8*20):3+1個
通用部品
ご注意:椅子を組み立てる前に、ネジの分類を完成してからネジの長さを測ってください。
組立説明書
底板用ネジ:
M6*14(4+1個)
ヘ ッド レ スト 用 ネ ジ:
M6*16(2+1個) 飾りカ バ ー 手 袋:1 ペ ア
2×
M6*16
012345678910cm
12
46
7
3
5
8
13 14
扶手可上下左右
调节
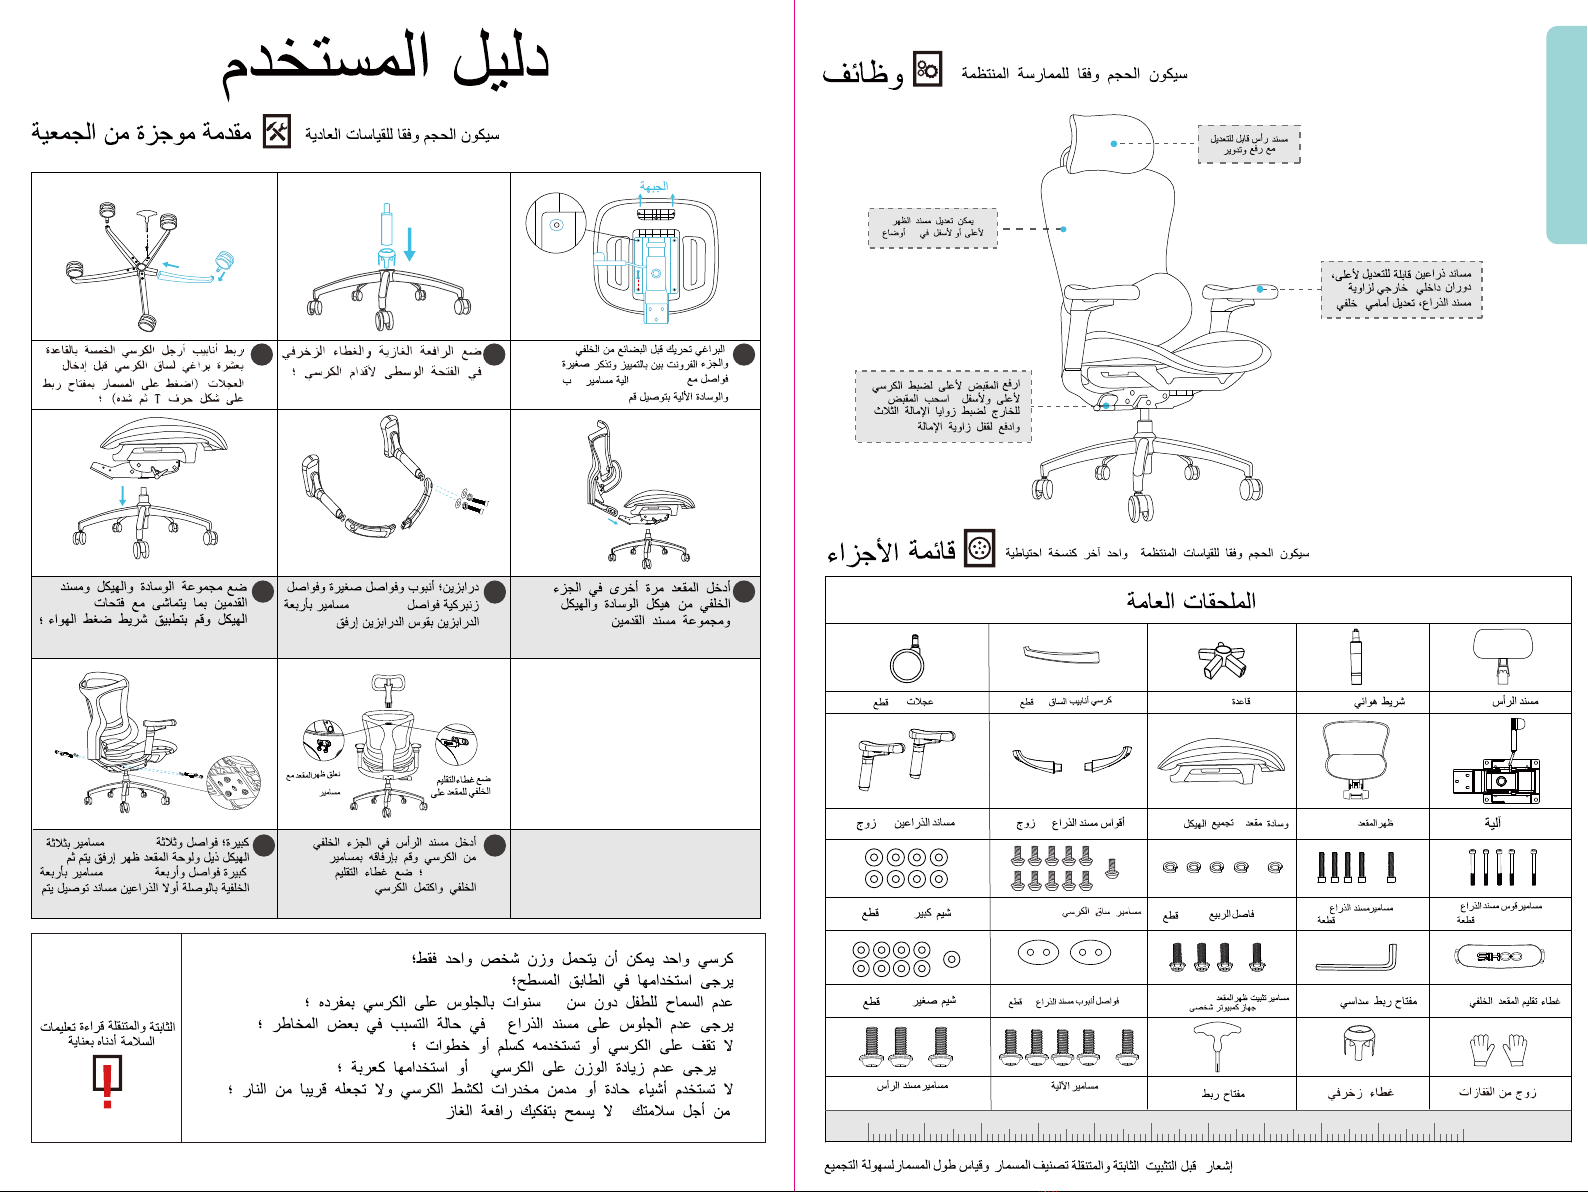
دليل المستخدم-
1+3:(02*8M) :CP1 :CP1
1T
:
،
،
( )
.
61*6M
.
.
.1
.2
5.3
،.4
.5
،;.6
.7
،.8
)(
4
/
/
.
،
).(
:
5:
5:CP1 :CP1 :CP1
:1 :
1*
:CP1 :CP1 1
:7
+
11 + 10:(21*6M) 6M
:
4+1 1+4:(03*6M) 1+4:(87*8M)
:
8
+
1:2
4 41* 6M
،
.
03*6M ،
87*8M ،
02*8M
:
SCP1+2:(41*6M)
:
SCP1+2:(61*6M)

1615
1. Gasfeder - Sicherheitshinweis
Die Gasfedereinheit darf von Laien montiert werden.
Achtung: Arbeiten an und Austausch der Gasdruckfeder sind nur durch eingewi-
esenes Fachpersonal auszuführen.
2. Verstellung der Rückenlehne
Nur wenn die Rückenlehne unter Druck steht, können Sie den Gegendruck des Gewichts
unter der Rückenlehne einstellen.
Die innovative Technologie der weichen Gummiauflage bildet ein Dreieck flexibler
Unterstützung, das es der Rückenlehne ermöglicht, sich je nach Körperform und Sitzhal-
tung natürlich zu bewegen, und der S-förmige Wirbelsäulenrahmen, der sich der Krüm-
mung der Wirbelsäule anpasst, stützt den Rücken vollständig und macht das Sitzen
bequemer; 3 Stufen können durch Anheben eingestellt werden.
3. Sitzhöheverstellung (8 CM)
Nur wenn die Rückenlehne unter Druck steht, können Sie den Gegendruck des Gewichts
unter der Rückenlehne einstellen.
Die innovative Technologie der weichen Gummiauflage bildet ein Dreieck flexibler
Unterstützung, das es der Rückenlehne ermöglicht, sich je nach Körperform und Sitzhal-
tung natürlich zu bewegen, und der S-förmige Wirbelsäulenrahmen, der sich der Krüm-
mung der Wirbelsäule anpasst, stützt den Rücken vollständig und macht das Sitzen
bequemer; 3 Stufen können durch Anheben eingestellt werden.
4.Neigungverstellung der Körperlehne (95-130°)
Die Rückenlehnenverstellung (Spannung der Rückenlehne) kann mit dem Hebel auf der
rechten Seite unter dem Sitz schnell eingestellt werden. Funktion der Rückenlehne:
Drehen Sie den Bediengriff nach hinten, um zur positiven Arretierung der Rückenlehne
zurückzukehren. Schiebesitzfunktion: Drehen Sie den Bediengriff nach vorne, um den
Schiebesitz in die positive Position zu bringen
Achtung: Wenn die Rückenlehne verriegelt ist, ist ein gewisser Druck erforderlich, um die
Verstellung zu lösen (Nur wenn kein Rückenlehnendruck vorhanden ist).
5. Nackenstütze (4.5 CM)
Die Nackenstütze besteht aus PA-Material und ist stufenlos höhenverstellbar. Zur
Höheneinstellung schieben Sie die Nackenstütze nach oben oder unten.
Tipp: Beim Zurücklehnen muss Ihr Nacken durch die Nackenstütze komfortabel abge-
stützt werden.
6. Armlehnen/Armsupports (6.5 CM)
Die Höhe der Armlehnen kann ohne Werkzeug eingestellt werden. Die Armlehnen lassen
sich in mehreren Winkeln frei verstellen, nach oben, nach hinten und nach vorne, und der
Armlehnenwinkel kann auch nach innen und nach außen gedreht werden.
Tipp: Die Armlehnen entlasten die Wirbelsäule, den Schultergürtel und die Armmuskula-
tur dann wirkungsvoll, wenn Ober- und Unterarm einen Winkel von etwa 90 Grad bilden.
* Bedienknopf an der Unterseite der Armlehne drücken, verstellen und fixieren
Sie die Armlehne in die Höheposition.
Normen/
Zertifikate
Qualitätsgütesiegel
Konstruktionsgrundlage der SIHOO Serie sind Normen
und Anforderungsprofile zeitgemäßer Sitztechnik. Die
SIHOO Serie ist SGS + TÜV Rheinland LGA Produkts
GmbH geprüft und zertifiziert.
Höhenverstellung
Höhenverstellbare Armlehne
6.5 cm
EN Siegel EN 1335 -1/-2:2018 Büro-Arbeitsstuhl
EN 16955:2017 Gasdruckfeder / EN 12529 Laufrollen
Zertifikatssymbol Sicherheit für hohen ergonomischen Standard
über EN hinaus
Garantie Auf diesen Stuhl haben Sie 3 Jahre Garantie
Wartung/Reinigung
Alle mechanischen und beweglichen Teile sind
wartungsfrei. Gelegentliches Säubern der Laufrollen
von Teppichflusen ist ratsam. Für die Reinigung der
Bezüge entfernen Sie zuerst den Staub. Flecken
behandeln Sie mit einem weißen, weichen Tuch
(keine Mikrofaser). Zuerst reinigen, dann pflegen.
Sitz- und Rückbezüge der A3 Serie sind nutzerfreun-
dlich wechselbar.
Anwendung
Dieser Bürodrehstuhl darf nur bestimmungsgemäß
unter Beachtung der allgemeinen Sorgfaltspflicht und
der Anletung benutzt werden. Bei unsachgemäßem
Gebrauch (z.B. Aufstiegshilfe, Sitzen auf den Armleh-
nen, extremen Belastungen) besteht Unfallgefahr.
Rollen
Serienausstattung mit Rollen für Teppichböden. Auf
Wunsch weiche Räder für Hartböden, erkennbar am
andersfarbigen Laufring.
Aus sicherheitstechnischen Gründen muss ein
entsprechender Austausch der Rollen bei Wechsel
von Teppich- auf Hartboden und umgekehrt erfolgen.
Wichtiger Hinweis
Gasfederaggregat nicht erhitzen und nicht gewaltsam
öffnen! Arbeiten und Austausch an Gasfedern nur
durch eingewiesenen Fachpersonal.
Vertretung in Europa:
Like Sun GmbH
Planckstr. 59 / 45147 Essen
Tel: +49 1726894470 / Email: Ec-connec-
7. Armlehnen/Armsupport (optional)
15 16

Help Center
About Products:
About Orders:
Q: The backrest mesh is broken.
A: Please contact us, and we will arrange the delivery of a eplacement.
Q: The chair is too short for me.
A: Please adjust it to the maximum height to see if it’s suitable for you. If not,
we recommend changing the gas lift.
Q: What if I receive a damaged or incorrect product?
A: If you receive a defective, incorrect, or incomplete product, please contact
us immediately and keep all items and packaging materials until your claim is
resolved. If your replacement product is out of stock, we will notify you
immediately of the estimated arrival date and work with you to suggest a suitable
replacement product.
Q: I hear noises when sitting on the chair.
A: Please check if all parts of the chair have been installed tightly. If not, there
might be a problem with the mechanism, and we recommend you send us a
video for further evidence first.
Q: Why would the armrest shake?
A: Please check whether the screws are tightened enough first, then check the
shaking of the armrest pad.
Q: The backrest shakes.
A: The backrest might not be installed tightly. It’s recommended to reinstall it first.
Q: There is an abnormal odor when the chair is taken out of the box.
A: Please leave the chair in an airy room for 2-3 days before use.
Q: There are scratches or cracks in the backrest or other parts.
A: We hope this does not affect the normal use of the chair, and you can consult
us for the replacement of the flawed parts.
Q: There are missing parts in this order.
A: In this case, please inform us which parts are missing with your order number
and offer us a photo of all the parts you currently have. Then we will report this to
the factory and arrange the delivery or work with you to find a satisfactory solution.
Q: The chair makes me uncomfortable, but I cannot find where the
problem is.
A: We are sorry to hear that you are having an unsatisfactory user experience.
Please kindly send us a photo or video of where the problem might lie. This way,
we can better locate the problem and offer you a solution.
About Delivery:
Q: What is the estimated delivery time?
A: Home delivery within the continental U.S. usually takes 3-8 days.
Q: The product has not been delivered.
A: We apologize for the inconvenience caused. Due to COVID-19, shipping may
experience delays. Please be patient, and we will keep track of it with you.
Q: The product fails to be dispatched.
A: Please contact us, and we will confirm your address again. Then we will report
this to the DPD.
Q: The shipping information has not been updated.
A: Due to a large quantity of orders, it might take some time before the information
is fully updated. Your patience is highly appreciated.
Q: There are scratches or cracks in the backrest or other parts.
A: We hope this does not affect the normal use of the chair, and you can consult
us for the replacement of the flawed parts.
Q: Can I cancel my order?
A: For items that have not been delivered or items with delayed delivery, canceling
the order will be accepted. Inventory items are usually shipped within 24-48 hours
after an order is placed. Once the items are shipped, they cannot be canceled.
*Orders of customized or special items cannot be canceled.
Q: My order is lost during delivery.
A: Please contact the responsible logistics center and report detailed information
to them for compensation. If you need any help concerning this, feel free to contact
us.
17 18
Other manuals for DORO-C300L-A3
1
Table of contents
Languages:
Other SIHOO Indoor Furnishing manuals


Popular Indoor Furnishing manuals by other brands

Onespace
Onespace 50-JN23TV Assembly instructions

Furniture of America
Furniture of America Launces CM-AC119 Assembly instructions

Next
Next 853213 Assembly instructions

OSP Home Furnishings
OSP Home Furnishings ALH26 Assembly instructions

Inspired by Bassett
Inspired by Bassett PAULA BP-PAKI52 Assembly instructions

dellonda
dellonda DH23 manual


