SINTERIT Lisa X User manual
LISA X
SLS 3D printer
Translation of the original short manual
Please read the full instruction manual before putting the device into service.
Version 01/2022

Sinterit LISA PRO User Manual | 2
Table of contents
1. Printer overview ........................................................................................................................................................4
2. Preparing to print.......................................................................................................................................................5
2.1 Starting the printer ............................................................................................................................................................5
2.2 Choosing the le to print ..................................................................................................................................................5
2.3 Filling up the printer with powder.....................................................................................................................................6
2.4 Preparing the print chamber.............................................................................................................................................6
2.5 Final steps before printing................................................................................................................................................ 6
3. Removing and cleaning the printout ..........................................................................................................................7
4. Cleaning the printer ...................................................................................................................................................8
5. Technical support .....................................................................................................................................................9
The short manual provides only a basic overview of the device and its general use. It will guide you throughout the entire
printing process. For detailed information and to learn more about specic features of your printer, please view the full
manual at www.sinterit.com/support-page/. Sinterit disclaims any liability resulting from the lack of knowledge provided
in the full manual.
Listed below are the conventional symbols used throughout the guide and basic safety rules for working with the machine.
They indicate warnings or carry important notices, so as to protect the user, any bystanders and objects in the vicinity. They
also provide the basic guidelines for proper and safe operation of the device.
WARNING!
An inevitably dangerous situation, potentially resulting in bodily harm or even death. The initiation,
refusal or neglect to carry out the specied procedure, or carrying it out in a careless or negligent
manner, may cause potential injury to the user or any bystanders.
ATTENTION!
The initiation, refusal or neglect to carry out the specied procedure, or carrying it out in a careless
or negligent manner, may cause property damage and/or injury to person(s) operating the device
and/or those located in its vicinity.
DANGER!
Risk of electric shock. An inevitably dangerous situation, potentially resulting in severe burns or
even death. Before operating any electric device, it is important to understand the dangers of
electricity and the proper procedures to mitigate them, as well as the steps necessary to perform
in case of a related emergency.
WARNING!
Pressurized gas! Danger of asphyxiation!
The gas canister could potentially become unsealed – the intert gas is a simple asphyxiant
(displaces oxygen from the air). Low oxygen levels may result in the loss of consciousness and
ultimately death, if not correctly mitigated. The immediate symptoms include shallow or labored
breathing, migraines and vertigo; in critical concentrations, the aicted may experience nausea,
weakness, long-term loss of conciousness and, ultimately, complete asphyxiation.
ATTENTION!
IR laser radiation. The laser emits infrared (IR) light, which is not visible to the naked eye. It is
important to avoid skin and eye contact. Direct eye exposure to the laser beam may result
in deterioration of eyesight or even blindness. It is forbidden to observe the beam with optical
instruments (i.e. looking glass, lenses). Additionally, direct skin exposure might result in burns.
ATTENTION!
High temperature – do not touch! Contact with the heating elements can result in severe burns.
Sinterit LISA PRO User Manual | 3
ATTENTION!
Mind the moving parts, which could potentially crush limbs.
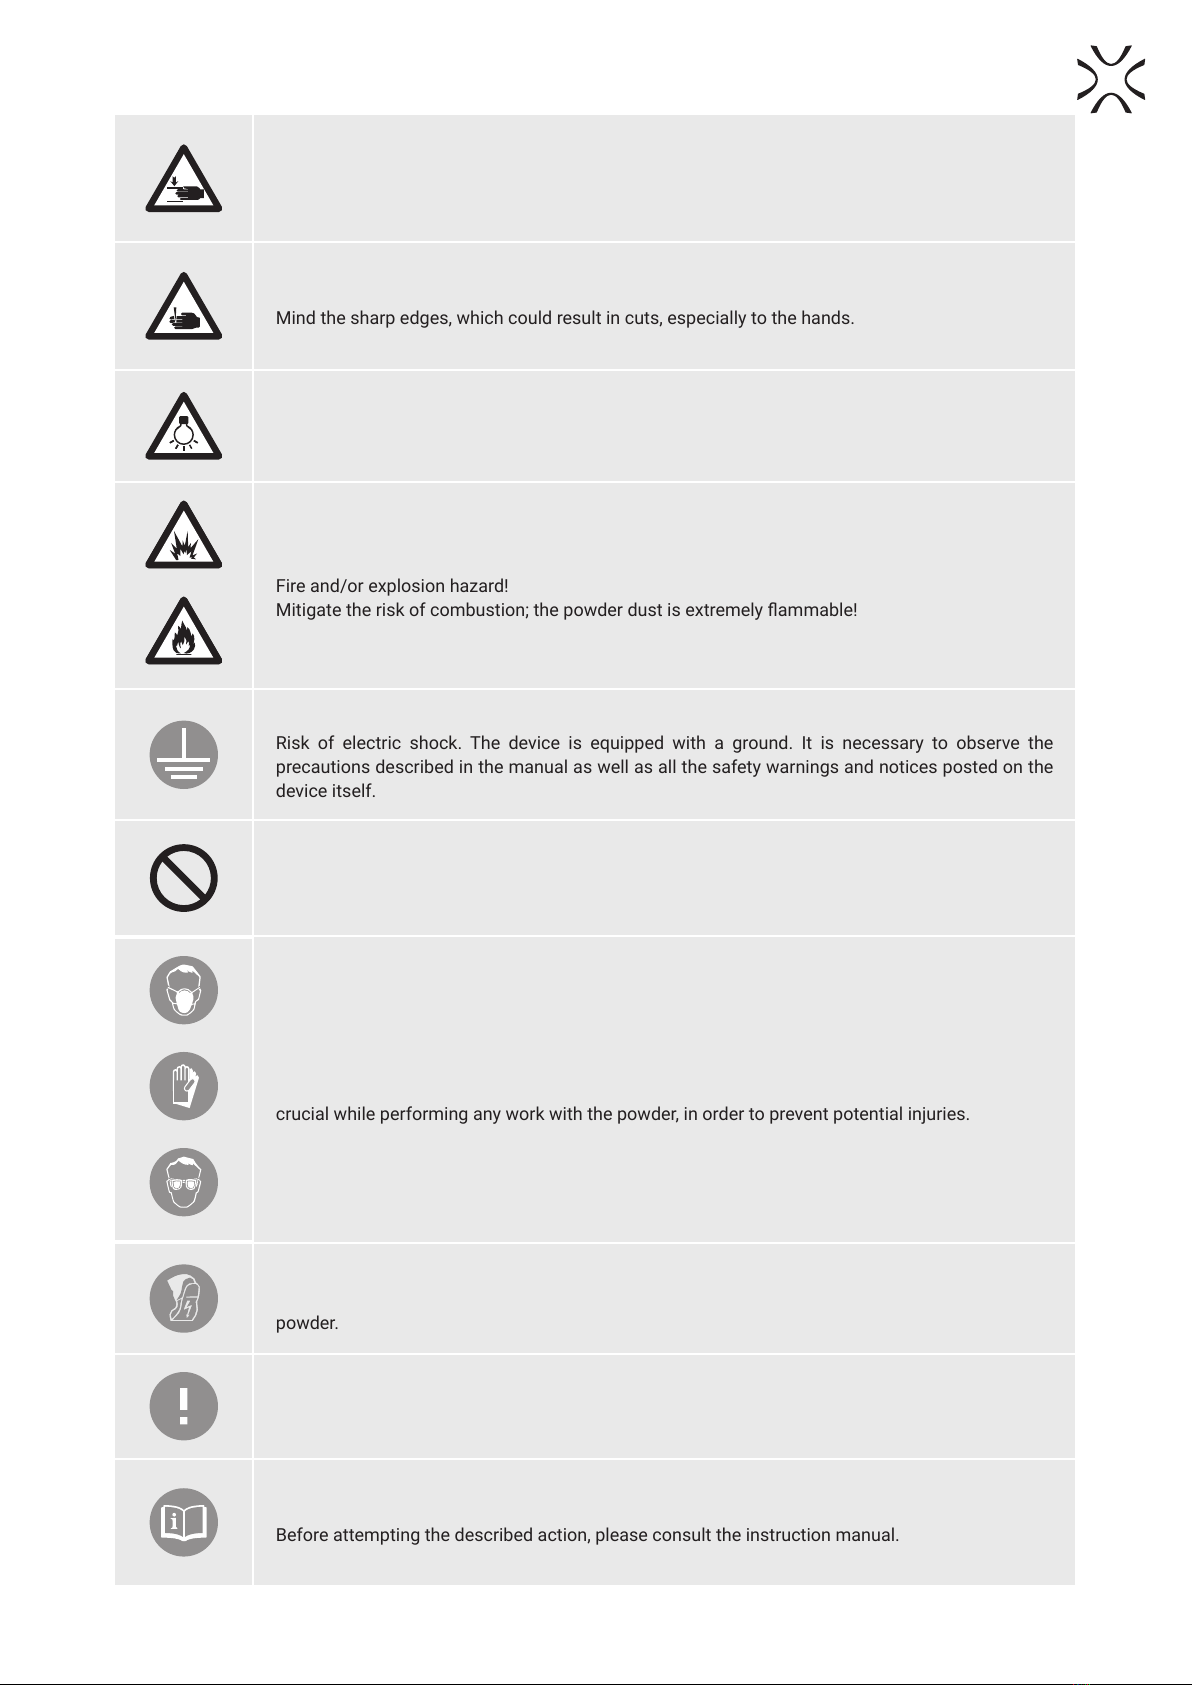
ATTENTION!
Mind the sharp edges, which could result in cuts, especially to the hands.
ATTENTION!
Beware of high intensity light.
DANGER!
Fire and/or explosion hazard!
Mitigate the risk of combustion; the powder dust is extremely ammable!
ATTENTION!
Risk of electric shock. The device is equipped with a ground. It is necessary to observe the
precautions described in the manual as well as all the safety warnings and notices posted on the
device itself.
STOP!
The described action is strictly forbidden.
ATTENTION!
It is necessary to wear personal protection: clothing, eyewear, facemask and gloves. It is absolutely
crucial while performing any work with the powder, in order to prevent potential injuries.
ATTENTION!
Antistatic clothing and footwear required. They are absolutely necessary while working with
powder.
IMPORTANT!
Information necessary to correctly perform the described task.
IMPORTANT!
Before attempting the described action, please consult the instruction manual.

Sinterit LISA PRO User Manual | 4
1. Printer overview
1
LID HANDLE
14
RECOATER
6
EMERGENCY STOP PUSHBUTTON (E-STOP)
5
SCREEN
8
DOOR
9
OVERFLOW
CONTAINER
7
FEED BED
PRINT BED
12
4
PRINTER LID
11
RESET BUTTON
10
USB PORT
2
SPLIT PIN
3
HEATING MODULE
15
INFRARED BULB
13
RECOATER GUIDE BAR
Fig. 1.1 View of the front of the printer, heating module, print chamber, and overow bin.
16 PYROMETER
WINDOW
Fig. 1.2 View of the pyrometer window.
Sinterit LISA PRO User Manual | 5
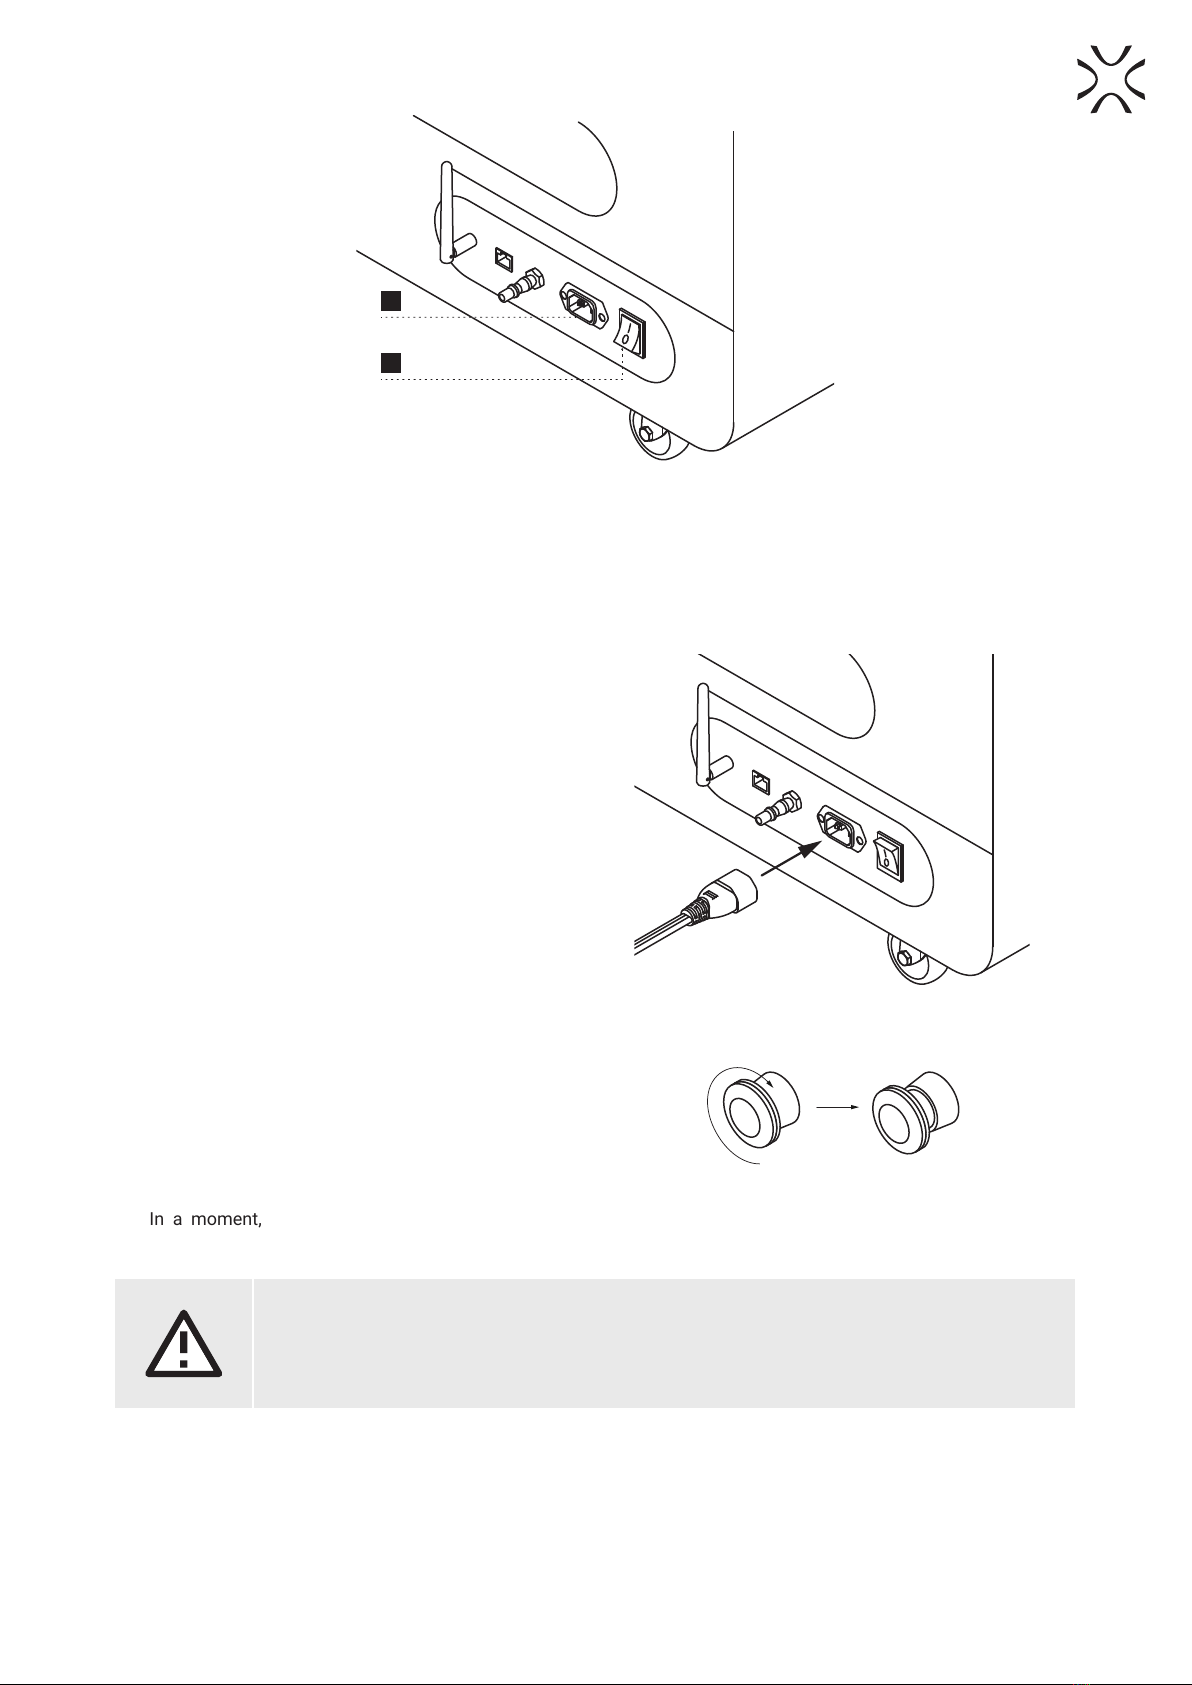
17
POWER SOCKET
18
POWER SWITCH (ON/OFF)
1.3 View of the back of the printer.
2. Preparing to print
2.1 STARTING THE PRINTER
1. Connect the printer to power (g. 2.1). Power socket is
located on the back of the printer.
2. Flip the power button on the back of the printer to the
Iposition.
Fig. 2.1 Connecting the power cord to the power socket.
3. Make sure that the E-STOP button is released. If not,
twist it clockwise up to the stop and release (g. 2.2).
Fig. 2.2 Releasing the E-STOP button.
4. In a moment, the main menu should appear on the
printer screen.
ATTENTION!
While preparing the printer for use, it is necessary to read and acknowledge any messages on the
screen. Disregarding or skipping any crucial steps of the process can negatively impact the quality
of printouts or damage the printer.
Sinterit LISA PRO User Manual | 6
2.2 CHOOSING THE FILE TO PRINT
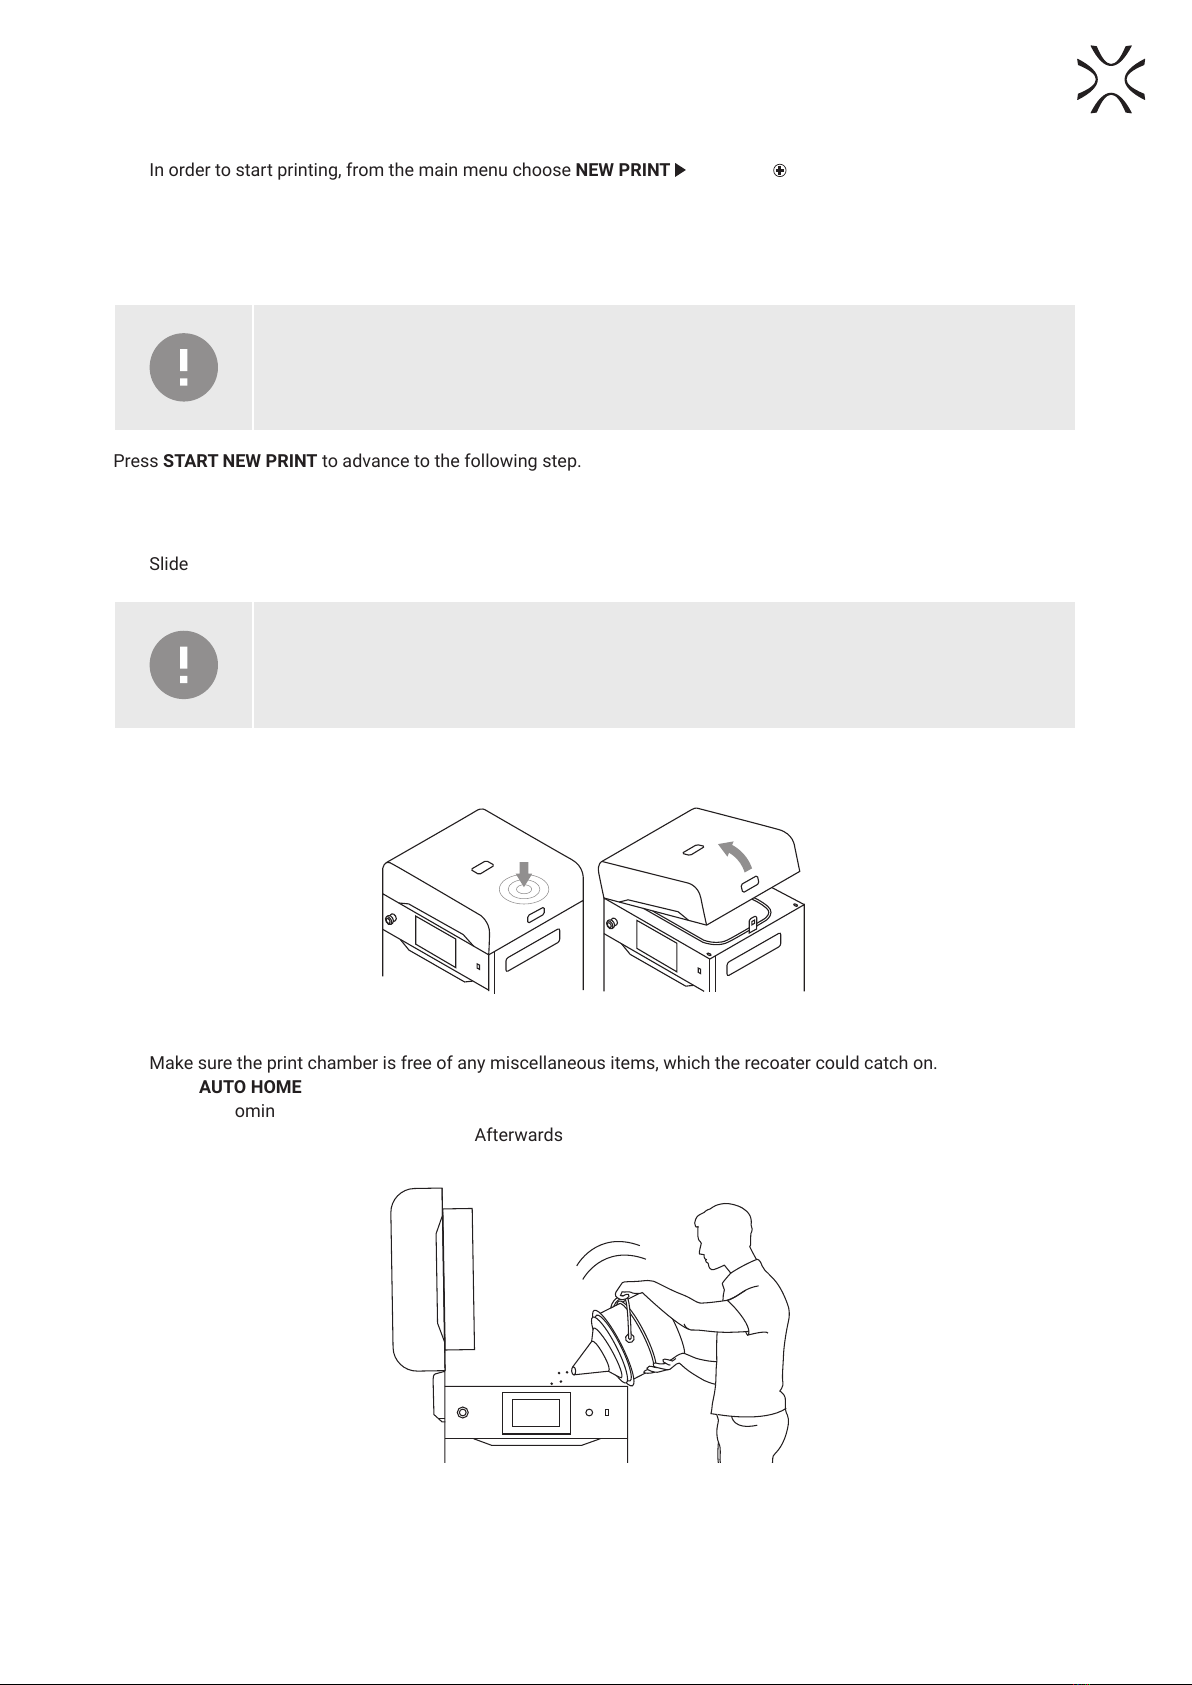
1. In order to start printing, from the main menu choose NEW PRINT and press ADD NEW PRINT JOB.
2. Choose the le from the list – NEW PRINT JOB or repeat a RECENT PRINT JOB.
3. The following screen displays some basic information about the processed le (PRINT JOB) as well as the current
status of the printer (PRINTER STATUS). If at this point you want to instead choose another le to print, choose
CHANGE PRINT JOB.
IMPORTANT!
In case any components of the printer should require maintenance or replacement, a corresponding
message will appear on the screen.
Press START NEW PRINT to advance to the following step.
2.3 FILLING THE PRINTER WITH POWDER
1. Slide the UNLOCK LID button to release the electrolock and allow the print chamber to be opened.
IMPORTANT!
After 10 seconds the electrolock will activate and it will no longer be possible to lift the lid. If you
still want to open the printer, slide the UNLOCK LID button again on the printer screen.
2. Push on the lid and pull it up using the lid handle (g. 2.3).
Fig. 2.3 Lifting the printer lid.
3. Make sure the print chamber is free of any miscellaneous items, which the recoater could catch on.
4. Press AUTO HOME to begin homing the Feed Bed and Print Bed positions.
5. Once the homing process is nished, ll the Feed Bed up with the desired powder. You may use the powder funnel
provided in the Dedicated Powder Tools. Afterwards press DONE.
Fig. 2.4 Filling the print chamber with powder using a funnel.

Sinterit LISA PRO User Manual | 7
IMPORTANT!
Add a little more powder than ts in the Feed Bed.
IMPORTANT!
The information which powder to use has been displayed on the printer screen as well as in the
Sinterit Studio software end report.
6. Compress the powder using the metal spatula provided in Dedicated Powder Tools. This will release any residual air
trapped in the Feed Bed during the pouring of the powder. Afterwards press DONE.
7. Remove any powder spilled directly under the guide bars. You may use the brushes and spatulas provided in
Dedicated Powder Tools. Afterwards press DONE.
8. Choose START LEVELING to begin leveling the powder surface.
IMPORTANT!
During the powder leveling process you can scrape the excess powder from under the guides with
a plastic spatula, for example from the Dedicated Powder Tools set.
9. You should see a smooth powder surface in the print chamber. Once the surface is suciently level, choose STOP
LEVELING.
10. Press DONE to advance to the following step.
2.4 PREPARING THE PRINT CHAMBER
1. Delicately wipe the pyrometer window with a wipe soaked in 2% salicylic spirits (ethanol solution) or another ethanol-
based cleaning solution. You may also use cleaning wipes provided in Dedicated Powder Tools.
2. Wipe the pyrometer window again with a dry cotton cloth, in order to remove any alcohol residue. Afterwards press
DONE.
3. Wipe the recoater guide bar with a wipe soaked in 2% salicylic spirits (ethanol solution) or another ethanol-based
cleaning solution. You may also use cleaning wipes provided in Dedicated Powder Tools.
4. Wipe the recoater guide bar again with a dry cotton cloth, in order to remove any alcohol residue. Afterwards press
DONE.
5. Apply silicone oil (available in Dedicated Powder Tools) to the recoater guide bar. A few drops along the whole length
is enough. Afterwards press DONE.
6. Make sure no miscellaneous items (i.e. spatulas) remain in the print chamber, then close the lid. Afterwards press
DONE.
2.5 FINAL STEPS BEFORE PRINTING
1. Press the RESET button on the printer itself, in order to engage the safety mechanism.
2. Choose START PRINT to begin printing.

Sinterit LISA PRO User Manual | 8
3. Removing and cleaning the printout
1. Once the screen displays a message saying FINISHED the printing process is over. Choose REMOVE PRINTOUT to
retrieve it from the print chamber.
2. After the print is nished, the screen may show a message saying MAINTENANCE TIME. It contains information on
required maintenance to certain components of the printer in the near future. For more information consult the full
instruction manual, section 13. Maintenance. Press GOT IT. If the message hasn’t appeared, it means that at present
no components require any maintenance.
3. Press the UNLOCK LID button to release the electrolock and allow the print chamber to be opened
IMPORTANT!
After 10 seconds the lock will re-engage and it will no longer be possible to lift the lid. If you still
want to open the printer lid, press the UNLOCK LID button again on the screen.
4. Push on the lid and pull it up using the handle (g. 3.1).
Fig. 3.1 Lifting the printer lid
5. Place the folded IO BOX inside the print chamber. Make sure its elements are arranged like in the picture (g. 3.2.)
FEED BED PRINT BED
Fig. 3.2 The proper arrangement of the IO BOX, allowing the user to remove the nished printout.
ATTENTION!
While placing the IO BOX in the chamber, make sure you do not accidentally damage its components.
6. Unfold the IO BOX elements as much as possible. Inside the IO BOX you should see a covered Feed Bed and an
uncovered Print Bed.
7. Choose REMOVE PRINTOUT and wait until the contents of the Print Bed (the cake) are ejected.
8. Join the IO BOX elements together.
9. Carry the IO BOX and its contents onto the foldable tray from Dedicated Powder Tools 1or on the PHS worktop 2
then press DONE on the screen.

Sinterit LISA PRO User Manual | 9
or
1 2
Fig. 3.3 Moving the IO BOX to the foldable tray 1or to the PHS worktop 2to clean the printout.
10. Clean the printout from unsintered powder. You may use the brushes and the probe provided in Dedicated Powder
Tools.
4. Cleaning the printer
IMPORTANT!
The SLS powders are hygroscopic (draw moisture out from the air). The print chamber and the
overow container are not 100% airtight. Leaving the powder inside of the printer may cause it to
become wet and lose its intended properties.
1. Press YES, I DO, to start cleaning the printer.
2. Make sure no miscellaneous items remain in the print chamber. Afterwards press AUTO HOME to begin homing the
Feed Bed and Print Bed positions.
3. Collect the remaining powder in the print chamber with the PHS or ATEX Vacuum Cleaner hose. Afterwards press
DONE.
DANGER!
The vacuum cleaner used to collect the powder must be suitable for handling combustible dust.
Sinterit recommends the ATEX Vacuum Cleaner available in the offer.
4. Press the arrow buttons to the left and right to move the recoater and collect the remaining powder underneath.
5. Once the print chamber is clean, choose DONE.
6. Press OPEN AND UNLOCK, to unlock the overow container.
IMPORTANT!
After 10 seconds the lock will re-engage and it will no longer be possible to open the overow door.
If you still want to slide the overow bin out, press the UNLOCK OVERFLOW button again back on
the LCD screen.
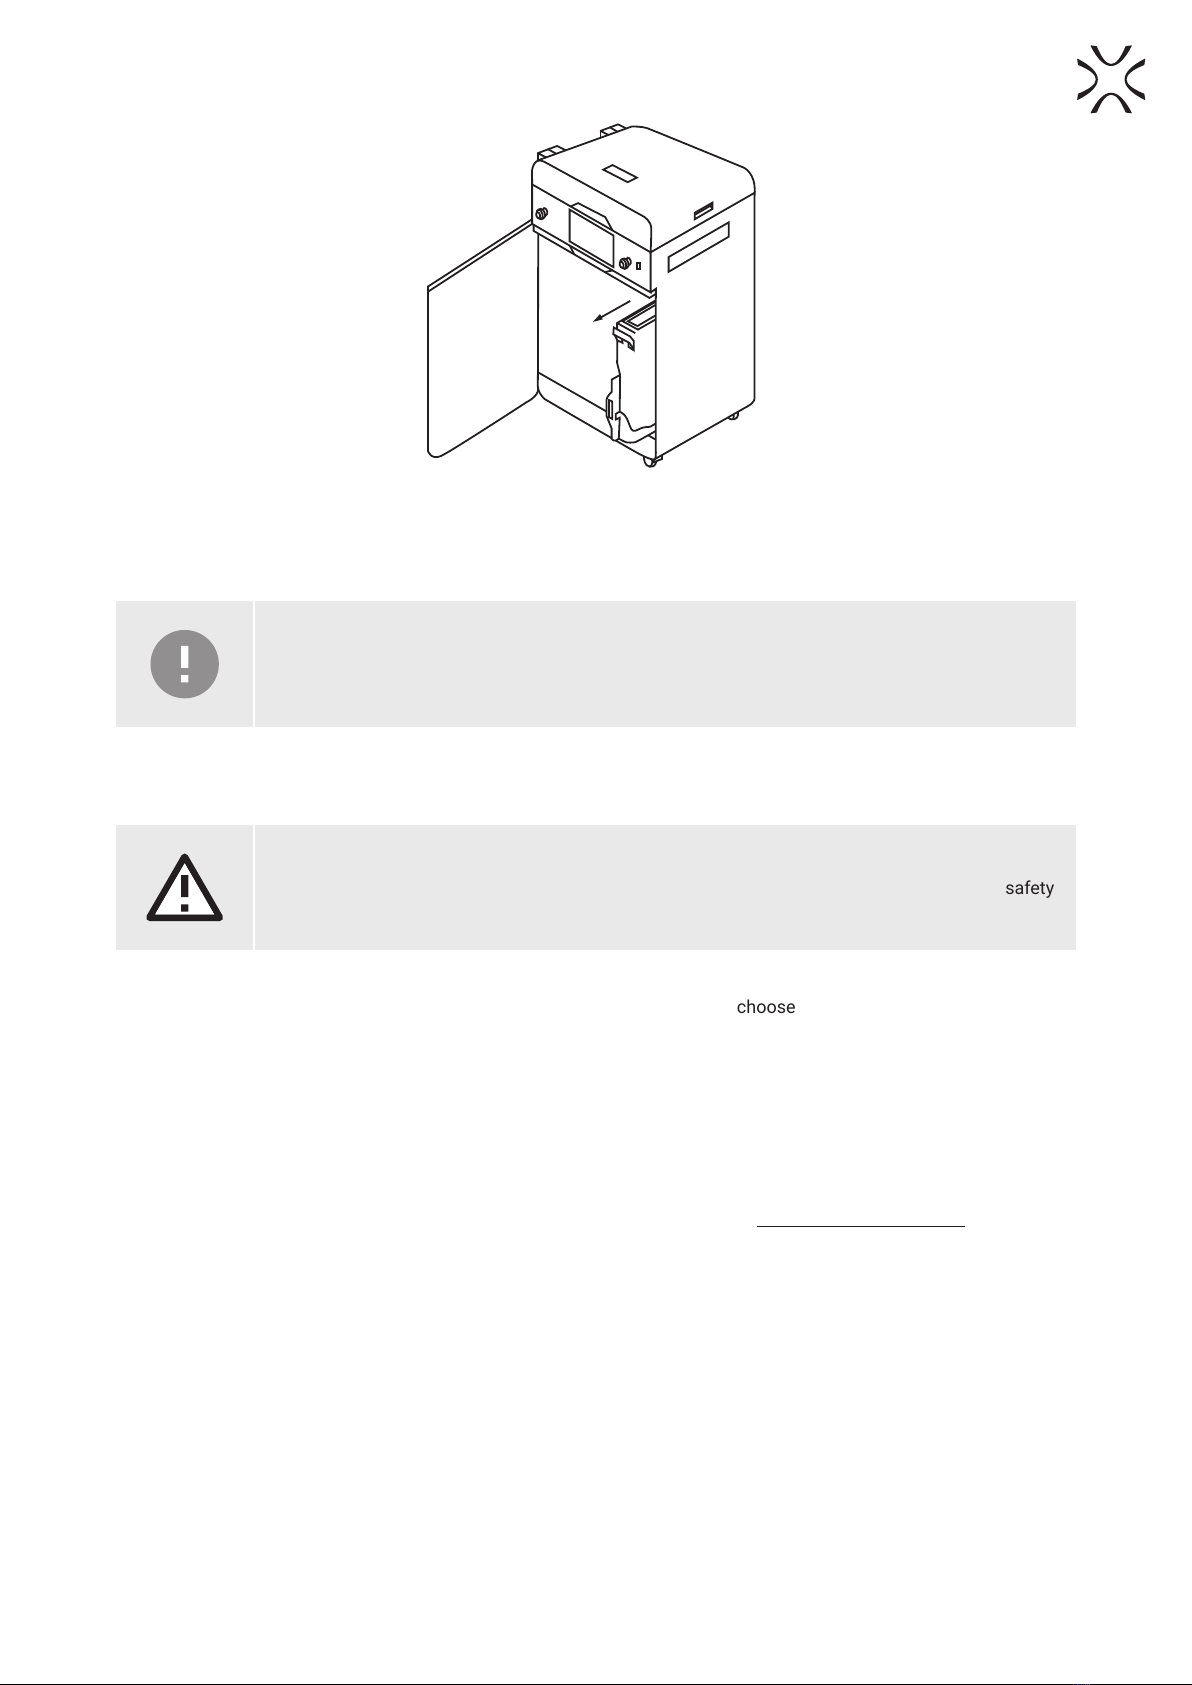
7. Open the overow door and slide out the drawers. (g. 4.1).
Sinterit LISA PRO User Manual | 10
Fig. 4.1 Sliding out the overow container.
8. Take the overow container from its drawers and transfer its contents into a metal bucket or onto the PHS.
9. Put the overow container back in its drawers.
IMPORTANT!
Make sure the overow container is oriented correctly once you put it back. Pay attention to the
markings on the bin.
10. Slide the UNLOCK OVERFLOW button to the UNLOCKED position, to release the lock and slide the drawer back into
the printer.
ATTENTION!
Attempting to slide the overow container back into the printer without unlocking the safety
mechanism can damage it
11. Close the overow door and press DONE.
12. If you want to learn how to refresh the powder and what exact mix to use, choose SHOW REFRESH INFO. If you wish
to instead do that another time, choose LATER.
5. Technical support
In case of any questions or issues, please don’t hesitate to contact the after-sales support:
• phone: +48 570 702 886
The full list of resellers and technical support in select countries can be found at www.sinterit.com/contact.

SINTERIT Sp. z o.o.
ul. Nad Drwina 10 bud. B3, 30-741 Krakow, Poland
www.sinterit.com
Contact: +48 570 967 854
Other manuals for Lisa X
3
Table of contents
Other SINTERIT 3D Printer manuals

SINTERIT
SINTERIT Lisa Pro User manual

SINTERIT
SINTERIT LISA User manual

SINTERIT
SINTERIT Lisa Pro User manual

SINTERIT
SINTERIT SANDBLASTER User manual

SINTERIT
SINTERIT LISA User manual

SINTERIT
SINTERIT Lisa X Installation and operating instructions

SINTERIT
SINTERIT Lisa Pro User manual

SINTERIT
SINTERIT Lisa X Repair manual

SINTERIT
SINTERIT LISA User manual

SINTERIT
SINTERIT LISA User manual


