manuals.online logo
Brands
  1. Home
  2. •
  3. Brands
  4. •
  5. Smanos
  6. •
  7. Accessories
  8. •
  9. Smanos DB-20 Instruction sheet

Smanos DB-20 Instruction sheet

Note: Please check the following indoor chime diagrams
on the next page and determine which installation mode
that suits you the best.
Install scheme with existing chime
DB-20 Chime
Transformer of Chime
(8~24VAC)
OUTDOOR INDOOR
This line is connected by default
Power Regulator
For mechanical doorbells
commonly used in Europe
*Power Regulator:
This is used to ensure
your existing door chime
continues to work and
receives enough power
when the DB-20 bell
button is pressed.
-01-
Type A
Start from page 04
DB-20
Internal Chime
Transformer of Chime
(8~24VAC)
Power Regulator
OUTDOOR
INDOOR
Transformer
Rear Front
-02-
For mechanical doorbells
commonly used in America
*Power Regulator:
This is used to ensure
your existing door chime
continues to work and
receives enough power
when the DB-20 bell
button is pressed.
Type B
Start from page 11
1. The DB-20 should only be connected to a low voltage 8~24VAC
transformer or an existing internal mechanical chime with a
voltage of 8~24VAC.
2. Do a Wi-Fi speed test to make sure that the location has an
upload speed of at least 2Mbps. (Use a Wi-Fi/Internet speed test
app to test your upload and download rate).
3. The items needed to install your new DB-20 are listed below:
- All the items in this video doorbell package
- Flathead screwdriver
- Phillips screwdriver
- Drill and drill bit (drill bit size: 15/64ths or 5mm). Either wood or
masonry depending on where you are mounting to. If you are
installing the video doorbell on wood or softer surfaces, the anchors
are not required but do make for easier fastening of screws.
- Wire stripper
PLEASE NOTE:
-03-
1. Remove the cover of your internal chime.
2. Plug the wiring harness into the Power Regulator.
Step 1: Install the power regulator
nstallation of the power regulator is required to ensure proper
function of your internal chime and DB-20 video doorbell.
WARNING:
Shut off power to your existing chime from the breaker
panel or fuse box.
1. Internal Chime
2. Power Regulator
3
4
1 2
For mechanical doorbells commonly used in Europe
-04-
Inside the internal chime, if you see four terminals, two of them should be
connected by default. Disconnect the wire on the left nonconnected
terminal. Then using one of the supplied wire connectors, attach wire with
the black wire from the power regulator. Finally, place the O-shape ring
attached to wire to the left nonconnected terminal and tighten the screw.
Note: To open the wire connector, you need to lift the orange levers
all the way up until they click and remain at a 90 degree angle.
(Optional) We provide other optional wire connectors as well in case
the upper ones are too big for you.
3.
1
1
3
3
3
4
1
2
-05-
Disconnect the wire on the right nonconnected terminal.
Then using one of the supplied wire connectors, attach wire
with the white wire from the power regulator. Finally, place
the O-shape ring attached to wire to the right of
nonconnected terminal and tighten the screw.
5. Place the power regulator inside or beside the internal chime.
Verify that the wiring does not interfere with its operation.
Note: If your internal chime has a different terminal setup please refer
to the manufacturer or consult a professional.
2
2
4
4
3
4
1
2
4.
-06-
Front View Rear View
1
2
3
Configuration Button
This button is used to connect this video doorbell to your Wi-Fi
network
Tamper Switch
This tamper switch will trigger a 30 second warning alarm if an
unauthorized attempt is made to remove this video doorbell from
its installed location.
Status
Solid red light (lasts for 30 seconds) Powered on
Searching for WiFi network
On standby for WiFi configuration
Live streaming
Low battery
Flashing green light (once every 0.2s)
Alternating green and red light
Solid green light
Flashing red light (once every 3s)
LED Indicator
Step 2: Identify Your Video Doorbell Button
Bell Button
2.
1.
3.
-07-
Step 3: Replace your old bell button
IMPORTANT:
Remove your existing bell button.
Allow the doorbell wires to go through the wire hole and place the
video doorbell mounting bracket on the wall. Then install the
mounting bracket with the provided screws.
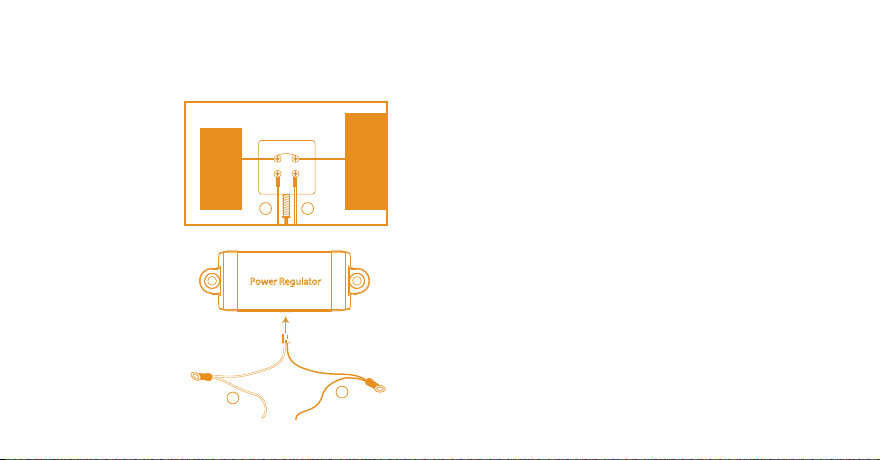
Wrap the wires around the terminals on the back of the video
doorbell. Please tighten the screws so that it won’t easily move after
mounting to the bracket. The arrangement of the wires does not
matter.
(Optional) If the wires are too short, attach the provided black wires
to the terminals on the back of the video doorbell and connect them
with your original wires via wire connectors. We provide two kinds of
wire connectors, please use the ones that suit your wiring condition
and make sure the wirings are not easily get watered for it will
influence the normal operation of the doorbell.
Confirm that power is disconnected to the internal chime.
Note: Do not place your video doorbell on the mounting bracket just yet.
3.
1.
2.
4.
-08-
Turn the power back on.
The video doorbell will start and it will give off audio and visual
cues within 30 seconds of starting.
After initializing, press the "bell button" to confirm your internal
chime rings. If it rings, continue to step 8. If not, turn the power off
and review the steps above.
Press the configuration button on the back of the video doorbell
for 3 seconds until it beeps. Then place the video doorbell on the
mounting bracket.
Download and install the smanos Home app from the App Store
or Google Play. Follow the additional steps in the app to connect
the video doorbell to your Wi-Fi network. Once connected, press
the "bell button" and accept the incoming call to test audio and
video.
5.
6.
7.
8.
-09-
Push the wires back into the hole until the video doorbell can be
attached tightly to the mounting bracket.
Use the provided security screws and screwdriver to secure the
video doorbell at the bottom.
Snap the waterproof cover on for extra protection against
inclement weather.
9.
10.
11.
Thank you for choosing smanos, your smart
portal to home while you roam.
-10-
Trans Front
1
2
Rear
1. Internal Chime
2. Power Regulator
For mechanical doorbells commonly used in America
3
4
1. Remove the cover of your internal chime.
2. Plug the wiring harness into the Power Regulator.
Step 1: Install the power regulator
nstallation of the power regulator is required to ensure proper
function of your internal chime and DB-20 video doorbell.
WARNING:
Shut off power to your existing chime from the breaker
panel or fuse box.
-11-
21
3
4
Trans
FrontRear
Inside the internal chime, if you see four terminals, two of them should be
connected by default. Disconnect the wire on the left nonconnected
terminal. Then using one of the supplied wire connectors, attach wire with
the black wire from the power regulator. Finally, place the O-shape ring
attached to wire to the left nonconnected terminal and tighten the screw.
Note: To open the wire connector, you need to lift the orange levers
all the way up until they click and remain at a 90 degree angle.
(Optional) We provide other optional wire connectors as well in case
the upper ones are too big for you.
3.
1
1
3
3
-12-
1
2
3
4
Trans FrontRear
The installation of the DB-20 is the same with European one.
Please check above.
Step 2: Identify Your Video Doorbell Button (Page 7)
Step 3: Replace your old bell button (Page 8-10)
Disconnect the wire on the right nonconnected terminal.
Then using one of the supplied wire connectors, attach wire
with the white wire from the power regulator. Finally, place
the O-shape ring attached to wire to the right of
nonconnected terminal and tighten the screw.
5. Place the power regulator inside or beside the internal chime.
Verify that the wiring does not interfere with its operation.
Note: If your internal chime has a different terminal setup please refer
to the manufacturer or consult a professional.
2
2
4
4
4.
-13-
Help center: [email protected] +31 (0)23-7271570
Please go to the "Help" section in the app or scan the
QR code to read more instructions:
Support
-14-

Other manuals for DB-20

2

Other Smanos Accessories manuals

Smanos WI-20 User manual

Smanos

Smanos WI-20 User manual

Smanos DS-20 User manual

Smanos

Smanos DS-20 User manual

Smanos DS2300 User manual

Smanos

Smanos DS2300 User manual

Smanos MD2300 User manual

Smanos

Smanos MD2300 User manual

Smanos DB-20 User manual

Smanos

Smanos DB-20 User manual

Smanos DS-20 User manual

Smanos

Smanos DS-20 User manual

Smanos BM-20 User manual

Smanos

Smanos BM-20 User manual

Smanos BM4200 User manual

Smanos

Smanos BM4200 User manual

Smanos DB-30 User manual

Smanos

Smanos DB-30 User manual

Smanos DS2300 User manual

Smanos

Smanos DS2300 User manual

Smanos BM4200 User manual

Smanos

Smanos BM4200 User manual

Smanos RD-20 User manual

Smanos

Smanos RD-20 User manual

Popular Accessories manuals by other brands

Monoprice 7928 instruction manual

Monoprice

Monoprice 7928 instruction manual

INNOBIZ Kemila manual

INNOBIZ

INNOBIZ Kemila manual

SOMFY animeo IB + installation guide

SOMFY

SOMFY animeo IB + installation guide

FUTABA WTR-7 instruction manual

FUTABA

FUTABA WTR-7 instruction manual

SICK VISIC100SF operating instructions

SICK

SICK VISIC100SF operating instructions

Uniden U-Bell quick start guide

Uniden

Uniden U-Bell quick start guide

GOWEIL MS 100 operating instructions

GOWEIL

GOWEIL MS 100 operating instructions

Tri-Tronics CLSC-1M8LEX185 installation manual

Tri-Tronics

Tri-Tronics CLSC-1M8LEX185 installation manual

Veris Industries AG01E installation guide

Veris Industries

Veris Industries AG01E installation guide

Razor Ripstick Electric Guide

Razor

Razor Ripstick Electric Guide

KROHNE OPTIFLUX 4000 Handbook

KROHNE

KROHNE OPTIFLUX 4000 Handbook

Lifetime 1529 owner's manual

Lifetime

Lifetime 1529 owner's manual

Pebble Smart Installation and training

Pebble

Pebble Smart Installation and training

GolfAchiever GA SIM Setup guide

GolfAchiever

GolfAchiever GA SIM Setup guide

Niles 525 installation guide

Niles

Niles 525 installation guide

Volante PAC-310 manual

Volante

Volante PAC-310 manual

MK Electric K5025 quick start guide

MK Electric

MK Electric K5025 quick start guide

nvent Raychem MONI-PT100-EXE manual

nvent

nvent Raychem MONI-PT100-EXE manual

manuals.online logo
manuals.online logoBrands
  • About & Mission
  • Contact us
  • Privacy Policy
  • Terms and Conditions

Copyright 2025 Manuals.Online. All Rights Reserved.