manuals.online logo
Brands
  1. Home
  2. •
  3. Brands
  4. •
  5. Solinst
  6. •
  7. Measuring Instrument
  8. •
  9. Solinst 101B User manual

Solinst 101B User manual

Water Level Meter: Op Instructions
Model 101B
Printed in Canada
June 22, 2015
(#112205)
For further information contact: Solinst Canada Ltd.
Fax: +1 (905) 873-1992; (800) 516-9081 Tel: +1 (905) 873-2255; (800) 661-2023
35 Todd Road, Georgetown, Ontario Canada L7G 4R8
Web Site: www.solinst.com E-mail: [email protected]
®Solinst is a registered trademark of Solinst Canada Ltd.
Equipment Check
1. Submerse the probe in tap water to test
the probe. This completes the circuit
and activates the buzzer and light.
Routine Care
1. After the depth to water has been
recorded, the tape should be carefully
rewound onto the reel, the probe
wiped dry and placed into the probe
holder.
2. The probe, tape and reel can be
wiped clean with phosphate free
(non-abrasive) detergent and water.
Do not submerge the reel.
Battery Replacement
• Battery type - alkaline, 9 volt.
1. The battery is housed within the
faceplate of the reel.
2. Using a Phillips screwdriver, remove
the three screws on the faceplate.
3. Carefully remove the faceplate so as
to not unwind the tape.
Replacement Parts
The following parts can be provided should
components become lost or damaged.
1. Splice kits
2. Electronics
3. Faceplate and backplate
4 Tapes
5. Probes
6. Probe holders, brakes, etc.
4. Replace the battery.
5. Carefully place the faceplate back
onto the hub and line up the holes.
Troubleshooting
SYMPTOM CAUSE REMEDY
No sound when probe
immersed in water.
Dead battery. Replace with 9V Alkaline.
Water Conductivity is very low. Try a different Solinst 101 Water Level Meter.
Disconnected wires on circuit
board.
Check all connections inside hub of reel for
loose/disconnected wires - solder or reconnect.
Broken wire in tape. Locate break in tape - splice and seal, or replace.
(Contact Solinst)
Damaged probe. Contact Solinst to obtain parts/repair instructions.
Instrument continuously
sounds after being
immersed in water.
Probe may be dirty which
could interfere with the circuit
connection.
Contact Solinst for instructions to remove, clean
and replace the probe.
Probe
Holder
Note: Before screwing the faceplate back
onto the hub, make sure no wires are
outside the hub.
6. Once the screws have been tightened
and the faceplate is secure, test the
water level meter.
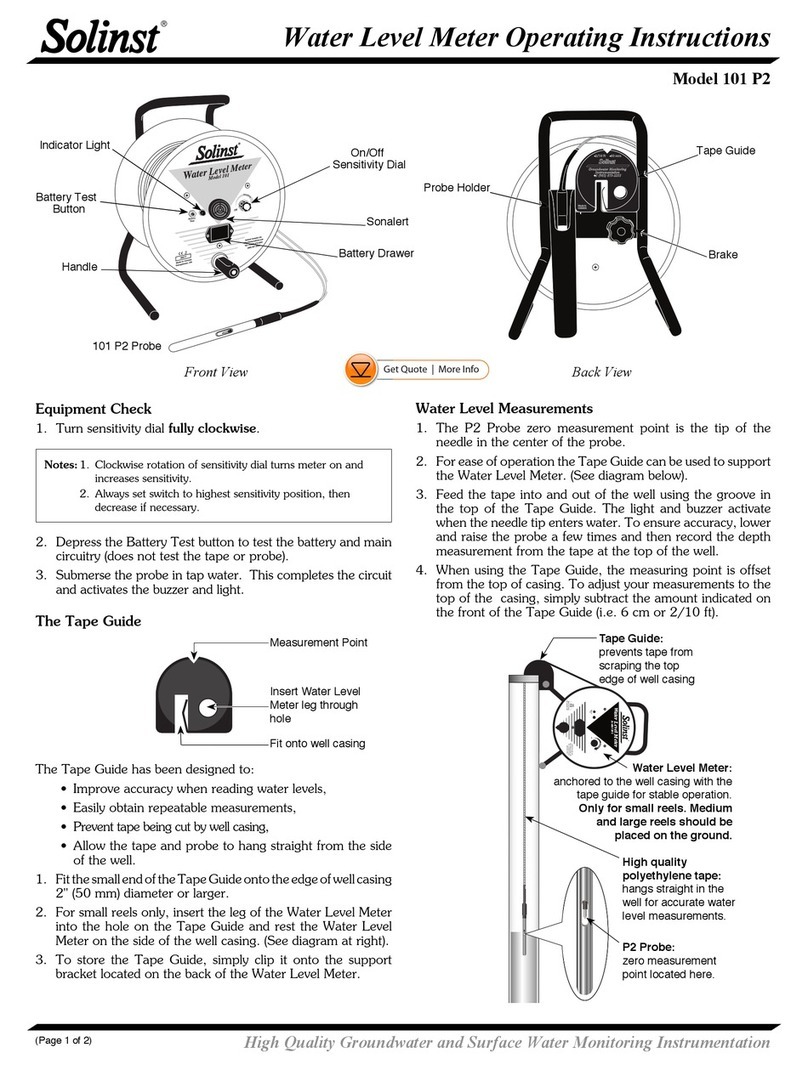
Water Level Measurements
1. The zero measurement point on the
101B P1 Probe is at the tip of the
conductor pins.
2. Feed the tape into the well. If a tape
guide is used, lay the tape onto the
groove on the top. Measurements will
be read at the point of the V-notch on
the tape guide. Remember to deduct
2/10 ft or 6.0 cm.
3. The light and buzzer activate when the
probe conductor pins enter water. To
ensure accuracy, lower and raise the
probe a few times and then record the
depth measurement from the tape at
the top of the well.
Carry
Handle
LED Light
Winding
Handle
Tape Guide (Optional)
Fit onto well casing
Measurement point
(Deduct 2/10 ft or 6.0 cm)
Sonalert
101B P1
Probe

Other Solinst Measuring Instrument manuals

Solinst 101 User manual

Solinst

Solinst 101 User manual

Solinst 101 Operating and safety instructions

Solinst

Solinst 101 Operating and safety instructions

Solinst Levelogger 3001 User manual

Solinst

Solinst Levelogger 3001 User manual

Solinst 101 Parts list manual

Solinst

Solinst 101 Parts list manual

Solinst 101 P7 SC1000 User manual

Solinst

Solinst 101 P7 SC1000 User manual

Solinst 102 Operating and safety instructions

Solinst

Solinst 102 Operating and safety instructions

Solinst 122M User manual

Solinst

Solinst 122M User manual

Solinst 101 User manual

Solinst

Solinst 101 User manual

Solinst Levelogger 3001 Use and care manual

Solinst

Solinst Levelogger 3001 Use and care manual

Solinst 401 User manual

Solinst

Solinst 401 User manual

Solinst 122M User manual

Solinst

Solinst 122M User manual

Solinst 102M User manual

Solinst

Solinst 102M User manual

Solinst LevelSender 5 User manual

Solinst

Solinst LevelSender 5 User manual

Solinst Levelogger Series User manual

Solinst

Solinst Levelogger Series User manual

Solinst 9700 SolSat 5 User manual

Solinst

Solinst 9700 SolSat 5 User manual

Solinst 101 P2 User manual

Solinst

Solinst 101 P2 User manual

Solinst 101M User manual

Solinst

Solinst 101M User manual

Solinst 101 P7 User manual

Solinst

Solinst 101 P7 User manual

Solinst 101D User manual

Solinst

Solinst 101D User manual

Solinst 102 User manual

Solinst

Solinst 102 User manual

Solinst 101 Operating and safety instructions

Solinst

Solinst 101 Operating and safety instructions

Solinst 122 User manual

Solinst

Solinst 122 User manual

Solinst 201 User manual

Solinst

Solinst 201 User manual

Solinst 101 SC2000 Operating and safety instructions

Solinst

Solinst 101 SC2000 Operating and safety instructions

Popular Measuring Instrument manuals by other brands

Conrad Electronic 32 34 40 operating instructions

Conrad Electronic

Conrad Electronic 32 34 40 operating instructions

Merlaud SDR 2423 Operation & maintenance instructions

Merlaud

Merlaud SDR 2423 Operation & maintenance instructions

Leica DISTO D410 user manual

Leica

Leica DISTO D410 user manual

MZ electronic EVVA-M Instructions for use

MZ electronic

MZ electronic EVVA-M Instructions for use

Endress+Hauser Micropilot NMR81 manual

Endress+Hauser

Endress+Hauser Micropilot NMR81 manual

Fluidwell E119-P manual

Fluidwell

Fluidwell E119-P manual

KROHNE OPTISONIC 7300 quick start

KROHNE

KROHNE OPTISONIC 7300 quick start

Sylvac PS15 manual

Sylvac

Sylvac PS15 manual

Konica Minolta CHROMA METER CS-200 instruction manual

Konica Minolta

Konica Minolta CHROMA METER CS-200 instruction manual

Delmhorst Instrument Co CX-30 owner's manual

Delmhorst Instrument Co

Delmhorst Instrument Co CX-30 owner's manual

Pentax R-422VN instruction manual

Pentax

Pentax R-422VN instruction manual

Signet 2551 manual

Signet

Signet 2551 manual

ATAGO VISCO-895 Quick manual

ATAGO

ATAGO VISCO-895 Quick manual

Siemens 7KT1 300 operating instructions

Siemens

Siemens 7KT1 300 operating instructions

Keysight U1461A quick start guide

Keysight

Keysight U1461A quick start guide

Aktakom ATT-8509 user manual

Aktakom

Aktakom ATT-8509 user manual

IUL iPeak Europium Instructions for use

IUL

IUL iPeak Europium Instructions for use

PCB Piezotronics W356A12 Installation and operating manual

PCB Piezotronics

PCB Piezotronics W356A12 Installation and operating manual

manuals.online logo
manuals.online logoBrands
  • About & Mission
  • Contact us
  • Privacy Policy
  • Terms and Conditions

Copyright 2025 Manuals.Online. All Rights Reserved.