EnglishDeutsch
 logo
Brands
  1. Home
  2. •
  3. Brands
  4. •
  5. SOMFY
  6. •
  7. Recording Equipment
  8. •
  9. SOMFY 9018247 Specification sheet

SOMFY 9018247 Specification sheet

Other SOMFY Recording Equipment manuals

SOMFY DCT2RTS User manual

SOMFY

SOMFY DCT2RTS User manual

SOMFY Neocontrol SLIMTOUCH NEO-SLT-BL User manual

SOMFY

SOMFY Neocontrol SLIMTOUCH NEO-SLT-BL User manual

SOMFY Connect Operating instructions

SOMFY

SOMFY Connect Operating instructions

SOMFY ZigBee User manual

SOMFY

SOMFY ZigBee User manual

SOMFY 1860333 User manual

SOMFY

SOMFY 1860333 User manual

SOMFY DCT2RTS User manual

SOMFY

SOMFY DCT2RTS User manual

SOMFY TaHoma RTS/Zigbee Smartphone and Tablet... Quick setup guide

SOMFY

SOMFY TaHoma RTS/Zigbee Smartphone and Tablet... Quick setup guide

SOMFY 1810872 User manual

SOMFY

SOMFY 1810872 User manual

SOMFY 1810607 User manual

SOMFY

SOMFY 1810607 User manual

SOMFY URTSI 2 Quick setup guide

SOMFY

SOMFY URTSI 2 Quick setup guide

SOMFY SDN 0-10V Interface V2 Operating instructions

SOMFY

SOMFY SDN 0-10V Interface V2 Operating instructions

SOMFY DCT2RTS User manual

SOMFY

SOMFY DCT2RTS User manual

SOMFY NeoControl CUBEE NEO-CUB-BL User manual

SOMFY

SOMFY NeoControl CUBEE NEO-CUB-BL User manual

SOMFY 1810815 User manual

SOMFY

SOMFY 1810815 User manual

SOMFY ZDMI User manual

SOMFY

SOMFY ZDMI User manual

SOMFY Connect UAI User manual

SOMFY

SOMFY Connect UAI User manual

SOMFY TaHoma Operating instructions

SOMFY

SOMFY TaHoma Operating instructions

SOMFY TaHoma Operating instructions

SOMFY

SOMFY TaHoma Operating instructions

SOMFY CONTROL4 Operating instructions

SOMFY

SOMFY CONTROL4 Operating instructions

SOMFY SDN 0-10V Interface V2 User manual

SOMFY

SOMFY SDN 0-10V Interface V2 User manual

SOMFY Sonesse 40 RTS User manual

SOMFY

SOMFY Sonesse 40 RTS User manual

SOMFY animeo 1860161 User manual

SOMFY

SOMFY animeo 1860161 User manual

SOMFY Tridonic animeo User manual

SOMFY

SOMFY Tridonic animeo User manual

Popular Recording Equipment manuals by other brands

Philips CDR 765 null

Philips

Philips CDR 765 null

Philips CDR770 null

Philips

Philips CDR770 null

KV2 Audio 500 Series user guide

KV2 Audio

KV2 Audio 500 Series user guide

Robotics Technologies microBus-Cam II installation manual

Robotics Technologies

Robotics Technologies microBus-Cam II installation manual

Seca 460 quick start guide

Seca

Seca 460 quick start guide

Cognex MVS-8000 Series Hardware manual

Cognex

Cognex MVS-8000 Series Hardware manual

Mect MPNC006 Series user manual

Mect

Mect MPNC006 Series user manual

Bad Caf THE LEASH operating manual

Bad Caf

Bad Caf THE LEASH operating manual

Strymon NIGHTSKY user manual

Strymon

Strymon NIGHTSKY user manual

Mitsubishi Electric 16CH DIGITAL RECORDER DX-TL5000U user manual

Mitsubishi Electric

Mitsubishi Electric 16CH DIGITAL RECORDER DX-TL5000U user manual

Tews Technologies TPMC465 user manual

Tews Technologies

Tews Technologies TPMC465 user manual

Honeywell Excel 50 user guide

Honeywell

Honeywell Excel 50 user guide

SeaLevel COMM+8.LPCI user manual

SeaLevel

SeaLevel COMM+8.LPCI user manual

Arturia AUDIOFUSE STUDIO user manual

Arturia

Arturia AUDIOFUSE STUDIO user manual

Rukra RK-1240 quick start guide

Rukra

Rukra RK-1240 quick start guide

Samson SCOM owner's manual

Samson

Samson SCOM owner's manual

Dynacord DPS260 owner's manual

Dynacord

Dynacord DPS260 owner's manual

Pyle Pro PSS8 manual

Pyle Pro

Pyle Pro PSS8 manual

https://manuals.online logo
https://manuals.online logoBrands
  • About & Mission
  • Contact us
  • Privacy Policy
  • Terms and Conditions

Copyright 2026 Manuals.Online. All Rights Reserved.

© 2013, Somfy SAS. ALL RIGHTS RESERVED. REF 5116878 - 20131122
KNX IP Interface wireless, Ref. 9018247 EN
Operating and installation manual
Application
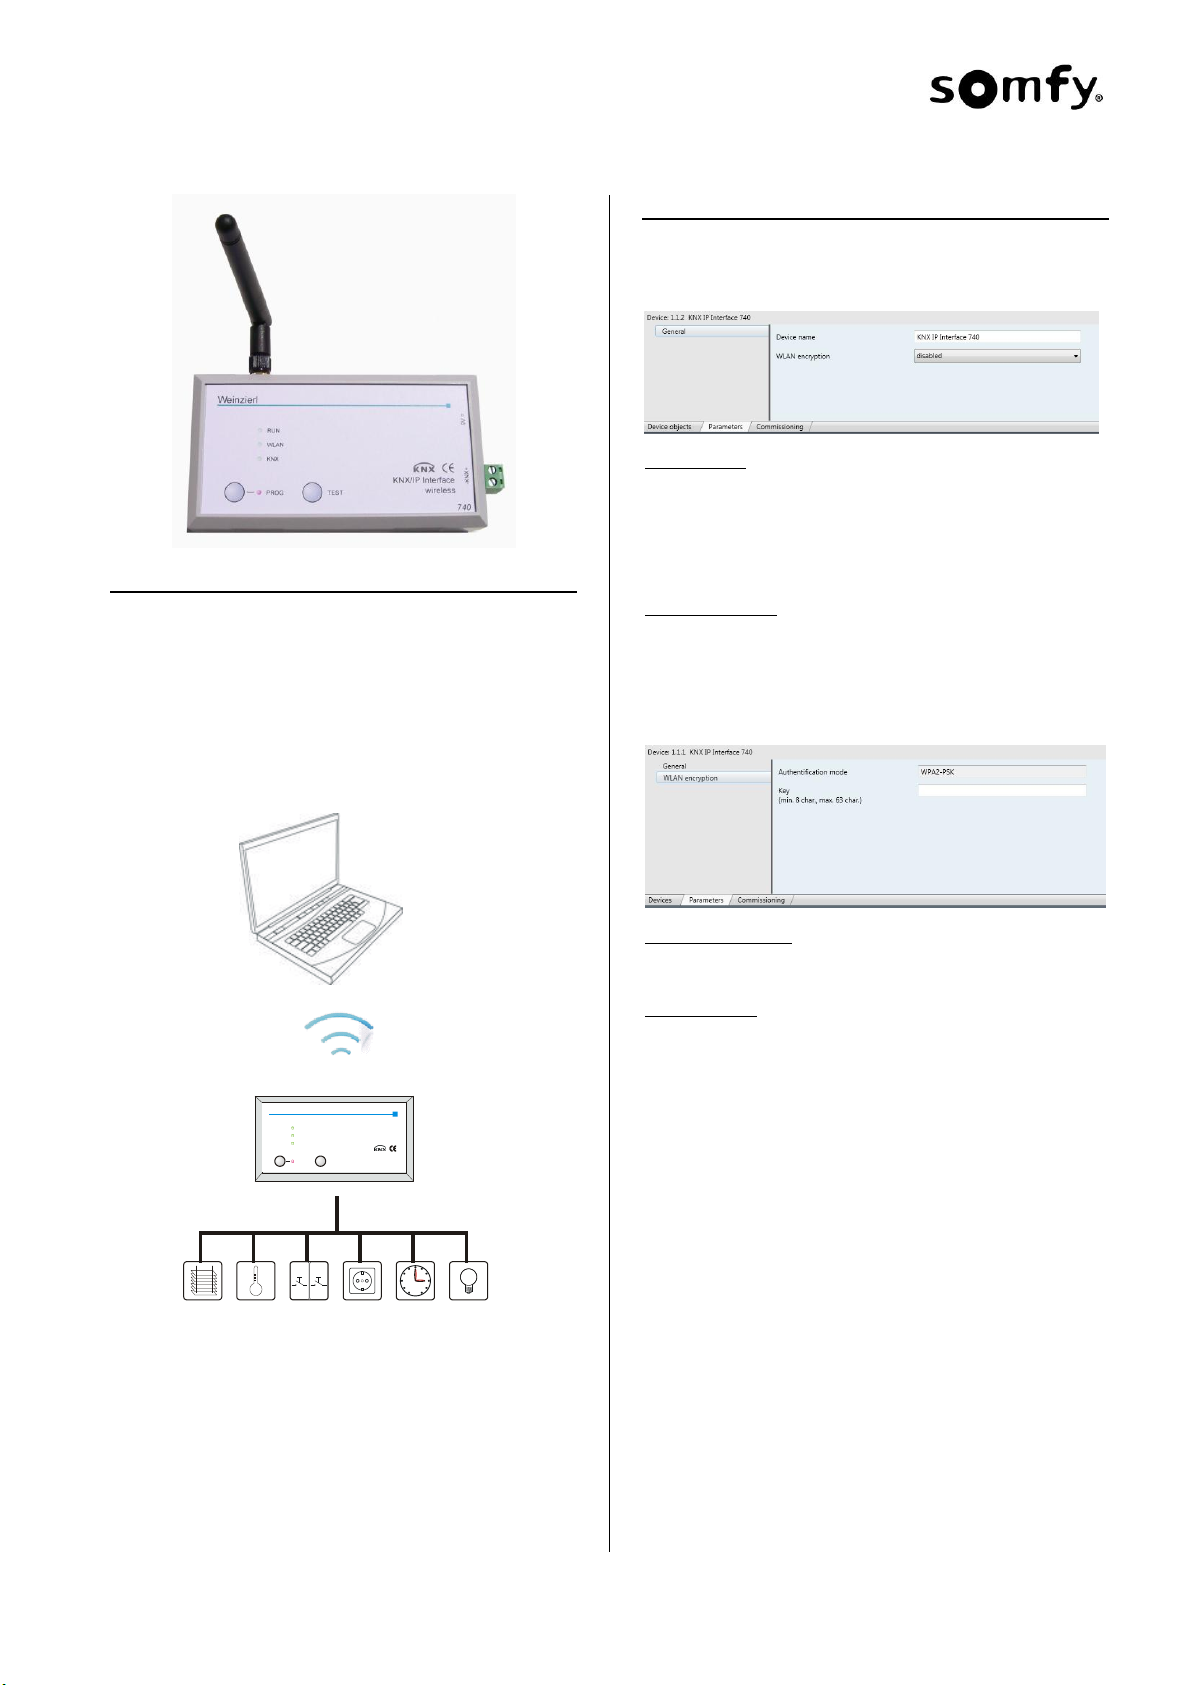
The KNX IP Interface wireless is a WLAN interface to the KNX/
EIB bus. It can be used instead of a USB or wire-bound IP inter-
face, e.g. for ETS3. Utilising the wireless technology the installer
can now move unhindered throughout the building.
The KNX IP Interface wireless contains an integrated Access
Point which provides the direct connection to the device via a
WLAN network. It has an external 9 V power supply.
This device functions according to the KNXnet/IP specification. It
is compatible with ETS from version 3.0c.
Client
EIB/KNX
WLAN
TEST KNX/IP Interface
wireless
9V =-KNX+
Weinzierl
RUN
WLAN
KNX
PROG
740
ETS Database
The following parameters can be configured with ETS:
General:
Device Name:
The KNX IP Interface wireless can be assigned a name of your
choice. The device name should be descriptive. It is used to
search for and recognize a device. For example, the device
name appears in the dialog of the ETS Connection Manager.
Additionally the device name is used for WLAN network identifi-
cation (SSID, Service Set Identifier).
WLAN-Encryption:
By default, the WLAN-Encryption is disabled. That is, the in-
staller can initially connect to the WLAN network without entering
a password. The configuration attribute “enabled” activates the
WLAN connection encryption.
WLAN encryption:
Encryption standard:
WPA2-PSK (Wi-Fi Protected Access 2, pre-shared-key) is sup-
ported.
Encryption Key:
This is where you enter the encryption key (in ASCII characters,
max. 63 Zeichen). It is also possible to enter the key during the
initial connection setup phase from a PC.
Example:
Herbert15985
VGVwdv36fhe468415v1weerh3zf73b8JKB45SUsqmf
To ensure a high degree of security it is advised to use a longer
key.
© 2013, Somfy SAS. ALL RIGHTS RESERVED. REF 5116878 - 20131122
WLAN Connection Initiation
To create a WLAN connection from a PC or Laptop a WLAN
adaptor is required. Most new computers have an integrated
WLAN adaptor. To create a WLAN connection to the KNX IP
Interface wireless the device must first be found by the wireless
connection manager. The dialog window „Wireless Network
Connection“from Windows® lists all available wireless networks.
This can be found under „Control Panel/Network Connec-
tions/Wireless Network Connection“. It is also possible to open it
from the corresponding “Wireless networks” icon on the taskbar.
The KNX IP Interface wireless contains an integrated DHCP-
Server which will automatically assign the PC an IP address. For
most laptops this is the standard setting.
To view/modify the wireless network connection configuration
select „Internet Protocol (TCP/IP)“ and press the „Properties“
button.
In the following window „Obtain an IP address automatically“
should be selected.
ETS Connection Manager
Following the successful creation of a wireless connection the
KNX IP Interface wireless can now be used as an interface to the
KNX/EIB bus.
The following configuration is necessary:
Select the button “Settings”and the tab “Communication”in the
main window of ETS4. All available connections are listed by
“Configured connections”. Select the desired connection.
To connect to the KNX/EIB bus the KNX IP Interface wireless
requires a second physical address. The button Local settings
enables the configuration of the individual address, which is
used for bus access.
A dummy device may be created in the ETS-project to reserve
this address.
© 2013, Somfy SAS. ALL RIGHTS RESERVED. REF 5116878 - 20131122
Installation and connection
The housing of the KNX IP Interface wireless has the following
dimensions: 125 x 67 x 31 mm.
It has the following connectors, display elements and buttons:
24,00 mm
4,00 mm
5,50 mm
47,40 mm
TEST KNX/IP Interface
wireless
9V =-KNX+
Weinzierl
RUN
WLAN
KNX
PROG
740
4
5
6
7 8 9
1
2
3
1:
Antenna Terminal
2:
External power supply connection (9 V DC)
3:
Connector for KNX/EIB with a bus terminal
4:
RUN LED (green):
- Blinks quickly during the startup phase (approx. 40 sec-
onds)
- Lights up to indicate the device is operational
5:
WLAN LED (green):
- Flashes to indicate telegram activity
6:
KNX LED (green):
- Lights up to indicate the KNX/EIB is available
- Flashes to indicate telegram traffic
7:
Programming Button
8:
Programming Mode LED (red)
9
Test mode button:
While this button is pressed the device goes into test
mode. In test mode the display elements have the following
meaning:
- RUN LED: blinks slowly and indicates the device is in
test mode
- WLAN LED: off
- KNX LED: on when an active connection is available,
otherwise off
The connection to the mains (230 V~/50 Hz) is done via the en-
closed wall power supply.
The KNX IP Interface wireless is delivered in a plastic case with
the following content:
- Wall power supply (Primary: 230 V~/50 Hz, Secondary: 9 V=)
- Antenna (SMA-R connector)
- Pluggable screwing terminal for the connection of the KNX/EIB
bus
- Documentation
SOMFY
50 avenue du Nouveau Monde
BP 152 - 74307 Cluses Cedex
France
www.somfy-architecture.com