manuals.online logo
Brands
  1. Home
  2. •
  3. Brands
  4. •
  5. Sony
  6. •
  7. Conference System
  8. •
  9. Sony PCS-1P Instruction manual

Sony PCS-1P Instruction manual

This manual suits for next models

1

Other Sony Conference System manuals

Sony BRU-300 User manual

Sony

Sony BRU-300 User manual

Sony PCS-TL50 Instruction Manual

Sony

Sony PCS-TL50 Instruction Manual

Sony PCS-G70N User manual

Sony

Sony PCS-G70N User manual

Sony Ipels PCS-G50 User manual

Sony

Sony Ipels PCS-G50 User manual

Sony PCS-TL50P User manual

Sony

Sony PCS-TL50P User manual

Sony SX-1062 User manual

Sony

Sony SX-1062 User manual

Sony Ipela PCS-XG80 User manual

Sony

Sony Ipela PCS-XG80 User manual

Sony Ipela PCS-XG80 User manual

Sony

Sony Ipela PCS-XG80 User manual

Sony Ipela PCS-XG80 User manual

Sony

Sony Ipela PCS-XG80 User manual

Sony Ipela PCS-XC1 User manual

Sony

Sony Ipela PCS-XC1 User manual

Sony CMU-BR100 User manual

Sony

Sony CMU-BR100 User manual

Sony PCS-TL50 User manual

Sony

Sony PCS-TL50 User manual

Sony IPELA PCS-XG55 Quick setup guide

Sony

Sony IPELA PCS-XG55 Quick setup guide

Sony PCS-XG100 Quick setup guide

Sony

Sony PCS-XG100 Quick setup guide

Sony PCS-XG100 Instruction Manual

Sony

Sony PCS-XG100 Instruction Manual

Sony Ipels PCS-G50 User manual

Sony

Sony Ipels PCS-G50 User manual

Sony IPELA PCS-G70 User manual

Sony

Sony IPELA PCS-G70 User manual

Sony PCSXL55 User manual

Sony

Sony PCSXL55 User manual

Sony Ipels PCS-G50 User manual

Sony

Sony Ipels PCS-G50 User manual

Sony PCS-XG100 User manual

Sony

Sony PCS-XG100 User manual

Sony PCS-HG90 User manual

Sony

Sony PCS-HG90 User manual

Sony PCS-1 - Video Conferencing Kit User manual

Sony

Sony PCS-1 - Video Conferencing Kit User manual

Sony PCS-1 - Video Conferencing Kit User manual

Sony

Sony PCS-1 - Video Conferencing Kit User manual

Sony IPELA PCS-G70 User manual

Sony

Sony IPELA PCS-G70 User manual

Popular Conference System manuals by other brands

Jabbla Tellus 6 operating instructions

Jabbla

Jabbla Tellus 6 operating instructions

LY International Electronics H-9500 Series Installation and operating manual

LY International Electronics

LY International Electronics H-9500 Series Installation and operating manual

RADVision Scopia XT1000 user guide

RADVision

RADVision Scopia XT1000 user guide

AT&T MERLIN LEGEND Reference

AT&T

AT&T MERLIN LEGEND Reference

Polycom RealPresence Group Series setup sheet

Polycom

Polycom RealPresence Group Series setup sheet

ProSoft Technology AN-X4-AB-DHRIO user manual

ProSoft Technology

ProSoft Technology AN-X4-AB-DHRIO user manual

Middle Atlantic Products VTC Series instruction sheet

Middle Atlantic Products

Middle Atlantic Products VTC Series instruction sheet

AVT MAGIC AC1 Go Configuration guide

AVT

AVT MAGIC AC1 Go Configuration guide

Prentke Romich Company Vanguard Plus Setting up and using

Prentke Romich Company

Prentke Romich Company Vanguard Plus Setting up and using

Speakerbus iD 712 user guide

Speakerbus

Speakerbus iD 712 user guide

Trelleborg SafePilot CAT PRO user guide

Trelleborg

Trelleborg SafePilot CAT PRO user guide

Sennheiser ADN instruction manual

Sennheiser

Sennheiser ADN instruction manual

ADTRAN NetVanta 7100 Configuration guide

ADTRAN

ADTRAN NetVanta 7100 Configuration guide

AINA PTT Voice Responder quick guide

AINA

AINA PTT Voice Responder quick guide

Yamaha ProjectPhone PJP-100H owner's manual

Yamaha

Yamaha ProjectPhone PJP-100H owner's manual

vissonic VLI Series user manual

vissonic

vissonic VLI Series user manual

Panasonic KX-VC500 user manual

Panasonic

Panasonic KX-VC500 user manual

Poly Trio 8300 user guide

Poly

Poly Trio 8300 user guide

manuals.online logo
manuals.online logoBrands
  • About & Mission
  • Contact us
  • Privacy Policy
  • Terms and Conditions

Copyright 2025 Manuals.Online. All Rights Reserved.

3-863-988-11 (1)
© 2004 Sony Corporation Printed in Japan
Video Communication System PCS-1/1P
Connection Sheet (LAN Connection)
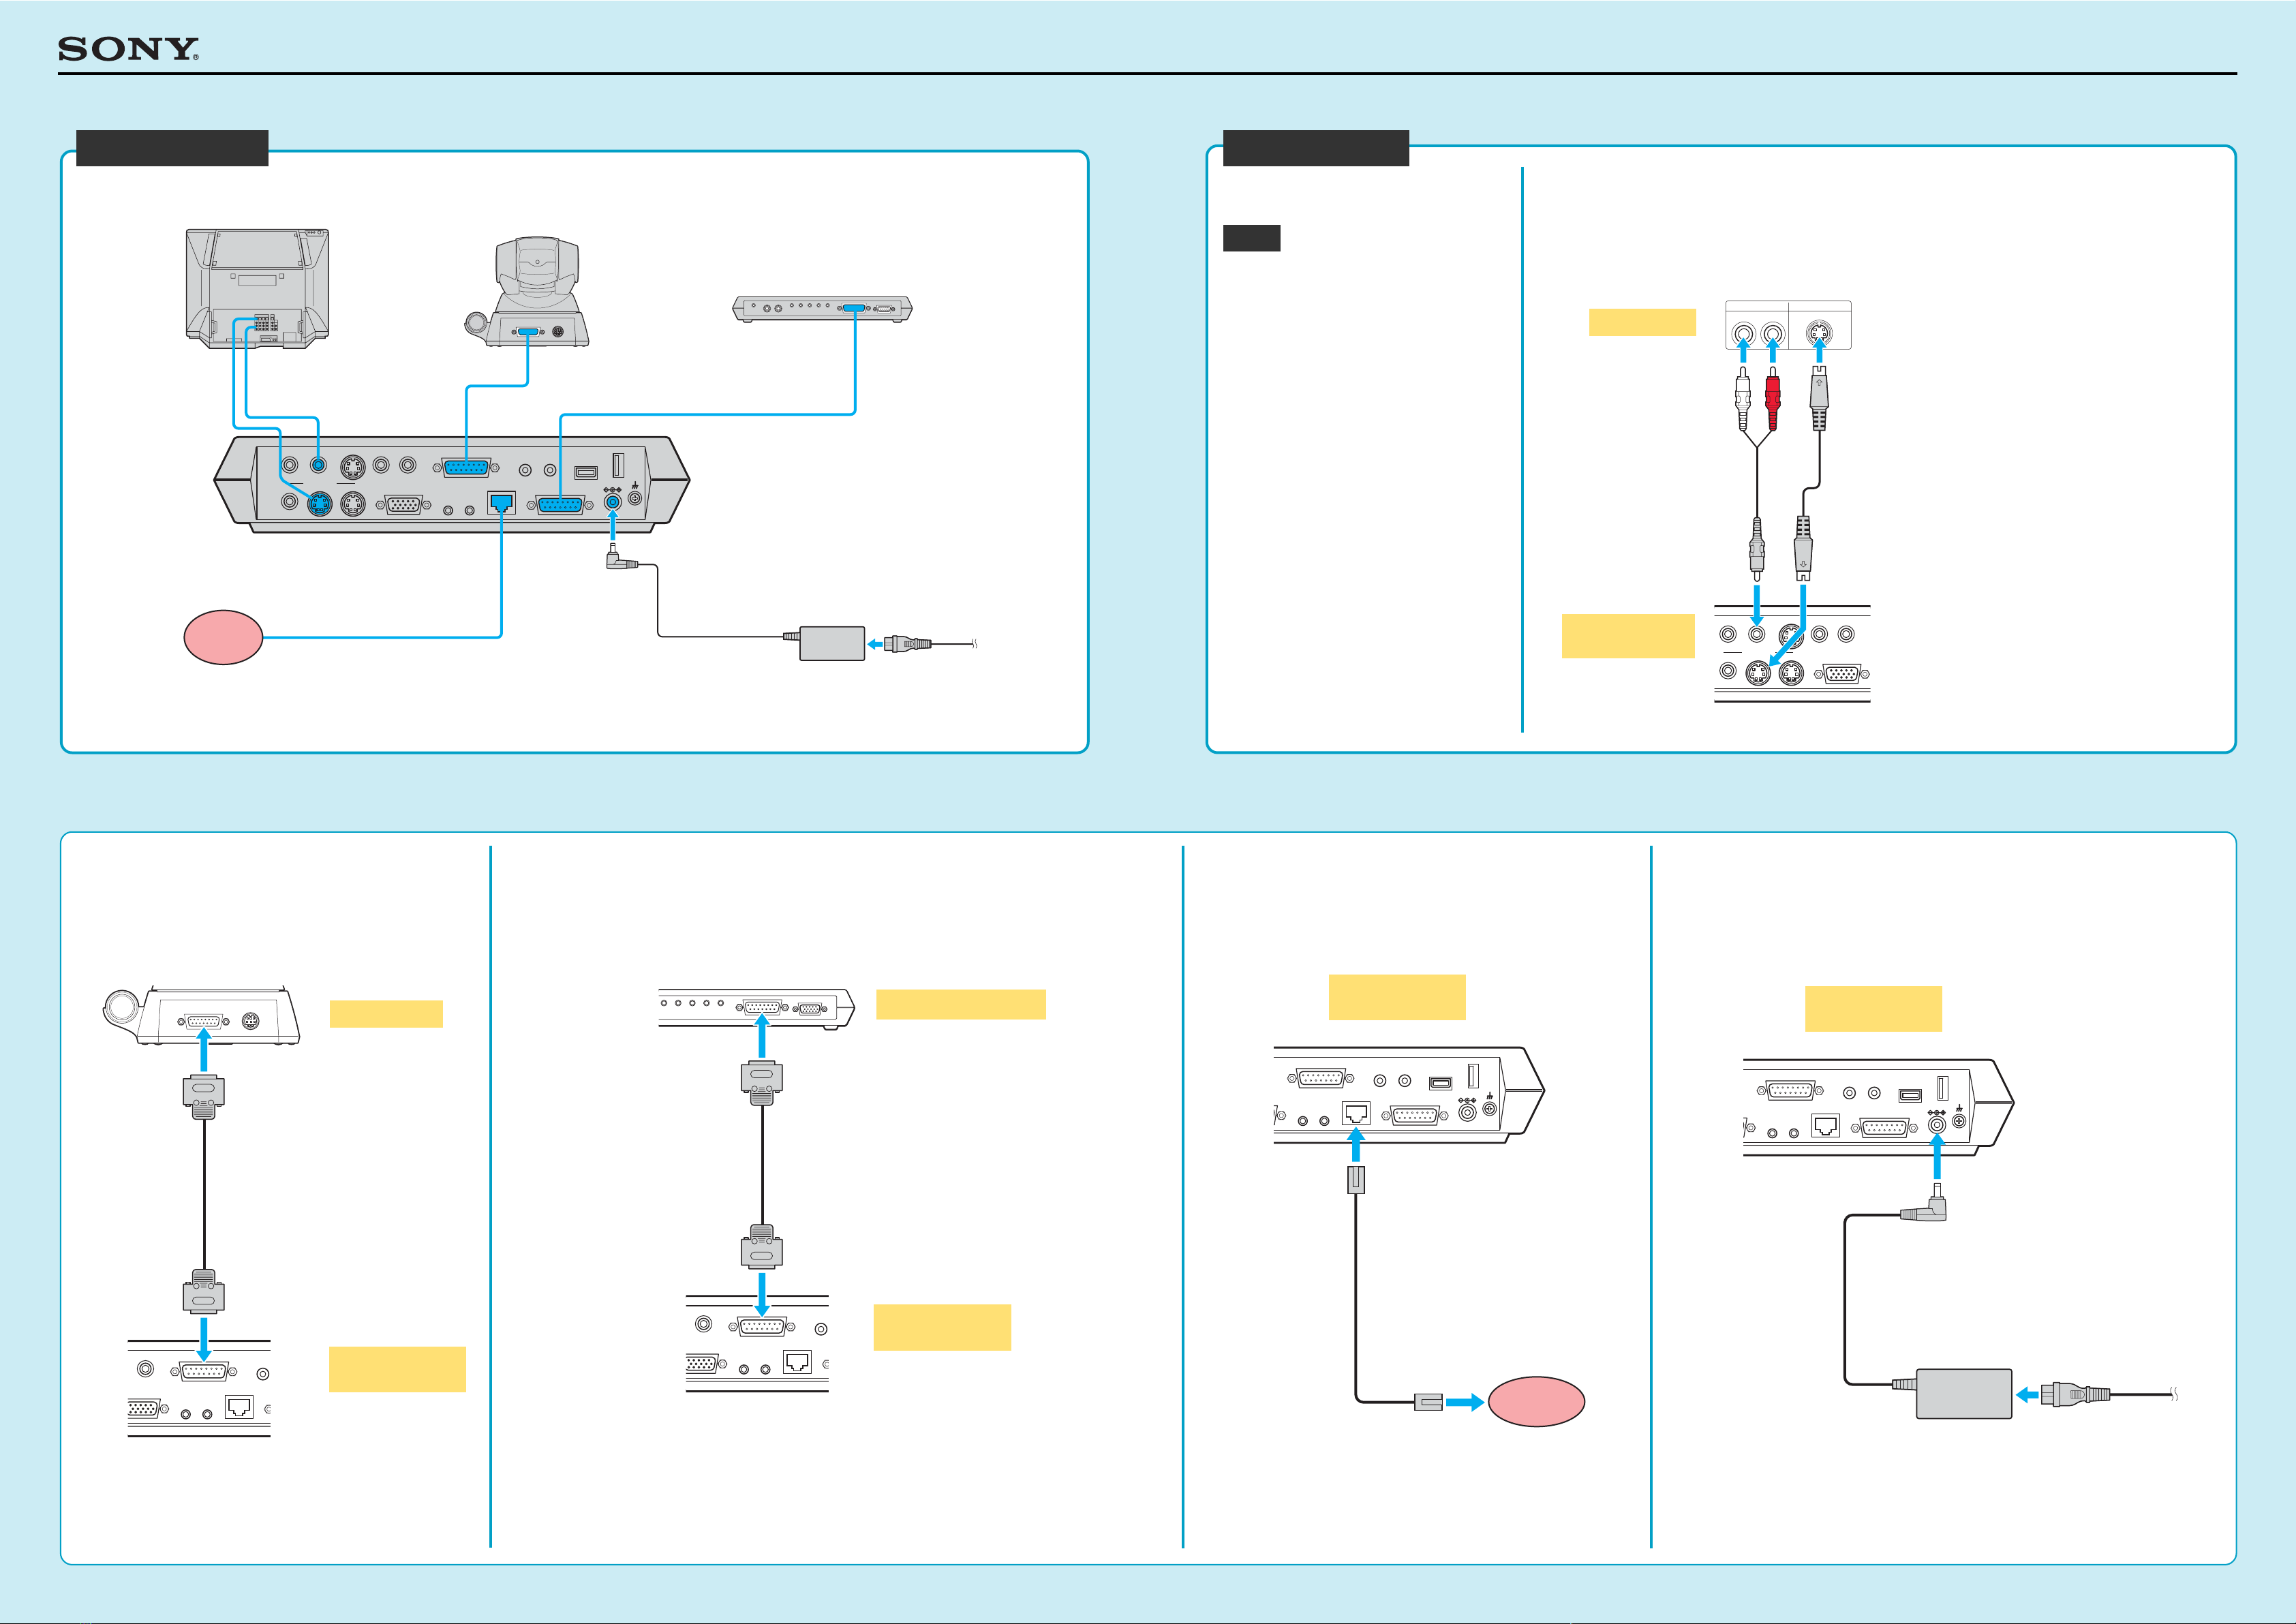
System Setup
2Connect the camera.
Connect the Camera Unit and Communication
Terminal using the supplied camera cable.
3Connect the Data Solution Box.
Connect the Data Solution Box and Communication Terminal using the
cable supplied with the Data Solution Box.
4Connect the LAN cable.
Connect the Communication Terminal to a
LAN using a LAN cable (not supplied).
DC 19.5V
AUDIO OUT
AUDIO IN
AUX1–VIDEO IN–AUX2
CAMERA UNIT MIC
(PLUG IN POWER)
ISDN UNIT WHITE
BOARD
(MIXED)
AUX
MAIN
–
MONITOR
–
SUB
VIDEO OUT
RGB OUT DSB
IR OUT
100BASE-TX
10BASE-T
12
12
AUXMIC 1 MIC 2 MIC 3 MIC 4 MIC 5 TO PROCESSOR RGB OUTOUTLINE OUT IN
TERMINAL VISCA OUT
1TV monitor** 2Camera Unit
Communication Terminal
PCS-P1/P1P
3Data Solution Box
PCS-DSB1**
4LAN cable**
5AC adaptor
Power cord*
PCS-AC195*
LAN
1Connect the TV monitor.
Connect the TV monitor and Communication Terminal
using the supplied audio cable and S-video cable.
• When connecting a second monitor,
use the VIDEO OUT MONITOR
SUB or the RGB OUT connector on
the Communication Terminal, or the
RGB OUT connector on the Data
Solution Box. For details, refer to the
Operating Instructions.
• The AUDIO OUT (MIXED) jack is
used to make an audio recording of
a conference. This is not used
during regular conferences.
DC 19.5V
N
CAMERA UNIT MIC
(PLUG IN POWER)
ISDN UNIT
WHITE
BOARD
DSB
IR OUT
100BASE-TX
10BASE-T
12
12
5Connect the AC adaptor.
Connect the supplied AC adaptor to the Communication
Terminal, and then plug the power cord into a wall outlet.
AC adaptor*
to a wall outlet
(100 -240V AC)
Power cord*
PCS-C1/C1P*
Let’s connect
Used with the Data Solution Box for the first time, the Communication Terminal may
automatically upgrade the software of the Data Solution Box. While the upgrading message
is displayed on the monitor screen, be sure not to turn off the Communication Terminal.
Doing so may cause malfunction of the system.
AUDIO IN
CAMERA UNIT
M
(PLUG
RGB OUT
IR OUT
100BASE-TX
10BASE-T
12
1
MIC 1 MIC 2 MIC 3 MIC 4 MIC 5 TO PROCESSOR RGB OUT
Interface cable
(supplied with the PCS-DSB1)
Data Solution Box
AUDIO IN
CAMERA UNIT
M
(PLUG
RGB OUT
IR OUT
100BASE-TX
10BASE-T
12
1
TERMINAL VISCA OUT
Camera cable*
Camera Unit
Communication
Terminal
DC 19.5V
N
CAMERA UNIT MIC
(PLUG IN POWER)
ISDN UNIT
WHITE
BOARD
DSB
IR OUT
100BASE-TX
10BASE-T
12
12
UTP cable
(category 5, straight)**
to LAN
*supplied
** not supplied
•Be sure to turn off all the equipment
before making any connections.
•Do not connect/disconnect the camera
cable with the power on. Doing so may
damage the Camera Unit or
Communication Terminal.
*supplied
*supplied
Communication
Terminal
*supplied
Communication
Terminal
** not supplied
Communication
Terminal
* supplied
Notes
AUDIO OUT
AUDIO IN
AUX1–VIDEO IN–AUX2
(MIXED)
AUX
MAIN
–
MONITOR
–
SUB
VIDEO OUT
RGB OUT
S-VIDEO INAUDIO IN
LR
S-video cable*
Audio cable*
TV monitor
Communication
Terminal
For safety, do not connect the 100BASE-TX/10BASE-T
connector to a network that applies an excess voltage via
the 100BASE-TX/10BASE-T connector.
DC 19.5V
AUDIO OUT
AUDIO IN
AUX1–VIDEO IN–AUX2
CAMERA UNIT MIC
(PLUG IN POWER)
ISDN UNIT WHITE
BOARD
(MIXED)
AUX
MAIN
–
MONITOR
–
SUB
VIDEO OUT
RGB OUT DSB
IR OUT
100BASE-TX
10BASE-T
12
12
AUX MIC 1 MIC 2 MIC 3 MIC 4 MIC 5 TO PROCESSOR RGB OUTOUTLINE OUT IN
TERMINAL VISCA OUT
Connection Sheet (ISDN Connection)
2Connect the camera.
Connect the Camera Unit and
Communication Terminal using the
supplied camera cable.
4Connect the ISDN Unit.
1Connect the ISDN Unit and Communication Terminal using the interface cable
supplied with the ISDN Unit.
2Connect the ISDN Unit to an ISDN line using an ISDN modular cable (not supplied).
3Connect the Data Solution Box.
Connect the Data Solution Box and Communication
Terminal using the cable supplied with the Data Solution
Box.
1Connect the TV monitor.
Connect the TV monitor and Communication Terminal using the
supplied audio cable and S-video cable.
•When connecting a second monitor,
use the VIDEO OUT MONITOR SUB
or the RGB OUT connector on the
Communication Terminal, or the RGB
OUT connector on the Data Solution
Box. For details, refer to the Operating
Instructions.
•The AUDIO OUT (MIXED) jack is used
to make an audio recording of a
conference. This is not used during
regular conferences.
DC 19.5V
MIC
(PLUG IN POWER)
ISDN UNIT
WHITE
BOARD
DSB
12
12 3
12 3 4 5 6
DC 19.5V
N
CAMERA UNIT MIC
(PLUG IN POWER)
ISDN UNIT
WHITE
BOARD
DSB
IR OUT
100BASE-TX
10BASE-T
12
12
5Connect the AC adaptor.
Connect the supplied AC adaptor to the
Communication Terminal, and then plug the power
cord into a wall outlet.
AC adaptor*
to a wall outlet
(100 - 240V AC)
Power cord*
1TV monitor** 2Camera Unit
Communication Terminal
PCS-P1/P1P
3 Data Solution Box
5AC adaptor
Power cord*
PCS-AC195*
PCS-C1/C1P*
4ISDN Unit**
PCS-DSB1**
System Setup
Data Solution Box
ISDN
line
Used with the Data Solution Box for the first time, the
Communication Terminal may automatically upgrade the software
of the Data Solution Box. While the upgrading message is
displayed on the monitor screen, be sure not to turn off the
Communication Terminal. Doing so may cause malfunction of the
system.
Used with an ISDN Unit for the first time, the Communication Terminal may automatically upgrade the
software of the ISDN Unit. While the upgrading message is displayed on the monitor screen, be sure
not to turn off the Communication Terminal. Doing so may cause malfunction of the system.
AUDIO OUT
AUDIO IN
AUX1–
VIDEO IN
–AUX2
(MIXED)
AUX
MAIN
–
MONITOR
–
SUB
VIDEO OUT
RGB OUT
S-VIDEO INAUDIO IN
LR
S-video cable*Audio cable*
AUDIO IN
CAMERA UNIT
M
(PLUG
RGB OUT
IR OUT
100BASE-TX
10BASE-T
12
1
TERMINAL VISCA OUT
Camera cable*
*supplied
** not supplied
Let’s connect
•Be sure to turn off all the
equipment before making
any connections.
•Do not connect/disconnect
the camera cable or the
interface cable with the
power on. Doing so may
damage the Camera Unit,
Communication Terminal or
ISDN Unit.
*supplied
TV monitor
Communication
Terminal
Camera Unit
Communication
Terminal
* supplied ** not supplied
Communication
Terminal
Communication
Terminal
*supplied
Notes
AUDIO IN
CAMERA UNIT
M
(PLUG
RGB OUT
IR OUT
100BASE-TX
10BASE-T
12
1
MIC 1 MIC 2 MIC 3 MIC 4 MIC 5 TO PROCESSOR RGB OUT
ISDN modular cable**
PCS-B384**
PCS-B768**
1
2
to ISDN 1-3
to ISDN 1-6
ISDN Unit (front)
to ISDN
line
Communication
Terminal
ISDN Unit (rear)
Interface cable
(supplied with
the ISDN Unit)
Interface cable
(supplied with the PCS-DSB1)