Sony SU-PJ2000 User manual

1998 by Sony Corporation
取付説明書
お買い上げいただきありがとうございます。
安全のための注意事項を守らないと、
人身事故になることがあります。
この取付説明書には、事故を防ぐための重要な注意事項と製
品の取り付けかたを示しています。この取付説明書をよくお
読みのうえ、製品を安全にお使いください。お読みになった
あとは、いつでも見られるところに必ず保管してください。
Installation manual
Manuel d’installation
Installationshandbuch
Manual de instalación
Manuale d’installazione
3-865-454-02(1)
SU-PJ2000
警告
プロジェクタースタンド
Projector Stand

2
安全のために
警告表示の意味
取扱説明書および製品では、次
のような表示をしています。表
示の内容をよく理解してから本
文をお読みください。
この表示の注意事項を守らない
と、火災や感電などにより死亡
や大けがなど人身事故につなが
ることがあります。
この表示の注意事項を守らない
と、感電やその他の事故により
けがをしたり周辺の物品に損害
を与えたりすることがあります。
注意を促す記号
行為を禁止する記号
行為を指示する記号
お客様へ
この説明書は、サービス専用です。
設置や設置場所の変更は必ずソニーサービス窓口またはお買い上げ店にご依頼
ください。
サービス担当の方へ
ソニー製品は安全に充分に配慮して設計されています。しかし、電気製品は、まち
がった使いかたをすると、火災や感電などにより死亡や大けがなど人身事故につ
ながることがあり、危険です。
この「安全のために」は事故を防ぐために重要な注意事項を示しています。4、5
ページの注意事項をよくお読みのうえ、安全に設置を行ってください。
注意
警告
注意
感電
火災
禁止
強制

3
日本語 English
目次/Table of contents/Table des matières/Inhalt/
Indice/Indice/•ÿø˝
注意
警告 ...............................................................................4
注意
注意 ...............................................................................5
概要 .....................................................................................6
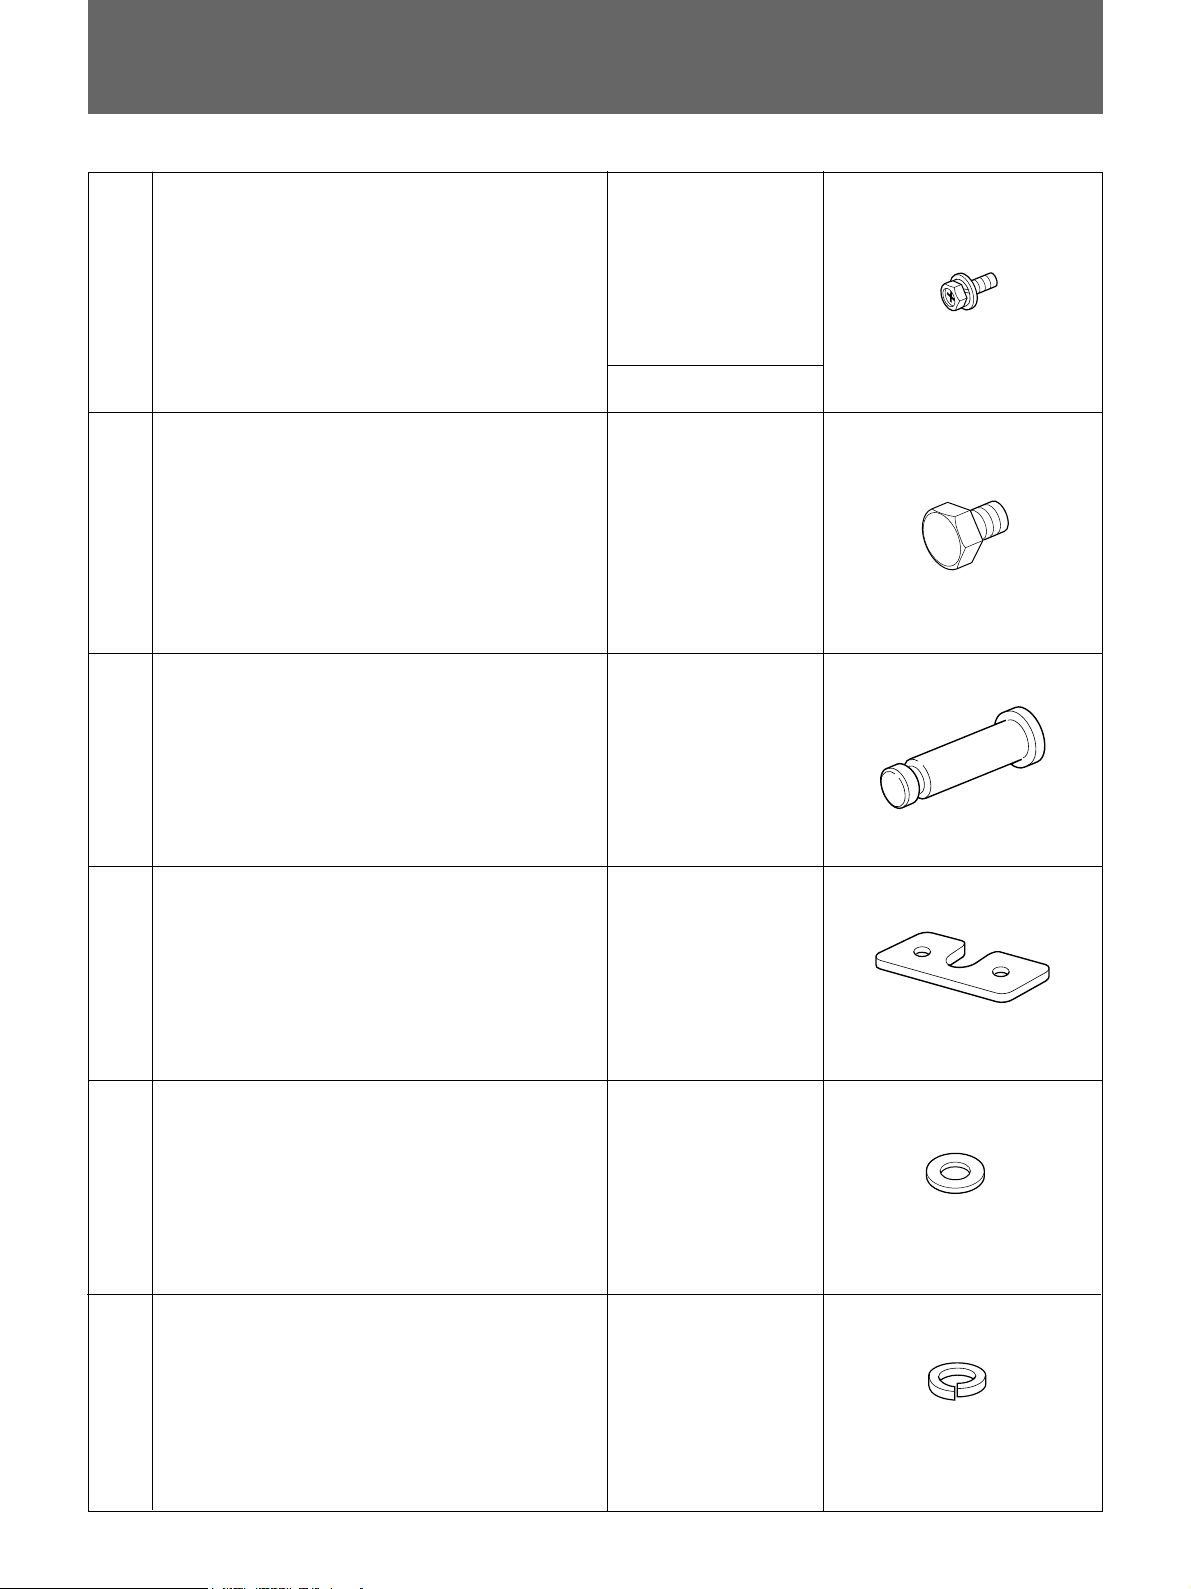
部品表 .................................................................................8
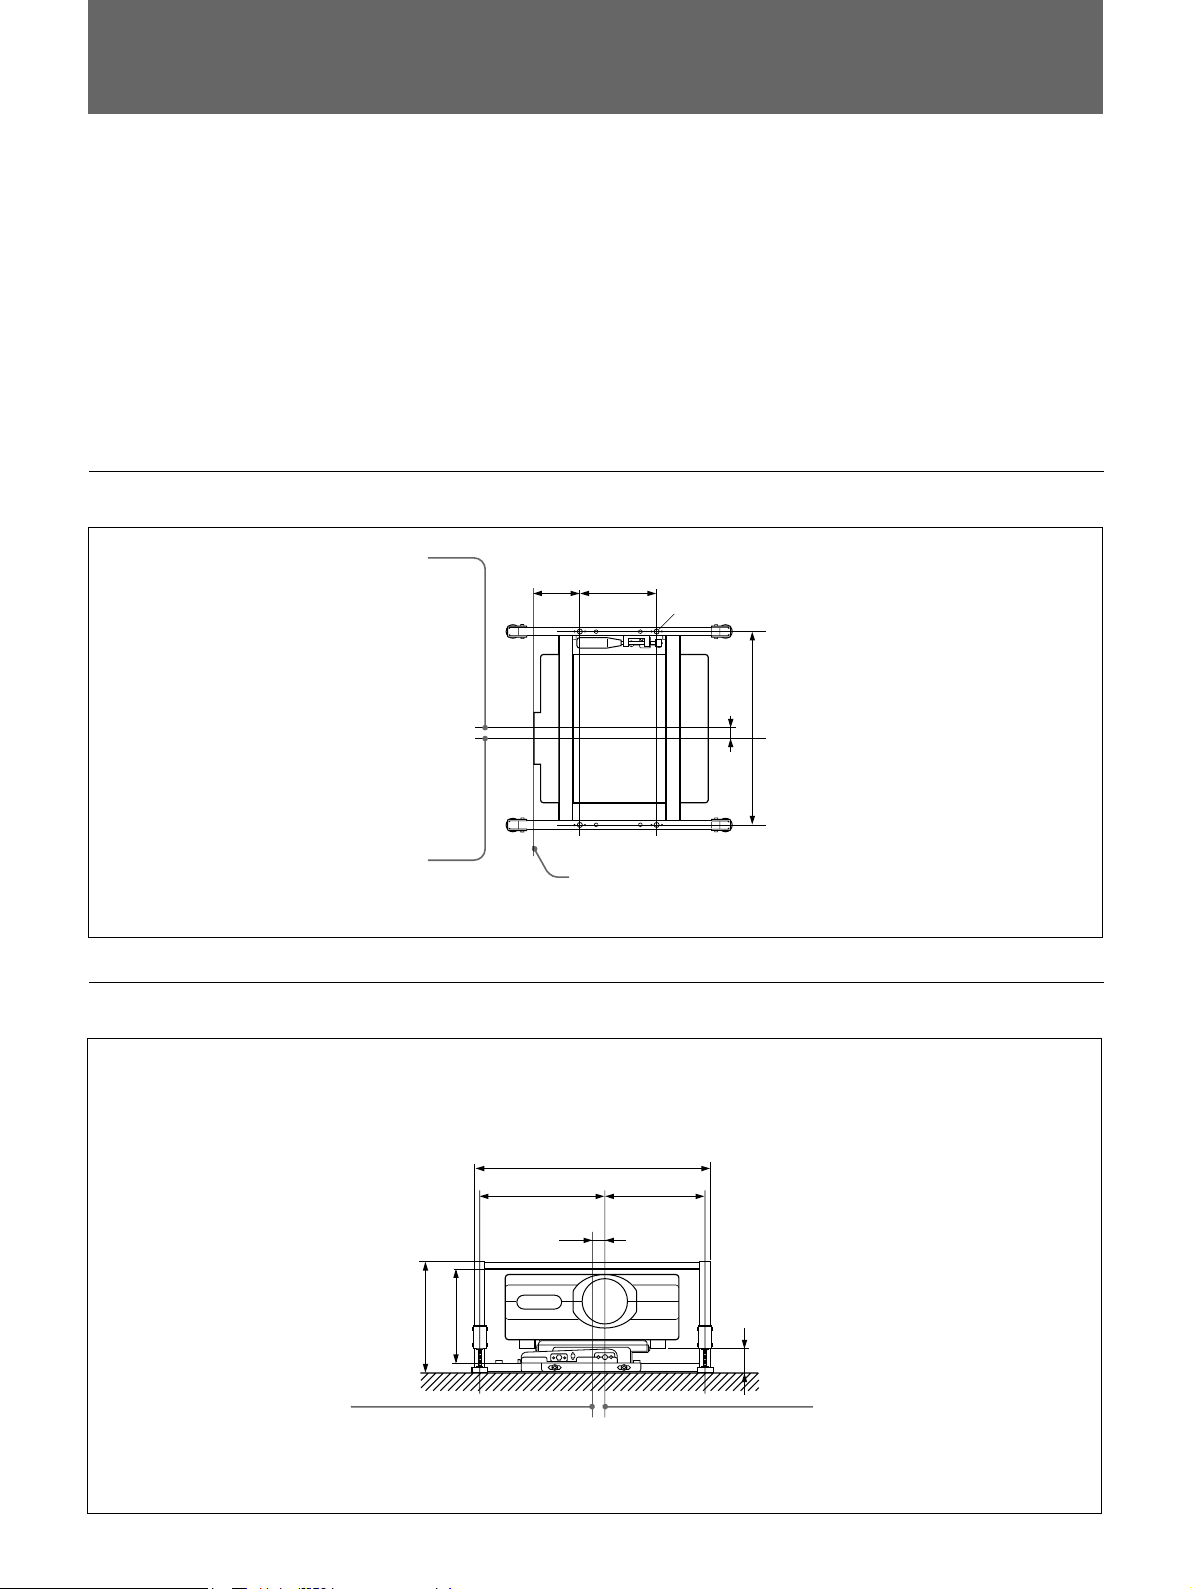
設置寸法..............................................................................9
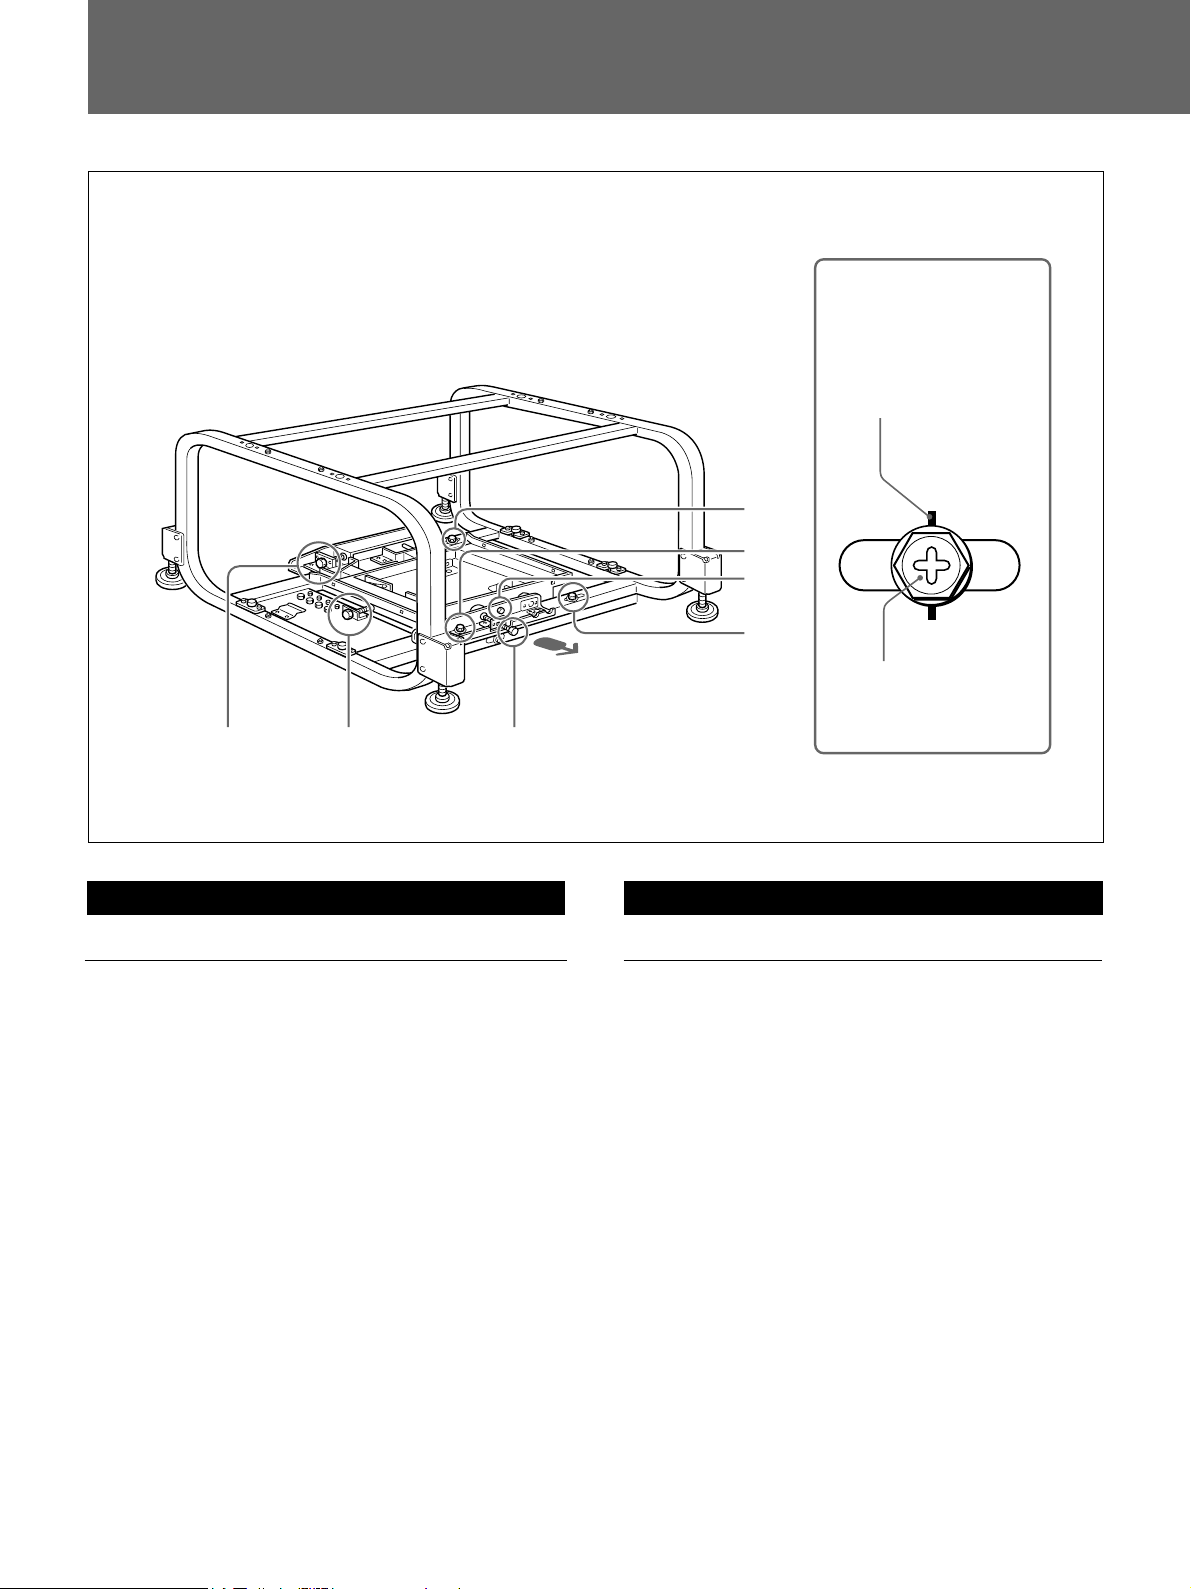
設置方法........................................................................... 10
複数のプロジェクターの画像を合わせる ........................ 20
主な仕様........................................................................... 44
Overview ................................................................... 6
Parts List ................................................................... 8
Installation Diagram .................................................. 9
Installation ............................................................... 10
Aligning projectors................................................... 20
Specifications .......................................................... 44
Español Italiano
Français Deutsch
Présentation .............................................................. 6
Composants .............................................................. 8
Schéma d’installation ................................................ 9
Installation............................................................... 11
Alignement des projecteurs..................................... 21
Spécifications .......................................................... 44
Überblick ................................................................... 6
Teileliste .................................................................... 8
Installationsdiagramm ............................................... 9
Installation ............................................................... 11
Ausrichten der Projektoren...................................... 21
Technische Daten ................................................... 44
Descripción general .................................................. 7
Lista de componentes ............................................... 8
Diagrama de instalación............................................ 9
Instalación............................................................... 11
Alineación de los proyectores ................................. 22
Especificaciones ..................................................... 44
Presentazione ........................................................... 7
Elenco dei componenti.............................................. 8
Schema dell’installazione.......................................... 9
Installazione ............................................................ 11
Allineamento dei proiettori....................................... 22
Caratteristiche tecniche........................................... 44
§§ §Â
∑ß≠z ...........................................................................7
πs•Û™Ì .......................................................................8
©w¶Ï§ÿ§o ....................................................................9
¶w∏À§Ë™k ..................................................................11
®œ®‚•xßκv昙∫πœπ≥≠´¶X.........................................23
•D≠n≥WÆÊ..................................................................44

4
開梱・運搬は二人以上で
開梱・運搬は必ず二人以上で行ってください。一人で行うと腰を痛めたり、落とし
て足を痛めたりすることがあります。
警告
下記の注意を守らないと、
火災や感電により死亡や大けがにつながることがあります。
感電火災
注意

5
注意
下記の注意を守らないと、
けがをしたり周辺の物品に損害を与えることがあります。
プロジェクターを取り付ける際には、手をはさまないように注
意する
プロジェクターを取り付ける際に、誤って手をはさむとけがをすることがありますの
で、作業は注意深く行ってください。
部品の取り付けは注意深く行う
プロジェクターをプロジェクタースタンドに取り付けるときは、部品などの角で手や
指にけがをしないように注意深く作業してください。
電源コードを傷つけない
電源コードを傷つけると、火災や感電の原因となることがあります。
設置時に、プロジェクターとプロジェクタースタンドの間に、電源コードをはさみ込ん
でコードを傷つけないようにご注意ください。
取り付けは手順に従う
手順に従わないと落下の危険があり、けがの原因となることがあります。
強制
注意
注意
禁止

6
日本語
Deutsch
Maximum load of one projector stand: Up to 50 kg (110
lb 4 oz) per projector
The SU-PJ2000 projector stand is designed for use with Sony
LCD data projector VPL-X2000U/E/M. You can stack up to
three stands.
Caution
You can attach only one projector to one projector stand.
English
Français
Charge maximale d'un support pour projecteur: un
projecteur de 50 kg (110 lb 4 oz) max.
Le support pour projecteur SU-PJ2000 est conçu en vue d'une
utilisation avec un projecteur de données LCD Sony VPL-
X2000U/E/M. Vous pouvez superposer jusqu'à trois supports.
Attention
Vous pouvez installer un projecteur par support pour
projecteur.
Maximale Belastbarkeit eines Projektorständers: ein
Projektor mit bis zu 50 kg
Der SU-PJ2000 ist ein Projektorständer für den LCD-
Datenprojektor VPL-X2000E von Sony. Sie können bis zu drei
dieser Ständer übereinander stapeln.
Achtung
In jedem Projektorständer können Sie einen Projektor
montieren.
プロジェクタースタンド1台の耐用荷重:最大50kgのプ
ロジェクターを1台
SU-PJ2000はLCDデータプロジェクターVPL-X2000J用のプロ
ジェクタースタンドです。スタンドを3台まで積み重ねることができ
ます。
ご注意
プロジェクタースタンド1台にプロジェクターは1台しか取り付けら
れません。
概要/Overview/Présentation/Überblick

7
Español
Carga máxima de un soporte para proyector: un
proyector de 50 kg (110 lb 4 oz) como máximo
El proyector SU-PJ2000 está diseñado para su utilización con
proyectores de datos LCD VPL-X2000U/E/M de Sony. Puede
apilar hasta tres soportes.
Precaución
Puede instalar un proyector en cada soporte para proyector.
Carico massimo di un supporto del proiettore: un
proiettore di massimo 50 kg
Il supporto del proiettore SU-PJ2000 è progettato per essere
utilizzato con un proiettore di dati LCD Sony VPL-X2000E. È
possibile impilare fino a tre supporti.
Precauzioni
In un supporto del proiettore è possibile installare un
proiettore.
Italiano
Descripcióngeneral/Presentazione/∑ß≠z
§§ §Â
§@•xßκv昧‰¨[™∫≥çj≠t≤¸°J≥çj50kg™∫ßκv昧@•x
SU-PJ2000 ßκv昧‰¨[¨O¨∞ªP Sony LCD º∆æ⁄ßκvæ˜ VPL-
X2000M§@∞_®œ•Œ¶”≥]≠p™∫-≥öh•i≈|∏À§T•x§‰¨[-
ƒµßi
¶b§@•xßκv昧‰¨[§W•u؇¶w∏À§@•xßκvæ˜-

8
ネジ M6 ×14 (8)
Screw M6 ×14 (8)
Vis M6 ×14 (8)
Schraube M6 ×14 (8)
Tornillo M6 ×14 (8)
Vite M6 ×14 (8)
¡≥µ∑ M6 ×14°]8°^
部品番号/Parts number/
Numéro de pièce/
Teilenummer/
N´umero de componentes/
Numero dei componenti/
πs•ÛΩs∏π
(a)
部品表/Parts List/Composants/Teileliste/Lista de
componentes/Elencodeicomponenti/πs•Û™Ì
ネジ M10 ×20 (4)
Screw M10 ×20 (4)
Vis M10 ×20 (4)
Schraube M10 ×20 (4)
Tornillo M10 ×20 (4)
Vite M10 ×20 (4)
¡≥µ∑ M10 ×20°]4°^
スタックシャフト (4)
Shaft stack (4)
Axes de superposition (4)
Stift (4)
Eje de pila (4)
Perno di impilazione (4)
≈|∏À∂b°]4°^
スタックブラケット (4)
Bracket stack (4)
Supports de superposition (4)
Montagescheibe (4)
Abrazadera de pila (4)
Staffa di impilazione (4)
≈|∏À•d™O°]4°^
4-068-379-01
4-068-383-01
4-068-382-01
(b)
(c)
(d)
4-068-381-01
平座金 M10 (4)
Flat washer M10 (4)
Rondelles plates M10 (4)
Flache Unterlegscheibe M10 (4)
Arandela plana M10 (4)
Rondella piatta M10 (4)
•≠π‘∞È M10°]4°^
4-068-378-01
(e)
バネ座金 M10 (4)
Spring washer M10 (4)
Rondelles élastiques M10 (4)
Federscheibe M10 (4)
Arandela de resorte M10 (4)
Rondella elastica M10 (4)
ºu¬Æπ‘∞È M10°]4°^
4-068-380-01
(f)

9
設置寸法/Installation Diagram/Schéma d’installation/Installationsdiagramm/
Diagramadeinstalación/Schemadell’installazione/
©w¶Ï§ÿ§o
スクリーンサイズと投射距離の寸法については、プロジェクターの設置説明書をご覧ください。
For details of screen size and installation measurement for projection, refer to the Installation Manual of the projector.
Pour plus de détails sur le format d’écran et la distance de projection, consultez le manuel d’installation du projecteur.
Genaue Angaben zu Projektionsschirmgröße und Installationsmaßen für die Projektion entnehmen Sie bitte dem Installationshandbuch zum
Projektor.
Para obtener información detallada sobre el tamaño de pantalla y las medidas de instalación para proyección, consulte el manual de instalación del
proyector.
Per informazioni dettagliate sulla dimensione dello schermo e le misure di installazione del proiettore, fare riferimento al manuale di installazione
del proiettore.
¶≥√ˆ´Ãπı§ÿ§o©M¶w∏À±π¨I°MΩ–∞—æ\ßκv昙∫¶w∏Àª°©˙Æ—-
前から見た図/Front view/Vue frontale/Vorderansicht/Vista frontal/Vista frontale/´eµ¯πœ
321(12 3/4)
38
(1 1/2)
300(11 7/8)
レンズの中心/Center of the
lens/Centre de l’objectif/Mitte
des Objektivs/Centro del
objetivo/Centro dell’obiettivo/
√Ë¿Y§§§fl
単位 : mm
Unit : mm (inches)
Unité : mm (pouces)
Einheit : mm
Unidades : mm (pulgadas)
Unità : mm
≥ʶϰJmm
75.6 (3)
352 (13 7/8)
上から見た図/Top view/Vue du dessus/Draufsicht/Vista superior/Vista superiore/≠¡µ¯πœ
38 (1 1/2)
プロジェクターの中心、プロジェクタース
タンドの中心/Center of the projector,
Center of the projector stand/Axe du
projecteur, Axe du support de
projecteur/Mitte des Projektors, Mitte
des Projektorständers/Centro del
proyector, Centro del soporte de
proyector/Centro del proiettore, Centro
del mobile di supporto del proiettore/
ßκv昧§§fl°Mßκv昧‰¨[§§§fl
キャビネット前面/Front of the cabinet/Avant du meuble/
Vorderseite des Gehäuses/Parte frontal de la caja/
Parte anteriore dell’apparecchio/春fl´e≠±
レンズの中心/Center of the lens/
Centre de l’objectif/Mitte des
Objektivs/Centro del objetivo/
Centrodell’obiettivo/√Ë¿Y§§§fl
プロジェクターの中心、プロジェ
クタースタンドの中心/Center of
the projector, Center of the
projector stand/Axe du
projecteur, Axe du support de
projecteur/Mitte des
Projektors, Mitte des
Projektorständers/Centro del
proyector, Centro del soporte
de proyector/Centro del
proiettore, Centro del mobile
di supporto del proiettore/
ßκv昧§§fl°Mßκv昧‰¨[§§§fl
718 (28 3/8)
単位 : mm
Unit : mm (inches)
Unité : mm (pouces)
Einheit : mm
Unidades : mm (pulgadas)
Unità : mm
≥ʶϰJmm
397(15 3/4)
180(7 1/8)280(11 1/8)4 –∅18 (HOLE)
750(29 5/8)

10
設置方法/Installation/Installation/Installation/
Instalación/Installazione/¶w∏À§Ë™k
1
日本語
プロジェクタースタンドにプロジェクターを取
り付ける
1固定ネジa、b、c、dをすべてゆるめ、マークの位置に
ネジがあることを確認する。
ずれている場合は、A、B、Cのノブを回して位置を調
整してください。
位置を合わせるには
固定ネジaの場合: Aのノブを回す。
固定ネジb、cの場合: Bのノブを回す。
固定ネジdの場合: Cのノブを回す。
(続く)
a, b, c, d
マーク/Mark/Repère/
Markierung/Marca/
Contrassegno/º–∞O
ネジ/Screw/Vis/
Schraube/Tornillo/
Vite/¡≥µ∑
English
Attaching the projector to the projector stand
1Loosen the screws a, b, c, d, and be sure that the each
screw is positioned to the mark line.
To move the screws to the correct position, turn the knobs
A, B, C.
To move screw a: turn the knob A.
To move screws b, c: turn the knob B.
To move screw d: turn the knob C.
(Continued)
a
c
d
b
AB C
スクリーンサイド/
Screen side/
Côté écran/
zum Projektionsschirm/
Lateral de la pantalla/
Lato dello schermo/
´Ãπı∞º

11
Français
Installation du projecteur sur le support pour
projecteur
1Desserrez les vis a, b, c, d, et veillez à ce que chaque
vis soit positionnée sur la ligne de repère.
Pour déplacer la vis vers la position correcte, tournez les
molettes A, B, C.
Pour déplacer la vis a: tournez la molette A.
Pour déplacer les vis bet c: tournez la molette B.
Pour déplacer la vis d: tournez la molette C.
(suite page suivante)
Deutsch
Montieren des Projektors im Projektorständer
1Lockern Sie die Schrauben a, b, c, d, und achten Sie
darauf, die einzelnen Schrauben auf der Markierungslinie
zu positionieren.
Um die Schrauben an die korrekte Position zu verschieben,
stehen die Knöpfe A, B, Czur Verfügung.
Um Schraube azu verschieben: Drehen Sie Knopf A.
Um die Schrauben b, czu verschieben: Drehen Sie
Knopf B.
Um Schraube dzu verschieben: Drehen Sie Knopf C.
(Fortsetzung)
Español
Instalación del proyector en el soporte para
proyector
1Afloje los tornillos a, b, c, dy compruebe que cada
uno está colocado en la línea de marca.
Para colocar el tornillo en la posición correcta, gire los
mandos A, Bó C.
Para mover el tornillo a: gire el mando A.
Para mover los tornillos by c: gire el mando B.
Para mover el tornillo d: gire el mando C.
(Continúa)
Italiano
Installazione del proiettore al supporto del
proiettore
1Allentare le viti a, b, c, d, quindi assicurarsi che
ciascuna vite sia posizionata sulla linea del contrassegno.
Per spostare la vite sulla posizione corretta, girare le
manopole A, B, C.
Per spostare la vite a: girare la manopola A.
Per spostare le viti b, c: girare la manopola B.
Per spostare la vite d: girare la manopola C.
(continua)
§§ §Â
±Nßκv昶w∏À®Ïßκv昧‰¨[§W
1¿æ™Q¡≥µ∑a°Nb°Nc°Nd®√ΩTª{¶U¡≥µ∑¶Ï§_º–∞OΩu§∫-
≠n±N¡≥µ∑≤æ¶‹•øΩT¶Ï∏m°M¬‡∞±¤∂sA°NB°NC-
≠n≤æ∞¡≥µ∑ a°J¬‡∞±¤∂sA-
≠n≤æ∞¡≥µ∑b°Mc°J¬‡∞±¤∂sB-
≠n≤æ∞¡≥µ∑ d°J¬‡∞±¤∂sC-
°
]´›ƒÚ
°
^

12
23
日本語
2プロジェクタースタンドからマウンティングプレートをはずす。
プラスドライバーでネジ(4)を取りはずします。
3プロジェクターを裏返し、マウンティングプレートを裏返し
て、マウンティングプレートの突起をプロジェクターの穴に
合わせて取り付ける。
スタンドに取り付けられている六角レンチを使って、付属の
ネジM10×20(b)(4)、平座金M10(e)(4)、バネ座金
M10(f)(4)で固定します。
(続く)
マウンティングプレート/Mounting plate/
Cadre de montage/Montageplatte/Placa
demontaje/Attacco/¶w∏À™O
English
2Remove the mounting plate from the projector stand.
Remove the screws (4) with the Phillips head screwdriver.
3Turn over the projector, then turn over the mounting plate
and attach it to the projector aligning the projections of the
mounting plate with the holes of the projector.
Fix the plate with the supplied screw M10 ×20 (b) (4), flat
washer M10 (e) (4) and spring washer M10 (f) (4) by using
the wrench attached to the stand.
(Continued)
(b)
設置方法/Installation/Installation/Installation/Instalación/Installazione/¶w∏À§Ë™k
(e)
(f)

13
Français
2Déposez le cadre de montage du support pour projecteur.
Déposez les vis (4) à l'aide d'un tournevis à tête Phillips.
3Retournez le projecteur, puis retournez le cadre de montage
et fixez-le au projecteur en alignant les saillies du cadre de
montage sur les orifices du projecteur.
Fixez la plaque à l'aide de la vis M10 ×20 (b)(4), de la
rondelle plate M10 (e)(4) et de la rondelle élastique M10
(f)(4) fournies, au moyen de la clé attachée au support.
(suite page suivante)
Deutsch
2Nehmen Sie die Montageplatte vom Projektorständer ab.
Lösen Sie die Schrauben (4) mit einem
Kreuzschlitzschraubenzieher.
3Drehen Sie den Projektor um. Drehen Sie dann die
Montageplatte um, und bringen Sie sie am Projektor an.
Richten Sie dabei die Vorsprünge der Montageplatte an den
Aussparungen am Projektor aus.
Fixieren Sie die Platte mit den mitgelieferten Schrauben
M10 ×20 (b)(4), den flachen Unterlegscheiben M10 (e)(4)
und den Federscheiben M10 (f)(4). Verwenden Sie dazu
den Schraubenschlüssel, der am Projektorständer befestigt
ist.
(suite page suivante)
Español
2Extraiga la placa de montaje del soporte para proyector.
Quite los tornillos (4) con el destornillador para cabeza
Phillips.
3Dé la vuelta al proyector y también a la placa de montaje,
después, coloque esta última en el proyector, alineando los
salientes de la placa de montaje con los orificios del
proyector.
Utilizando la llave colocada en el soporte, fije la placa con
el tornillo M10 ×20 (b) (4), la arandela plana M10 (e) (4) y
la arandela de resorte M10 (f) (4) suministrados.
(Continúa)
Italiano
2Rimuovere la piastra di montaggio dal supporto del
proiettore.
Rimuovere le viti (4) con un cacciavite Phillips (a stella).
3Capovolgere il proiettore, quindi capovolgere la piastra di
montaggio e installarla sul proiettore allineando le parti
sporgenti della piastra con i fori del proiettore.
Fissare la piastra con le viti M10 ×20 (b)(4), la rondella
piatta M10 (e) (4) e la rondella elastica M10 (f) (4) in
dotazione usando la chiave installata sul supporto.
(continua)
§§ §Â
2±qßκv昧‰¨[§W®˙§U¶w∏À™O-
•Œµ·§O¥∂¡≥µ∑§M®¯§U¡≥µ∑(4)-
3¬Ω¬‡ßκv昰MµM¶Z¬Ω¬‡¶w∏À™O°M±N¶w∏À™O™∫•Y∞_≥°§¿πÔ
∑«ßκv昙∫§’°M±N¶w∏À™O∏À®Ïßκv昧W-
•Œ∏À¶b§‰¨[§W™∫ßʧ‚∏À¶n™˛±a™∫¡≥µ∑M10×20(b)(4)°N
•≠π‘∞ÈM10(e)(4)©Mºu¬Æπ‘∞ÈM10(f)(4)°M©T©w¶w∏À
™O-
°
]´›ƒÚ
°
^

14
45
日本語
4マウンティングプレートを取り付けたプロジェクターの向き
を元に戻し、図 のようにプロジェクタースタンドの下段に後
ろからガイドに合わせて載せてスライドさせる。
5マウンティングプレートが 止まる(一番手前)までスライドさ
せ、固定する。
手順2ではずしたネジ(4)を使用します。
English
4Re-position the projector with the mounting plate attached
so that it faces in the original direction. Then, slide the
projector into the tray of the projector stand from the rear,
using the guides.
5Slide the projector in until the mounting plate stops
(foremost position).
Use the screws (4) removed in step 2.
設置方法/Installation/Installation/Installation/Instalación/Installazione/¶w∏À§Ë™k

15
Français
4Retournez le projecteur avec le cadre de montage installé de
façon à le ramener dans la direction originale. Faites ensuite
coulisser le projecteur le long des guides par l'arrière dans
le chariot du support pour projecteur.
5Faites coulisser le projecteur jusqu'à ce que le cadre de
montage arrive en butée (position frontale).
Utilisez les vis (4) déposées à l'étape 2.
Deutsch
4Drehen Sie den Projektor mit der angeschraubten
Montageplatte wieder um, so daß er wieder richtigherum
steht. Schieben Sie dann den Projektor entlang der
Führungsschienen von hinten in das Fach des
Projektorständers ein.
5Schieben Sie den Projektor hinein, bis die Montageplatte
ganz vorne anschlägt.
Bringen Sie die in Schritt 2gelösten Schrauben (4) wieder
an.
Español
4Vuelva a colocar el proyector en la dirección original con la
placa de montaje instalada. A continuación, coloque el
proyector en la bandeja del soporte para proyector desde la
parte posterior, mediante las guías.
5Inserte el proyector hasta que la placa de montaje haya
alcanzado el tope (la posición más adelante).
Vuelva a colocar los tornillos (4) extraídos en el paso 2.
Italiano
4Girare il proiettore con la piastra di montaggio installata, in
modo da rivolgerlo nella direzione originale. Quindi far
scorrere il proiettore nel vassoio del supporto dalla parte
posteriore, utilizzando le guide.
5Far scorrere il proiettore all'interno finché la piastra di
montaggio non si blocca (posizione principale).
Usare le viti (4) rimosse nel punto 2.
§§ §Â
4±N∏À¶≥¶w∏À™O™∫ßκvæ˜¬Ω¶^≠Ï¥¬¶V°M¶pπœ©“•‹±q¶Z§Ë∂∂
˙¶æ…≠y±Nßκv昪¥ª¥±¿§Jßκv昧‰¨[§Uºh-
5ª¥ª¥±¿§Jßκvæ˜™Ω¶‹¶w∏À™O∞±§Ó§£∞°]®ÏπF≥ôe§Ë°^-
•Œ¶b®B∆J2®¯§U™∫¡≥µ∑(4)±N®‰©T©w-

16
2
日本語
プロジェクタースタンドを積み重ねる
プロジェクタースタンドSU-PJ2000は3台まで積み重ねて使うこと
ができます。
1プロジェクターを取り付けたプロジェクタースタンド(1台目)
を設置場所に運ぶ。
スクリーンに対して傾きの無い場所に設置してください。
2プロジェクターのハッチパターンを投射して水平、垂直を確
認し、図中のA(4箇所)を市販のボルト(M14)とワッシャー
(M14)で固定する。
32台 目、3台目のプロジェクターについて「プロジェクタースタ
ンドにプロジェクターを取り付ける」(10ページ)の手順1〜
3を行う。
41台目のプロジェクタースタンドの上に2台目のプロジェクター
スタンドを積み重ねる。
(続く)
English
Stacking the projector stand
You can stack up to three SU-PJ2000 projector stands.
1Put the 1st projector stand with the projector at the place
they are to be used.
Place the stand on a flat surface facing the screen.
2Display the HATCH pattern of the projector, adjust the
horizontal and vertical positioning and fix the A (4) with
the commercially available bolts (M14) and washers (M14).
3Follow to the steps 1to 3of “Attaching the projector to the
projector stand” (page 10) for 2nd and 3rd projectors.
4Stack the 2nd projector stand on the 1st stand.
(Continued)
設置方法/Installation/Installation/Installation/Instalación/Installazione/¶w∏À§Ë™k
A
A

17
Superposition de supports pour projecteur
Vous pouvez superposer jusqu'à trois supports pour projecteur
SU-PJ2000.
1Amenez le 1er support pour projecteur avec le projecteur
installé sur le lieu d'utilisation.
Placez le support en position horizontale face à l'écran.
2Affichez la mire HATCH du projecteur, ajustez le
positionnement horizontal et vertical et fixez les éléments A
(4) à l'aide de boulons (M14) et de rondelles (M14)
disponibles dans le commerce.
3Exécutez les étapes 1à 3de la procédure d’ “Installation du
projecteur sur le support pour projecteur” (page 11) pour les
2e et 3e projecteurs.
4Installez le 2e support pour projecteur au-dessus du 1er
support. (suite page suivante)
Français
Stapeln der Projektorständer
Sie können bis zu drei Projektorständer SU-PJ2000 übereinander
stapeln.
1Transportieren Sie den ersten Projektorständer mit dem
Projektor an die Stelle, an der er verwendet werden soll.
Stellen Sie den Ständer so auf, daß er gegenüber der
Projektionsleinwand nicht geneigt ist.
2Rufen Sie am Projektor das Gittermuster (HATCH) auf,
stellen Sie die horizontale und die vertikale Position ein,
und fixieren Sie die mit A markierten Stellen (4) mit
handelsüblichen Schrauben (M14) und Unterlegscheiben
(M14).
3Montieren Sie nun die Montageplatten an den Projektoren 2
und 3, wie in Schritt 1bis 3unter “Montieren des
Projektors im Projektorständer” (Seite 11) erläutert.
4Stellen Sie den zweiten Projektorständer auf den ersten.
(Fortsetzung)
Deutsch
Apilamiento de soportes para proyector
Puede apilar hasta tres soportes para proyector SU-PJ2000.
1Lleve el primer soporte con el proyector al lugar donde se
va a utilizar.
Coloque el soporte en un lugar sin inclinación hacia la
pantalla.
2Muestre el patrón HATCH del proyector, ajuste las
posiciones horizontal y vertical, y fije A (4) con los pernos
(M14) y las arandelas (M14) disponibles en comercio.
3Realice los pasos del 1al 3de “Instalación del proyector
en el soporte para proyector” (página 11) para los
proyectores segundo y tercero.
4Apile el segundo soporte para proyector encima del
primero. (Continúa)
Español
Impilazione del supporto del proiettore
È possibile impilare fino a tre supporti del proiettore SU-PJ2000.
1Portare il primo supporto del proiettore con il proiettore nel
luogo in cui verrà utilizzato.
Sistemare il supporto in una posizione non inclinata verso
lo schermo.
2Visualizzare il modello HATCH (a riquadri) del proiettore,
regolare la posizione orizzontale e verticale e fissare A (4)
con i bulloni (M14) e le rondelle (M14) reperibili in
commercio.
3Seguire i punti da 1a 3della sezione “Installazione del
proiettore al supporto del proiettore” (pagina 11) per il
secondo e il terzo proiettore.
4Impilare il secondo supporto del proiettore sul primo
supporto. (continua)
Italiano
§§ §Â
≈|∏Àßκv昧‰¨[
≥öh•i≈|∏À§T•x SU-PJ2000 ßκv昧‰¨[-
1±N∏À¶≥ßκv昙∫≤ƒ§@•xßκv昧‰¨[∏m§_≥q±`®œ•Œ¶Ï∏m-
±N§‰¨[∏m§_≠±πÔ´Ãπı™∫•≠©Z≠±§W-
2≈„•‹•Xßκv昙∫HATCHΩ’∏’πœßŒ-Ω’æ„§Ù•≠©M´´™Ω¶Ï
∏m°M•Œ•´∞‚™∫¡≥ÆÍ(M14)©Mπ‘∞È(M14)©T©wA(4)-
3πÔ≤ƒ§G•x©M≤ƒ§T•xßκv昰M∂i¶Ê°ß±Nßκv昶w∏À®Ïßκv
昧‰¨[§W°®°]≤ƒ11≠∂°^§§®B∆J1¶‹3™∫æfiß@-
4±N≤ƒ§G•xßκv昧‰¨[≈|∏À¶b≤ƒ§@•x§‰¨[§W-
°
]´›ƒÚ
°
^

18
(a)
(d) (c)
設置方法/Installation/Installation/Installation/Instalación/Installazione/¶w∏À§Ë™k
日本語
51 台目と2 台目のプロジェクタースタンドを固定する。
プロジェクタースタンドの穴にスタックシャフト(c)を下から差し
込み、スタックブラケット(d)をはめて固定します。スタックシャ
フトは付属のネジM6×14(a)(8)で固定します。
6トリプルスタックの場合:2台目のプロジェクタースタンド
の上に3台目のプロジェクタースタンドを積み重ね手順5と同
様に固定する。
72台目、3台目のプロジェクタースタンドにプロジェクターを取
り付ける。
5
English
5Fix the 1st and 2nd stands.
Insert the shaft stack (c) from the under side and fix the
projector stand with the bracket stack (d). Fix the bracket
stack with the supplied screws M6 ×14 (a) (8) .
6Triple stack: Stack the 3rd projector stand on the 2nd stand
and fix them as step 5.
7Attach the projectors to the 2nd and 3rd projector stands.

19
Français
5Fixez les 1er et 2e supports.
Insérez l'axe de superposition (c) par le dessous et fixez le
support pour projecteur à l'aide du support de superposition
(d). Fixez le support de superposition à l'aide des vis M6 ×
14 (a)(8) fournies.
6Triple superposition: Installez le 3e support pour
projecteur au-dessus du 2e et fixez-les suivant la procédure
de l'étape 5.
7Installez des projecteurs dans les 2e et 3e supports pour
projecteurs.
Deutsch
5Befestigen Sie die beiden Projektorständer aneinander.
Führen Sie den Stift (c) von unten her ein, und fixieren Sie
die Verbindung mit der Montagescheibe (d). Schrauben Sie
die Montagescheibe mit den mitgelieferten Schrauben M6 ×
14 (a) (8) fest.
6Stapel aus drei Projektoren: Stellen Sie den dritten
Projektorständer auf den zweiten, und verschrauben Sie die
beiden Ständer, wie in Schritt 5erläutert.
7Montieren Sie die Projektoren im zweiten und dritten
Projektorständer.
Español
5Fije los dos soportes.
Inserte el eje de pila (c) desde abajo y fije el soporte para
proyector con la abrazadera de pila (d). Fije esta última con
los tornillos M6 ×14 (a) (8) suministrados.
6Apilamiento triple: Apile el tercer soporte encima del
segundo y fije ambos como se indica en el paso 5.
7Coloque los proyectores correspondientes en los soportes
segundo y tercero.
Italiano
5Fissare il primo e il secondo supporto.
Inserire il perno di impilazione (c) dal lato inferiore e
fissare il supporto del proiettore con la staffa di impilazione
(d). Fissare la staffa di impilazione con le viti in dotazione
M6 ×14 (a)(8).
6Impilazione tripla: Impilare il terzo supporto del proiettore
sul secondo supporto e fissarli con la stessa procedura del
punto 5.
7Installare i proiettori nel secondo e nel terzo supporto del
proiettore.
§§ §Â
5©T©w≤ƒ§@•x©M≤ƒ§G•x§‰¨[-
±q§U§Ë¥°§J≈|∏À∂b(c)°M•Œ≈|∏À•d™O(d)©T©wßκv昧‰
¨[-•Œ™˛±a™∫¡≥µ∑M6×14(a)(8)©T©w≈|∏À•d™O-
6§T•x≈|∏À°G±N≤ƒ§T•xßκv昧‰¨[≈|∏À¶b≤ƒ§G•x§‰¨[§W®√
´ˆ∑”®B∆J5±N®‰©T©w¶n-
7±Nßκvæ˜∏À®Ï≤ƒ§G•x©M≤ƒ§T•xßκv昧‰¨[§W-

20
複数のプロジェクターの画像を合わせる/Aligningprojectors
日本語
ご注意
•リモートコマンダーで調整するときは、すべてのプロジェクターの
デバイスインデックス番号を違う番号に設定し、リモートコマン
ダーのインデックス機能を使って、別々に操作してください。
•プロジェクターの以下の操作について詳しくは、VPL-X2000Jの
設置説明書をご覧ください。
−インデックス番号の設定
−サービス調整モードの入りかた
−画像の調整
−フォーカスの調整
•2台目、3台目のプロジェクターの画像は1台目の画像に合わせ
ます。そのため、1台目の調整は正確に行ってください。
1す べ て のプロジェクターのリモートコマンダーまたはコントロー
ルパネルのONキーを押して、電源を入れる。
ONインジケーターが緑色に点灯します。
2すべてのプロジェクターでサービス調整モードに入る。
32台目、3 台目のプロジェクターにレンズキャップをかぶせる
か、MUTINGキーを押して映像を一時的に消す。
41台目のプロジェクターのリモートコマンダーまたはコントロー
ルパネルのPATTERNキーを押して、ハッチパターンをスク
リーンに映す。
5スクリーンにハッチパターンが正しく映るように、リモートコマン
ダーまたはコントロールパネルのFOCUS+または−キーを押
してフォーカスを調整する。
6リモートコマンダーまたはコントロールパネルのZOOM+また
は−キーを押して投影する画像の大きさを調 整し、SHIFT+
または−キーを押して垂直方向の投射位置を調整する。
(24ページに続く)
English
Notes
• When adjusting with the Remote Commander, set a different
index number on each projector, and designate the projector to
be operated with the Remote Commander.
• For details on the following operations of the projector, see the
Installation Manual for Dealers of the VPL-X2000U/E/M.
-Setting the index number.
-Entering into the service mode.
-Adjusting the picture.
-Adjusting the focus.
• Complete the adjustment on the 1st projector as the pictures of
the 2nd and 3rd projectors are aligned with the picture of the 1st
projector.
1Press the ON key of the Remote Commander or the control
panel for all projectors.
The ON indicator lights in green.
2Enter into the SERVICE MODE for all projectors.
3Put the lens cap on the 2nd and 3rd projectors or mute the
picture by pressing the MUTING key.
4Press the PATTERN key for the 1st projector on the
Remote Commander or the control panel to display the
HATCH pattern.
5Adjust the focus with the FOCUS + or – key on the Remote
Commander or the control panel.
6Adjust the screen size using the ZOOM + or – key on the
Remote Commander or the control panel, and adjust the
vertical positioning using the SHIFT + or – key.
(Continued to page 24)
Other Sony Projector Accessories manuals

Sony
Sony LMP-Q120 User manual

Sony
Sony PAM-200 User manual

Sony
Sony LMP-H330 User manual

Sony
Sony PK-HS1FL User manual

Sony
Sony VID-P150 User manual

Sony
Sony VID-P110 User manual

Sony
Sony Vision Exchange PEQ-C100 Reference guide

Sony
Sony LMP-E220 User manual

Sony
Sony LMP-P200 User manual

Sony
Sony Operating Instructions LMP-H160 User manual