73203452/A86095-B Copyright©2014 Stanley Security, Inc.
Z1
Z2
Z3
Z3
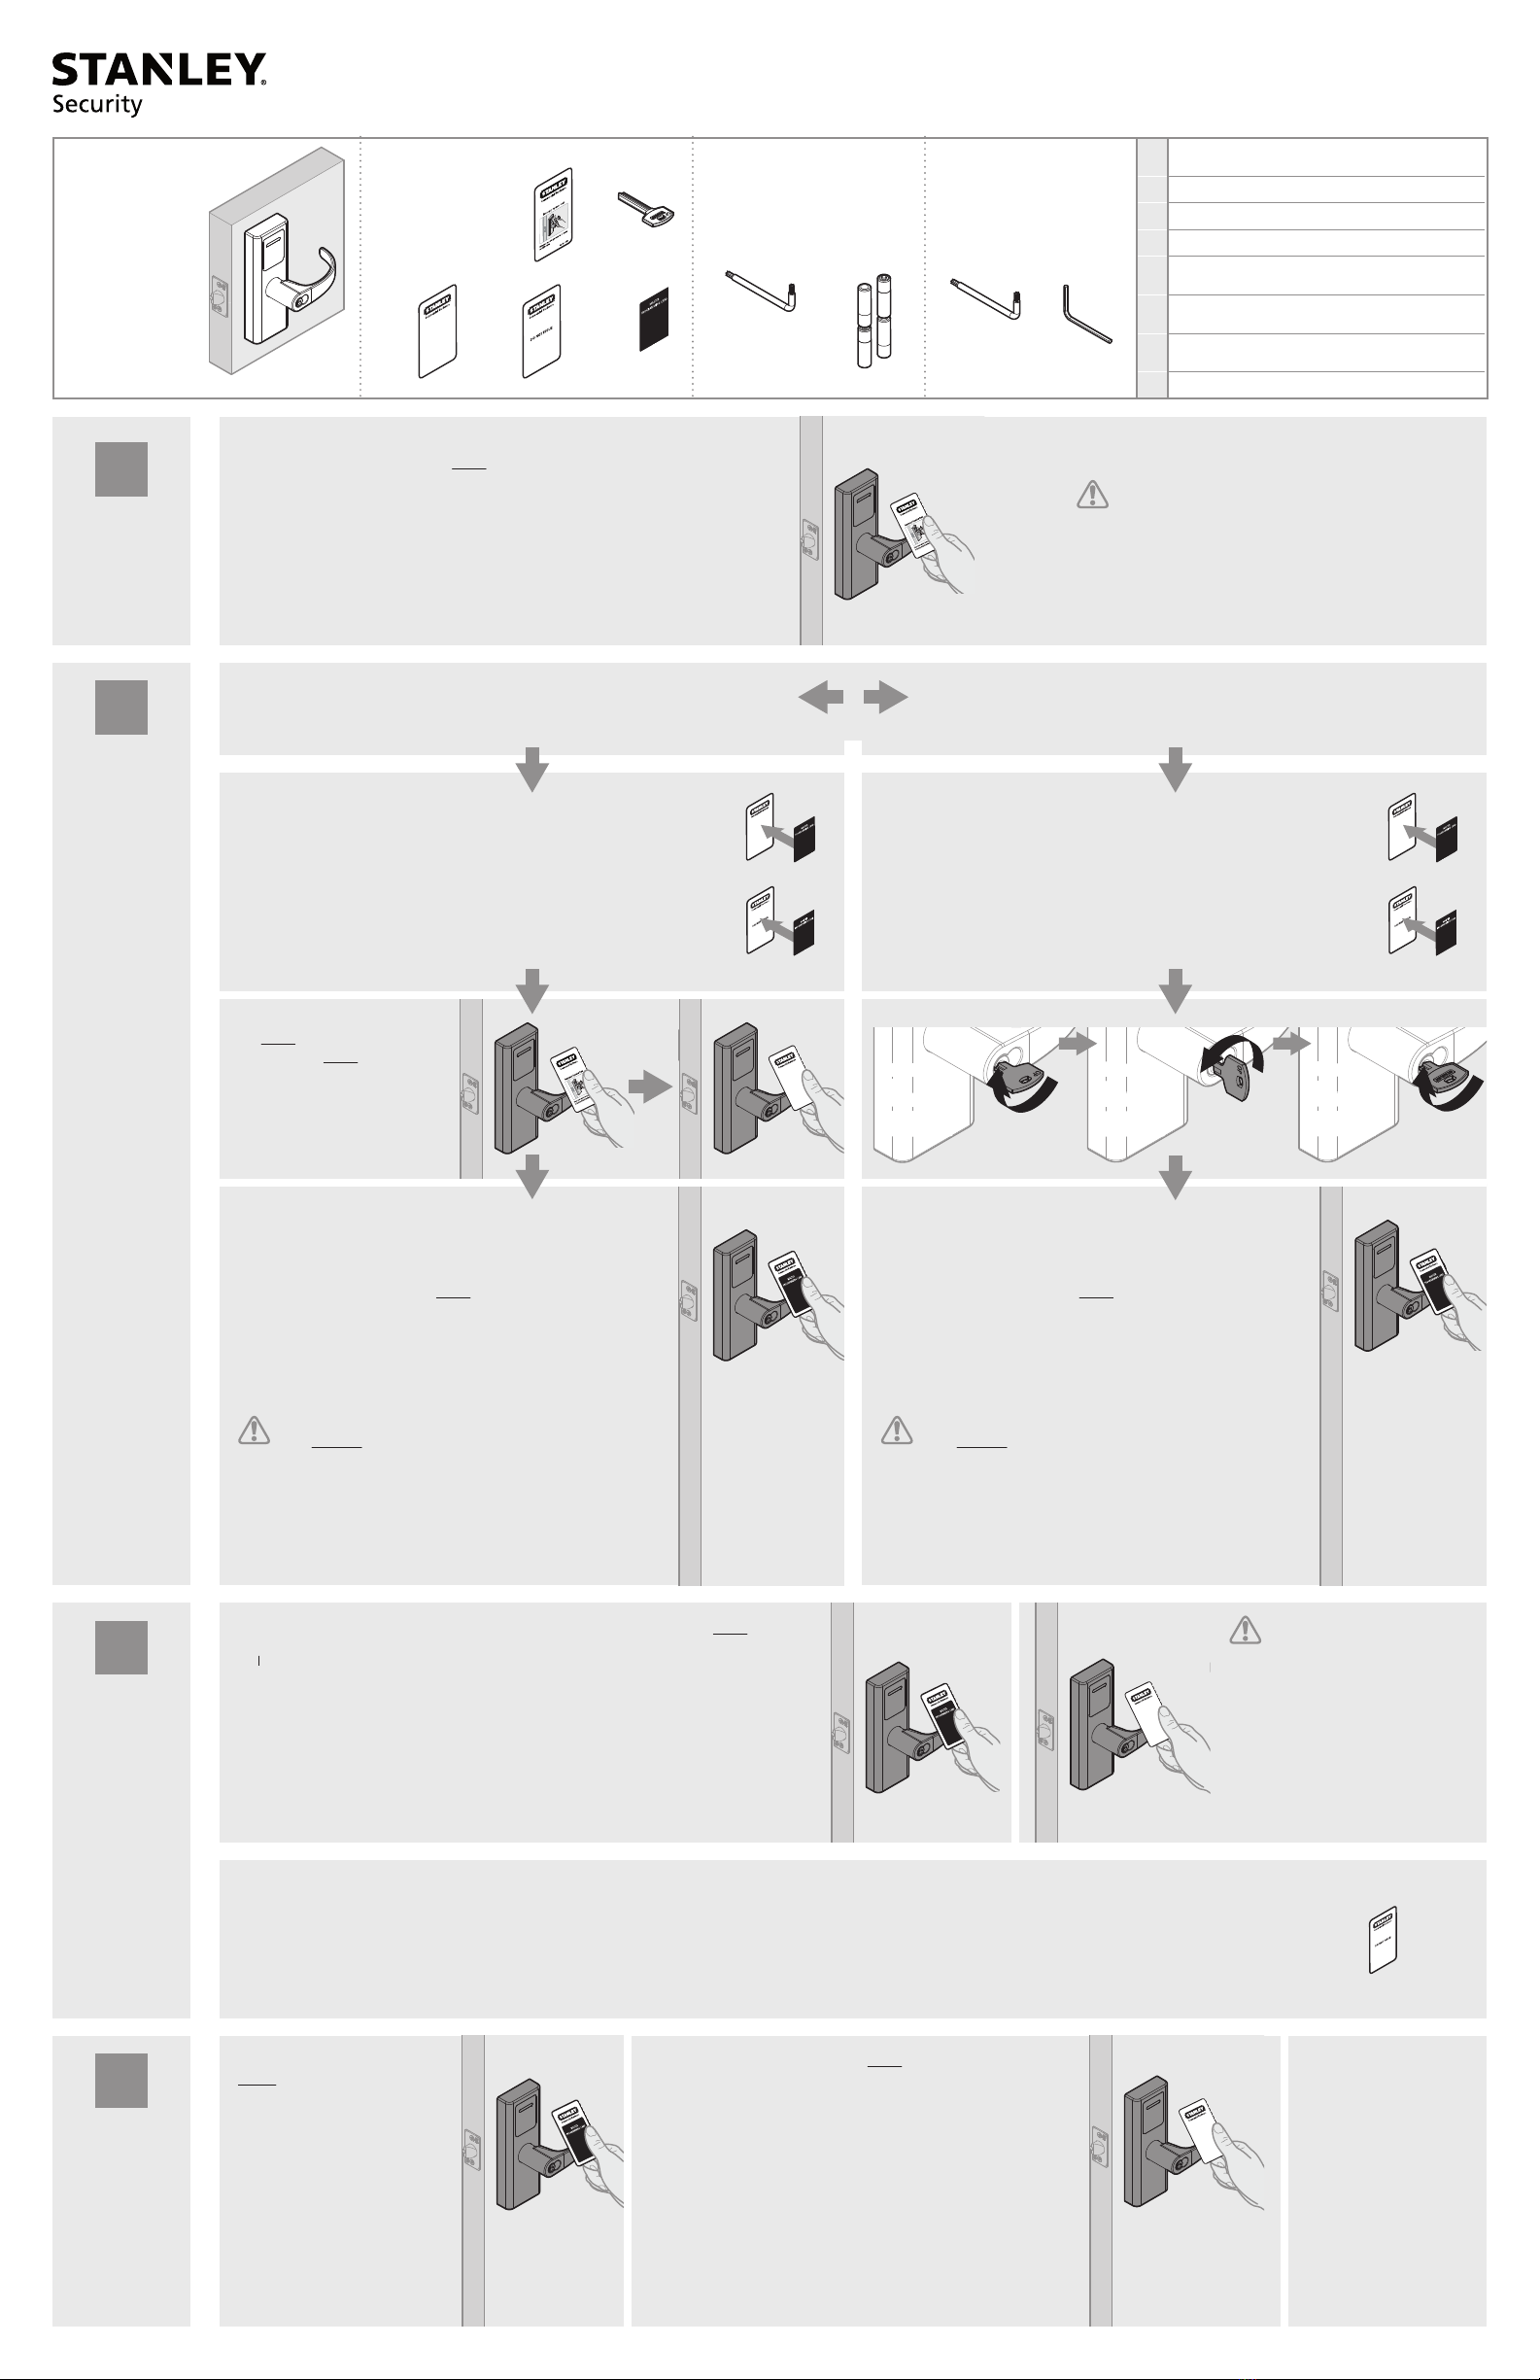
QEL 200 Lockset Quick Start Guide
Guía rápida de inicio de cerraduras QEL 200
Guide de démarrage rapide de l'ensemble serrure et accessoires QEL 200
T
Z1
M
Z2
X2
Z2
Present Temporary Operator Card (M) ONCE. The lockset will enter Normal
Operation, accompanied by a green light. Lockset will relock after 5 seconds.
Presente la tarjeta de operador temporal (M) UNA VEZ. La cerradura ingresará
en modo de Funcionamiento normal, acompañada por una luz verde. La
cerradura se volverá a bloquear después de 5 segundos.
Présenter la Carte opérateur temporaire (M) UNE FOIS. L'ensemble serrure et
accessoires entrera en Opération normale et un voyant vert s'allumera.
L'ensemble se reverrouillera après 5 secondes.
Present Temporary Operator Card
(M) ONCE and then present any
User Card (Z1) ONCE.
Presente la tarjeta de operador
temporal (M) UNA VEZ.
Présenter la Carte opérateur
temporaire (M) UNE FOIS.
M
*TEMPORARY
OPERATION
*FUNCIONAMIENTO
TEMPORAL
*OPÉRATION
TEMPORAIRE
*ENROLL MASTER
PROGRAMMING
CARD
*REGISTRE LA
TARJETA MAESTRA
DE PROGRAMACIÓN
*ACTIVER LA CARTE
MAÎTRESSE DE
PROGRAMMATION
*ENROLL PASSAGE
MODE CARD
*ENROLL PASSAGE
MODE CARD
*ENROLL PASSAGE
MODE CARD
T S
Choose 1 Proximity Card Pack as the Master Programming Card pair. Place
Label (Z3) on both. Store Shadow Card (Z2) away safely for future use.
Elija 1 paquete de tarjetas de proximidad como par de tarjetas maestras de
programación. Coloque la etiqueta (Z3) en ambas. Guarde la tarjeta con sombra
(Z2) en forma segura para usos futuros.
Choisir 1 Paquet Carte de proximité comme paire de Carte maîtresse de
programmation.Apposer sur chacune d'elles une étiquette (Z3). Ranger le
Double de la Carte (Z2) dans un endroit sûr pour une utilisation ultérieure.
The rst card that you add becomes the Master Programming
Card. DO NOT assign the Master Programming card to a user.
La primera tarjeta que añade se convierte en la tarjeta maestra
de programación. NO asigne la tarjeta maestra de programación
a un usuario.
La première carte que vous ajoutez devient la Carte maîtresse
de programmation. NE PAS attribuer la carte Maîtresse de
programmation à un utilisateur.
Once the rst Operator Card is enrolled, the
Temporary Operator Card is void.
Una vez que se registra la primera tarjeta de
operador, la tarjeta de operador temporal se anula.
Une fois que la première Carte opérateur est
activée, la Carte opérateur temporaire est annulée.
If there is no proximity card
interaction for 10 seconds, the mode
will time out and return to Normal Mode.
En caso de no haber interacción con la
tarjeta de proximidad por 10 segundos, el
modo excederá el tiempo de espera y
regresará al modo Normal.
S'il n'y a pas d'interaction avec la carte de
proximité pendant 10 secondes, le mode
expirera et retournera en Mode normal.
QEL 200 will ash orange and give an audio cue.
QEL 200 exhibirá una luz de color naranja y producirá una indicación sonora.
QEL 200 produira un clignotement orange et émettra un signal sonore.
Parts Needed
Piezas necesarias
Pièces nécessaires
QEL 200 Successfully
Installed
Cerradura QEL 200
instalada con éxito
Installation réussie de
QEL 200
Z3
2x
Present Master Programming Card ONCE and a green light will
conrm that the card has been accepted.
Presente la tarjeta maestra de programación UNA VEZ y una luz
verde conrmará que la tarjeta ha sido aceptada.
Présenter la Carte maîtresse de programmation UNE FOIS et un
voyant vert s'allumer conrmera que la carte a été acceptée.
The rst card that you add becomes the Master Programming
Card. DO NOT assign the Master Programming card to a user.
La primera tarjeta que añade se convierte en la tarjeta maestra
de programación. NO asigne la tarjeta maestra de programación
a un usuario.
La première carte que vous ajoutez devient la Carte maîtresse
de programmation. NE PAS attribuer la carte Maîtresse de
programmation à un utilisateur.
QEL 200 will ash orange and give an audio cue.
QEL 200 exhibirá una luz de color naranja y producirá una indicación sonora.
QEL 200 produira un clignotement orange et émettra un signal sonore.
Present Master Programming Card ONCE and a green light will
conrm that the card has been accepted.
Presente la tarjeta maestra de programación UNA VEZ y una luz
verde conrmará que la tarjeta ha sido aceptada.
Présenter la Carte maîtresse de programmation UNE FOIS et un
voyant vert s'allumer conrmera que la carte a été acceptée.
((1x))
((1x))
((1x))
Present Master Programming Card
TWICE and a green light will conrm
that the card has been accepted.
Presente la tarjeta maestra de
programación DOS VECES y una luz
verde conrmará que la tarjeta ha
sido aceptada.
Présenter la Carte maîtresse de
programmation DEUX FOIS et un
voyant vert s'allumer conrmera que
la carte a été acceptée.
((2x))
Present Master Programming Card rst. Immeditely present new Operator Card (Z1) ONCE and a
green light will conrm that the user has been added. Continue to add the rest of your Users. Present
Master Programming Card after user enrollment is complete to take QEL 200 out of Enroll User Mode.
Presente la tarjeta maestra de programación en primer lugar. Presente de inmediato la nueva tarjeta
de operador (Z1) UNA VEZ y una luz verde comunicará que se ha añadido el usuario. Continúe
añadiendo el resto de los usuarios. Una vez que se registra la primera tarjeta de operador, la tarjeta de
operador temporal se anula.
Présenter d'abord la Carte maîtresse de programmation. Présenter immédiatement la nouvelle Carte
opérateur (Z1) UNE FOIS et un voyant vert conrmera qu'un utilisateur a été ajouté. Continuer à
ajouter le reste de vos Utilisateurs. Une fois que la première Carte opérateur est activée, la Carte
opérateur temporaire est annulée.
*ENROLL USERS
*REGISTRO DE
USUARIOS
*ACTIVER DES
UTILISATEUR
Z1
((1x))
Z1
((1x))
Z1
((1x))
((1x))
M
((1x))
The Shadow Card (Z2) from the pack of the newly added Operator Card is needed if the Operator Card is lost or destroyed. The administrator may use the Shadow Card to remove the lost
or destroyed Operator Card from QEL 200’s database. It must be stored away safely for future use.
La tarjeta con sombra (Z2) del paquete perteneciente a la tarjeta del operador recientemente añadido se necesita en caso de pérdida o destrucción de la tarjeta de operador. El administra-
dor puede utilizar la tarjeta con sombra para eliminar la tarjeta de operador perdida o destruida de la base de datos de QEL 200. Se debe guardar en forma segura para usos futuros.
Le Double de la carte (Z2) contenu dans le paquet de la nouvelle Carte opérateur ajoutée est nécessaire si la Carte opérateur est perdue ou détruite. L'administrateur peut utiliser le Double
de la carte pour supprimer de la base de données de QEL 200 la Carte opérateur perdue ou détruite. Elle doit être rangée dans un endroit sûr pour une utilisation ultérieure.
H
(4x)
Battery Replacement Parts Only
Solo reemplazo de batería
Remplacement de pile
uniquement
Factory Reset Parts Only
Solo reinicio a las
conguraciones de fábrica
Réinitialisation uniquement
Z1
Z2
Z3
Z3
Choose 1 Proximity Card Pack as the Master Programming Card pair. Place
Label (Z3) on both. Store Shadow Card (Z2) away safely for future use.
Elija 1 paquete de tarjetas de proximidad como par de tarjetas maestras de
programación. Coloque la etiqueta (Z3) en ambas. Guarde la tarjeta con sombra
(Z2) en forma segura para usos futuros.
Choisir 1 Paquet Carte de proximité comme paire de Carte maîtresse de
programmation.Apposer sur chacune d'elles une étiquette (Z3). Ranger le
Double de la Carte (Z2) dans un endroit sûr pour une utilisation ultérieure.
Rotate Fully
Gire
completamente
Tourner
complètement
Rotate Fully
Gire
completamente
Tourner
complètement
Rotate Fully
Gire
completamente
Tourner
complètement
Option1
Opción1
Option1
Option 2
Opción 2
Option 2
or
o
ou
Immedietly present Operator Card (Z1) ONCE and a green light will conrm
that the user has been accepted. If there is no proximity card interaction for
10 seconds, the mode will time out and return to Normal Mode.
Inmediatamente después presente la tarjeta de operador (Z1) UNA VEZ en
sucesión rápida y una luz verde comunicará que la tarjeta ha sido aceptada.
En caso de no haber interacción con la tarjeta de proximidad por 10
segundos, el modo excederá el tiempo de espera y regresará al modo
Normal.
Présenter immédiatement la Carte opérateur (Z1) UNE FOIS en succession
rapide et un voyant vert s'allumer conrmera que la carte a été acceptée.
S'il n'y a pas d'interaction avec la carte de proximité pendant 10 secondes,
le mode expirera et retournera en Mode normal.
Supervisor Card may now be
used for Passage Mode. See
back page.
Tarjeta Supervisor ahora se
puede usar para el modo de
Passage. Vea la última página.
Superviseur carte peut
maintenant être utilisé pour le
mode de passage. Voir la
dernière page.
MTemporary Operator Card Tarjeta de operador temporal
Carte opérateur temporaire
X2 Operator Key Llave de operador Clé opéateur
Z1 Operator Card Tarjeta de operador Carte opérateur
Z2 Shadow Card Tarjeta de respaldo Double de carte
Z3 Master Programming Label Etiqueta de programación principal
Étiquette programme directeur
TT-15 Security Torx Wrench Llave de seguridad Torx T-15
Clé Torx de sécurité T-15
HFour AA 1.5V LR6 Batteries Four AA 1.5V LR6 Batteries
Four AA 1.5V LR6 Batteries
S3-32 Hex Wrench Llave hexagonal 3-32 Clé hexagonale 3-32
1
2
3
4


