Sunpak S34 Instruction Manual

OPERATION, INSTALLATION & MAINTENANCE INSTRUCTIONS
FOR THE SUNPAK S34 PATIO HEATER
Victoria (Head Office)
12 Yiannis Court
Springvale VIC 3171
Phone61 395494444
Fax 61 3 9546 6069
Authorised Distributor
AppliedClimateControl
AustraliaWide
Phone 1300 798 088
Techrite Controls Australia Pty Ltd
ABN 30 006 959 495
Email info@techrite.com.au
Website www.techrite.com.au
www.techrite.com.au
The SUNPAK, by TECHRITE Controls Australia. A wholly Australian owned company.
‘
‘
Yourpatiowillshinewitha
SUNPAKstainlesssteelheater’

Last Update 4/2/2008 2
SUNPAK S34 Heater Manual © Techrite Controls Australia
OPERATION, INSTALLATION & MAINTENANCE INSTRUCTIONS
FOR THE SUNPAK S34 HEATER
CONTENTS Page
• Description and Features 3
• Sequence of Operation, Maintenance Trouble-Shooting
and warranty
4
• Minimum clearance to combustible materials (Diagrams) 5
• Minimum clearance to combustible materials and angle
mounting
6
• Installation and Mounting 7
• Unit Clearance (Enclosure definitions) 8
• Suggested heater locations and configurations 9
• Proper mounting location 10
• Lighting/Servicing Instructions and Installation Trouble-
Shooting
11
• Contact information 12
Table of Contents

Last Update 4/2/2008 3
SUNPAK S34 Heater Manual © Techrite Controls Australia
The SUNPAK patio heater
provides radiant warmth for
you, your family and friends.
SUNPAK is AGA certified as a flueless
infrared heater suitable for domestic and
commercial outdoor and commercial
indoor use. All units are equipped with
spark ignition and100% shutoff for safety.
SUNPAK’s stainless steel enclosure and
aluminium face grille provides resistance to
the wind. A slim body gives SUNPAK the
versatility to fit easily into a wide variety of
patiosituations.
WARNING:
Appliance must be installed to the
requirements of Gas Code AS5601 and the
local author itie s, both Gas and Electrical.
Retain these instructions for future
reference. Installation of SUNPAK heaters
should only beperformed by an authorised
person.
HEATER FEATURES
HEATER FEATURES
• Automatic operation
• Slim profile
• Decorative safety grille
• Reduced clearance
requirements
• Angle mounting - zero to 30°
• 34MJ/h input
• Natural Gas or LPG
• Direct spark ignition
• 100% safety shutoff
• Stainless steel body
• Easy installation
MODEL S34
Gas-Fired Infrared Heater
For indoor or outdoor operation

Last Update 4/2/2008 4
SUNPAK S34 Heater Manual © Techrite Controls Australia
Sequence of Operation
Turn gas and power ‘ON’. The pilot and burnershould light within 4 seconds. A flame sensor
will shut offthe spark. If the burner does not lightwithin 15 seconds, the flame sensor will shut
the gas valve ’OFF’. To re-light the pilot and burner, shut ‘OFF’ power. Wait 5 minutes. Turn
power back‘ON’.
Maintenance Trouble-Shooting
Problem Possible Causes
No sparkto pilot • Voltage under 240 volts
• Improper sparkgap 2.7mm
• Loose groundwire
• Brokenelectrode
• Faulty electronicmodule
Burnerwon’t light • Air in gas line
• Low gas pressure
• Gas valve failure
• Blockage ingas line ormaininjector
• Brokenelectrode
Inconsistent operation • Variable gas pressure (improperly sized
gas line)
• Variable voltage
• Wind exceeding 24km/h
• Debris inside burner
• Erraticw inds
Deterioration ofthe front grille SUNPAK heaters must be installed in such a
manner as to allow the products of
combustion or hot gases to vent out the top
portion of the heater. When operating
normally, only radiant heat passes through
the front grille. If conditions exist which force
hot gases through the front grille of the
heater, the installation must be altered to
correct the condition.
Limited Warranty and Service
SUNPAK infrared heaters carry a 90-day commercial or one year residential limited factory
warranty. All heaters arestampedwiththe dateof manufacture.In most cases,your dealer
or sales representative will handle the warranty procedure for you. If there is no sales
representative available, the heater may be returned to the factory for repair. Warranty is
limited to repair of heaters at the factory or replacement parts. Any work or repair of this
heater must be performed by qualified service personnel. Any unauthorized tampering with
the heater will void warranty. Techrite will not be liable for any expense to the customer,
except as statedabove.

Last Update 4/2/2008 5
SUNPAK S34 Heater Manual © Techrite Controls Australia
1213mm 600mm
203mm
1206mm
1248mm
1200mm
(Minimum clearance tocombustible materials)
430mm
430mm
1200mm
(Minimum clearance
to combustible materials)
430mm
430mm
430mm
430mm
1200mm
(Minimum clearance
to combustible materials)
S34 WIRING DIAGRAM
50mm
600mm600mm
600mm
600mm

Last Update 4/2/2008 6
SUNPAK S34 Heater Manual © Techrite Controls Australia
1213mm
203mm
203mm
240V
12mm
Part No. Model Description Dimension (mm) Type
12002-2 S34-NAT SUNPAK 34mJ/Hr Heater 203 x 203 x 1213 Natural Gas
12004-2 S34-LP SUNPAK 34mJ/Hr Heater 203 x 203 x 1213 Propane Gas
9.5mm
H = Height
S = Spread of heat
MODEL S34
Horizontal
H 2.74m
S 3.66m
30°An gle
H 2.44m
S 3.66m
SUNPAK will raise the comfort level 3 to 6°C outdoors. The
above coverage table was based on still breeze
conditions. Under w indy conditions, more heat w ill be
required. For example, an 8km/h breeze typically w ill
require twice as many heaters to achieve the same
comfort level. It is recommendedthat awindswept patio
be designedwithwind breaks inorder to stabilize the patio
environment.
ANGLE MOUNTING
The SUNPAK heater may be angle mounted to a
max imum of 30°to accommodate mounting the
heaters around the patio.
MODEL S34
( see chart on page 5)

Last Update 4/2/2008 7
SUNPAK S34 Heater Manual © Techrite Controls Australia
INSTALLATION
Prior to installing your SUNPAK infrared space
heater,the following shouldbe reviewed.
Compliance w ith the following should yield
satisfactory heater operation and minimize
installationcosts.
1. The gas inlet supply and normal operating
manifold pressure for each heater are as
follows. For gas supply line pressure in excess
of 5kPa, consult with your representative or
the factory. The pressure regulator supplied
with the appliance must be installed in the
gas line for natural gas models.
Gas inlet pressure Nat. Gas LP Gas
Max imum pressure 5kPa 5kPa
Manifold pressure 1.0kPa 2.6kPa
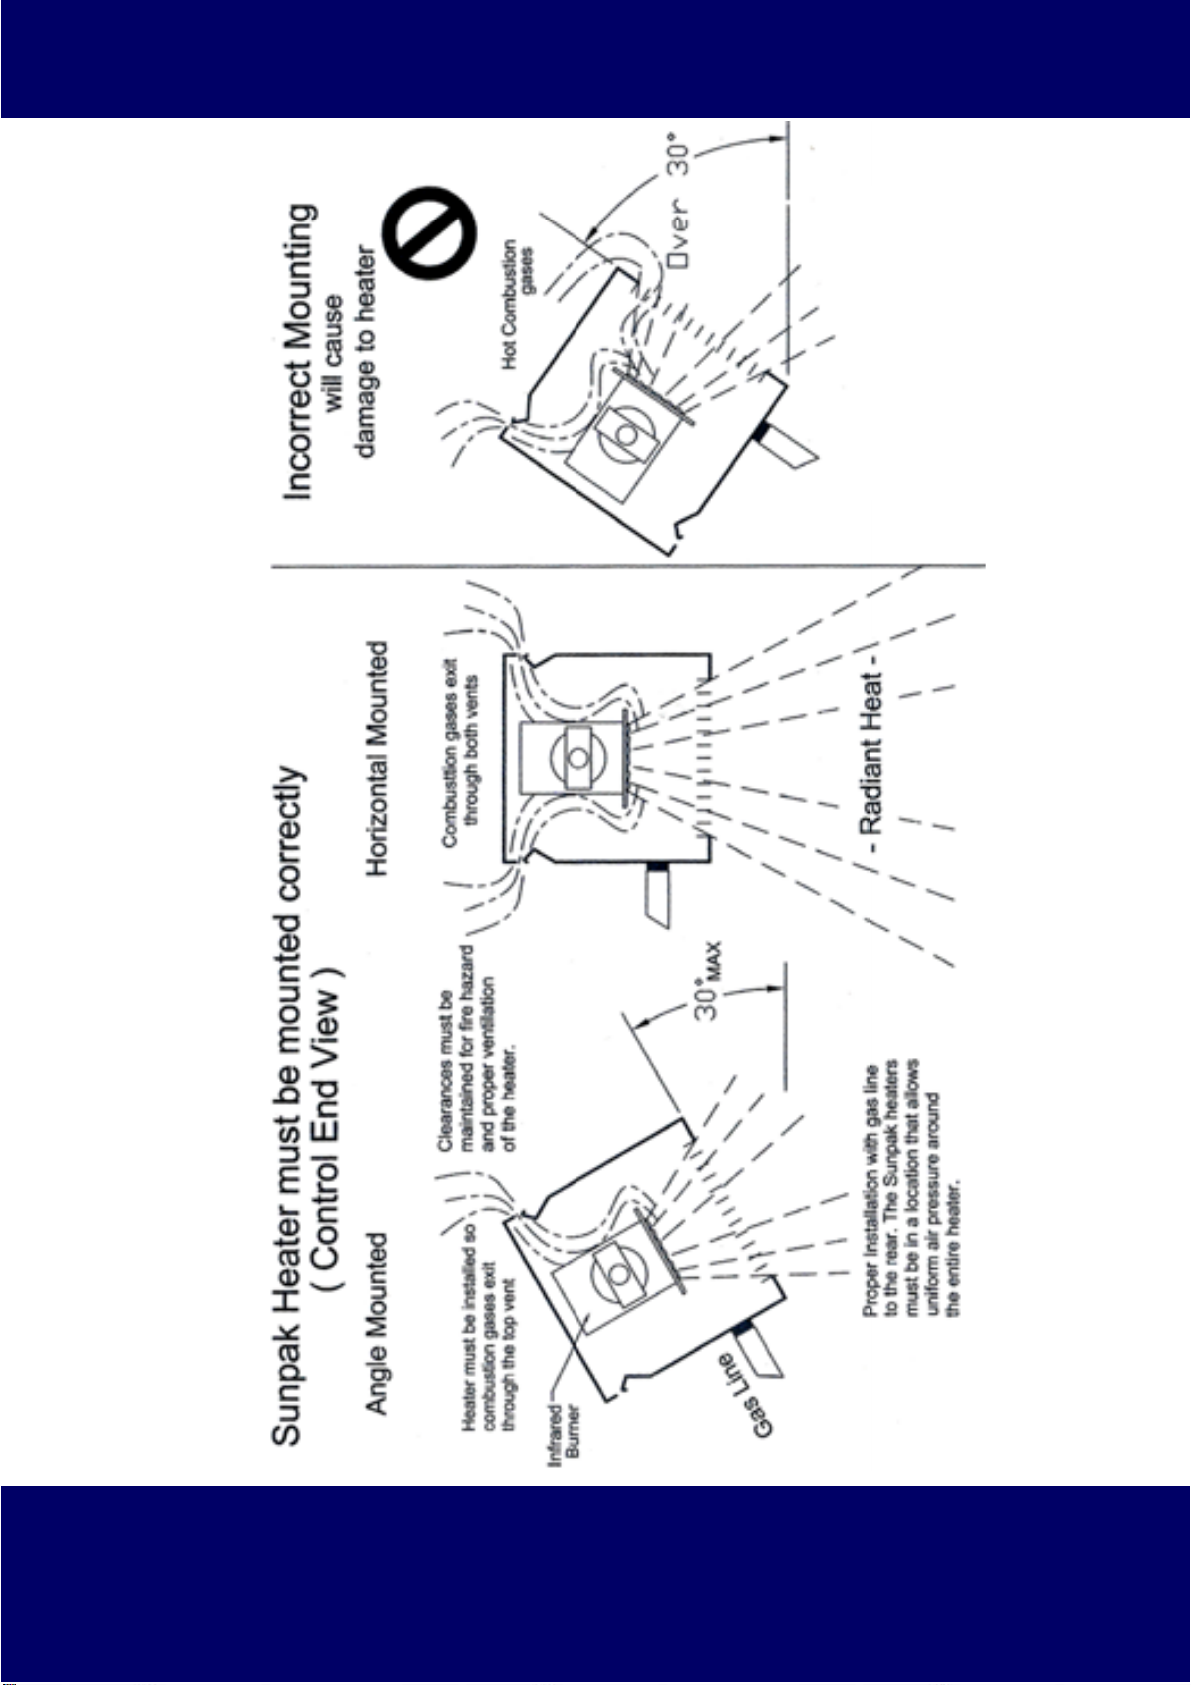
Sunpak heaters must always be operated in a
location that allows uniform air pressure around
the heater. If only part of the heater is located in
awindprotected zone damage to the heater or
incorrect operation may occur. Time should be
taken to observe how the wind will affect the
heaters under local conditions.
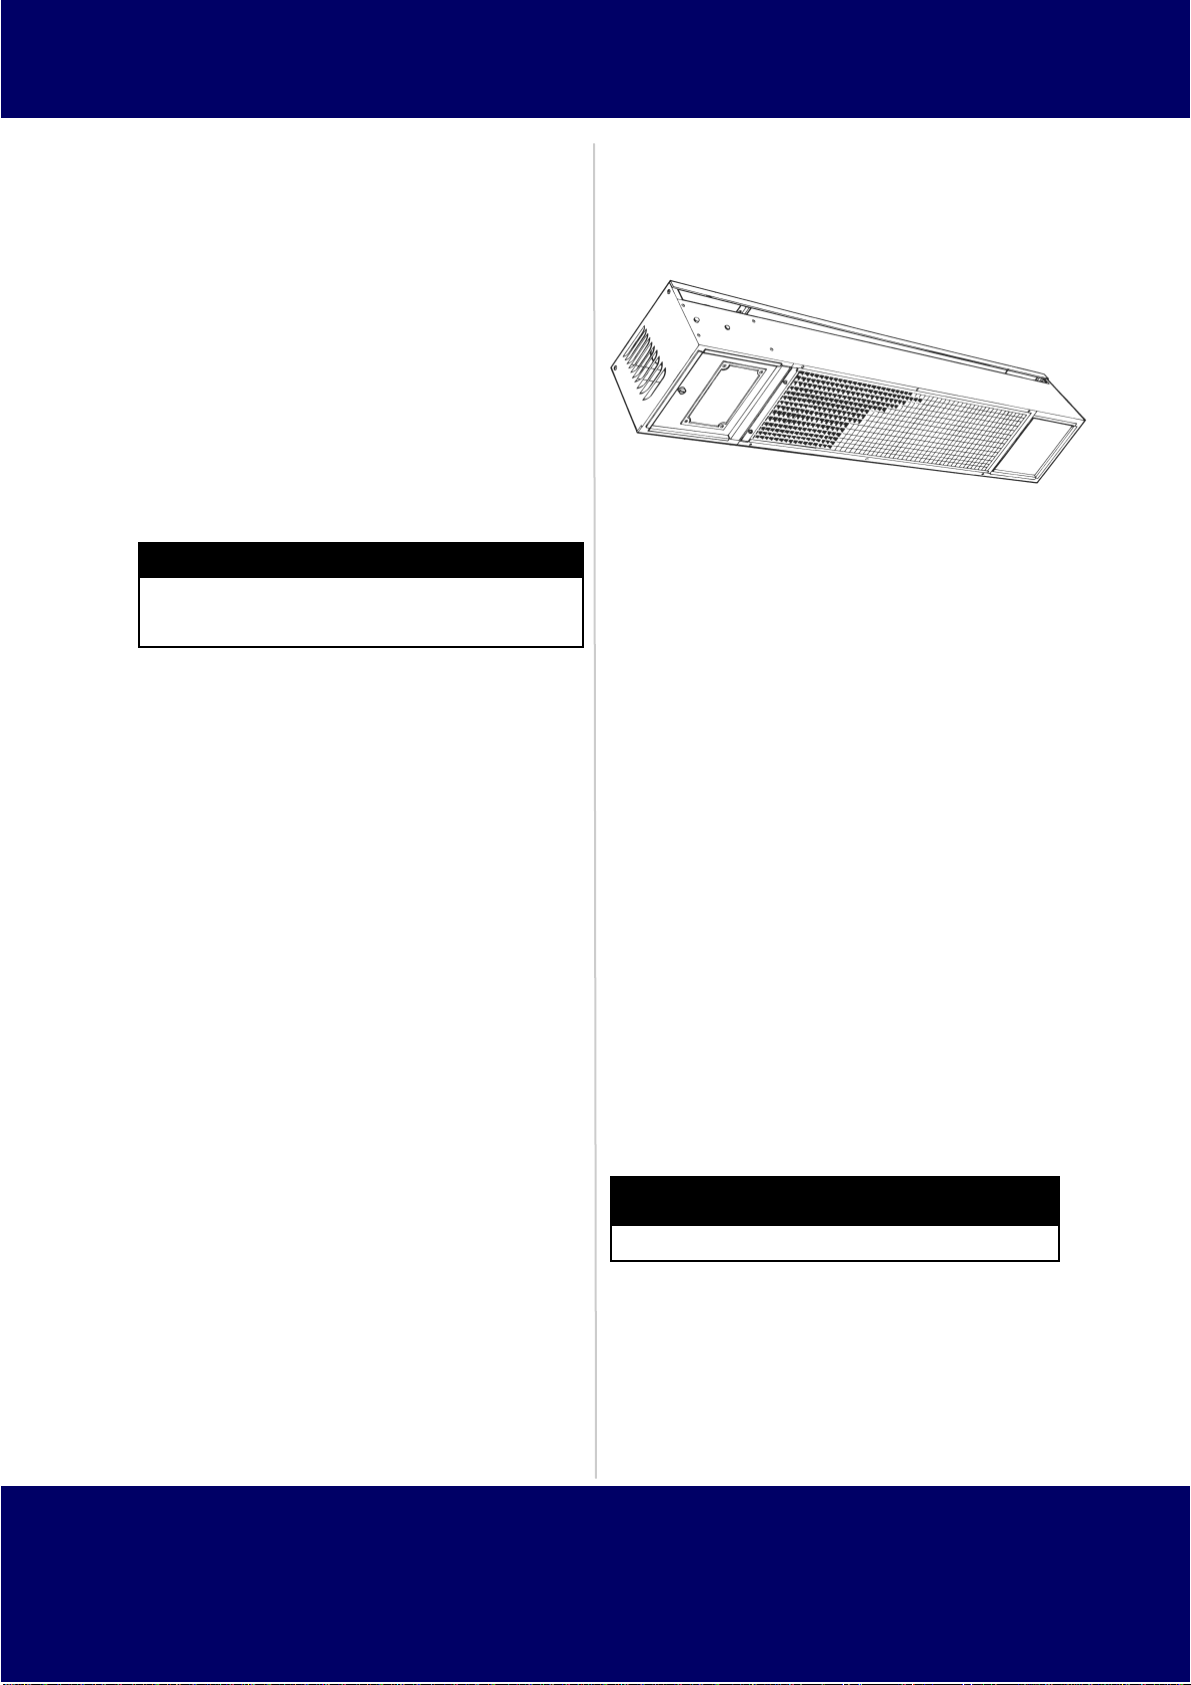
• DO NOT place articles on or against this
appliance.
• DO NOT use or store flammable materials
near this appliance.
• DO NOT spray aerosols in the vicinity of this
appliance while it is operating.
• Children and adults should be alerted to the
hazards of high surface temperatures, burns
and clothing ignition.
• Young children should be carefully supervised
when they are in the area of the appliance.
• Clothing or other flammable materials should
not be hung from the appliance, or placed on
or near the appliance.
• Any guard or other protective device
removed for servicing the appliance must be
replaced prior to operating the appliance.
• Installation of appliances fitted to fixed gas
supply systems and repair of all appliances
must be carried out by a qualified service
person.
• It is imperative that control compartment,
burners and circulating air passageways of
the appliance be kept clean.
2. The heater must be installed in a location such
that it is readily accessible for servicing and
have no restriction of air flow to the air inlet of
the heater’s casing. When installed indoors
(commercial installations only) minimum room
volume 200m3.
4. Wheninstalledoutdoorsthis heater must be in
a covered area protected from rainwater.
5. When installation is complete check the
soundness of the gas connections using a
manometer or soapy w ater.
6. Fully test the appliance’s operation.If unable to
adjust correctly, contact the supplier.
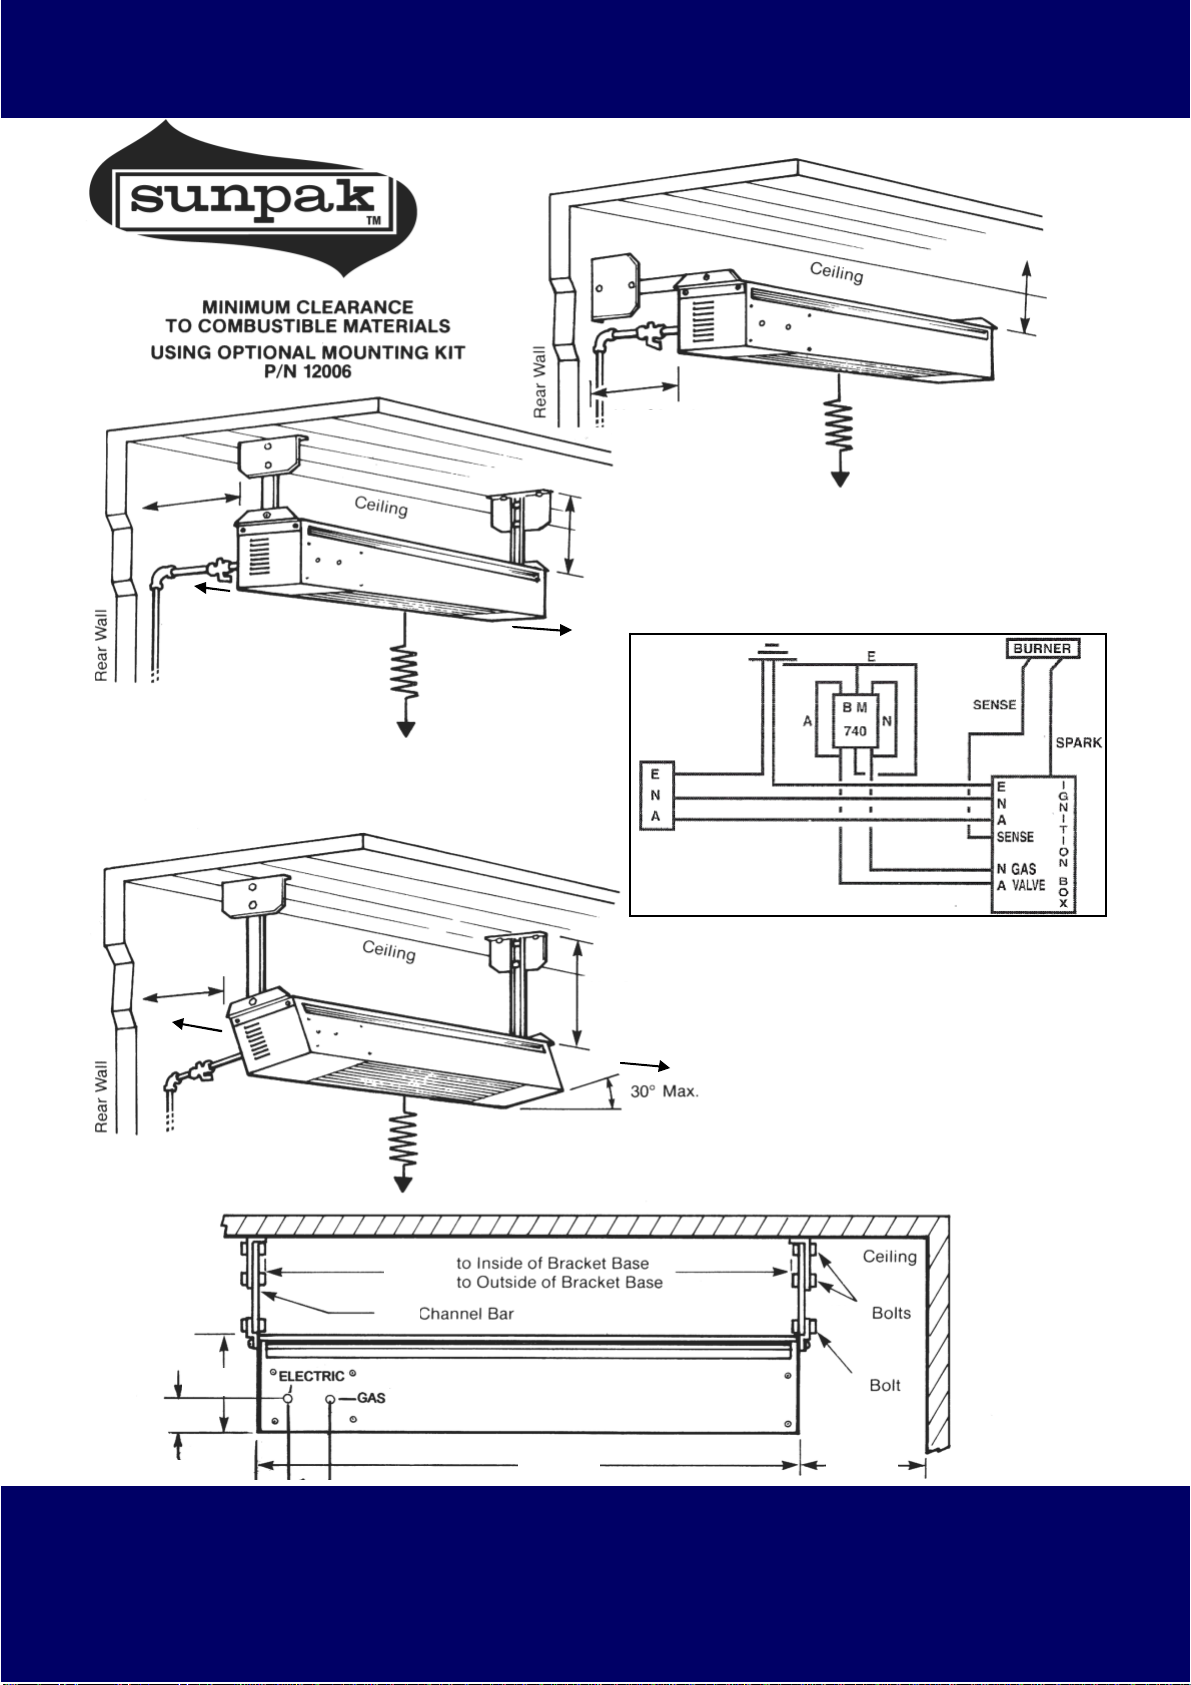
MOUNTING
Each heater must be installed such that the
follow ing minimum clearance from combustibles
are maintained.
Mounting Kit
A mounting kit is supplied with the heater.
Whether the mounting kit is used or not, minimum
clearance from combustibles must be observed
as follows:
WARNING: The clearances shown above are also
applicable to furniture or vehicles parked below
heaters.
Above clearances apply to models on either
natural or LPG gas.
Appliance supplied w ith 1 metre lead and
standard 3-pin plug.
Model Input
mj/hr
Side
mm
Rear
mm
Ceiling
mm
Below
mm
S34 34mj 600 430 430 1200
Certain materials or items, when stored under or
near the appliance, will be subjected to radiant
heat and could be seriously damaged.

Last Update 4/2/2008 8
SUNPAK S34 Heater Manual © Techrite Controls Australia
UNIT CLEARANCE
The unit must have the following clearances from combustible materials:
430mmabove and beside,600mmat the sides ends and1200mm below.
This appliance shall only be used in an above ground open-air situation with
natural ventilation, without stagnant areas, where gas leakage and
products of combustion are rapidly dispersed by wind and natural
convection.
Any enclosure inwhich the appliance is used shall comply with one of the
following:
In the case of balconies, at least 20% of the total wall area must remain
openand unrestricted.
An enclosure withwalls on all sides, but at least
one permanent opening at ground level and
no overhead cover.
Within apartial enclosure that includes anoverhead cover and no more thantwo walls.
Within a partial enclosure that includes anoverhead cover andmore than two walls, the
following shall apply:
• At least25%ofthetotalwallarea is completelyopen,and
• At least 30% of the remaining wall area is openand unrestricted.

Last Update 4/2/2008 9
SUNPAK S34 Heater Manual © Techrite Controls Australia

Last Update 4/2/2008 10
SUNPAK S34 Heater Manual © Techrite Controls Australia
SUNPAK S34 HEATER - Proper Mounting Location
Heater is improperly mounted at
greater than a 3 0° angle resulting in
combustion gases spilling out of the
front, resulting in deterioration of the
front grille and damaging heater
components.

Last Update 4/2/2008 11
SUNPAK S34 Heater Manual © Techrite Controls Australia
LIGHTING INSTRUCTIONS
To start the heater:
Turn electricity supply ‘ON’
To shut down heater:
Turn electricity supply ‘OFF’
CAUTION: If burner fails to ignite, shut down
electrical power and w ait five (5) minutes before
turningpow er ‘ON’.
SERVICING INSTRUCTIONS
Performance of Routine Maintenance
Over time, particularly during long periods of
disuse,the heater canaccumulate dirt and debris
in and around the pilot and burner. Routine
maintenance should be performed at least once
a year by a qualified service technician to insure
the heater is operating properly. More frequent
service may be required for heaters located near
coastal regions. Servicing shall be carried out only
by authorised personnel.
Service Instructions
Turnoff gasand electricity beforeattemptingany
service to this appliance. Internal workings/
components of the heater are located behind
the service door. The service door canbe opened
by turningtheblackknurledknobat least 1/4turn.
Rotate round slotted disk on control door 90°to
open. Top of heater may need to be removed if
the gas controls, burner or burner orifice is to be
replaced.
1. Removal of burner
A) Remove grille by removing two (2) screws at one
end of grille near control door. Pull downward at
the end and grille will loosen. The far end of the
grilleissupportedbytwo(2) pinsthat enter(2)holes
in t he reflect or’s far end.
B) Remove t op of heat er by removing six ( 6) screws
holdingtopin place.
C) The burner can be removed w ithout removing the
pilot electrode assembly. However, extreme care
should be taken to prevent the burner from
contacting the fragile electrode when removing or
re-installingtheburner.
D) To remove the pilot-electrode assembly,
disconnect the electrical wire. Detach the pilot
tubing. Removethetwo(2) screws holdingthepilot
electrode in place.
E) Remove 9.5mm hex locknut located inside burner
orificebracket holdingpiping assemblytoburner. A
22mm 12-point wrench will be handy to loosen the
9.5mmlocknut fromthetopoftheheater.
F) Remove two (2) screws holding the end of the
burner. Carefully slide burner down and out. When
re-installing, be sure both ends of the burner are
beneath the reflect or and end flanges.
G) To re-inst all burner, reverse procedure.
2. Removal of TECHRITE AIS spark ignition control
A) Disconnect 240 Volt power.
B) Disconnect HTlead.
C) Disconnect two(2) valveleads.
D) Disconnect ignitor lead from control
E) Remove two (2) screws and nuts holding
control inplace
F) If insufficient removal clearance, loosen
control assembly and move out ofw ay.
INSTALLATION TROUBLE SHOOTING
1. If no spark from electrode; or if gas valve
doesn’t work then:
A) Check pow er supply. Should have 240 volts AC at
cont rol. Us e volt met er betw een inlet 240 volts w ire
and groun d t erminal at elect rode plat e t o meas ure
240 volts.
B) Check continuit y. Use ohmmeter. For example,
check resistance betw een valve w ire and ground.
Should show almost no resistance(0 ohms)through
valve. If high resistance, check wire connectors.
C) Check spark gap. Should be 2.7m between
electrode tip and pilot hood. If gap is t oo large,
spark will occur at wrong location. If gap is too
small, spark may not be hot enough to light pilot
burner.
D) Be sure connectors are fully inserted into ignition
control(seewiringdiagram on rating plate)
2. If insufficient gas flow then:
Burner orifice is blocked. Remove heater top,
remove burner orifice (use 12mm hex w rench) and
thoroughly clean. Spiders often crawl into orifice
holeandmake aweb,blocking theorifice.

Last Update 4/2/2008 12
SUNPAK S34 Heater Manual © Techrite Controls Australia
●SOLENOID & CONTROL VALVES
●REGULATORS, METERS & GAS
FILTERS
●INDUST RIAL COMBUSTION
EQUIPMENT
●CONTROL MOTORS
●PRESSURE SWITCHES
●IGNITION TRANSFORMERS &
DEVICES
●COMMERCIAL & DOMESTIC
CONT ROLS
●ATMOSPHERIC BURNERS
●THERMOSTATS & TEMPERATURE
CONTROL INSTRUMENTS
●MISCELLANEOUS
Visit us at: www.techrite.com.au
TECHRITE CONTROLS AUSTRALIA
Head Office:
12 Yiannis Court, Springvale, VIC 3171
Website: www.techrite.com.au
Email: info@techrite.com.au
MELBOURNE
Ph: +61 3 9549 4444
Fax: +61 3 9546 6069
APPLIED CLIMATE CONTROL
Authorised Dealer - Australia wide
Ph: 1300 798 088
TECHRITE CONTROLS AUSTRALIA
SUNPAK S34 Heater Manual
Other manuals for S34
1
Table of contents
Other Sunpak Patio Heater manuals
Popular Patio Heater manuals by other brands

Napoleon
Napoleon BELLAGIO PTH31GTSSP manual

Bromic Heating
Bromic Heating ECLIPSE SMART-HEAT ELECTRIC 3400W instruction manual

Primato
Primato L Qube User and maintenance manual

Infrared Dynamics
Infrared Dynamics Sunglo A270 Installation, operation and maintenance instructions

EUROM
EUROM THG12000 Instruction leaflet

AEI
AEI PATIO COMFORT NPC 05 Assembly instructions

Blue Sky Outdoor Living
Blue Sky Outdoor Living PFP2416-C owner's manual

Endless Summer
Endless Summer GWU501E owner's manual

VONROC
VONROC PH513AC Original instructions

Outdoor Leisure
Outdoor Leisure TD101 owner's manual

GEDA
GEDA HS 10000 Assembly and user's manual

BUTSIR
BUTSIR NEW ATALAYA instruction manual