TCL 40 XE 5G User manual

User Guide

1 2
4.7 NXTVISION..........................................................................................57
4.8 Sound & vibration............................................................................. 58
4.9 Notifications ....................................................................................... 59
4.10 Button & gestures............................................................................ 59
4.11 Advanced features.......................................................................... 59
4.12 Smart Manager.................................................................................60
4.13 Security & biometrics ....................................................................60
4.14 Location................................................................................................. 61
4.15 Privacy.................................................................................................... 61
4.16 Safety & emergency........................................................................ 61
4.17 Apps ....................................................................................................... 62
4.18 Storage ................................................................................................. 62
4.19 Accounts.............................................................................................. 62
4.20 Digital Wellbeing & parental controls ..................................... 62
4.21 Google................................................................................................... 63
4.22 Accessibility........................................................................................ 63
4.23 System updates................................................................................ 63
4.24 System .................................................................................................. 63
5 FOTA upgrade...................................................................................65
6 Accessories.......................................................................................66
7 Licenses ............................................................................................. 67
8 1 YEAR LIMITED WARRANTY.......................................................68
9 Troubleshooting ...............................................................................69
10 Specifications................................................................................... 75
11 Disclaimer.......................................................................................... 77
Table of Contents
1 Your mobile...........................................................................................3
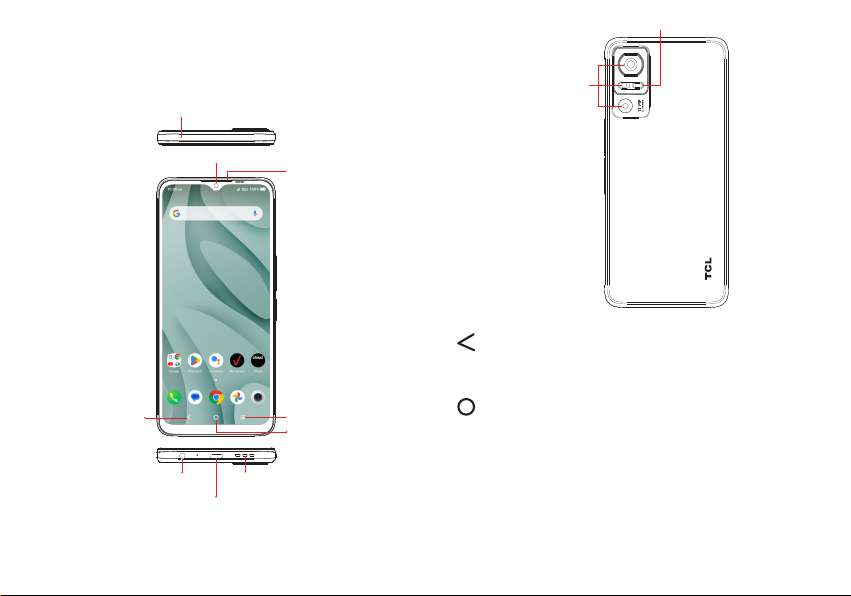
1.1 Keys and connectors........................................................................ 3
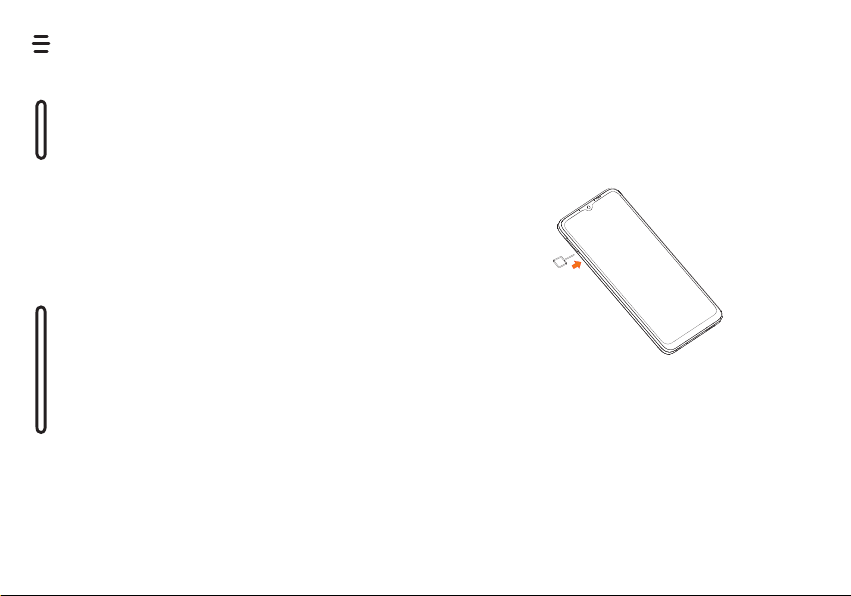
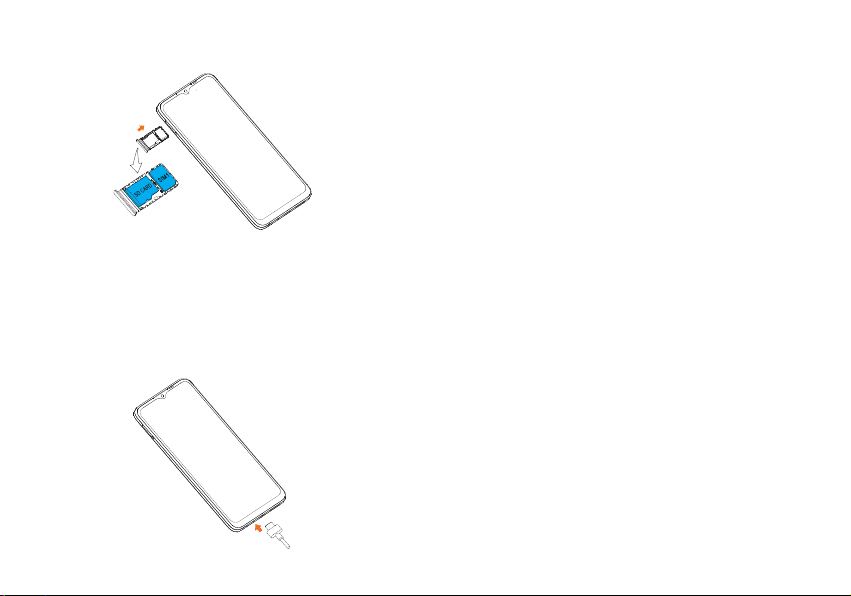
1.2 Setting up your phone...................................................................... 6
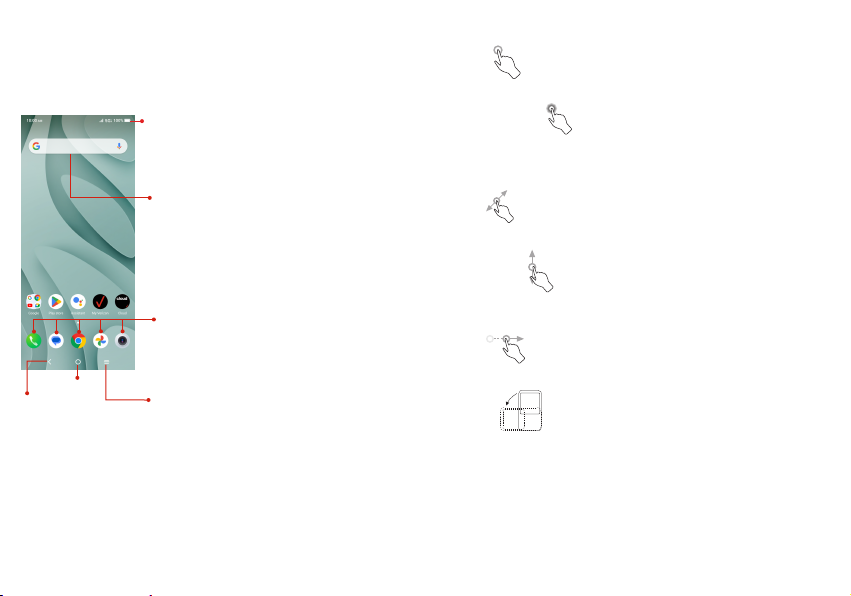
1.3 Home screen......................................................................................... 9
1.4 Text input ...............................................................................................17
2 Multimedia applications.................................................................20
2.1 Camera .................................................................................................20
2.2 Google Photos .................................................................................. 26
2.3 YT Music .............................................................................................. 28
3 Apps and features ...........................................................................29
3.1 Phone..................................................................................................... 29
3.2 Contacts............................................................................................... 35
3.3 Messages ............................................................................................ 39
3.4 Calendar............................................................................................... 42
3.5 Clock...................................................................................................... 43
3.6 Calculator ............................................................................................ 46
3.7 Other applications............................................................................47
3.8 Google applications.........................................................................47
4 Settings............................... ...............................................................50
4.1 Wi-Fi ....................................................................................................... 50
4.2 Bluetooth............................................................................................... 51
4.3 Mobile network ................................................................................. 52
4.4 Connections....................................................................................... 52
4.5 Home screen & lock screen........................................................55
4.6 Display....................................................................................................55

3 4
1 Your mobile
1.1 Keys and connectors
Microphone
3.5mm headphones jack
USB Type-C /
Charger Port
Speaker
Receiver
Front Camera
Home
Recent Apps
Back
Rear
cameras
LED Flash
Back key
• Touch to go back to the previous screen, or to close a
dialog box, options menu, the notification panel, etc.
Home key
• Touch to return to the Home screen from any other
application or screen.
• Touch and hold to open Google Assistant. You can
get help such as getting directions and restaurant
information based on the content detected on the
screen.

5 6
1.2 Setting up your phone
Your phone already has a SIM card installed. For an optimal wireless
experience, use the SIM installed in your new phone. MicroSD cards
(capacity up to 1TB)
Note: microSDTM card is sold separately.
1. Install the SIM card /microSDTM card
Step 1. If you need to replace the NANO SIM card and/or insert an
optional microSDTM card, use the SIM tool provided in the box to
open the SIM tray.
Step 2. Remove the NANO SIM card/microSDTM card tray.
Recent apps
• Touch to switch between recently opened individual
app activities and documents.
Power/Lock Key (right side of the device)
• Press: Lock the screen/Light up the screen
Note: Additional shortcuts and customizable settings
are available at Settings > Button & gestures > Power
key.
• Press and hold the Power key to show the popup
menu to select from Power o/Restart/Airplane
mode/Cast.
• Press the Power key and Volume down key at the
same time to take a screenshot.
• Press and hold the Power key for at least 10 seconds
to force reboot.
Volume up/down
• In call mode, adjusts the earpiece or headset volume.
• In Music/Video/Streaming mode, adjusts the media
volume.
• In general mode, adjusts the media volume.
• After popping up Media, select the down menu button,
and then click Ring Adjustment, Mutes the ringtone of
an incoming call.
• In camera preview mode, press the Volume up or
Down key to take a photo or press and hold to take
burst shots. To set, touch Camera > Settings >
Volume button function.

7 8
Step 3. Place the SIM card and/or microSDTM card into the tray, then
slide the tray into the slot. It only fits one direction. Do not force into
place. Keep the SIM tool in a safe place for future use.
NOTE: A Verizon SIM card is already installed in your phone. This
diagram shows SIM card location if you choose to remove or
replace it.
2. Charge the phone
Before turning on your phone, charge it fully.
Insert the small end of the USB cable into the phone.
Insert the larger end into the charger and plug it into an outlet.
WARNING: Only use approved chargers with your device.
Incompatible chargers or tampering with the charger port could
damage your device and void the warranty.
3. Turn your phone on/o
To turn your phone on, press and hold the Power/Lock button until
the screen turns on.
NOTE: The first time you turn on your phone, you will need to activate
it.
See the Welcome Guide included with your phone. After you turn on
the phone, follow the on screen instructions to set up your device.
To turn your phone o, press and hold the Power/Lock Key, and tap
Power O on the screen when it appears.
Locking/unlocking the screen
To turn on your screen, press the Power/Lock button. Then swipe
up on the screen to unlock it.
To turn o your screen and prevent accidental key presses, press
the Power/Lock button.

9 10
1.3 Home screen
The Home screen provides quick access to all the items
(applications, shortcuts, folders and widgets) you like to use most
frequently.
Touch the Home symbol to get instant access to the Home screen.
Google Search bar
Touch to enter text search screen.
Touch to speak to Google Assistant.
Favorite applications tray
Touch to enter the applications.
Touch and hold to move or change
applications.
Notification bar
Touch and drag down to open
the notifications panel.
Back
Home
Recent apps
The Home screen oers multiple pages for shortcuts or applications
you may download from the Play Store. Simply swipe your finger
horizontally to the left. From the Home screen, swipe right to view a
Google news feed page.
Using the touchscreen
Touch
To access an application, touch it with your finger.
Touch and hold
To enter the available options for an item, touch and hold the item.
For example. Select a contact in Contacts and touch and hold it. An
options list will then appear.
Drag
Place your finger on the screen to drag an object to another location.
Slide/Swipe
Slide the screen to scroll up and down the applications, images, and
web pages. You can slide the screen horizontally too.
Flick
Similar to swiping, but flicking makes it move quicker.
Rotate
Automatically change the screen orientation from portrait to
landscape by turning the phone sideways to have a better screen
view.

11 12
Status bar
From the status bar, you can view both phone status (on the right
side) and notification information (on the left side).
Drag down the status bar to view notifications and drag again to
enter the quick settings panel.
Touch and drag up to close it. When there are notifications, they can
be accessed by touching them.
Notification panel
Swipe down the Status bar to open the Notification panel to read the
detailed information.
Touch to clear all event–based notifications
(other ongoing notifications will remain).
Quick settings panel
Swipe down the Status bar twice to access the Quick Settings panel
where you may enable or disable functions or change modes by
tapping the icons.
Touch to access Settings,
where you can set more items.
Lock/Unlock your screen
To protect your phone and privacy, you can lock the screen with a
pattern, PIN, password, registered Face Unlock(1).
To create a screen unlock, touch Settings > Security & biometrics >
Screen lock.
(1) Face unlock and fingerprint may not be as secure as Pattern, PIN,
or Password locks. We may use Face unlock methods only for the
purpose to unlock the phone. The data collected from you through
such methods will be stored in your device and will not be disclosed
to any third-party. You may delete your data anytime.

13 14
To lock the phone screen
• If your phone remains inactive for a period of time, it will
automatically lock the screen and enter sleep mode to save
power. Go to Settings > Display > Sleep and select a screen
timeout period.
• You can also manually lock the screen by pressing the Power
key once.
Swipe to unlock the screen
Press the Power key once to light up the screen, swipe up the
screen to unlock the screen. (1)
Swipe right to
enter Phone (1)
Swipe left to
enter Camera (1)
Swipe up to unlock
the screen
Enter a password to unlock the screen
Once the screen is turned on, swipe up the screen to display the
password input panel. Then enter your lock screen password.
(1) Customized by touching Settings > Home screen & lock screen >
Lock screen shortcut.
Use pattern unlock
Draw the same pattern you have set to unlock the screen.
Use Face unlock
• From the app list, touch Settings >Security & biometrics > Face
unlock. Before using the face unlock, you need to set a pattern/
PIN/password.
• Hold your phone 8 - 20 inches from your face. Position your face
in the circle shown on the screen. For best results, we suggest
that the Face Unlock is used indoors and away from direct
sunlight.
• Use Face unlock when your screen turns on, otherwise you will
have to swipe up on the screen then use a password or pattern to
unlock the phone.
Personalizing your Home screen
Add
You can touch and hold a folder, an application or a widget and drag
the item to your preferred Home screen.
Reposition
Touch and hold an item and drag it to the desired position and then
release. You can move items both on the Home screen and the
Favorite tray. Hold the icon on the left or right edge of the screen to
drag the item to another Home screen.
Remove
Touch and hold the item and drag it up to the top of the Remove
icon, and release after it turns white or touch and hold the item and
choose Remove.

15 16
Create folders
To improve the organization of shortcuts or applications on the
Home screen and the Favorite tray, you can add them to a folder by
stacking one item on top of another. To rename a folder, open it and
touch the folder’s title bar to input the new name.
Wallpaper customization
Touch and hold an empty area on the Home screen, then touch
Wallpapers & style to change wallpaper.
Widgets and recently used applications
Widgets
Touch and hold the empty area in the Home screen, then touch
Widgets to display all widgets.
Touch and hold the selected widget and slide it to move to your
preferred screen.
Recently used applications
To consult recently used applications, touch the Recent apps key.
Touch a thumbnail in the window to open the application.
Recent apps
Touch one thumbnail and slide it up to close the application, slide it
right/left to switch between the applications.
Touch CLEAR ALL at the bottom of the screen to close all the
running applications.

17 18
Volume adjustment
Press the Volume key to adjust the Media volume.
Touch to adjust Media,
Ring, Alarm and Notification
volume.
1.4 Text input
Using the Onscreen Keyboard
Onscreen Keyboard settings
Touch Settings > System > Language & input, touch the Virtual
keyboard you want to set up and a series of settings will become
available.
Adjust the Onscreen Keyboard orientation
Turn the phone sideways or upright to adjust the onscreen keyboard
orientation. You can adjust it by changing the settings (Touch on/o
Settings > Display > Auto-rotate screen).
Android keyboard
1
2
3
5
6
4
1Enter recipient numbers or select from contacts
2Touch to send the message
3Touch to insert a period. Touch and hold to select symbols
4Touch to insert a comma
Touch and hold to access keyboard settings or enter left or right
hand input mode.
5Touch to switch between «abc/Abc» mode
Touch and hold to switch to «ABC» mode
6Touch to access the symbols and numbers keyboards

19 20
Text editing
You can edit text which you have entered.
• Touch and hold or double tap within the text
you want to edit.
• Drag the tabs to change the amount of text
to edit.
• The following options will appear: Cut, Copy,
and Share.
You can also insert new texts if preferred
• Touch where you want to type, or touch and
hold a blank area. The cursor will blink and
the tab will appear. Drag the tab to move the
cursor.
• If you have cut or copied any text, touch
the tab to show the Paste and Select all
option which allows you to complete pasting
immediately.
2 Multimedia applications
2.1 Camera ..........................................................
Launch Camera
There are multiple ways to open the Camera app.
From the Home Screen
From the home screen, touch Camera .
From the Lock Screen
When the screen is locked, press the Power key once to light up the
screen, then swipe left on the camera icon in the lower right corner
to open the camera.
Using a shortcut key
Simply double-press the Power key to open the camera.
To set, touch Settings > Button & gestures > Power key > Quick
launch camera.

21 22
10
11
1
2
3
4
5
6
7
8
9
12
Drop down for more shortcut options
(Please refer to the picture on the right)
1Apply a real-time filter
2Enable flash: Tap to enable/disable flash, auto flash, or no flash
WARNING: Keep a safe distance when using the flash. Do not
point the flash toward people’s or animals’ eyes.
3AI scene detection: Once turned on, the camera will
automatically identify the image content of a scene and
categorize it accordingly. Many dierent scene categories are
supported. This only works when using the main camera.
4Enable High-Dynamic Range
5Zoom in/out
6Switch between front/back camera
7Take a photo
8Access camera settings
9Change image or video size
10 Pinch fingers together to zoom out, or spread fingers apart to
zoom in
11 View the photos or videos you have taken
12 Google Lens(1)
Google Lens
Google Lens is a free tool that uses Google to help you:
Copy and translate text
Search for similar products
Identity plants and animals
Discover books & media
Scan barcodes
To take a photo
The screen acts as the viewfinder. First, position the object or
landscape in the viewfinder, touch the screen to focus if necessary.
Touch to capture. The photo will be automatically saved. You can
also touch and hold to take burst shots.
(1) Your phone must also be connected to a network.

23 24
To take a video
Tap VIDEO to change the camera mode to video. Tap to start
video recording. While the recording is in progress, you can tap
to save the frame as a separate photo.
Further operations when viewing a photo/video you have taken
• Touch , slide left or right to view the photos or videos you
have taken.
• Touch , then Gmail/Bluetooth/Messages/etc. to share the
photo or video.
• Touch Back button to return to Camera.
Modes and settings
Modes
Slide left or right to switch between modes.
• AUTO: Auto is the default mode for Camera.
• VIDEO: Touch to access video mode.
• PORTRAIT: Touch to create a depth of field eect. You can
compose an image that highlights your subject while producing a
gorgeously blurred background.
• PRO: Pro camera mode lets you fine-tune parameters and gives
you full control over ISO, WB exposure time, aperture, shutter
speed and so on.
• PANO: Use pano to capture a panoramic photo, an image with a
horizontally elongated field of view. Tap the shutter button and
move the phone steadily along in the direction indicated on the
screen. The photo will be saved when all the slots are filled, or
when pressing the shutter button again.
Touch to access more modes. These modes can be moved to
the main screen by touching .
• STOP MOTION: Capture a number of photos of a certain scene,
then convert them into a speeded-up video.
• LIGHT TRACE: Capture creative movements of light using a long
exposure photograph.
• SLO-MO: Record special occasions and fast moving scenes even
in a dark environment, then play them back at a slow frame rate.
• SUPER MACRO: Tap to access super macro mode. 4cm is the
best macro shooting distance.
• MOVIE VIDEO: Tap to take a video with movie special eect.
• ART EFFECTS: Tap to set dierent filters when you take a video.
Settings
Touch to set more options:
• Photo size: Set the photo MP size and screen ratio. You can
quickly change this setting by tapping from Camera screen.
• Video quality: Set the video FPS (frames per second) and screen
size ratio.
• Video stabilisation (EIS): Activate anti-shake to reduce or
eliminate blurry image resulting from camera shake while
recording a video.
• Calorie detection(1):Turn on to detect the calorie content
of a captured object.
• Smart guideline(1): Tap the switch to turn on/o. This feature
provides AI-powered facial detection and composition guides for
portrait shots. It only works when using the main camera.
• Intelligent mode recommendation: Tap the switch to activate/
deactivate the function of Recommending appropriate modes
based on scenarios.
(1) Only available when the AI scene detection is turned on.

25 26
• Dark shot: Turn on to take great pictures in a dark
environment.
• Quick snap: Tap to turn on/o. When activated, double press the
volume down button to take a picture.
• Volume button function: Touch to customize the Volume button
to Shutter, Zoom or Volume when using camera.
• Gesture to capture: Touch to turn on/o. Once the palm gesture
feature is activated, show your palm to the camera and the device
will automatically take a photo or video after few seconds.
• Storage: Touch to choose between phone and microSDTM card
storage when an microSDTM card is inserted. The default is phone
storage.
• Save location information: Tap the switch to activate/deactivate
the function of tagging photos and videos with your location.
This option is available when GPS location services and wireless
network are enabled and permission is granted.
• Shutter sound: Tap the switch to enable/disable shutter sound
when taking a photo or video.
• Watermark: Tap to turn on/o Watermark
• Reset settings: Touch to reset the camera to its factory default
settings.
More options are available when you switch to using the front
camera:
• Face Beauty: Touch to turn on/o. When activated, touch to
adjust skin smoothing and enhance coloring eects in portraits.
• Mirror camera: Touch to turn on/o. It allows you to save selfies
as previewed, save selfies as they appear in the preview without
flipping them.
2.2 Google Photos .............................................
Google Photos acts as a media player for you to view photos and
play videos. In addition, a set of further operations to pictures and
videos are available for selection.
To view the photos you have taken, touch from the Home screen.
Tap to access more
options
Tap to access
Photos, Trash or
PhotoScan

27 28
2.3 YT Music........................................................
A music streaming service and online music locker operated by
Google.
You can upload and listen to a large number of songs for free. In
addition to oering music streaming for Internet-connected devices,
the YT Music app allows music to be stored and listened to oine.
Songs purchased through the YT Music app are automatically added
to the user›s account.
Working with pictures
You can work with pictures by rotating or cropping them, sharing
them with friends, setting them as a contact photo or wallpaper, etc.
Find the picture you want to work on, and touch the picture.
• Touch to share the picture.
• Touch to edit the picture.
• Tap to access Google Lens.
• Touch to delete the picture.
• Touch >Use as to set the picture as a Contact photo or
Wallpaper.

29 30
3 Apps and features
3.1 Phone .............................................................
Making a call
To make a call, touch in the Favorites tray.
Contacts
View the
call's detailed
information
Recents
Favorite numbers
Show the dial pad
Touch and
hold to access
voicemail
Enter the desired number from the dial pad and touch to place
the call or select a contact from Contacts or Recents or touch tabs,
then make the call.
The number you entered can be saved to Contacts by touching
Create new contact or Add to a contact.
If you make a mistake, you can delete the incorrect digits by touching
.
To hang up a call, touch .
International call
To dial an international call, touch and hold to enter “+”, then enter
the international country prefix followed by the full phone number
and touch .

31 32
Emergency call
If your phone has network coverage, dial the emergency number and
touch to make an emergency call. Depending on your network
and country this could even work without a SIM card and without
typing in the SIM PIN code.
Answering or rejecting a call
When you receive a call:
• Swipe up the icon to answer;
• Swipe down the icon to reject;
• Swipe up the icon to reject the call by sending a preset
message.
Calling your voicemail
Your voicemail is provided by your network to avoid missing calls. It
works like an answering machine that you can consult at any time.
To access your voicemail, touch and hold or dial *86.
If you receive a voicemail, appears on the Status bar. Open the
Notification panel and touch New voicemail.
During a call
To adjust the volume during a call, press the Volume up/down key.

33 34
End the current call.
Touch to mute the current call. Touch this icon again to
unmute the call.
Display the dial pad.
Touch to activate the speaker during the current call. Touch
this icon again to deactivate the speaker.
Add another call to the current call
Put a call on hold
Swap the calls.
To avoid accidental operation of the touchscreen during a
call, the screen will be locked automatically when you put
the cellphone close to your ear; and it will be unlocked when
the cellphone is taken away from your ear.
Managing multiple calls
With this phone you can handle multiple calls at the same time.
Swap calls
When you accept two calls, touch the icon to switch between
two lines. The current call will be put on hold and you are able to join
the other call.
Conference calls
You can set up a conference call as follows.
• Place a call to the first participant of the conference call.
• Touch to add another call.
• Enter the phone number of the person you want to add to the
conference and touch . You can also add participants from
Call logs or Contacts.
• Touch to start the conference.
• Touch to end the conference call and disconnect all callers.
Call settings
Touch from the Phone screen, then touch Settings to set phone
and contact settings.
Recents
You can access your call logs by touching from the Phone
screen to view missed calls, outgoing calls and incoming calls.
Touch one call to view information or further operations. You can
launch a new call, send a message to the contact or number, or view
detailed information of the call.
To delete the call history of a selected contact or number, touch and
hold the contact and choose Delete.

35 36
Adding a contact
Touch in the contact list to create a new contact.
You are required to enter the contact’s name and other contact
information. By scrolling up and down the screen, you can move from
one field to another.
Select a picture or take a
photo for the Phone contact
Touch to save
Touch to open available labels
Add to/remove from Favorites (1)
To add a contact to favorites, you can touch a contact to view details
then touch to add the contact to favorites.
To remove a contact from favorites, touch on the contact details
screen.
(1) Phone and Gmail contacts can be added to favorites.
3.2 Contacts........................................................
Contacts enables quick and easy access to the contact you want
to reach.
You can view and create contacts on your phone and synchronize
these with your Gmail contacts or other applications on the web or
on your phone.
Consult your Contacts
To see your contacts, swipe up from the Home screen, then tap .
Add new contact
• Touch to open the Quick contact
panel
• Touch and hold to share or delete
the selected contact
Deleted contacts will also be removed from other applications
on the phone or web the next time you synchronize your
phone.

37 38
Editing your contacts
To edit contact information, touch in the contact details screen.
When finished, touch Save.
Using the Quick contact panel
Touch a contact to open the Quick contact panel.
• Touch or the number to make a call.
• Touch to send a message.
• Touch to make a video call.
The icons available on the Quick contact panel depend on the
information you have for the contact and the applications and
accounts on your phone.
Sharing contacts
You can share a single contact or contacts with others by sending
the contact’s vCard to them via Bluetooth, Gmail, etc.
• From the Contacts screen, touch and hold a contact and touch
.
• Select the application to perform this action.
Accounts
Contacts, data or other information can be synchronized from
multiple accounts, depending on the applications installed on your
phone.
To add an account, touch from the contacts list and touch
Settings > Accounts > Add account, or from the home screen, touch
Settings > Users & accounts > Add account.
You are required to select the kind of account you are adding, like
gmail, yahoo, etc.
As with any other account setup, you need to enter detailed
information, like username, password, etc.
You can remove an account and all associated information from
the phone. Touch the account you want to delete, touch Remove
account, then confirm.
Auto-sync
On the Accounts screen, turn on Automatically sync data .
When activated, all changes to information on the phone or online
will be automatically synchronized with each other.
Table of contents
Other TCL Cell Phone manuals

TCL
TCL SIGNA User manual

TCL
TCL Alcatel POP4-10 4G&VF Technical manual

TCL
TCL 205 User manual

TCL
TCL Alcatel Neon Technical manual

TCL
TCL IONz User manual

TCL
TCL Alcatel Pixi4-4.5 TF User manual

TCL
TCL 4X 5G User manual

TCL
TCL 40XE 5G User manual

TCL
TCL Alcatel Neon Technical manual

TCL
TCL PIXI4-4.5 GOPHONE User manual