TCL Alcatel Pixi4-3.5 3G Technical manual

L2E Repair Document TCLCommunication Ltd.
Rev.
4017A_D_E_F_X_S Level 2 enhance Repair Document
Page
1.0
1/54
All rights reserved. Transfer, copy, use or communication of this file is prohibited without authorization.
Pixi4-3.5 3G
4017A_D_E_F_X_S
Note: this manual is non-contractual and TCL Communication Ltd. can modify it without prior
notice on the characteristics of described equipments.

L2E Repair Document TCLCommunication Ltd.
Rev.
4017A_D_E_F_X_S Level 2 enhance Repair Document
Page
1.0
2/54
All rights reserved. Transfer, copy, use or communication of this file is prohibited without authorization.
1.0
2016-2-27
Official version
Peter ye
Rev.
Date
Modification description
Prepared By
Checked By
Approved By

L2E Repair Document TCLCommunication Ltd.
Rev.
4017A_D_E_F_X_S Level 2 enhance Repair Document
Page
1.0
3/54
All rights reserved. Transfer, copy, use or communication of this file is prohibited without authorization.
Content
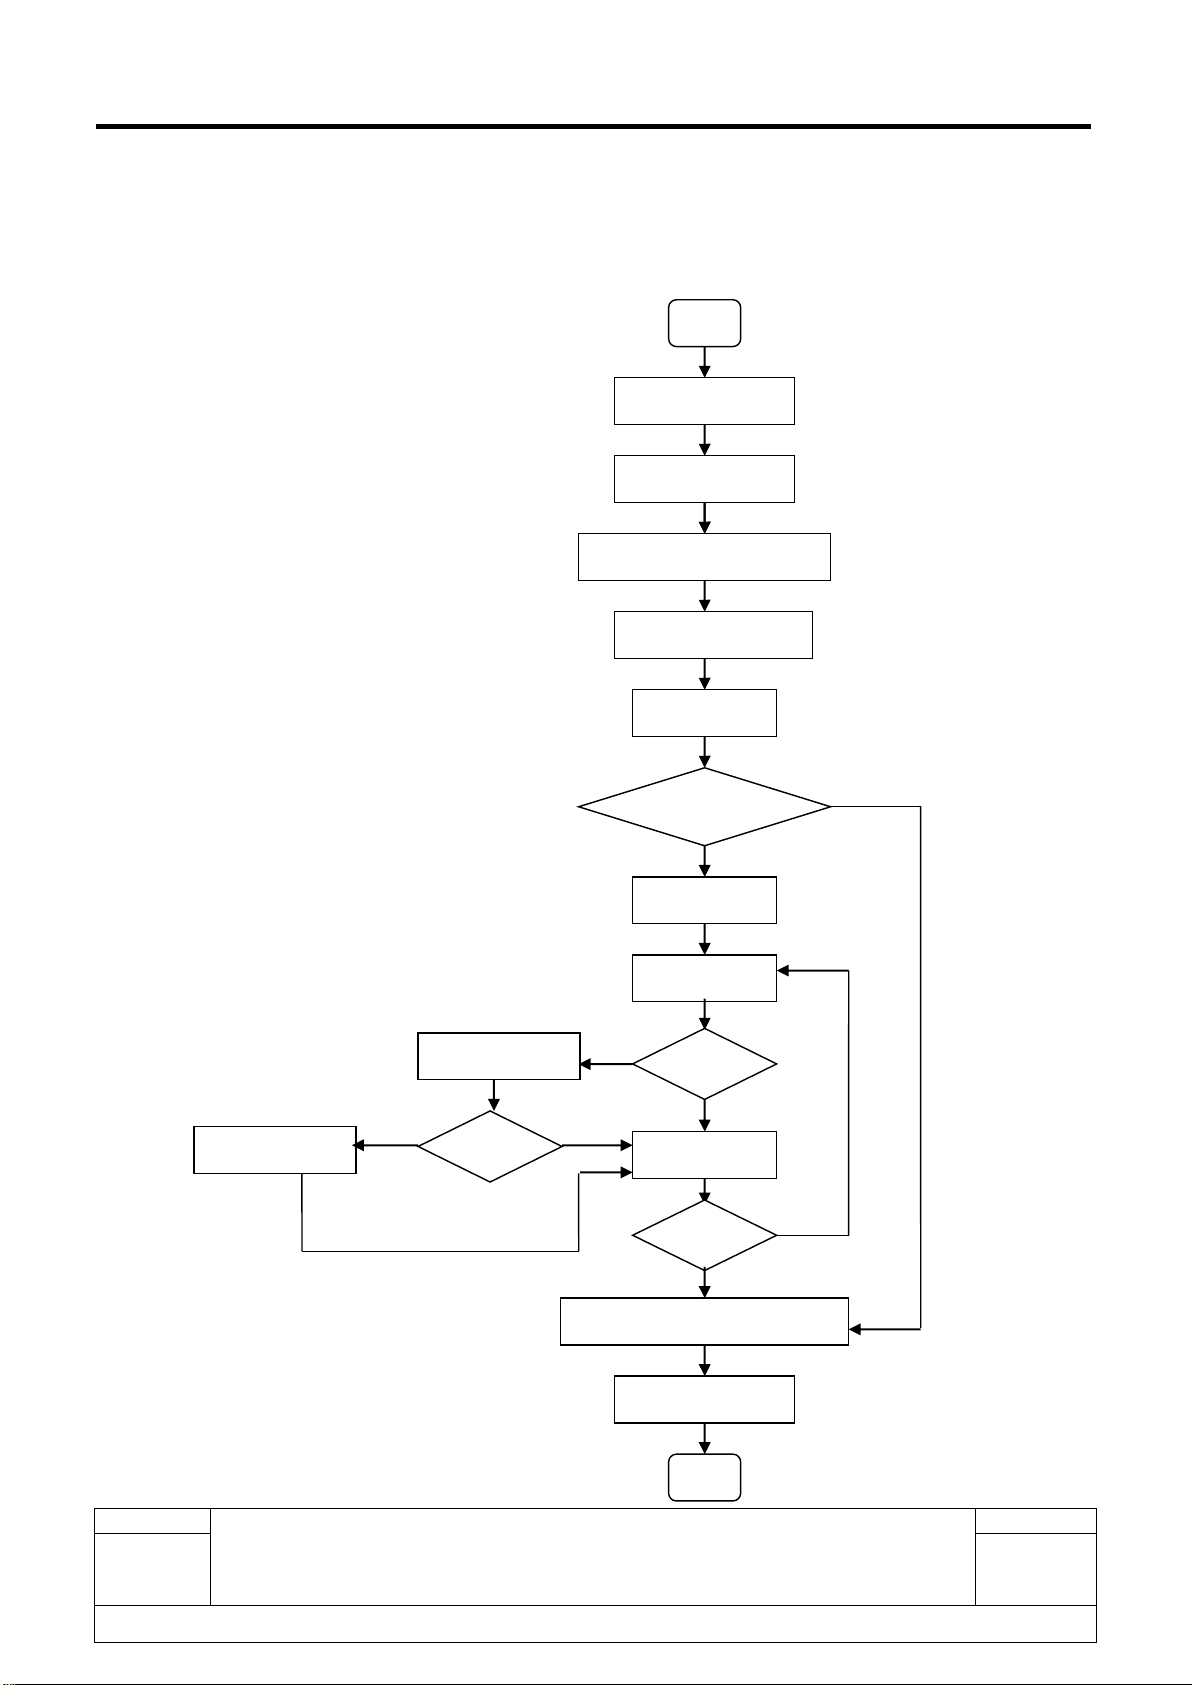
1Level 2 enhance repair process...............................................................................4
2Warranty Check and Visual Inspection ...................................................................5
2.1 Warranty confirmation of L1.....................................................................................5
2.2 Visual mechanical check ..........................................................................................6
2.3 Pretest........................................................................................................................7
2.5 Accessories inspection ............................................................................................8
2.6 Cell phone maintenance procedure ........................................................................9
3Software download .................................................................................................15
3.1 Equipments requested when download:............................................................16
3.2 Install driver.............................................................................................................16
3.3 SW download process............................................................................................17
5Disassembly and assembly 4017...........................................................................21
5.1 ESD Safety ...............................................................................................................21
5.2 Disassembly tool.....................................................................................................21
5.3 Disassembly process .............................................................................................22
5.4 Reassembly Process ..............................................................................................29
5.5 Disassembly process evaluation...........................................................................30
6Disassembly Complete...........................................................................................31
7Level 2 repair ...........................................................................................................33
8L2 Enhance repair ...................................................................................................41
8.1 Position of L2 enhance components on main PCBA...........................................41
8.2 Trouble shooting for common failures..................................................................43
8.3 L2 enhance spare part list ......................................................................................52
9PCBA exchange.......................................................................................................52
10 Other component exchange...................................................................................53
11 Final test ..................................................................................................................54

L2E Repair Document TCLCommunication Ltd.
Rev.
4017A_D_E_F_X_S Level 2 enhance Repair Document
Page
1.0
4/54
All rights reserved. Transfer, copy, use or communication of this file is prohibited without authorization.
1 Level 2 enhance repair process
Reassembly
Record in BIG
End
OK
Rete
st
OK
OK
Star
Visual Inspection
Warranty Check
Pretest & Failure confirm
SW Upgrade
Disassembly
L2 Repair
Rete
st
Function
test
PCBA Replace
NG
NG
NG
Restore User Information
Back up user data
L2E Repair
Rete
st
OK
NG

L2E Repair Document TCLCommunication Ltd.
Rev.
4017A_D_E_F_X_S Level 2 enhance Repair Document
Page
1.0
5/54
All rights reserved. Transfer, copy, use or communication of this file is prohibited without authorization.
2 Warranty Check and Visual Inspection
2.1 Warranty confirmation of L1
1) IMEI sticker check:
a) Power on the handset, enter *#06#
b) If the IMEI sticker in the back casing is not lost:
We should make sure that the IMEI number must be the same with the one on the IMEI sticker; if
not, it’s out of warranty policy
2) Humidity sensitive label
If humidity sensitive label is not good, the cell phone will be considered as out of guarantee.
a) Liquid was detection by humidity sensitive label
b) Position of humidity sensitive sticker.
Humidity sensitive sticker is on the bottom of the front casing.
Here is the
humidity sensitive
sticker.

L2E Repair Document TCLCommunication Ltd.
Rev.
4017A_D_E_F_X_S Level 2 enhance Repair Document
Page
1.0
6/54
All rights reserved. Transfer, copy, use or communication of this file is prohibited without authorization.
2.2 Visual mechanical check
Mechanical warranties check items:
1) Corrosion
Corrosion on the USB connector, SIM connector, and other metal surfaces。
2) Hole (diameter > 1mm)
Holes on any surface, including the front casing, furnished frame, battery cover, touch Lens,
keypad…
3) Bump
Bumps (diameter > 1mm) on any surface, including front casing, decorate frame, battery
cover, touch Lens, keypad, etc.
4) Scratch
Scratches (length > 3mm) on any surface, including the front casing, decorate frame, battery
cover, touch Lens, keypad, etc.
5) Distortion
Bend, twisted or crushed on the h/s, cover/casing or connectors, etc.
6) Broken
Touch broken, casing/cover broken, etc.
7) Dropped
Keypad tear off, touch lens, connectors dropped, etc.

L2E Repair Document TCLCommunication Ltd.
Rev.
4017A_D_E_F_X_S Level 2 enhance Repair Document
Page
1.0
7/54
All rights reserved. Transfer, copy, use or communication of this file is prohibited without authorization.
8) Gap
External physical damage relating to abnormal use, like front case and frame opened
9) Others
Damage caused by disassembly ,wrong part assembly, loss of components
Use in abnormal environment like high temperature causing plastic melts
2.3 Pretest
1) Check that the SIM card is set correctly.
2) Power on the cell phone.
3) If the cell phone asks to input NCK code, this means it is SIM locked and can only be worked
with dedicated SIM card. Use the correct SIM card.
4) Enter the phone code if necessary.
5) After the phone power on, test step by step with the auto test code:
Press *#2886# in dial screen and then you will see the interface displaying the SW version. Select
“Auto” to start the auto test, or select “MANU”to do the MMI test manually.
If one of the tests failed during “Auto”test mode, it will show “Text[X] xxx failed. Restart?”, press
“YES”to retest, press “Next”to go on next test and press ”NO”to finish test.
1) Corrosion
Corrosion on the USB connectors, SIM connectors, and other metal surfaces
2) Hole

L2E Repair Document TCLCommunication Ltd.
Rev.
4017A_D_E_F_X_S Level 2 enhance Repair Document
Page
1.0
8/54
All rights reserved. Transfer, copy, use or communication of this file is prohibited without authorization.
Holes (Diameter > 1mm) on any surface, including front casing, decorate frame, battery
cover, LCD Lens, keypad.
3) Bump
Bumps (Diameter>1mm) on any surface, including the front casing, decorate frame,
battery cover, LCD Lens, keypad
4) Scratch (length > 3mm)
Scratches on any surface, including the front casing, furnished frame, battery cover,
LCD Lens, keypad
5) Distortion
Bend, twisted or crushed on the h/s, cover/casing or connectors
6) Broken
LCD broken, casing broken, cover broken
7) Dropped.
Keypad tear off, LCD lens, connectors fallen off
8) Gap:
External physical damage relating to abnormal use, like front case and frame opened
9) Others:
Damage caused by disassembly like wrong part assembly, lost of components
Use in abnormal environment like too high temperature with plastic melts
2.5 Accessories inspection
Accessories warranties check items:
6) Any use in abnormal temperature, other than the one specified in the user manual. Any
evidence of plastic/casing melted.
7) Any mark of food or liquid around the accessory or in the USB socket.

L2E Repair Document TCLCommunication Ltd.
Rev.
4017A_D_E_F_X_S Level 2 enhance Repair Document
Page
1.0
9/54
All rights reserved. Transfer, copy, use or communication of this file is prohibited without authorization.
8) Any evidence of mechanical shocked which damage the enclosure of the battery, charger
or headset.
9) Any mark of tentative of disassembly the accessory
10) Any abnormal use which induce wire damage, wire broken or USB socket deformed.
2.6 Cell phone maintenance procedure
1) Check that the SIM card is set correctly.
2) Power on the cell phone.
3) If the cell phone asks to input NCK code, which means it is SIM locked, and can only be
worked with dedicated SIM card. Use the correct SIM card.
4) Enter the phone code if necessary.
5) If power on, test step by step with the auto test code:
Press *#2886# in dial screen and then you will see the interface displaying the SW
version. Select “Auto” to start the auto test, or select “MANU”to do the MMI test
manually.
If one of the tests failed during “Auto”test mode, it will show “Text[X] xxx failed.
Restart?”, press “YES”to retest, press “Next”to go on next test and press ”NO”to finish
test.
TRACABILITY
I. You can get some information such as IMEI, CU-REF, PTM, Date Code,
etc.

L2E Repair Document TCLCommunication Ltd.
Rev.
4017A_D_E_F_X_S Level 2 enhance Repair Document
Page
1.0
10/54
All rights reserved. Transfer, copy, use or communication of this file is prohibited without authorization.
II. Press “Pass” to continue.
TP0
I. It will running the test automatically, don’t touch TP during test and it will show
“Pass”if it functions well;
II. Press “PASS”to continue.
TP1
I. Please draw on the yellow area and it will show “TEST RESULT OK!”;
II. Press “Pass” to continue.
TP2
I. Please draw on the yellow area and it will show “TEST RESULT OK!”;
II. Press “Pass” to continue;
LCD MIRERGB
I. You will see the LCD display three colors: RED, GREEN and BLUE if it
functions well;
II. Press “Pass” to continue;
LCD BLACK
I. You will see the LCD displays black if it functions well;
II. Press “Pass” to continue;
LCD GREYCHART

L2E Repair Document TCLCommunication Ltd.
Rev.
4017A_D_E_F_X_S Level 2 enhance Repair Document
Page
1.0
11/54
All rights reserved. Transfer, copy, use or communication of this file is prohibited without authorization.
I. You will see the LCD displays grey if it functions well;
II. Press “Pass” to continue;
LCD GRAYLEVEL
I. You will see the LCD displays grey level if it functions well;
II. Press “Pass” to continue;
LCD WHITE
I. You will see the LCD displays white if it functions well;
II. Press “Pass”to continue.
KEYPAD
I. Press the key displayed on the screen. The key on the screen will turn grey
when you press it if it functions well;
II. Press “Pass” to continue.
BACKLIGHT
I. The screen backlight will be flashing if it functions well;
II. Press “Pass” to continue.
CAMERA
Press “Pass”to continue if the main camera functions well.
CAMERA LED
I. Camera LED will turn on if it functions well;

L2E Repair Document TCLCommunication Ltd.
Rev.
4017A_D_E_F_X_S Level 2 enhance Repair Document
Page
1.0
12/54
All rights reserved. Transfer, copy, use or communication of this file is prohibited without authorization.
II. Press “Pass”to continue.
CHARGER LED
I. The charge LED will turn on if it functions well;
II. Press “Pass”to continue.
AUDIO
I. You will hear a voice prompt which introduces some emergency call numbers
from the receiver if it functions well;
II. Press “PASS”to continue;
III.You will hear a voice prompt which introduces some emergency call numbers
from the speaker if it functions well;
IV. Press “Pass”to continue;
V. Make a noise near the MIC, you will hear it from the receiver if it functions
well;
VI. Press “Pass”to continue;
VIBRATOR
I. You can feel the phone’s vibrating if it functions well;
II. Press “Pass”to continue.
ACCESSORY
I. Insert headset according to the instruction and you will hear a voice prompt
which introduces some emergency call numbers through the headset left if it

L2E Repair Document TCLCommunication Ltd.
Rev.
4017A_D_E_F_X_S Level 2 enhance Repair Document
Page
1.0
13/54
All rights reserved. Transfer, copy, use or communication of this file is prohibited without authorization.
functions well;
II. Press “Pass”to continue;
III.You will hear a voice prompt which introduces some emergency call numbers
through the headset right if it functions well;
IV. Press “Pass”to continue;
V. Make a noise near the headset mic, you will hear it from headset if it functions
well;
VI. Press “Pass”to continue;
VII. You will hear FM playing and FM frequency will be displayed on the screen if it
functions well;
VIII. Press “Pass”to continue;
IX. Remove headset according to the instruction;
X. Press “Pass”to continue.
CHARGER
I. Insert charger cable according to instruction, it will detect it and say “Battery
Voltage”, “Charger Current”, “Charger: OK”if it functions well;
II. Please remove charger cable and press “Pass”to continue.
USB
I. Insert USB cable according to instruction and it will say “USB: OK”if it functions
well;

L2E Repair Document TCLCommunication Ltd.
Rev.
4017A_D_E_F_X_S Level 2 enhance Repair Document
Page
1.0
14/54
All rights reserved. Transfer, copy, use or communication of this file is prohibited without authorization.
II. Remove USB cable according to instruction and press “Pass”to continue.
GSENSOR
I. Put the handset towards up according to instruction;
II. Press “Pass”to continue;
III.Put the handset “face down”, “down”, “left”, “right”and “face up”according to
instruction, and then the instruction will disappear and it will say “All positions
checked”if it functions well;
IV. Press “Pass”to continue.
PROXIMITY
I. Please shawdow the senor and it will display “near->far: 1”, “far->near: 1”if it
functions well;
II. Press “Pass”to continue.
SIM CARD
I. Insert SIM card and the phone will detect it if it functions well;
II. Press “Pass”to continue.
SD CARD
I. Insert SD card and the phone will detect it if functions well;
II. Press “Pass”to continue.
BATTERY TEMP

L2E Repair Document TCLCommunication Ltd.
Rev.
4017A_D_E_F_X_S Level 2 enhance Repair Document
Page
1.0
15/54
All rights reserved. Transfer, copy, use or communication of this file is prohibited without authorization.
I. It will display the value of battery temperature, battery content, battery voltage
and battery ID if it functions well;
II. Press “Pass”to continue.
BT
I. Bluetooth will search automatically and it will display device address if it
functions well;
II. Press “Pass”to continue.
WIFI
I. It will search for WIFI hotspot and it will display searched result on the screen if it functions
well;
II. Press “Pass” to continue.
CALL
I. It will make a Emergency call if it functions well;
II. Hang up to continue.
3 Software download
It is authorized to download software for the handset which needs to be updated. This downloading tool
is called “Sugar MTK_SP”. Thus internet access is necessary. TS Website: https://css.tclmobile.cn/.

L2E Repair Document TCLCommunication Ltd.
Rev.
4017A_D_E_F_X_S Level 2 enhance Repair Document
Page
1.0
16/54
All rights reserved. Transfer, copy, use or communication of this file is prohibited without authorization.
3.1Equipments requested when download:
1) A handset with full power;
2) PC with windows system;
3) A USB cable.
3.2Install driver
Double click to install the Sugar MTK_SP, then select the “Install driver”check box for the driver
installation.

L2E Repair Document TCLCommunication Ltd.
Rev.
4017A_D_E_F_X_S Level 2 enhance Repair Document
Page
1.0
17/54
All rights reserved. Transfer, copy, use or communication of this file is prohibited without authorization.
3.3SW download process
Ⅰ. Login the Sugar MTK_SP, then select the 4017 model:

L2E Repair Document TCLCommunication Ltd.
Rev.
4017A_D_E_F_X_S Level 2 enhance Repair Document
Page
1.0
18/54
All rights reserved. Transfer, copy, use or communication of this file is prohibited without authorization.
Ⅱ. Click the button ”Get Version”to check the SW version of the headset.

L2E Repair Document TCLCommunication Ltd.
Rev.
4017A_D_E_F_X_S Level 2 enhance Repair Document
Page
1.0
19/54
All rights reserved. Transfer, copy, use or communication of this file is prohibited without authorization.
III. Click the “Upgrade”button, disconnect the USB cable, then insert USB cable again.
Online upgrade process starting:
IV. Upgrade finished:

L2E Repair Document TCLCommunication Ltd.
Rev.
4017A_D_E_F_X_S Level 2 enhance Repair Document
Page
1.0
20/54
All rights reserved. Transfer, copy, use or communication of this file is prohibited without authorization.
Note: During the download progress a warning window will prompt as below if the phone
has been rooted before.
Other manuals for Alcatel Pixi4-3.5 3G
1
This manual suits for next models
6
Table of contents
Other TCL Cell Phone manuals