TECE TECEone User manual

TECEone
Sanitary systems
TECHNICAL INFORMATION

2
All data contained in the Technical Information has been compiled with the utmost care. However,
the correctness of the data presented cannot be guaranteed. TECE assumes no liability for damage
resulting from the use of this information. Text and images are protected by copyright law.
Issue: March 2020
© Copyright 2020, TECE GmbH, Hollefeldstraße 57, D-48282 Emsdetten

3
Contents
Introduction 4
System description 5
Functions
Technical data
Dimensions
Approval and certificates
Operation 6
Planning and assembly 7
Water connection device
Mounting the toilet ceramic
Temperature adjustment
Mounting the toilet seat
Cleaning and Maintenance 12
Faults 12
Servicing and spare parts 13
4
Introduction
Introduction
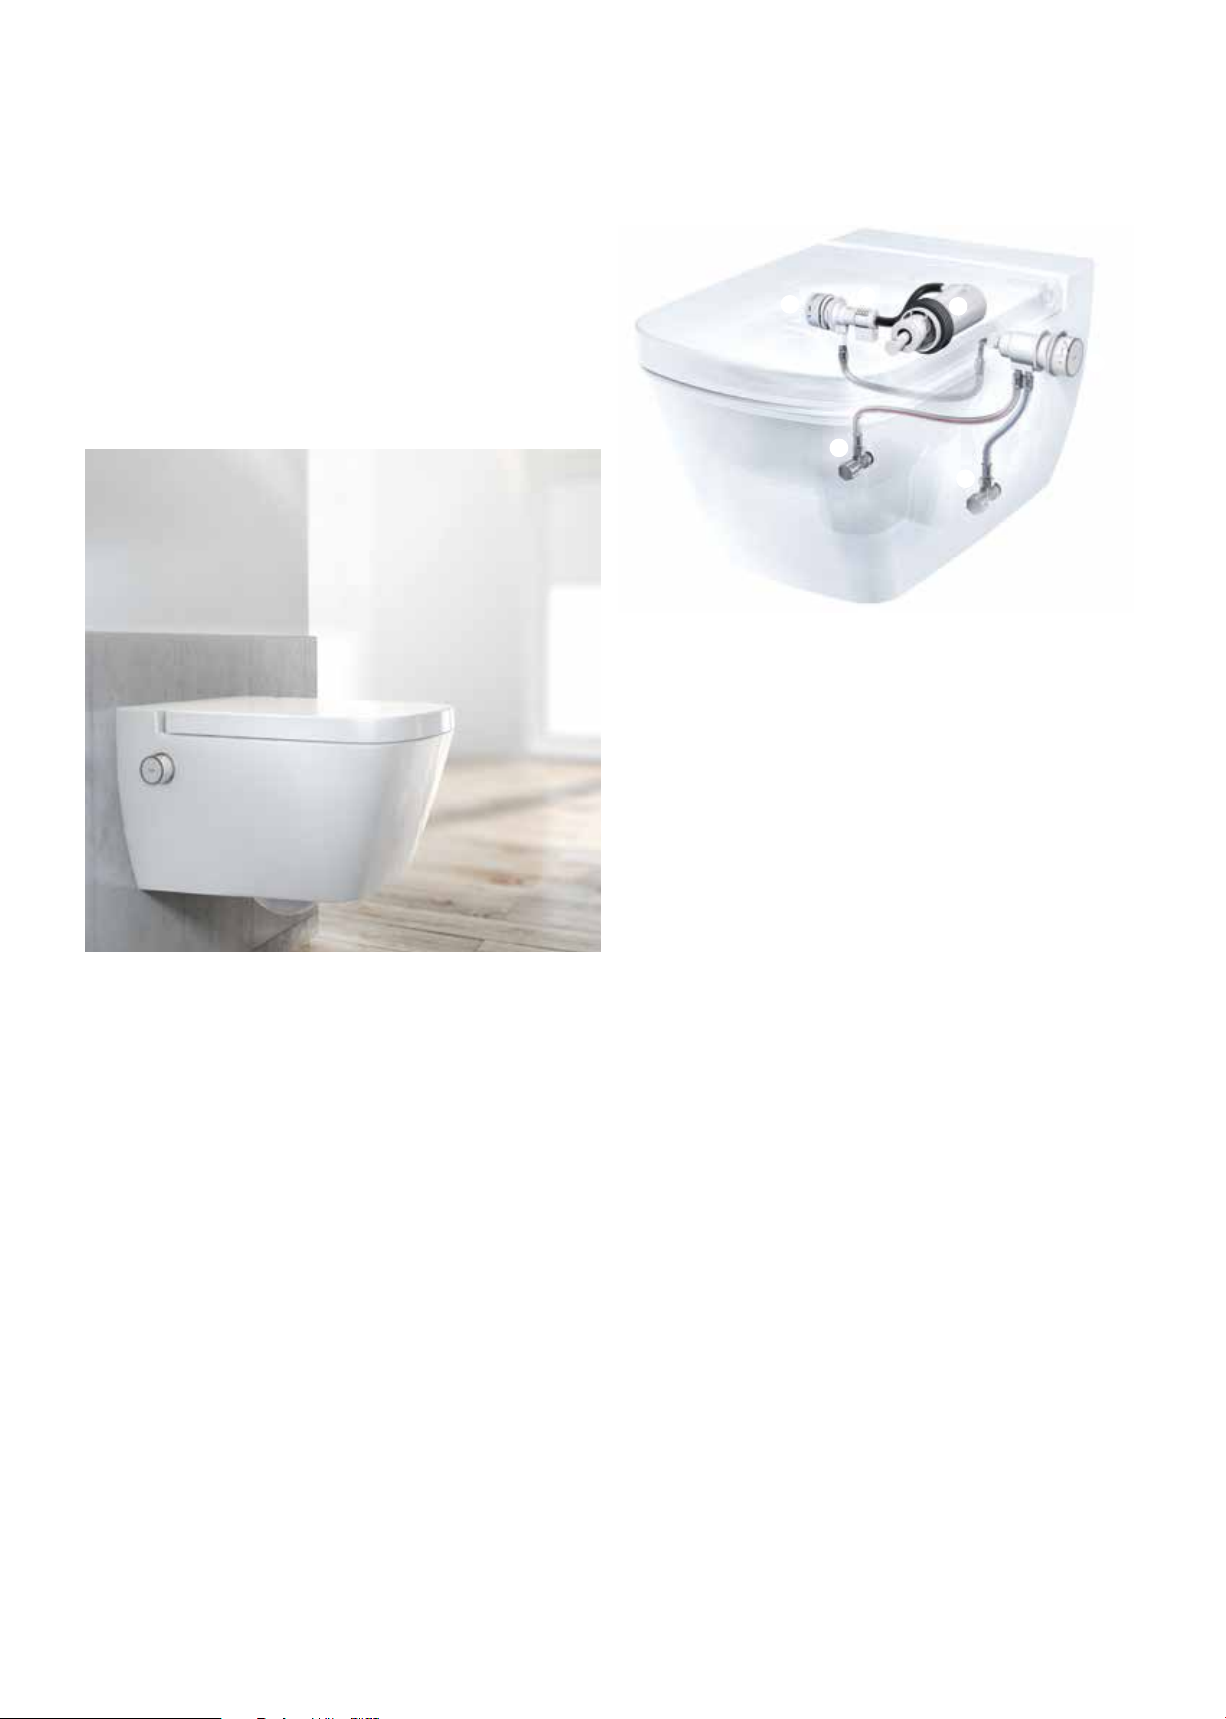
TECEone is a wall-hung ceramic toilet with shower func-
tion and is designed for comfortable buttocks and intimate
cleaning. Without using the shower function, it can also be
used as a conventional toilet ceramic.
TECEone not only shines with inner values, it looks pretty
good too! Thanks to its timeless, elegant design, it can be
easily integrated into any bathroom ambience and com-
bined with the existing bathroom equipment.
Toilet ceramic with shower function - what sounds like
twice the installation work is actually quite easy: TECEone
is a new product solution, but with a technology that the
installer is also familiar with from shower fittings and which
does not require a power connection:
1 Hot and cold water connection, corner valves
2 Temperature setting rotary knob, thermostat valve
3 Water volume rotary knob
4 Shower unit with shower arm
5 Standardised protective device according to DIN EN 1717
1
2
354
1
5
System description
System description
Functions
Rotary knobs for controlling the water volume and regu-
lating the temperature
The rotary knobs for regulating the water volume (left)
and for setting the temperature (right) are located on the
side of the ceramic. Operation is intuitive. TECE relies on
proven technology in this area.
The EN-compliant safeguard is integrated in the
TECEone, so the product no longer needs to be safe-
guarded separately.
Shower arm
By turning the rotary knob, the showerarm automatically
extends, regulating the quantity of water by increasing
the water pressure applied. Gently turning the volume
controller allows cooled water to run out first. After the
subsequent warm water shower, the shower arm is auto-
matically rinsed when it is retracted and thus cleans itself.
Theshower armalso cleans itself when extending.
The shower arm cap can be replaced — various versions
are available with dierently angled jets and intensities.
Toilet seat
The ergonomically-shaped toilet seat and lid with
soft-close function have been developed specially for
TECEone. The attachment is already installed and firmly
cast with the ceramic.
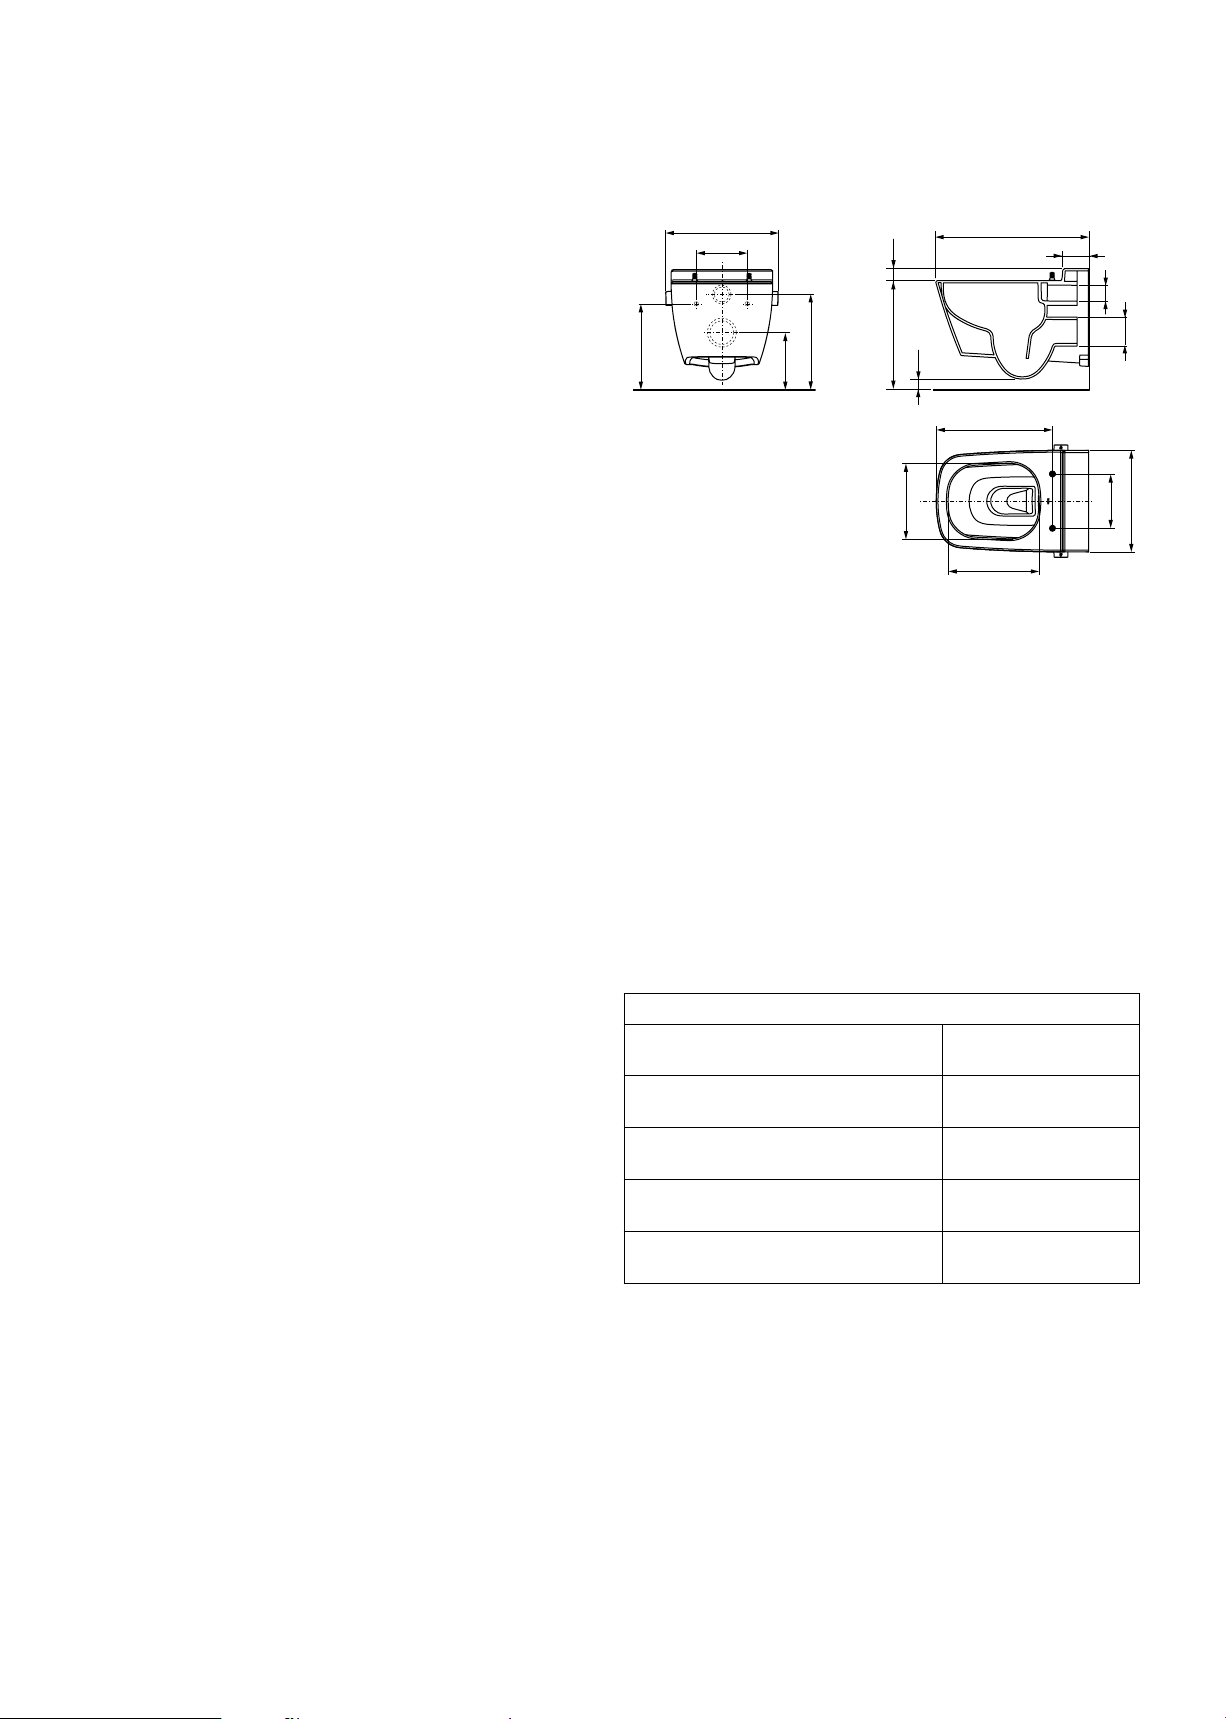
Technical data
Temperature range – °C
Water pressure Min. bar (. MPa)
Max. bar ( MPa)
Water consumption up to . l/min.
Dimensions
Approval and certificates
TECEone complies with many national and international
standards and directives. The DVGW W conformity
mark confirms that TECEone is equipped with the required
protective device in accordance with DIN EN for the
protection of potable water, and thus fulfils the appropriate
requirements.
The toilet ceramic also meets the requirements of DIN EN
(European standard for toilet bowls and toilet sys-
tems), while the toilet seat fulfils the requirements of DIN
(Toilet seats – Requirements and test methods).
Standards/guidelines
Protection against pollution of potable water
in water installations
DIN EN 1717
Self-protecting equipment for connection to
potable water installations
DVGW worksheet W 540
Protective devices for protecting potable
water
DIN EN 13079
Toilet bowls and toilet systems with a pre-
formed odour trap
DIN EN 997
Toilet seats – Requirements and test meth-
ods
DIN 19516
Current approvals and certificates can be found at www.
tece.com/en.
Local requirements and guidelines must be observed
when installing a TECEone toilet ceramic.
320
220
355
180
400
358
191
321
410
250
400 42
50
90
540
Ø102
Ø55

6
Operation
• Fully turn the right rotary knob: the showerarm now
extends completely and you can start washing with water
(right picture).
• You can increase or reduce the volume of water by turn-
ing the right rotary knob until you achieve the required
result.
• By turning the left-hand rotary knob, you can set your
desired water temperature - even during operation.
• To turn o the shower function, turn the knob back as far
as it will go.
Removing the toilet lid
• Lift up the toilet lid and toilet seat.
• Remove the two set screws from the hinges using an
Allen key (.mm).
• Hold the toilet lid and seat with both hands and pull them
gently upwards.
Note: When mounting, press both hinges - simultaneously
with a little pressure - onto the fastening bolts after putting
them on.
Replacing the shower nozzle heads
The scope of delivery also includes three shower caps
(standard °).
To replace them, proceed as follows:
• Turn the right rotary knob until the showerarm extends
a little.
• Pull out the showerarm with your hand and turn o the
water supply (left picture).
• Hold the shower arm with one hand and pull the cap
forward o the shower arm with the other hand (right
picture).
• Now push your chosen showerhead– with the opening
pointing upwards – onto the showerarm until it gently
locks into position.
Additional showercaps can be optionally ordered which
dier from each other in terms of the intensity and position
of the shower jet (see “Spare parts”).
Operation
Controls
TECEone is operated intuitively using the right and left
rotary knobs:
• “Water regulation” right rotary knob (pictured left): Use
this knob to open the water supply to the shower arm
and control the intensity of the water jet. The shower arm
moves out "automatically" when a certain water volume
is reached.
• “Temperature setting” left rotary knob (right picture): use
this knob to set the temperature of the water for washing
your buttocks and intimate area.
Testing the water temperature when using for the first
time
• Turn theleft rotary knobas far as it will go to the highest
possible temperature.
• Hold a suitable container (e.g. cup) in front of the shower
arm.
• Turn the right rotary knob and test the water to check
the temperature. If the temperature is higher than °C,
it must be reset. The corresponding procedure can be
found in the Installation and Assembly/Temperature
setting chapter.
• Turn the left rotary knob to the required temperature or
to the middle position.
• Turn the right rotary knob as far as it will go to turn o
the water supply.
Starting the shower function
• If necessary, turn the right rotary knob slightly: the
showerarm does not yet extend and cooled water may
run into the ceramic, at the same time the shower arm is
rinsed and washed with water (left picture).
7
Planning and assembly
Planning and assembly
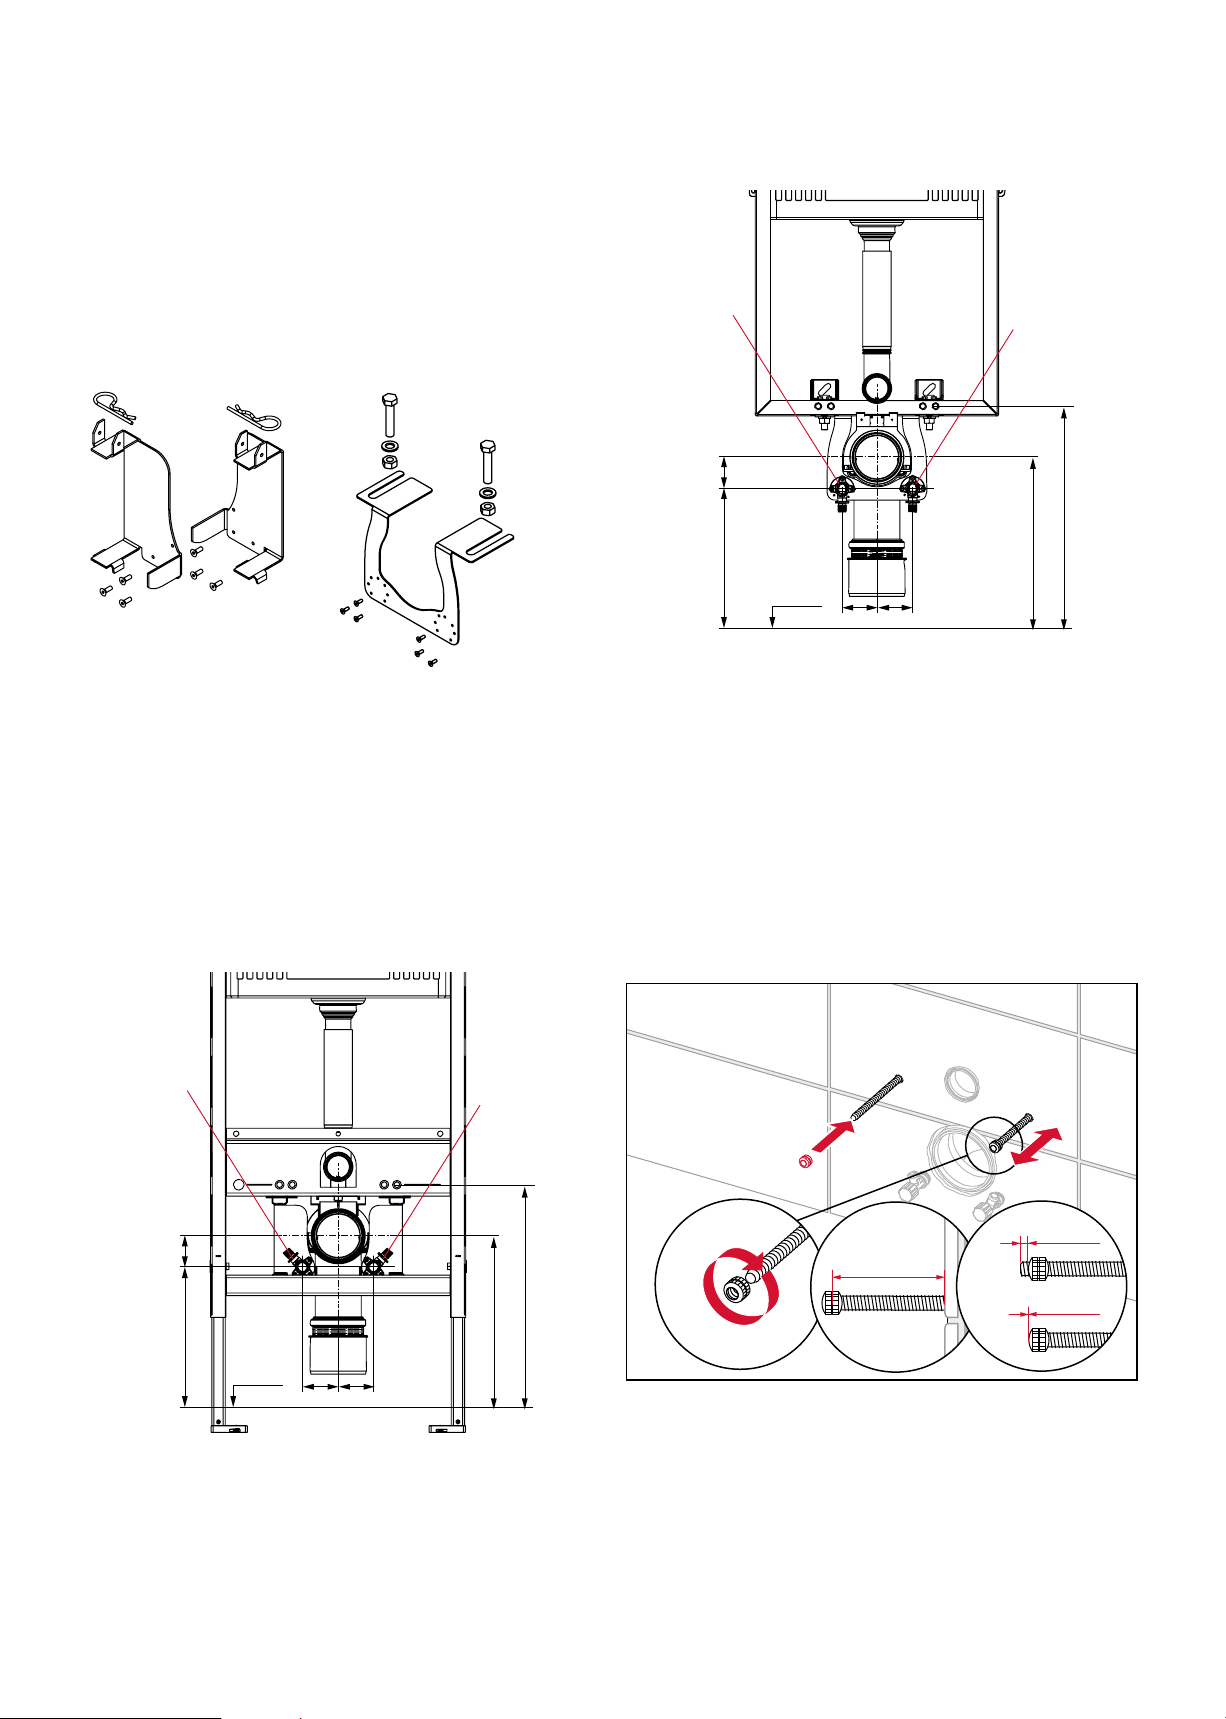
Water connection device
TECEone is operated with fresh hot and cold water from
the pipe. Corresponding upgrade sets are available for
installing and precisely positioning the water connections
for the dierent TECE modules:
Dry-wall upgrade set Brick-wall upgrade set
Item no. 9 880 046 Item no.9 880 047
To use a TECElux module in combination with a TECEone,
you will find the necessary information in the "TECElux"
technical information.
For the water connection, we recommend connecting
the shortest possible stub line to the circulating hot water
pipe. In this way, the demands for comfort and hygiene are
taken into account in the best possible way.
Dry-wall connection and dimensions
70 70
159 61
OKFF
220
320
PWC
kalt
cold
froid
frio
freddo
zimna
холодный
PWH
warm
hot
chaud
caliente
caldo
ciepła
теплый
Brick-wall connection and dimensions
Mounting the toilet ceramic
For a detailed description of the individual steps, please
refer to the assembly instructions enclosed with the prod-
uct.
Here, we would just like to draw your attention to a few
points which should be taken into account when installing
a TECEone:
The threaded rods should be screwed in or cut o so that
the distance between the groove of the knurled nut and
the wall is mm. The threaded rod should not protrude
out of the knurled rod.
PWC
kalt
cold
froid
frio
freddo
zimna
холодный
PWH
warm
hot
chaud
caliente
caldo
ciepła
теплый
70 70
159 61
OKFF
220
320
70 mm
> 0 mm
= 0 mm
X
8
Planning and assembly
Attach the sound insulation strips to the back of the
ceramic.
Combine the colour-coded reinforced hoses with the
appropriate corner valves. Use conventional corner valves
with a maximum length of mm. Push the ceramic
against the wall with the aid of the mounting accessory
(packaging).
PWC
kalt
cold
froid
frio
freddo
zimna
холодный
PWH
warm
hot
chaud
caliente
caldo
ciepła
теплый
< 85 mm
A
Secure it with the concealed fitting (mm ratchet) from
the underside of the toilet ceramic. Observe the maximum
torque of Nm.
To flush the safety device, hold your hand in front of the
shower arm and press the rotary knob for water regulation
at the same time. Allow the water to run into the ceramic
for seconds.
13 mm
max. 7 Nm!
1.
2.
4.
3.
10 s

9
Planning and assembly
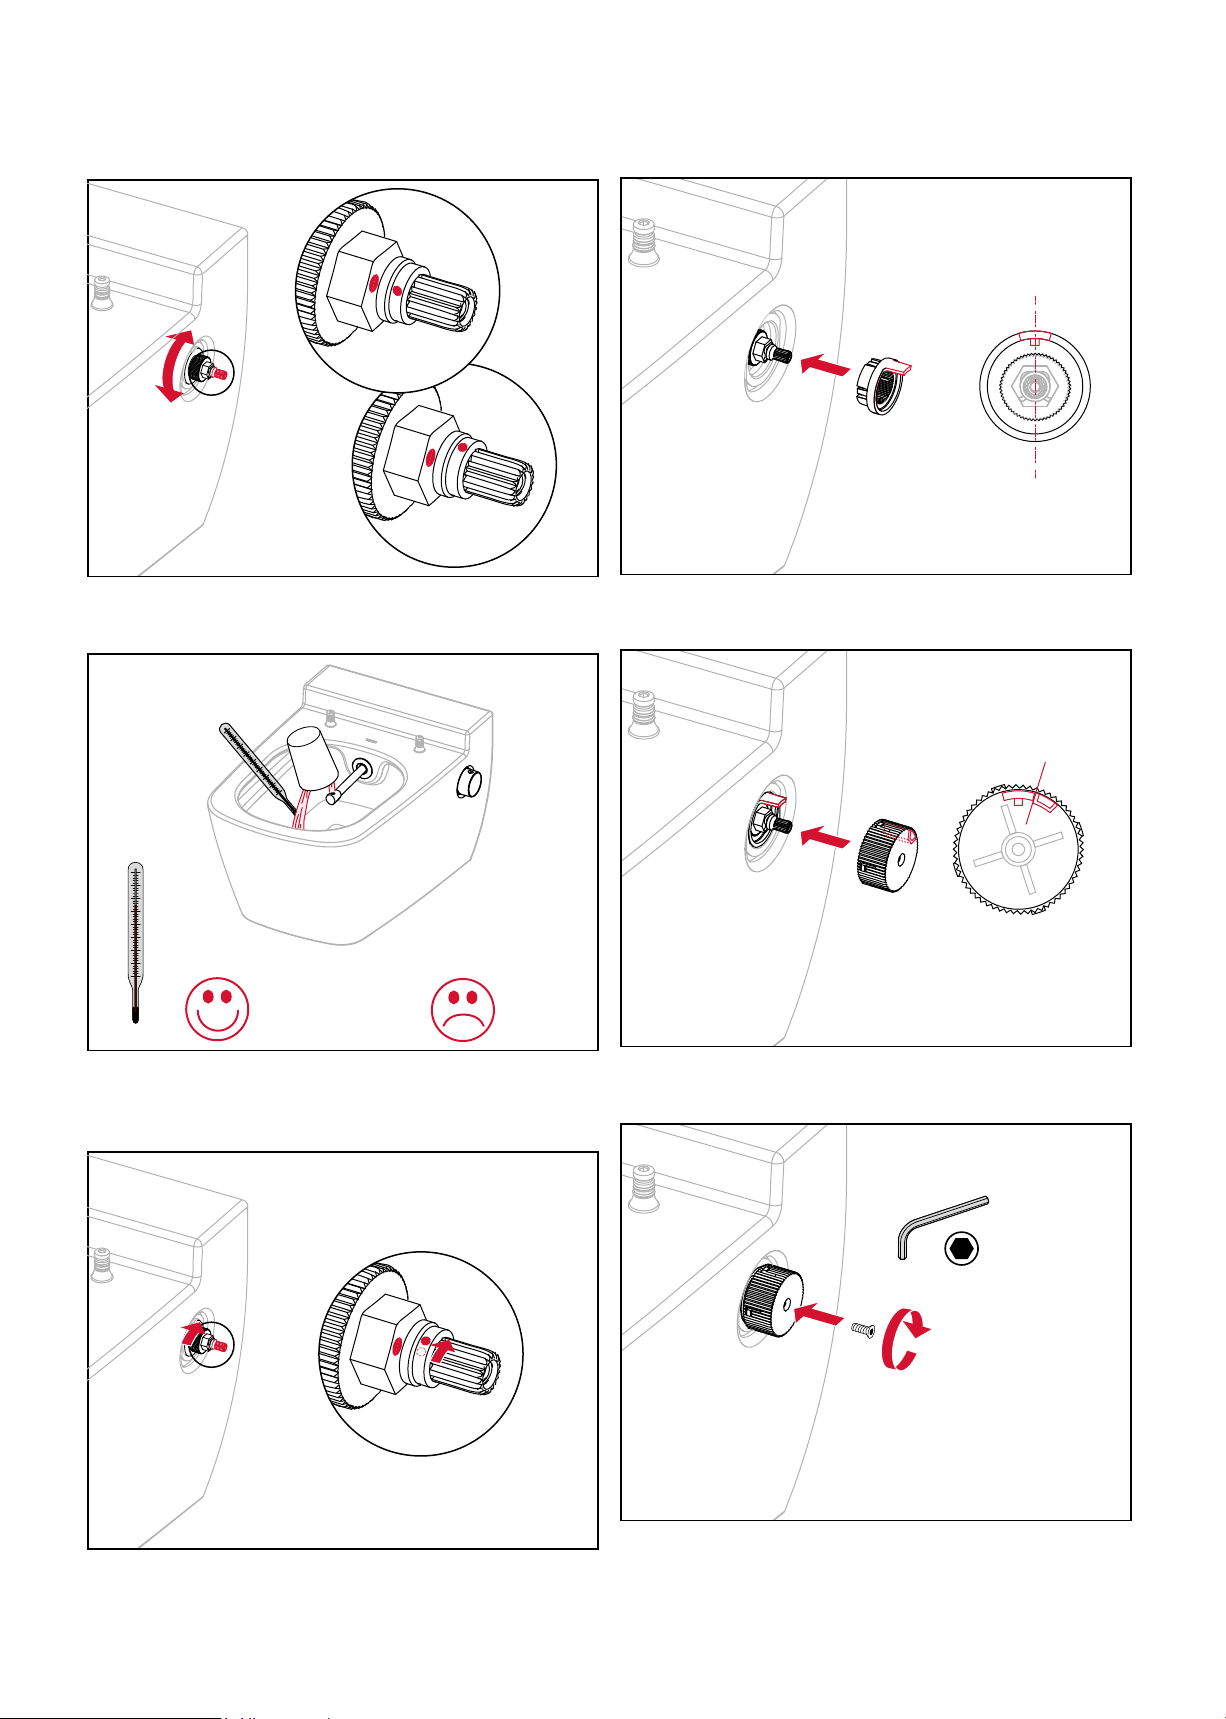
Temperature adjustment
After installing the toilet ceramic, the hot water tempera-
ture must be checked - as is usual when using thermostatic
cartridges.
To do this, turn the temperature controller to the maximum
temperature, then open the water volume rotary knob and
measure the temperature.
If the measured temperature is not higher than °C, you
do not need to do anything else and can use the TECEone
immediately.
However, if the measured water temperature is higher than
°C, follow the steps below to adjust the temperature.
1.
3.
2.
max
≤38 °C > 38 °C
First, remove the cap from the rotary knob.
Then remove the cap holding fixture — the screw is
secured with a seal.
Pull out the stop with needle-nose pliers.
2,5 mm
10
Planning and assembly
Turn the toothed shaft until the two red marks are aligned.
Now open the water volume rotary knob and measure the
temperature again.
If the temperature is still too high, turn the marking on the
toothed shaft slightly to the right.
X
≤38 °C > 38 °C
Place the stop in the “up” position on the toothed shaft.
Fit the cap holding fixture onto the toothed shaft until it
reaches the stop (scald protection).
Tighten the screw.
0°
2,5 mm

11
Cleaning and Maintenance
Turn the cap holding fixture up to the left stop, then turn it
° to the right.
Place the rotary knob cap on the fixture so that the mark-
ing is pointing upwards.
60°
60°
X
Mounting the toilet seat
TECEone must always be combined with the TECEone
seat with lid. The toilet seat and lid fixings are already in
place and immovably cast with the ceramic.
When installing the seat, gently apply pressure to push the
hinges (left picture) onto the attachment bolts until they
click into place.
Finally, secure the seat using the set screws.
!
2,5 mm
12
Cleaning and Maintenance
Cleaning and Maintenance
Lid and toilet seat, rotary knobs
Clean the lid, toilet seat and rotary knobs every day using
a soft cloth and warm water with a mild household clean-
ing agent. Do not use abrasive, chlorine-based or acidic
cleaning products.
When cleaning the ceramics, always open the lid or
remove it completely so that any rising vapours cannot
damage the plastic.
Toilet ceramics
Clean the ceramics regularly or as soon as they get dirty.
Use a commercial sanitary cleaner to regularly clean the
ceramic. To remove limescale, use a commercial limescale
remover or a vinegar-based cleaner. Always follow the
manufacturer's instructions when using a cleaning product.
Avoid any contact with hard or metal objects which could
damage or mark the surface.
Shower arm
• Slightly turn the right rotary
knob to the self-cleaning
position: The showerarm
does not extend and the
water rinses the shower
nozzle, cleaning it in this
position.
• In the event of stubborn
soiling, turn the right rotary
knob until the showerarm
extends with a small jet of water. Remove the dirt using a
suitable brush or a soft cloth. Always use a mild cleaning
agent to do this.
If using water with a very high lime content, lime deposit
can build up on the shower head, shower arm, the protec-
tive device and the hygiene system. This can be removed
using a commercial limescale remover or a vinegar-based
cleaner. In the event of stubborn limescale, these compo-
nents can be replaced.
Faults
The TECEone has been designed in such a way that prob-
lems are extremely unlikely and may only occur in very few
cases. However, if a fault should occur, it is generally best
to contact a suitable specialist (i.e. fitter).
Problem Possible cause Solution
Water runs/drips out
of the ceramic.
Close the corner valve or
the main valve and call
the installer/fitter.
The showerarm
does not extend.
The water pressure is
too low.
Call the installer.
The shower jet is
too weak.
The water supply hose
is kinked.
Call the installer.
Theshower armor
showercap is blocked/
calcified.
Clean the showercap
orthe shower armwith a
suitable brush or replace
it in the same way as
when removing limescale.
No water comes out
of the shower arm.
The water supply has
been switched o.
Check whether the corner
valves are opened or
check the central water
feed supply.
The temperature
of the water is
suddenly too high or
too low.
The temperature
cartridge is faulty.
Call the installer.

13
Servicing and spare parts
Servicing and spare parts
TECE relies on tried-and-tested technology. However,
should components ever need to be replaced or serviced,
you will find the spare parts for TECEone below.
No. Item no. Description
1 9820356 Concealed mounting
2 9820357 Knurled nut (x 2) for concealed mounting
3 9820362 Water volume rotary knob
4 9820469 Ceramic cartridge including EN 1717 protection
5 9820361 Temperature rotary knob
6 9820360 Thermostatic cartridge
7 9820471
9820365
Reinforced hoses (from 01/2020) warm and cold
Reinforced hoses (to 12/2019) warm and cold
8 9820364 Rosette
9 9820403 Shower arm cap (x 3) “standard” 75°
10 9820404 Shower arm cap (x 3) “standard” 90°
11 9820405 Shower arm cap (x 3) “medium” 90°
12 9820406 Shower arm cap (x 3) “small” 90°
13 9820363 Shower arm complete set
14 9820422 Removal tool shower arm
15 9820351 Acoustic tape
1
2
6
4
3
9, 10, 11, 12
13
7
5
8
14
15
No. Item no. Description
1 9820357 Set of fittings
2 9820366 Damper set for seat and lid
3 982036 Toilet seat support buer (4 x)
4 982035 Lid support buer
The required installation information is included in the
scope of delivery for the spare parts (thermostatic car-
tridge, ceramic cartridge, protective device, shower arm,
shower arm cap). The relevant videos can also be found on
the Internet at www.tece.com/en
Shower arm caps
TECEone shower arm caps come in four versions which
dier from each other in terms of intensity and position of
the shower jet:
The as-delivered state of the TECEone includes three
“standard” ° caps.
1
2
3
4
„standard“ 75°
75° 90°
90° 90°
„standard“ 90°
„medium“ 90° „small“ 90°

14
Other manuals for TECEone
6
Table of contents
Other TECE Toilet manuals

TECE
TECE one 9700200 User manual

TECE
TECE TECEone User manual

TECE
TECE U2 TECEfilo Instruction Manual

TECE
TECE TECEbox 8 cm Instruction Manual

TECE
TECE TECEone User manual

TECE
TECE TECEplanus Installation manual

TECE
TECE TECEone User manual

TECE
TECE TECElux 100 9600100 Instruction Manual

TECE
TECE TECElux 100 Manual

TECE
TECE TECEone User manual


Popular Toilet manuals by other brands

VOVO
VOVO VB-4000SE user manual

Tecma
Tecma EasyFit Eco Owners and installation manual

nella
nella BERO NBKD-20A installation instructions

Croydex
Croydex CONSTANCE Installation and maintenance manual

Medline
Medline Microban BEDSIDE TOILET User instructions and warranty

Olympia
Olympia ETHER 69193 Installation and Maintenance


