CONTENTS - OBSAH - TARTALOM - OBSAH - СЪДЪРЖАНИЕ - SPIS TREŚCI
EN
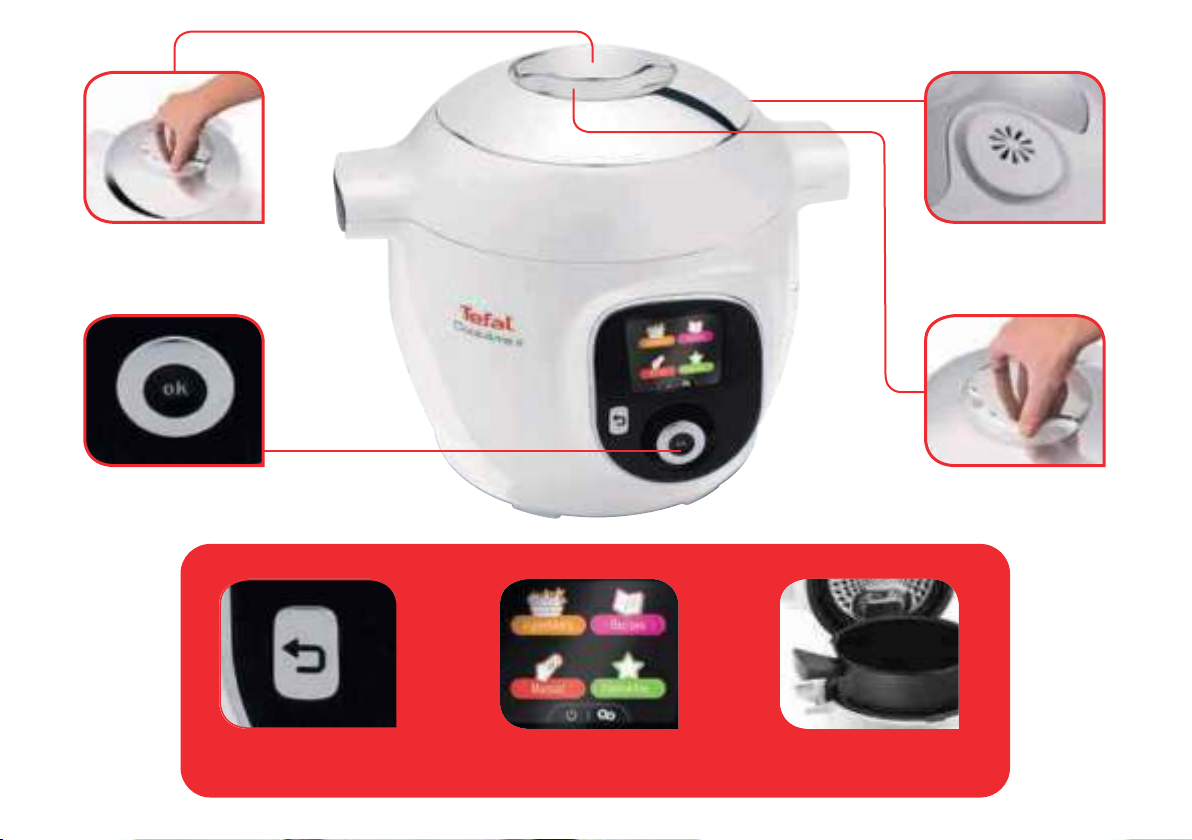
P. 4-5 - BEFORE USE
P. 6-8 - USE AND OPERATION
P. 9 - ON/OFF MENU
P. 10-11 - SETTINGS MENU
P. 12-17 - MANUAL MENU
P. 18-19 - INGREDIENTS MENU
P. 20-21 - INGREDIENTS RECIPE
P. 22-23 - RECIPES MENU
P. 24-25 - FAVORITES MENU
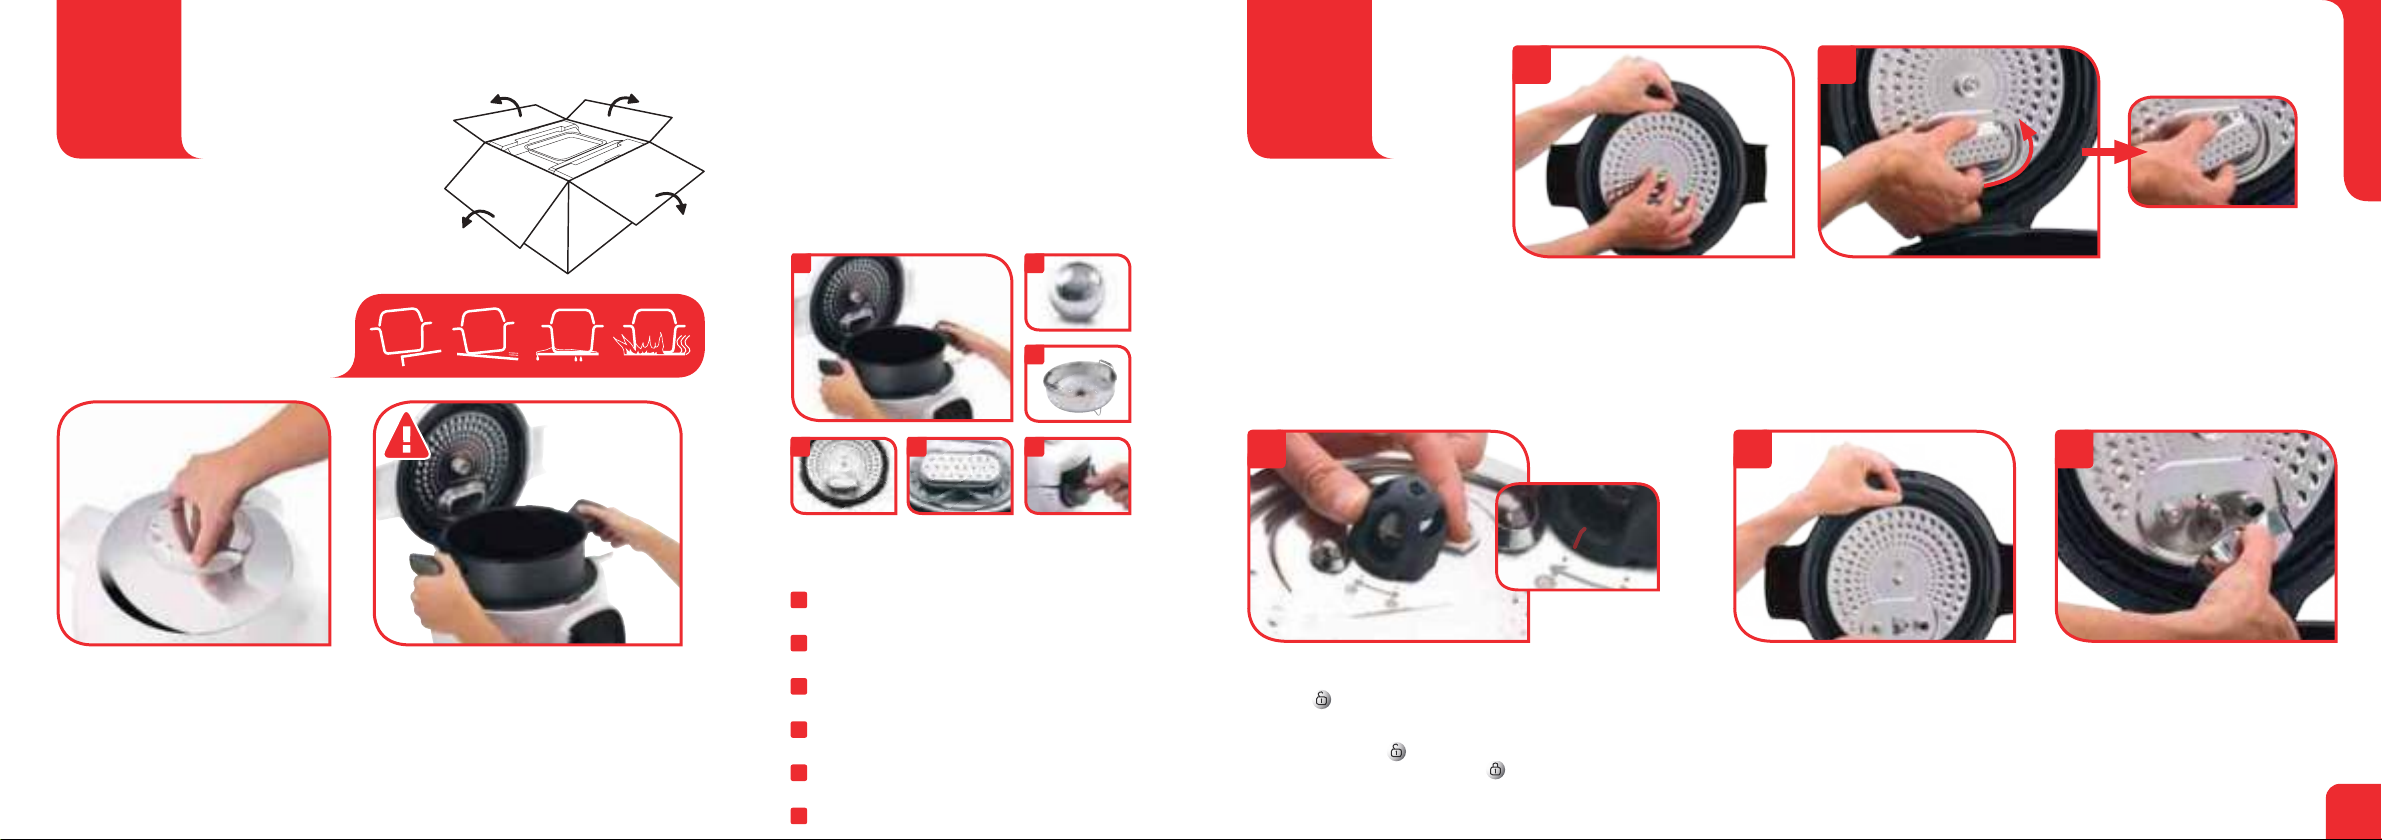
P. 26-31 - CLEANING MAINTENANCE
P. 32 - SAFETY FEATURES
P. 33 - TROUBLESHOOTING
HU
70-71. O. - HASZNÁLATBAVÉTEL ELŐTT
72-75. O. - HASZNÁLAT ÉS MŰKÖDTETÉS
76. O. - BE/KI MENÜ
77. O. - BEÁLLÍTÁSOK MENÜ
78-83. O. - MANUÁLIS BEÁLLÍTÁS
84-85. O. - ÖSSZETEVŐK MENÜ
86-87. O. - RECEPT HOZZÁVALÓK
88-89. O. - RECEPTEK MENÜ
90-93. O. - KEDVENCEK MENÜ
94-99. O. - TISZTÍTÁS ÉS KARBANTARTÁS
100. O. - BIZTONSÁGI FUNKCIÓK
101. O. - HIBAELHÁRÍTÁS
P. 36-37 - PŘED POUŽITÍM
P. 38-41 - POUŽITÍ A PROVOZ
P. 42 - MENU ZAPNOUT/VYPNOUT
P. 43 - MENU NASTAVENÍ
P. 44-49 - REŽIM PŘÍPRAVY POKRMŮ
P. 50-53 - MENU PŘÍSADY
P. 54-55 - MENU RECEPTY
P. 56-59 - MENU OBLÍBENÉ POKRMY
P. 60-65 - ČIŠTĚNÍ A ÚDRŽBA
P. 66 - BEZPEČNOSTNÍ PRVKY:
P. 67 - ŘEŠENÍ PROBLÉMŮ
SK
S. 104-105 - PRED POUŽITÍM
S. 106-109 - POUŽITIE A PREVÁDZKA
S. 110 - PONUKA ZAP/VYP
S. 111 - PONUKA NASTAVENÍ
S. 112-117 - PONUKA MANUÁLNE
S. 118-119 - PONUKA PRÍSADY
S. 120-121 - RECEPT NA PRÍSADY
S. 122-123 - PONUKA RECEPTY
S. 124-127 - PONUKA OBĽÚBENÉ
S. 128-133 - ČISTENIE A ÚDRŽBA
S. 134 - BEZPEČNOSTNÉ PRVKY
S. 135 - RIEŠENIE PROBLÉMOV
CUPRINS - СОДЕРЖАНИЕ - ЗМІСТ - VSEBINA - SADRŽAJ
BG RO
P. 202-203 - ÎNAINTE DE UTILIZARE
P. 204-206 - UTILIZARE ȘI FUNCȚIONARE
P. 207 - MENIU ON/OFF (PORNIRE/OPRIRE)
P. 208-209 - MENIU SETĂRI
P. 210-215 - MENIU MANUAL
P. 216-217 - MENIU INGREDIENTE
P. 218-219 - INGREDIENTE ȘI REȚETE
P. 220-221 - MENIU REȚETE
P. 222-223 - MENIU FAVORITE
P. 224-229 - CURĂȚARE ȘI ÎNTREȚINERE
P. 230 - FUNCȚII DE SIGURANȚĂ
P. 231 - DEPANARE
SL
P. 298-299 - PRED UPORABO
P. 300-302 - UPORABA DELOVANJE
P. 303 - MENI ZA VKLOP/IZKLOP
P. 304-305 - MENI NASTAVITEV
P. 306-311 - MENI ROČNO
P. 312-313 - MENI SESTAVINE
P. 314-315 - SESTAVINE RECEPTI
P. 316-317 - MENI RECEPTI
P. 318-319 - MENI PRILJUBLJENE
P. 320-325 - ČIŠČENJE IN VZDRŽEVANJE
P. 326 - VARNOSTNE FUNKCIJE
P. 327 - ODPRAVLJANJE TEŽAV
P. 138-139 - ПРЕДИ УПОТРЕБА
P. 140-142 - УПОТРЕБА И РАБОТА
P. 143 - МЕНЮ„ВКЛ./ИЗКЛ.“
P. 144-145 - МЕНЮ С НАСТРОЙКИ
P. 146-151 - МЕНЮ С РЪЧНИ НАСТРОЙКИ
P. 152-153 - МЕНЮ СЪСТАВКИ
P. 154-155 - СЪСТАВКИ ЗА РЕЦЕПТА
P. 156-157 - МЕНЮ РЕЦЕПТИ
P. 158-159 - МЕНЮ ЛЮБИМИ РЕЦЕПТИ
P. 160-165 - ПОЧИСТВАНЕ И ПОДДРЪЖКА
P. 166 - ФУНКЦИИ ЗА БЕЗОПАСНОСТ
P. 167 - ОТСТРАНЯВАНЕ НА
НЕИЗПРАВНОСТИ
PL
P. 170-171 - PRZED UŻYCIEM
P. 172-174 - UŻYTKOWANIE I DZIAŁANIE
P. 175 - MENU WŁ./WYŁ
P. 176-177 - MENU USTAWIENIA
P. 178-183 - MENU TRYB RĘCZNY
P. 184-185 - MENU SKŁADNIKI
P. 186-187 - SKŁADNIKI - PRZEPISY
P. 188-189 - MENU PRZEPISÓW
P. 190-191 - MENU ULUBIONE
P. 192-197 - CZYSZCZENIE I KONSERWACJA
P. 198 - ZABEZPIECZENIA
P. 199 - ROZWIĄZYWANIE
PROBLEMÓW
RU
P. 234-235 - ПЕРЕД ИСПОЛЬЗОВАНИЕМ
P. 236-238 - ИСПОЛЬЗОВАНИЕ И УПРАВЛЕНИЕ
P. 239 - МЕНЮ ВКЛЮЧЕНИЯ/ВЫКЛЮЧЕНИЯ
P. 240-241 - МЕНЮ НАСТРОЕК
P. 242-247 - МЕНЮ «РУЧНОЙ РЕЖИМ»
P. 248-249 - МЕНЮ «ИНГРЕДИЕНТЫ»
P. 250-251 - РЕЦЕПТЫ ПО ИНГРЕДИЕНТАМ
P. 252-253 - МЕНЮ «РЕЦЕПТЫ»
P. 254-255 - МЕНЮ «ИЗБРАННОЕ»
P. 256-261 - ОЧИСТКА И ОБСЛУЖИВАНИЕ
P. 262 - ФУНКЦИИ БЕЗОПАСНОСТИ
P. 263 - УСТРАНЕНИЕ НЕПОЛАДОК
UK
P. 266-267 - ПЕРЕД ПЕРШИМ ВИКОРИСТАННЯМ
P. 268-270 - ВИКОРИСТАННЯ ТА КЕРУВАННЯ
P. 271 - МЕНЮ ВМИКАННЯ/ВИМИКАННЯ
P. 272-273 - МЕНЮ НАЛАШТУВАНЬ
P. 274-279 - МЕНЮ РУЧНОГО КЕРУВАННЯ
P. 280-281 - МЕНЮ ІНГРЕДІЄНТІВ
P. 282-283 - РЕЦЕПТ ДЛЯ ІНГРЕДІЄНТІВ
P. 284-285 - МЕНЮ РЕЦЕПТИ
P. 286-287 - МЕНЮ ОБРАНОГО
P. 288-293 - ОЧИЩЕННЯ ТА ОБСЛУГОВУВАННЯ
P. 294 - ФУНКЦІЇ БЕЗПЕКИ
P. 295 - УСУНЕННЯ НЕСПРАВНОСТЕЙ
HR
P. 330-331 - PRIJE UPORABE
P. 332-334 - UPORABA RAD
P. 335 - IZBORNIK ZA
UKLJUČIVANJE/ISKLJUČIVANJE
P. 336-337 - IZBORNIK POSTAVKI:
P. 338-343 - IZBORNIK MANUAL (RUČNO)
P. 344-345 - IZBORNIK INGREDIENTS (SASTOJCI):
P. 346-347 - SASTOJCI RECEPTI
P. 348-349 - IZBORNIK RECIPES (RECEPTI)
P. 350-351 - IZBORNIK FAVORITES (FAVORITI)
P. 352-357 - ČIŠĆENJE I ODRŽAVANJE
P. 358 - SIGURNOSNE ZNAČAJKE
P. 359 - RJEŠAVANJE PROBLEMA
CS TR
S. 362-363 - KULLANMADAN ÖNCE
S. 364-366 - KULLANIM VE ÇALIŞTIRMA
S. 367 - AÇMA/KAPATMA MENÜSÜ
S. 368-369 - AYARLAR MENÜSÜ
S. 370-375 - MANUEL MENÜ
S. 376-377 - MALZEMELER MENÜSÜ
S. 378-379 - MALZEME TARIFI
S. 380-381 - TARIFLER MENÜSÜ
S. 382-383 - FAVORILER MENÜSÜ
S. 384-389 - TEMIZLIK VE BAKIM
S. 390 - GÜVENLİK ÖZELLİKLERİ
S. 391 - SORUN GIDERME