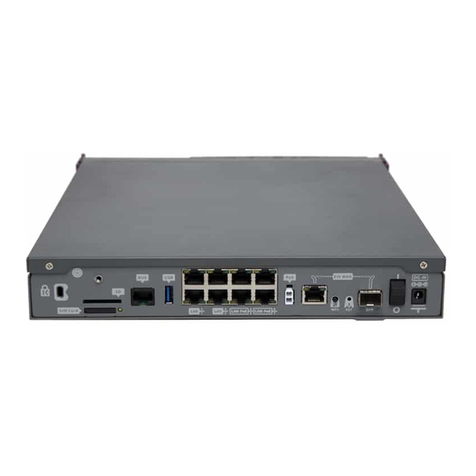
Teldat Connect-FW5G User manual

Teldat Connect-FW5G
Installation Manual
Copyright© Teldat Dm1054-I Version 1.0 01/2023 Teldat S.A.
Teldat S.A. Manual
Teldat Connect-FW5G 1

Legal Notice
Warranty
This publication is subject to change.
Teldat S.A. offers no warranty whatsoever for information contained in this manual.
Teldat S.A. is not liable for any direct, indirect, collateral, consequential or any other damage connected to the deliv-
ery, supply or use of this manual.
Manual Teldat S.A.
2Teldat Connect-FW5G

Table of Contents
I RelatedDocuments................................. 1
Chapter1 AboutthisGuide.................................. 2
1.1 Supporteddevices................................... 2
1.2 Who should read this manual? . . . . . . . . . . . . . . . . . . . . . . . . . . . . . . 2
1.3 When should this manual be read? . . . . . . . . . . . . . . . . . . . . . . . . . . . . 2
1.4 Whatisinthismanual?................................. 2
1.5 Whatisnotinthismanual? ............................... 2
1.6 How is the information organized? . . . . . . . . . . . . . . . . . . . . . . . . . . . . 2
1.7 Technicalsupport.................................... 2
Chapter2 TeldatConnect-FW5G............................... 3
2.1 Characteristics..................................... 3
2.1.1 Powersupply ..................................... 3
2.1.2 Hardwaremonitoring.................................. 3
Chapter 3 Components and Power Supply . . . . . . . . . . . . . . . . . . . . . . . . . . 4
3.1 Components...................................... 4
3.1.1 Frontpanel ...................................... 4
3.1.2 Rearpanel....................................... 5
3.1.3 Sidepanel....................................... 7
3.2 Mounting an anti-theft security cable . . . . . . . . . . . . . . . . . . . . . . . . . . . 8
3.3 Installation ...................................... 9
3.3.1 Standalone ...................................... 9
3.3.2 Wallmounting..................................... 9
3.3.3 Rackmounting.................................... 10
3.4 Plug-inmodules................................... 14
3.5 Powersource .................................... 14
3.6 RSTbutton ..................................... 15
3.6.1 Rebootingthedevice................................. 15
3.6.2 Defaultconfiguration................................. 15
3.7 Dataconnections................................... 15
3.7.1 4-port Ethernet LAN connections . . . . . . . . . . . . . . . . . . . . . . . . . . . . 16
3.7.2 WANconnections................................... 16
3.7.3 WWAN antenna connection . . . . . . . . . . . . . . . . . . . . . . . . . . . . . . 17
3.7.4 Wireless LAN internal antennas . . . . . . . . . . . . . . . . . . . . . . . . . . . . 19
Teldat S.A. Table of Contents
Teldat Connect-FW5G i

3.7.5 Connecting for configuration . . . . . . . . . . . . . . . . . . . . . . . . . . . . . . 19
3.8 InstallingtheSIMcard................................. 19
Chapter4 Compliance.................................... 21
4.1 Manufacturerinformation ............................... 21
4.2 Riskidentification................................... 21
4.3 Safetywarnings ................................... 21
4.4 WEEEinformation.................................. 23
4.5 REACH....................................... 23
4.6 Power usage and energy efficiency . . . . . . . . . . . . . . . . . . . . . . . . . . . 23
4.7 PSUenergyefficiency ................................ 24
4.8 EC declaration of conformity . . . . . . . . . . . . . . . . . . . . . . . . . . . . . . 25
4.9 CEmarking..................................... 25
4.10 Nationalrestrictions.................................. 25
4.11 Operatingfrequency ................................. 26
4.12 Intended use of the equipment . . . . . . . . . . . . . . . . . . . . . . . . . . . . . 26
Appendix A Technical Information. . . . . . . . . . . . . . . . . . . . . . . . . . . . . . . 27
A.1 Troubleshooting................................... 27
A.2 Updatingthesoftware................................. 27
A.3 Connectingtothedevice ............................... 28
A.3.1 Connecting using the local console (CONSOLE connector). . . . . . . . . . . . . . . . . 28
A.4 Connectors ..................................... 29
A.4.1 LANconnectors ................................... 29
A.4.2 WANBase-Tconnectors ............................... 29
A.4.3 WANSFPconnectors................................. 29
A.4.4 WWANconnector .................................. 29
A.4.5 USB3.0connector.................................. 30
A.4.6 Configurationconnector................................ 30
A.4.7 Powersupplyconnector................................ 31
A.5 Technicalspecifications................................ 31
A.5.1 Hardwarearchitecture................................. 31
A.5.2 LANinterface .................................... 31
A.5.3 WANBase-Tinterface................................. 31
A.5.4 WANSFPinterface.................................. 32
A.5.5 WirelessWANinterface................................ 34
A.5.6 WirelessLANinterface................................ 36
A.5.7 USB3.0interface................................... 36
Table of Contents Teldat S.A.
ii Teldat Connect-FW5G

A.5.8 Configurationinterface ................................ 36
A.5.9 Powersupply .................................... 36
A.5.10 Dimensionsandweight................................ 36
A.5.11 Environmental specifications . . . . . . . . . . . . . . . . . . . . . . . . . . . . . . 36
Appendix B CE Radio Information. . . . . . . . . . . . . . . . . . . . . . . . . . . . . . . 37
B.1 RFWANspecifications................................ 37
B.1.1 Regulatory model “TLDPM03E1” compliance . . . . . . . . . . . . . . . . . . . . . . . 38
B.2 WI-FIspecifications.................................. 38
Teldat S.A. Table of Contents
Teldat Connect-FW5G iii

I Related Documents
Teldat Dm704-I Configuration and Monitoring
Teldat Dm709-I LAN interfaces
Teldat Dm717-I Bridge
Teldat Dm748-I Software Updating
Teldat Dm771-I Wireless LAN Interface.
Teldat Dm781-I Cellular Interface
Teldat Dm830-I MNGPLAT Feature
Teldat S.A. Related Documents
Teldat Connect-FW5G 1

Chapter 1 About this Guide
This is the installation manual for the Teldat Connect-FW5G router and contains information on how to correctly in-
stall the device in a working environment.
1.1 Supported devices
The information provided in this installation manual only applies to the Teldat Connect-FW5G router.
1.2 Who should read this manual?
This manual should be read by support personnel who need to configure, maintain and monitor the device.
1.3 When should this manual be read?
Read this guide as soon as you are ready to familiarize yourself with the device and its components.
This manual will help you understand your new device in greater depth.
1.4 What is in this manual?
This installation guide contains the following information:
• A description of the features available in the Teldat Connect-FW5G router.
• Technical specifications.
• Power supply requirements.
• Elements that can be connected when the router is operating.
• How to install and uninstall the modules and power sources.
• A description of the LEDs and connectors in the device.
• Troubleshooting.
1.5 What is not in this manual?
This manual does not contain information on software or device configuration. For details on how to configure the
device, please see the relevant protocol manuals found at: http://www.teldat.com
1.6 How is the information organized?
Each chapter focuses on a specific part of the hardware and its components. All descriptive and technical specifica-
tions, as well as the information on a given component, can be found in the relevant chapter.
1.7 Technical support
Teldat S.A. offers technical support. Device software can be upgraded on a regular basis for maintenance purposes
and in case new features are developed.
Contact information:
Tel.: +34 918 076 565 - Fax: +34 918 076 566
1 About this Guide Teldat S.A.
2Teldat Connect-FW5G

Chapter 2 Teldat Connect-FW5G
Fig. 1: Teldat Connect-FW5G
2.1 Characteristics
2.1.1 Power supply
For further information on the different Teldat Connect-FW5G power supplies, please see Components and Power
Supply on page 4, Power source on page 14.
2.1.2 Hardware monitoring
The LEDs on the front and the rear panel are used to monitor the hardware in the Teldat Connect-FW5G router.
These LEDs provide visual information on the state of the device and reference the condition of the hardware com-
ponents, indicating whether or not there is connectivity, data flow, etc.
For further information on the LED panel, please see Components on page 4.
Teldat S.A. 2 Teldat Connect-FW5G
Teldat Connect-FW5G 3

Chapter 3 Components and Power Supply
The following chapter provides detailed information on the chassis of the Teldat Connect-FW5G router and its com-
ponents. This information includes:
• Components.
• Information on assembly.
• Power supply.
• RST button.
• Data connection.
• SIM card installation.
3.1 Components
3.1.1 Front panel
The following figure shows the front panel.
Fig. 2: Front Panel of the Teldat Connect-FW5G
The front panel components are as follows:
Front panel components
Item Description
A LED panel.
The LED panel provides information on the status of the components (indicating whether they are active or not) and
on network activity.
LEDs
LED Definition Status Indication
Cloud Cloud Information Off -> No connection, or connection disabled (shutdown).
Green -> Enabled, but no associated STAs.
Blinking -> Connected. Connection data activity.
Cell Status Off -> No connection, or connection disabled (shutdown, SIM er-
ror, not registered).
Green -> Registered.
Blinking -> Connected. Connection data activity.
WLAN-1 Access Point 2.4 GHz radio Off -> No connection, or connection disabled (shutdown).
Green -> Enabled, but no associated STAs.
Blinking -> Connected. Connection data activity.
3 Components and Power Supply Teldat S.A.
4Teldat Connect-FW5G

WLAN-2 Access Point 5 GHz radio Off -> No connection, or connection disabled (shutdown).
Green -> Enabled, but no associated STAs.
Blinking -> Connected. Connection data activity.
SYS General Status /
Default Configuration Process
Off -> System off.
Yellow -> Error, component operating incorrectly.
Green -> System initialized and operating.
3.1.2 Rear panel
The following figure shows the rear panel. Here you will find the majority of Teldat Connect-FW5G router connect-
ors.
Fig. 3: Rear panel
The following table provides information on each connector, as well as a description:
Rear panel components
Item Description
A Power source connection (DC).
Refer to Power source on page 14 for more information on Power connection and
Power supply on page 36 for power specifications applicable to theTeldat Con-
nect-FW5G device.
B Eth WAN-1 SFP.
For more information on the SFP interface, refer to:
-WAN connections on page 16
-WAN SFP connectors on page 29
-WAN SFP interface on page 32
C Eth WAN-1 Base-T. WAN Gigabit Ethernet.
For more information on the WAN interface, refer to:
-WAN connections on page 16
-WAN Base-T connectors on page 29
-WAN Base-T interface on page 31
D Eth WAN-2 SFP.
For more information on the SFP interface, refer to:
-WAN connections on page 16
Teldat S.A. 3 Components and Power Supply
Teldat Connect-FW5G 5

-WAN SFP connectors on page 29
-WAN SFP interface on page 32
E Eth WAN-2 Base-T. WAN Gigabit Ethernet.
For more information on the WAN interface, refer to:
-WAN connections on page 16
-WAN Base-T connectors on page 29
-WAN Base-T interface on page 31
F 4-port Gigabit LAN Ethernet (LAN1 to LAN4).
For more information on the LAN interface, refer to:
-4-port Ethernet LAN connections on page 16
-LAN connectors on page 29
-LAN interface on page 31
G CONSOLE. Provides access to the Teldat Connect-FW5G local console for con-
figuration and monitoring purposes.
-Connecting for configuration on page 19
-Configuration connector on page 30
-Configuration interface on page 36
H USB 3.0 Ports.
For more information on the USB 3.0 connector, refer to:
-Plug-in modules on page 14
- on page
-USB 3.0 interface on page 36
I RESET. Reset button. For further information on how the reset button works,
please see RST button on page 15.
J Cell connectors: ANT1 and ANT2.
For more information on the Cellular interface, refer to:
-WWAN antenna connection on page 17
-WWAN connector on page 29
-Wireless WAN interface on page 34
In addition to the foregoing, the rear panel also has LEDs linked to the LAN and WAN Ethernet interfaces.
3.1.2.1 LEDs
The following figure shows the router's Ethernet LAN LED indicators:
3 Components and Power Supply Teldat S.A.
6Teldat Connect-FW5G

Fig. 4: LAN LEDs
LAN Ethernet LED indicators
LED Description
Green - Steady: 10/100/1000M link established.
- Blinking: Transferring data.
Yellow - Steady: 1000M link established.
None Interface is either unavailable, not installed, or not registered.
The following figure shows the router's WAN LED indicators:
Fig. 5: WAN LEDs
WAN Ethernet LED indicators
LED Description
Green Copper status
- Steady: 10/100/1000M link established.
- Blinking: Transferring data.
Yellow Fiber status:
- Steady: 1000M link established.
None Interface is either unavailable, not installed, or not registered.
3.1.3 Side panel
SIM holder and Kensington slot are located on the side panel.
Teldat S.A. 3 Components and Power Supply
Teldat Connect-FW5G 7

Fig. 6: Side panels
The connectors are as follows:
Side panel connectors
Item Description
A Kensington security slot
For further information, please see on page .
BSIM Card. Slot where you can insert the SIM card.
Refer to Installing the SIM card on page 19 for more information on SIM installa-
tion.
CCell connectors: ANT3 and ANT4.
For more information on the Cellular interface, refer to:
-WWAN antenna connection on page 17
-WWAN connector on page 29
-Wireless WAN interface on page 34
3.2 Mounting an anti-theft security cable
Teldat Connect-FW5G devices have been equipped with a standard Kensington security slot to which a security
cable can be attached. The T-bar lock of the security cable allows the device to be attached to an anchor point, thus
preventing potential thefts.
The security slot is located on the rear panel of the housing, as shown in the following figure:
Fig. 7: Security Slot
3 Components and Power Supply Teldat S.A.
8Teldat Connect-FW5G

3.3 Installation
3.3.1 Standalone
Teldat Connect-FW5G devices can be placed as standalone on a flat, stable surface.
Make sure there is enough space around the router (for ventilation purposes) and check that the power cord and
data cables can easily reach it.
Workplace conditions. Main characteristics
• Avoid humid and/or dusty locations.
• Direct exposure to sunlight and other heat sources should be avoided. The device should not be placed amongst
papers, magazines or other elements that could hinder natural air circulation.
• The device should not be placed close to strong electromagnetic fields (such as speakers, engines, etc.).
• Knocks and/or strong vibrations should be avoided during transport, operation and storage.
3.3.2 Wall mounting
The Teldat Connect-FW5G can be mounted on the wall.
There are two slots on the underside of the device, used to fix it to the wall.
We recommend the following accessories for wall mounting, valid for solid and Gypsum board (plaster) walls:
• 2 screws: M4x20, 6.50-7mm diameter, 2.0mm head, 20mm length.
Fig. 8: Screw
• 2 wall anchors: 1/4X1, 8 mm diameter, 25mm length.
Fig. 9: Wall anchor
Warning
The screws must go into a wall stud (wood) or a wall anchor of the appropriate type for the wall. Screws
into drywall are not strong enough to mount the router.
Warning
Make sure that there are no concealed pipes and cables at the desired drilling location before drilling
any mounting holes. Damage to electricity cables, gas, water and sewage pipes can result in death or
material damage. Choose the installation location so that as few obstacles or electrical appliances as
possible disturb the connection.
Teldat S.A. 3 Components and Power Supply
Teldat Connect-FW5G 9

Note
The screws and anchors are not delivered with the router.
There are two slots on the underside of the device that can be used to fix it to the wall. You can see this in the follow-
ing figure:
To mount the router on a wall or another surface, follow these steps:
Procedure
Step 1. Align the two screws horizontally on a wall (or any other vertical surface) and install them 16.0 cm (6.3
inches) apart.
The screws should protrude 0.6 cm (0.25 inch) from the wall surface.
Warning
If you are installing the screws into drywall, use hollow-wall anchors (8 mm – 5/16 inch) to secure the
screws. If the screws are not properly anchored, the strain of the cables connected to the router's back
panel could pull the router from the wall.
Step 2. Hang the router on the screws.
3.3.3 Rack mounting
Teldat Connect-FW5G devices can be installed in a 19” rack.
Note
The necessary kit is not provided by default and has to be acquired separately.
The rack kit consists of two brackets (A and B) and two screws (C).
3 Components and Power Supply Teldat S.A.
10 Teldat Connect-FW5G

Fig. 11: Rack mounting kit
The kit can be installed at the front or back of the device.
Fig. 12: Front panel installation option
Fig. 13: Rear panel installation option
To install the kit, follow these steps:
• Step 1. Place side A as shown in the image. Place the bracket at the bottom (1) and adjust it until it is fastened and
in line with the side panel (2).
Teldat S.A. 3 Components and Power Supply
Teldat Connect-FW5G 11

Fig. 14: Side A installation
• Step 2. Do the same with side B.
Fig. 15: Side B installation
• Step 3. Insert screws C using a screwdriver. Use a Phillips PH1 screwdriver to fasten the screws.
Fig. 16: Screws
3 Components and Power Supply Teldat S.A.
12 Teldat Connect-FW5G

Fig. 17: Screw installation
Fig. 18: Screw placement
Fig. 19: Screw view
• Step 4. Make sure the mounting points (green arrows) appear as shown in the following figure:
Teldat S.A. 3 Components and Power Supply
Teldat Connect-FW5G 13

Fig. 20: Mounting points
The device is now ready for rack installation.
Fig. 21: Rack kit installed
3.4 Plug-in modules
The Teldat Connect-FW5G does not have plug-in modules.
Reserved for future use.
3.5 Power source
The Teldat Connect-FW5G router is powered through an external AC/DC power adapter.
Warning
The equipment must be used with the power supply provided by the manufacturer.
To power the router, plug the power supply into the mains supply and the DC connector.
Fig. 22: DC Connector
3 Components and Power Supply Teldat S.A.
14 Teldat Connect-FW5G

To avoid electric shocks, residual current circulation, and other unwanted effects that also affect communications, the
following is recommended:
Warning
All interconnected communication devices should be plugged into THE SAME GROUNDED POWER
OUTLET, which should, at the same time, be of good quality (lower than 10 ohms).
We recommend connecting all data devices to the same power source regardless of whether the work-
place has an uninterrupted power supply system (UPS), a regulated supply, or is independent of other
power supplies (such as lighting, etc.). This will help prevent malfunctions and premature aging of the
drivers and other components.
3.6 RST button
The different RST button features are described below.
Fig. 23: RST button
3.6.1 Rebooting the device
Once the device is operating normally, pressing the RST button will force a restart.
3.6.2 Default configuration
The RST button allows you to boot the device with its default configuration following these steps:
• With the device switched off, keep the RESET button pressed until the device switches on.
• The SYS LED (green) will light up and the WLAN-2 LED will begin to blink. This blinking will continue for 10
seconds.
• For the device to boot with the default configuration, release the Reset button while the WLAN-2 LED is blinking
(i.e., before the 10-second period expires).
Once the default configuration is running, the router's default configuration establishes the following access IP and
mask address:
• IP address: 192.168.0.1
• IP mask: 255.255.255.0
Note
Some devices leave the factory with customized settings. This personalization means your router's de-
fault configuration (and that of the embedded access point, where applicable) may be different from the
one shown above.
3.7 Data connections
The Teldat Connect-FW5G router has the following data connections.
Teldat S.A. 3 Components and Power Supply
Teldat Connect-FW5G 15
Table of contents
Other Teldat Network Router manuals
Teldat
Teldat iM8 User manual
Teldat
Teldat 4Ge User manual
Teldat
Teldat Connect-104 User manual
Teldat
Teldat Teldat V User manual

Teldat
Teldat Regesta Smart PRO User manual
Teldat
Teldat Atlas-i70 User manual
Teldat
Teldat Connect-FW User manual
Teldat
Teldat Regesta Smart PLC User manual

Teldat
Teldat Atlas 250 User manual

Teldat
Teldat 4Ge User manual
Teldat
Teldat REGESTA-PRO-ER Series User manual

Teldat
Teldat iM8 User manual
Teldat
Teldat SDE User manual
Teldat
Teldat Regesta PLC User manual

Teldat
Teldat C1+LS User manual
Teldat
Teldat RS123 Seies User manual

Teldat
Teldat bintec elmeg Regesta PRO PLC User manual

Teldat
Teldat K Seres User manual
Teldat
Teldat M1 User manual
Teldat
Teldat 5Ge-Rail User manual
