manuals.online logo
Brands
  1. Home
  2. •
  3. Brands
  4. •
  5. Teleco
  6. •
  7. Receiver
  8. •
  9. Teleco TVSTICK868NT10 User manual

Teleco TVSTICK868NT10 User manual

360 mm
30 mm
20 mm
STRIP
BLUE
COM
COM
COM
7
6
5
+ COM
-
STRIP
BLUE
COM
COM
COM
7
6
5
+ COM
-
IT - DIMENSIONI EN  DIMENSIONS FR - DIMENSIONS DE  ABMESSUNGEN
IT - Coperchio
EN - Lid
FR - Couvercle
DE - Deckel
IT - Alimentazione 230V~
EN - 230V~ Power supply
FR - Alimentation 230V~
DE - 230V~ Stromversorgung
IT - Uscita LED
EN - LED output
FR - LED sortie
DE - LED Ausgang
TVSTICK868NT10 (60W, 868.3Mhz) TVSTICK868NT11 (100W, 868.3Mhz)
TVSTICK916NT10 (60W, 916Mhz) TVSTICK916NT11 (100W, 916Mhz)
H03VVH2-F 2x0.75mm²
360 mm
30 mm
20 mm
STRIP
BLUE
COM
COM
COM
7
6
5
+ COM
-
STRIP
BLUE
COM
COM
COM
7
6
5
+ COM
-
360 mm
30 mm
20 mm
STRIP
BLUE
COM
COM
COM
7
6
5
+ COM
-
STRIP
BLUE
COM
COM
COM
7
6
5
+ COM
-
IT - Codice prodotto EN - Product code FR - Code du produit DE - Artikelnummer
IT - Tappo di chiusura cortocircuitato. Se l’ingresso non è utilizzato deve essere collegato.
EN - Shorting end cap. If the input is not used it must be connected.
FR - Bouchon de terminaison court-circuit. Si l’entrée n’est pas utilisée doit être connectée.
DE - Kurzschluss Endkappe. Wird der Eingang nicht verwendet muss angeschlossen werden.
IT - RICEVITORE RADIO 230V~ PER IL CONTROLLO DI LED 1-COLORE ANODO COMUNE CON COMANDI
RADIO, INGRESSO 1÷10V E INGRESSO ON/OFF/DIM
TRASFORMATORE INTEGRATO 60W (AL-24-60WNT) O 100W (AL-24-100WNT) .
EN  230V~ RADIO RECEIVER CONTROLLING 1COLOUR LED COMMON ANODE WITH RADIO CONTROLS,
INPUT 1÷10V AND INPUT ON/OFF/DIM.
60W AL2460WNT OR 100W AL24100WNT INTEGRATED TRANSFORMER.
FR - RECEPTEUR RADIO 230V~ POUR LE CONTROLE DES LED MONOCHROMES AVEC ANODE COMMUNE
AVEC DES COMMANDES RADIO, ENTRÉE 1÷10V ET ENTRÉE ON/OFF/DIM.
TRANSFORMATEUR INTÉGRÉ 60W (AL-24-60WNT) OU 100W (AL-24-100WNT).
DE  230V~ EMPFÄNGER ZUR ANSTEUERUNG VON EINFARBIGEN LEDS  GEMEINSAME ANODE MITTELS
FUNKSTEUERUNG, 1÷10V EINGANG UND EIN/AUS/DIM EINGANG
INTEGRIERTER 60W TRANSFORMATOR AL2460WNT ODER 100W TRANSFORMATOR AL24100WNT .
DOC.: I125.00_A
TVSTICKXXXNT10-NT11 DATE: 19/09/18
TELECO AUTOMATION SRL
Via dell’Artigianato, 16 - 31014 Colle Umberto (TV) ITALY
TELEPHONE: ++39.0438.388511 FAX: ++39.0438.388536 - www.telecoautomation.com
This document is the property of Teleco Automation Srl who reserves all reproduction and copying rights
IT - Ingresso 1÷10Vcc o ON/OFF/DIM (*)
EN - Input 1÷10Vdc or ON/OFF/DIM (*)
FR - Entrée 1÷10V ou ON/OFF/DIM (*)
DE - 1÷10V Eingang oder ON/OFF/DIM (*)
* IT - Impostato di default come ingresso 1÷10Vdc. Per utilizzarlo come ingresso ON/OFF/DIM seguire la procedura riportata nella sezione 1.0.
EN - Default set as Input 1÷10Vdc. In order to use as ON/OFF/DIM input follow the procedure reported in section 1.0.
FR – Conguré par default comme entrée 1÷10Vdc. Pour l’utiliser comme entrée ON/OFF/DIM suivre la procédure indiquée dans la section 1.0
DE - Von Default eingestellt als Input 1÷10Vdc. Um ihn als eingang ON/OFF/DIM zu benuetzen, muss mann die Section 1.0 folgen.
2
360 mm
30 mm
20 mm
STRIP
BLUE
COM
COM
COM
7
6
5
+
-
STRIP
BLUE
COM
COM
COM
7
6
5
+ COM
-
1
2
3
4
5
6
78
+
-
+
-
360 mm
30 mm
20 mm
STRIP
BLUE
COM
COM
COM
7
6
5
+ COM
-
STRIP
BLUE
COM
COM
COM
7
6
5
+ COM
-
IT - COLLEGAMENTI EN  WIRINGS
FR - CONNEXIONS DE  ANSCHLÜSSE
IT -Rimuovere il coperchio.
EN - Remove the lid.
FR -Enlever le couvercle.
DE - Den Deckel entfernen.
IT - Il prodotto garantisce una protezione
IP44 se correttamente assemblato.
EN - The product guarantees IP44 rating
if properly assembled.
FR - Le produit garantit un indice de
protection IP44 à condition qu’il ait été
assemblé correctement.
DE - Das Produkt gewährleistet den
Schutzgrad IP44, wenn es korrekt
zusammengebaut wurde.
IT - Attenzione: non invertire la polarità dei LED!
EN - Attention: do not invert the polarity of the LED!
FR - Attention: ne pas inverser la polarité des LED!
DE - Achtung: Polung der LEDs nicht invertieren!
IT - Alimentazione 24Vdc
EN - 24Vdc Power supply
FR - Alimentation 24Vdc
DE - 24Vdc Stromversorgung
IT - Uscita LED
EN - LED output
FR - LED sortie
DE - LED Ausgang
IT - Tasto di programmazione
EN - Programming button
FR - Bouton de programmation
DE - Programmierungstaste
(1÷10Vdc)
P1
ON/OFF/DIM
IT - Ingresso con funzione ON/OFF/DIM.
EN - Input with function ON/OFF/DIM.
FR - Entrée avec fonction ON/OFF/DIM
DE - Eingang mit funktion ON/OFF/DIM
= ON/OFF
(EIN/AUS)
< 0,5 s
= DIMMER
ꜛ ꜜ
> 0,5 s
IT - L’ingresso 1÷10V è prioritario e quando è utilizzato sono disabilitati i comandi radio.
Nel caso in cui l’ingresso non venga utilizzato deve essere collegato il tappo di chiusura
cortocircuitato.
EN - The input 1÷10V is primary and when it is used the radio commands are
disable.In case of the input is not used must be connected the shorting end cap
FR - L’entrée 1-10V est primaire et quand elle est utilisée les commandes radio
sont désactivées. Si l’entrée n’est pas utilisée on doit connecter le bouchon de
terminaison court-circuit.
DE - Der 1-10V Eingang ist prioritär und wenn er verwendet wird, werden die
Funkbefehle deaktiviert. Wird der Eingang nicht verwendet, Kurzschluss Endkappe
muss angeschlossen werden.
IT - DISPOSITIVI DI COMANDO WIRELESS EN  WIRELESS COMMAND DEVICES
FR - DISPOSITIFS DE COMMANDE SANS FIL DE  DRAHTLOSE STEUERUNGSGERÄTE
OFF
(AUS)
100%
75%
50%
Min.
DIM +
DIM -
CH1
CH2
CH3
CH4
CH5
CH6
CH7
IT - Trasmettitore 7 canali
EN - 7 channels transmitter
FR - Emetteur à 7 canaux
DE - 7-Kanal Sender
IT - Canale singolo di comando con funzione ON, OFF oppure ON/OFF
EN - Single command channel with function ON, OFF or ON/OFF/DIM
FR - Canal individuel de commande avec fonction ON, OFF ou ON/OFF/DIM
DE - Einzel- Kanal für Befehle mit Funktion EIN, AUS oder EIN/AUS/DIM
IT - Il controllo ON/OFF/DIM può essere fatto con il pulsante o con l’ingresso 1÷10V.
EN - The control ON/OFF/DIM can be done with the button or with the input 1 ÷ 10V.
FR - On peut controler ON/OFF/DIM avec le bouton ou avec l’entrée 1÷10V
DE - Die Steuerung EIN/AUS/DIM kann mittel taste oder dem 1÷10V Eingang getatigt werden.
IT - Trasmettitore 3 canali
EN - 3 channels transmitter
FR - Emetteur à 3 canaux
DE - 3 Kanal Sender
100% / DIM+
25%
LIBERO
FREE
LIBRE
FREI
CH1
CH2
CH3
CH4
CH5
CH6
CH7
OFF / DIM-
(AUS)
3
ON
< 10 s
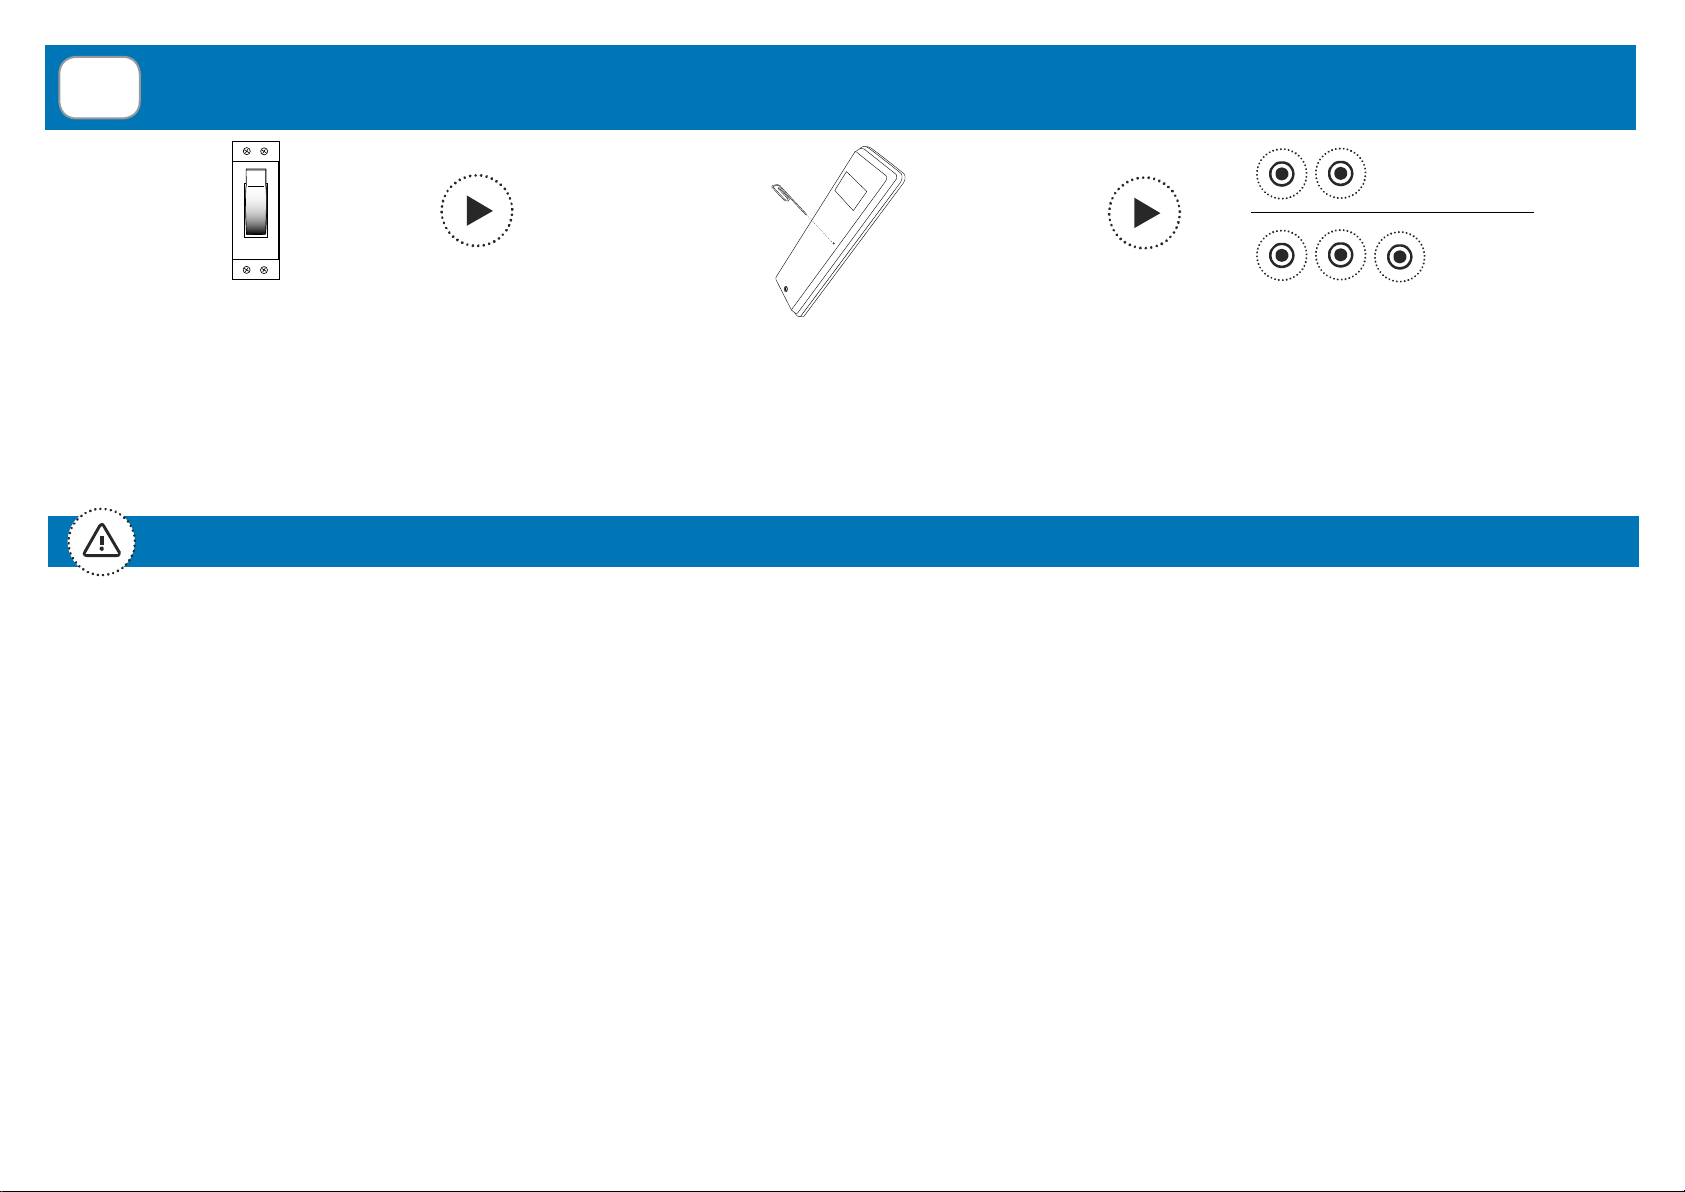
IT - IMPOSTARE INGRESSO COME 1÷10V O ON/OFF/DIM EN  SET INPUT AS 1÷10V OR ON/OFF/DIM
FR – CONFIGURER ENTRÉE COMME 1÷10V OU ON/OFF/DIM DE  EINGANG EINSTELLEN ALS 1÷10V ODER ON/OFF/DIM
1.0
x5
IT - Entro 10 s dall’accensione...
EN - Within 10 s from power ON...
FR - Dans les 10 s qui suivent la mise sous tension...
DE - Innerhalb von 10 Sek. nach dem Einschalten...
IT - Premere 5volte il tasto P3 del trasmettitore e tenere premuto per 5 s.
EN - Press 5times the button P3 of the transmitter and keep it pressed 5 s.
FR - Appuyer 5fois sur le bouton P3 de l’émetteur et le maintenir appuyé 5 s.
DE - Drücken Sie 5mal die Taste P3 des Senders und 5 S. gedrückt halten.
ON/OFF/DIM
1÷10V
IT - ON/OFF/DIM. Il carico lampeggia 2 volte
Ingresso 1÷10V. Il carico lampeggia 3 volte
EN - Input ON/OFF/DIM. The load ashes 2 times
Input 1÷10V. The load ashes 3 times
FR - Entrée ON/OFF/DIM. La charge clignote 2 fois.
Entrée 1÷10V. La charge clignote 3 fois.
DE - Eingang ON/OFF/DIM. Die Last blinkt 2 mal.
Eingang 1÷10V Die Last blinkt 3 mal.
P3
*
* IT - Il tasto P3 si trova all’interno del trasmettitore. EN - P3 button is located inside the transmitter. FR - Le bouton P3 se trouve à l’intérieur de l’émetteur. DE - Die Taste P3 bendet sich im Inneren des Senders.
IT - AVVERTENZE EN  WARNINGS FR - AVERTISSEMENTS DE  WARNHINWEISE
IT - Il prodotto in oggetto deve essere installato, messo in servizio e controllato periodicamente solo da personale tecnico qualicato nel rispetto delle normative vigenti riguardanti le apparecchiature elettriche. Tutti i
collegamenti devono essere previsti per un’alimentazione generale monofase 230V~. Per la disconnessione dalla rete utilizzare un interruttore onnipolare con un’apertura dei contatti di almeno 3,5 mm. Predisporre tutti i dispositivi di
sicurezza necessari ed utilizzare materiali di collegamento idonei secondo le attuali normative sulla sicurezza elettrica. I cavi di collegamento devono avere una sezione adeguata al carico applicato. Prima di collegare l’alimentatore
alla rete elettrica assicurarsi i LED siano collegati correttamente al ricevitore. Un errato collegamento dei diodi LED (inversione di polarità) potrebbe danneggiarli, fare pertanto molta attenzione al loro collegamento rispettando le
polarità. All’accensione il ricevitore riprende la condizione precedente allo spegnimento. Il prodotto non deve essere inglobato o appoggiato in prodotti isolanti come lana di vetro o polistirolo o prodotti analoghi. Lasciare il contenitore
il più arieggiato possibile. SMALTIMENTO DEL PRODOTTO: alla ne dalla vita utile, l’apparecchio non deve essere smaltito come riuto domestico, ma conferito in un centro di raccolta riuti elettrici ed elettronici. La dichiarazione di
conformità può essere consultata sul sito: www.telecoautomation.com/ce. Nell’ottica di un continuo sviluppo dei propri prodotti, il produttore si riserva il diritto di apportare modiche a dati tecnici e prestazioni senza preavviso. EN - The
product at issue must be installed, commissioned and maintained only by licensed and authorised people, respecting the laws concerning the electrical installations. All the connections must be rated for a single-phase 230V~ power
supply. For the disconnection from the power line, use an all-pole switch with contacts having a dimension of at least 3,5mm. Arrange all the necessary safety devices and use only materials complying with the standard of electrical
installations. The cable must have a section properly rated according to the load connected. Connect the LED correctly to the receiver before connecting the power supplier to the mains supply. A faulty connection of the LED diodes
(polarity inversion) could damages them, therefore pay attention during their connection by respecting the polarity. At the power-on the device resumes the status it had before the turning-off. The product must not be enclosed or
placed with insulating material such as glass wool, polystyrene or similar materials. Let the housing to be well-ventilated. PRODUCT DISPOSAL: at the end of this product’s useful life, it must not be disposed of as domestic waste,
but must be taken to a collection centre for waste electrical and electronic equipment. The declaration of conformity can be consulted on the web site: www.telecoautomation.com/ce. In the view of a constant development of their
products, the manufacturer reserves the right for changing technical data and features without prior notice. FR - Le produit en objet doit être installé, mis en service et vérié périodiquement seulement par des techniciens qualiés,
conformément aux normes en vigueur pour les appareillages électriques. Tous les branchements doivent être prévus pour une alimentation générale en monophasé 230V~. Pour la déconnexion du réseau, utiliser un interrupteur
omnipolaire avec une ouverture des contacts de minimum 3,5 mm. Installer tous les dispositifs de sécurité requis et utiliser des matériaux de branchement aptes à garantir une isolation conforme aux normes de sécurité électrique.
Les câbles de connexion doivent avoir une section adéquate à la charge appliquée. Avant de brancher l’alimentation à la ligne électrique, s’assurer que les LED soient branchées correctement au récepteur. Un branchement
incorrect des diodes LED (inversion de la polarité) peut les endommager, donc bien vérier les polarités lors du branchement. A la mise sous-tension, le dernier état avant extinction (ON ou OFF) est restauré. Le produit ne doit
pas être incorporé ou posé dans des matériaux isolants (comme bre de verre, polystyrène ou similaires). Faire en sorte de maintenir le boitier dans un endroit sec et aéré. ÉLIMINATION DU PRODUIT: à la n de la durée de vie
utile de ce produit, il ne doit pas être éliminé comme tout autre déchet domestique. La déclaration de conformité peut être consultée sur le site internet www.telecoautomation.com/ce. Dans l’optique d’un développement continu
de ses produits, le constructeur se réserve le droit d’apporter sans préavis des modications aux données techniques et aux prestations. DE - Das Produkt darf nur von qualiziertem technischen Personal unter Einhaltung der
geltenden Gesetze bezüglich elektrischer Geräte installiert, in Betrieb gesetzt und regelmäßig gewartet werden. Alle Verbindungen müssen auf einphasigen Wechselstrom mit 230V~ und dem jeweiligen Masseanschluss ausgelegt
sein. Für die Abtrennung vom Netz ist ein allpoliger Schalter mit einer Kontaktöffnung von mindestens 3,5 mm zu verwenden. Für den Anschluss sind geeignete Materialien zu verwenden, die eine Isolierung entsprechend den
geltenden elektrischen Sicherheitsbestimmungen gewährleisten. Der Querschnitt der Verbindungskabel muss für die entsprechende Last geeignet dimensioniert sein. Verbinden Sie die LEDs korrekt mit dem Empfänger bevor Sie
die Stromversorgung an das Netz anschließen. Ein fehlerhafter Anschluss (verkehrte Polung) kann die LEDs beschädigen. Mit power- on- reset werden die Einstellungen vor dem Abschalten wieder hergestellt. Das Gerät darf nicht
eingehaust oder durch Isolationsmaterial wie Glaswolle, Polystyrol oder ähnlichem umbaut werden. ENTSORGUNG DES GERÄTS: nach dem Ablauf der Nutzungszeit des Gerätes darf es nicht ohne Weiteres im Hausmüll entsorgt
werden, sondern muss zu einer entsprechenden Entsorgungsstelle für elektronische Geräte gebracht werden. Das Gehäuse muss eine ausreichende Durchlüftung haben. Die Konformitätserklärung kann auf der Internetseite www.
telecoautomation.com/ce abgefragt werden. Im Zuge einer kontinuierlichen Weiterentwicklung der Produkte behält sich der Hersteller das Recht vor technische Daten und Funktionen ohne vorherige Ankündigung zu ändern.
4
*IT - Il carico si spegne ad ogni pressione. EN - The load turns off each press. FR - La charge s’éteint à chaque pression. DE - Last schaltet bei jedem Druck aus.
** IT - Il tasto P3 si trova all’interno del trasmettitore. EN - P3 button is located inside the transmitter. FR - Le bouton P3 se trouve à l’intérieur de l’émetteur. DE - Die Taste P3 bendet sich im Inneren des Senders.
IT - MEMORIZZAZIONE REMOTA DEL PRIMO CODICE RADIO EN  REMOTE MEMORIZATION OF THE FIRST RADIO CODE
FR - MÉMORISATION À DISTANCE DU PREMIER CODE RADIO DE  FERNSPEICHERUNG DES ERSTEN FUNKCODES
IT - ATTENZIONE: procedura possibile solo se la memoria è vuota. Se presenti più ricevitori, alimentarne uno solo per volta.
EN - ATTENTION: the procedure is possible only if the memory is empty. If more receivers are present, supply just one at a time.
FR - ATTENTION: procédé exécutable seulement si la mémoire est vide. S’il y a plusieurs récepteurs, les alimenter un à la fois.
DE - ACHTUNG: Dieses Verfahren ist nur bei leerem Speicher möglich. Fall es mehrere Empfänger gibt, soll nur jeweils einer von diesen versorgt werden.
Il carico lampeggia
The load ashes
La charge clignote
Die Last blinkt
carico = ON
load = ON
charge = ON
Last = EIN
IT - Premere il tasto P3 del
trasmettitore.
EN - Press the button P3
of the transmitter.
FR - Appuyer sur le bouton
P3 de l’émetteur.
DE - Drücken Sie die Taste
P3 des Senders.
Attendere
Wait
Attendre
Warten
IT - TIPO DI MEMORIZZAZIONE EN - TYPE OF MEMORIZATION
(vedere descrizione p.2) (see description p.2)
FR - TYPE DE MÉMORISATION DE - EINLERNUNGSART
(voir description p.2) (siehe Beschreibung S.2)
IT - 7canali
EN - 7channels
FR - 7canaux
DE - 7Kanäle
*
x1
IT - 1 tasto:
EN - 1 button:
FR - 1 bouton:
DE - 1 Taste:
*
x2
IT - 3canali
EN - 3channels
FR - 3 canaux
DE - 3Kanäle
*
x3
IT - 1 tasto:
EN - 1 button:
FR - 1 bouton:
DE - 1 Taste:
*
x4
IT - Premere il tasto del trasmettitore relativo al codice da memorizzare tante volte
quante richieste dal tipo di memorizzazione e attendere.
EN - Press the button of the transmitter relative to the code to memorize as many
times as required by the type of memorization and wait.
FR - Appuyer sur le bouton de l’émetteur concernant le code à mémoriser le nombre de
fois requis par le type de mémorisation et attendre.
DE - Die auf den zu speichernden Code bezogene Sendertaste so oft drücken, wie für die
jeweilige Speicherungsart gefordert ist und warten.
nuovo
new
nouveau
neu
1.1
...
P3
**
ON/OFF
(EIN/AUS)
< 1 s
DIMMER
ꜛ ꜜ
> 1 s
OFF
(AUS)
( 2 s)
5
IT - TIPO DI MEMORIZZAZIONE EN - TYPE OF MEMORIZATION
(vedere descrizione p.2) (see description p.2)
FR - TYPE DE MÉMORISATION DE - EINLERNUNGSART
(voir description p.2) (siehe Beschreibung S.2)
IT - 7canali
EN - 7channels
FR - 7canaux
DE - 7Kanäle
*
x1
IT - 1 tasto:
EN - 1 button:
FR - 1 bouton:
DE - 1 Taste:
*
x2
IT - 3canali
EN - 3channels
FR - 3 canaux
DE - 3Kanäle
*
x3
IT - 1 tasto:
EN - 1 button:
FR - 1 bouton:
DE - 1 Taste:
*
x4
IT - Premere un tasto memorizzato del trasmettitore tante volte quante richieste dal
tipo di memorizzazione del nuovo codice.
EN - Press any memorized button of the transmitter as many times as required
by the type of memorization of the new code.
FR - Appuyer sur un quelconque bouton mémorisé de l’émetteur le nombre de fois
requis par le type de mémorisation du nouveau code.
DE - Eine gespeicherte Sendertaste so oft drücken, wie für die jeweilige
Speicherungsart des neuen Codes gefordert ist.
1.2
...
P3
**
IT - MEMORIZZAZIONE REMOTA DI ULTERIORI CODICI RADIO EN  REMOTE MEMORIZATION OF FURTHER RADIO CODES
FR - MÉMORISATION À DISTANCE D’AUTRES CODES RADIO DE  FERNSPEICHERUNG VON WEITERER FUNKCODES
*IT - Il carico si spegne ad ogni pressione. EN - The load turns off each press. FR - La charge s’éteint à chaque pression. DE - Last schaltet bei jedem Druck aus.
** IT - Il tasto P3 si trova all’interno del trasmettitore. EN - P3 button is located inside the transmitter. FR - Le bouton P3 se trouve à l’intérieur de l’émetteur. DE - Die Taste P3 bendet sich im Inneren des Senders.
Il carico lampeggia
The load ashes
La charge clignote
Die Last blinkt
IT - Premere il tasto relativo al
nuovo codice.
EN - Press the button relative to
the new code.
FR - Appuyer sur le bouton
concernant le nouveau code.
DE - Drücken Sie die auf den
neuen Code bezogene Taste.
memorizzato
memorized
mémorisé
gespeichert
nuovo
new
nouveau
neu
carico = ON
load = ON
charge = ON
Last = EIN
IT - Premere il tasto P3 del
trasmettitore memorizzato.
EN - Press the button P3 of the
memorized transmitter.
FR - Appuyer sur le bouton P3
de l’émetteur mémorisé.
DE - Drücken Sie die Taste P3
des gespeicherten Senders.
ON/OFF
(EIN/AUS)
< 1 s
DIMMER
ꜛ ꜜ
> 1 s
OFF
(AUS)
( 2 s)
6
IT - CANCELLAZIONE REMOTA DI UN CODICE RADIO EN  REMOTE DELETION OF A RADIO CODE
FR - SUPPRESSION À DISTANCE D’UN CODE RADIO DE  FERNLÖSCHUNG EINES FUNKCODE
IT - Premere tre volte il tasto P3 del trasmettitore memorizzato.
Premere il tasto relativo al codice da cancellare.
EN - Press three times the button P3 of the memorized transmitter.
Press the button relative to the code to delete.
FR - Appuyer trois fois sur le bouton P3 de l’émetteur mémorisé.
Appuyer sur le bouton concernant le code à supprimer.
DE - Drücken Sie drei mal die Taste P3 des gespeicherten Senders.
Drücken Sie die auf den zu löschenden Code bezogene Taste.
Il carico lampeggia
The load ashes
La charge clignote
Die Last blinkt
memorizzato
memorized
mémorisé
gespeichert
carico = OFF
load = OFF
charge = OFF
Last = AUS
* IT - Il tasto P3 si trova all’interno del trasmettitore. EN - P3 button is located inside the transmitter. FR - Le bouton P3 se trouve à l’intérieur de l’émetteur. DE - Die Taste P3 bendet sich im Inneren des Senders.
IT - CANCELLAZIONE REMOTA DI TUTTI I CODICI RADIO EN  REMOTE DELETION OF ALL THE RADIO CODES
FR - SUPPRESSION À DISTANCE DE TOUS LES CODES RADIO DE  FERNLÖSCHUNG ALLER FUNKCODES
IT - Procedura possibile con qualsiasi trasmettitore (memorizzato o nuovo).
EN - The procedure is possible using any transmitter (memorized or new).
FR - Procédé exécutable avec un quelconque émetteur (mémorisé ou nouveau).
DE - Die Prozedur ist bei allen Sendern möglich (gespeichert oder neu).
IT - Entro 10 s dall’accensione...
EN - Within 10 s from power ON...
FR - Dans les 10 s qui suivent la mise sous tension...
DE - Innerhalb von 10 Sek. nach dem Einschalten...
Il carico lampeggia
The load ashes
La charge clignote
Die Last blinkt
carico = ON (3 s)
load = ON (3 s)
charge = ON (3 s)
Last = EIN (3 S)
tenere premuto
keep it pressed
maintenir appuyé
gedrückt halten
IT - Premere 10 volte il tasto P3 del trasmettitore e tenere premuto per 5 s.
EN - Press 10 times the button P3 of the transmitter and keep it pressed 5 s.
FR - Appuyer 10 fois sur le bouton P3 de l’émetteur et le maintenir appuyé 5 s.
DE - Drücken Sie 10 mal die Taste P3 des Senders und 5 S. gedrückt halten.
2.1
x3
P3 *< 5 s
...
2.2
ON
x10
P3 *
< 10 s ( 5 s)
...
7
IT - TIPO DI CANCELLAZIONE EN - TYPE OF DELETION
FR - TYPE DE SUPPRESSION DE - LÖSCHUNGSART
IT - Singolo codice radio
EN - Single radio code
FR - Un seul code radio
DE - Einzelner Sendekanal
*
x5
IT - Premere il tasto del trasmettitore relativo
al codice da cancellare. EN - Press the
button of the transmitter relative to the code
to delete. FR - Appuyer sur le bouton de
l’émetteur concernant le code à supprimer.
DE - Drücken Sie die Sendertaste die auf
den zu löschenden Code bezogen ist.
IT - Tutti i codici radio
EN - All the radio codes
FR - Tous les codes radio
DE - Alle Sendekanäle
*
x6
1.1
IT - TIPO DI MEMORIZZAZIONE (p.2)
EN - TYPE OF MEMORIZATION (p.2)
FR - TYPE DE MÉMORISATION (p.2)
DE - EINLERNUNGSART (S.2)
P1
IT - 7canali
EN - 7channels
FR - 7canaux
DE - 7Kanäle
*
x1 IT - Premere il tasto del
trasmettitore relativo al codice
da memorizzare.
EN - Press the button of the
transmitter relative to the code to
memorize.
FR - Appuyer sur le bouton de
l’émetteur concernant le code à
mémoriser.
DE - Drücken Sie die Sendertaste
die auf den zu speichernden
Code bezogen ist.
IT - 1 tasto:
EN - 1 button:
FR - 1 bouton:
DE - 1 Taste:
*
x2
IT - 3canali
EN - 3channels
FR - 3 canaux
DE - 3Kanäle
*
x3
IT - 1 tasto:
EN - 1 button:
FR - 1 bouton:
DE - 1 Taste:
*
x4
tenere premuto
keep it pressed
maintenir appuyé
gedrückt halten
IT - FUNZIONI CON P1 EN  FUNCTIONS WITH P1
FR - FONCTIONS AVEC P1 DE  FUNKTIONEN MIT P1
*IT - Il carico si spegne ad ogni pressione. EN - The load turns off each press. FR - La charge s’éteint à chaque pression. DE - Last schaltet bei jedem Druck aus.
Il LED lampeggia
The LED ashes
La LED clignote
Die LED blinkt
LED = ON (3 s)
LED = ON (3 s)
LED = ON (3 s)
LED = EIN (3 S)
3
P1
(10 s)
...
...
ON/OFF
(EIN/AUS)
< 1 s
DIMMER
ꜛ ꜜ
> 1 s
OFF
(AUS)
8
4
CH1
CH2
CH3
CH4
CH5
CH6
CH7
21 CH1
CH2
CH3
CH4
CH5
CH6
CH7
CH1
CH2
CH3
CH4
CH5
CH6
CH7
3
( 5 s)
IT - 1. Premere il tasto relativo al valore da modicare (CH1..CH4). 2. Regolare il valore con i tasti CH5 e CH6. 3. Premere e tenere premuto CH7 per 5s.
EN - 1. Press the button relative to the value to modify (CH1..CH4). 2. Adjust the value with buttons CH5 and CH6. 3. Press CH7 and keep it pressed for 5s.
FR - 1. Appuyer sur le bouton concernant la valeur à modier (CH1..CH4). 2. Régler la valeur par mois des boutons CH5 et CH6. 3. Appuyer et maintenir appuyé CH7 pour 5s.
DE - 1. Drücken Sie die Taste bezüglich des zu ändernden Werts (CH1..CH4). 2. Stellen Sie den Wert mit den Tasten CH5 und CH6 ein. 3. CH7 drücken und halten Sie 5S. lang gedrückt.
IT - MODIFICA DEI VALORI DI LUMINOSITÀ PREIMPOSTATI DI UN TRASMETTITORE 7/42 CANALI EN  MODIFICATION OF THE
PRESET LIGHT VALUES OF A 7/42 CHANNEL TRANSMITTER FR - MODIFICATION DES VALEURS DE LUMINOSITÉ PRÉRÉGLÉES D’UN
ÉMETTEUR 7/42 CANAUX DE  ÄNDERUNG DER VOREINGESTELLTEN HELLIGKEITSWERTE EINES 7/42KANAL SENDERS
carico = ON (3 s)
load = ON (3 s)
charge = ON (3 s)
Last = EIN (3 S)
Alimentazione - Power supply - Alimentation - Stromversorgung 200-240V~ +/-10%
Uscite - Output - Sorties - Ausgänge 1 (24Vdc +/-5%)
Corrente assorbita Ingresso 1÷10V - Absorbed current Input 1÷10V -
Consommation de courant Entrée 1 ÷ 10V - Stromaufnahme 1÷10V Eingang 2mA
Potenza massima uscita - Max power output
Puissance maximale sortie - Max. Leistung Ausgänge
55W (TVSTICKxxxNT10)
95W (TVSTICKxxxNT11)
Temperatura di funzionamento - Operating temperature range
Température de fonctionnement - Umgebungstemperatur im Betrieb -20°C - +45°C
IT - I cavi di collegamento devono avere una sezione adeguata al carico massimo applicato. Il cavo di uscita ai LED
non dovrebbe superare 2 m di lunghezza in accordo con lo Standard EMC. EN - The connection cables must have a
section suitable to the maximum applied load. The maximum length of the output cable to the LED should not exceed 2 m
complying with EMC standard. FR - Les câbles de connexion doivent avoir une section appropriée à la charge maximale
appliquée. La longueur maximale du câble de sortie à la LED ne devrait pas excéder 2 mètres selon le standard EMC.
DE - Die Verbindungskabel müssen einen Durchschnitt haben der angemessen ist für die maximale Ausgangslast. Die
Maximallänge der Ausgangs- Kabel zu den LEDs sollte gemäß EMC Standards die Länge von 2 m nicht überschreiten.
Frequenza ricezione - Reception frequency
Fréquence de réception - Empfangsfrequenz
868.3 MHz (TVSTICK868NTxx)
916 MHz (TVSTICK916NTxx)
Capacità memoria radio (trasmettitori) - Radio memory capatibility (transmitters)
Capacité mémoire radio (émetteurs) - Speicherbare Sender 42
Grado di protezione - Protection rating - Degré de protection - Schutzart IP44
IT - SPECIFICHE TECNICHE EN  TECHNICAL SPECIFICATIONS
FR - SPÉCIFICATIONS TECHNIQUES DE  TECHNISCHE DATEN
AL-24-xWNT (Trasformatore integrato - Integrated transformer - Transformateur intégré - Integrierter Transformator)
Potenza massima uscita - Max power output
Puissance maximale sortie - Max. Leistung Ausgänge
60W (AL-24-60WNT)
100W (AL-24-100WNT)
Protezione: corto circuito, sovratensioni e sovratemperatura - Protection: short circuit, overload and overheating
Protection: courts-circuits, surtensions et surtempérature - Schutz: Kurzschlüsse, Überspannungen und Übertemperaturen
Posizione di montaggio nel caso di installazioni all’interno - Mounting location in case of indoor installations
Position de montage dans le cas d’installations en intérieur - Montageposition im Falle von Installierungen im Innenbereich
Il prodotto è progettato per l’uso esclusivo con carichi LED - The product is exclusively designed for LED loads
Ce produit est exclusivement designer pour les charges de LED - Das Produkt wurde ausschließlich für LED Lasten entworfen
TELECO AUTOMATION S.R.L.
ITALY
Tel. +39.0438.388511
info@telecoautomation.com
TELECO AUTOMATION FRANCE
FRANCE
Tel. +33.(0)472.145080
info@telecofrance.com
TELECO AUTOMATION GMBH
GERMANY
Tel. +49.(0)8122.9563024
info.de@telecoautomation.com
TELECO AUTOMATION OCEANIA PTY LTD
AUSTRALIA
Tel. +61.(07)5502.7801
info@telecoautomation.com.au
This document is the property of Teleco Automation Srl who reserves all reproduction and copying rights

This manual suits for next models

3

Other Teleco Receiver manuals

Teleco TVSTRD868BST24M User manual

Teleco

Teleco TVSTRD868BST24M User manual

Teleco TVSRGBWU868ST25 User manual

Teleco

Teleco TVSRGBWU868ST25 User manual

Teleco TVSPOT868ADI04 User manual

Teleco

Teleco TVSPOT868ADI04 User manual

Teleco TVHET868A01 User manual

Teleco

Teleco TVHET868A01 User manual

Teleco TVRGBDU868ST24 User manual

Teleco

Teleco TVRGBDU868ST24 User manual

Teleco TVPL4868AC4 User manual

Teleco

Teleco TVPL4868AC4 User manual

Teleco Flat Sat Elegance User manual

Teleco

Teleco Flat Sat Elegance User manual

Teleco TVLink RS868 User manual

Teleco

Teleco TVLink RS868 User manual

Teleco TVRCM868A01 User manual

Teleco

Teleco TVRCM868A01 User manual

Teleco TRRCL868W60 User manual

Teleco

Teleco TRRCL868W60 User manual

Teleco TSDR5000CI User manual

Teleco

Teleco TSDR5000CI User manual

Teleco TVRGBDU868ST30 User manual

Teleco

Teleco TVRGBDU868ST30 User manual

Teleco TUBELITE868A10 User manual

Teleco

Teleco TUBELITE868A10 User manual

Teleco TVDMM868A06 User manual

Teleco

Teleco TVDMM868A06 User manual

Teleco TVHET868A01C User manual

Teleco

Teleco TVHET868A01C User manual

Teleco TVRRL868G03P User manual

Teleco

Teleco TVRRL868G03P User manual

Teleco TVSTRD868NT24 User manual

Teleco

Teleco TVSTRD868NT24 User manual

Teleco TVDMM868A05 User manual

Teleco

Teleco TVDMM868A05 User manual

Teleco TVSTRD868SI24G User manual

Teleco

Teleco TVSTRD868SI24G User manual

Teleco TVSTRD868DI24G User manual

Teleco

Teleco TVSTRD868DI24G User manual

Teleco TVRRL868G02P User manual

Teleco

Teleco TVRRL868G02P User manual

Teleco TVLink TVSTRDW ST24 Series User manual

Teleco

Teleco TVLink TVSTRDW ST24 Series User manual

Teleco Master TVRCD868A04N User manual

Teleco

Teleco Master TVRCD868A04N User manual

Teleco TVRCL868A02 User manual

Teleco

Teleco TVRCL868A02 User manual

Popular Receiver manuals by other brands

Workrite Ergonomics CONF-ADPT-SPM-S Assembly/installation instructions

Workrite Ergonomics

Workrite Ergonomics CONF-ADPT-SPM-S Assembly/installation instructions

Aprimatic R-EX installation instructions

Aprimatic

Aprimatic R-EX installation instructions

Shinubow ANI-WHDI42 user manual

Shinubow

Shinubow ANI-WHDI42 user manual

Ericsson RX8330 specification

Ericsson

Ericsson RX8330 specification

FTE Maximal MAX S122 manual

FTE Maximal

FTE Maximal MAX S122 manual

JVC LVT1007-010A[A] instructions

JVC

JVC LVT1007-010A[A] instructions

Seitron DRG01M manual

Seitron

Seitron DRG01M manual

DuraComm PSDA-MU1 owner's guide

DuraComm

DuraComm PSDA-MU1 owner's guide

sesam 555HD instruction manual

sesam

sesam 555HD instruction manual

Sony STR-K890 Service manual

Sony

Sony STR-K890 Service manual

Pico Macom SIRD-FTA-2 owner's manual

Pico Macom

Pico Macom SIRD-FTA-2 owner's manual

CallingSYS RW6 user manual

CallingSYS

CallingSYS RW6 user manual

Motorola TRD6290A Technical service information

Motorola

Motorola TRD6290A Technical service information

LG LH-T753TB Service manual

LG

LG LH-T753TB Service manual

RadioMaster ER6GV quick start guide

RadioMaster

RadioMaster ER6GV quick start guide

Harman Kardon AVR4000RDS Service manual

Harman Kardon

Harman Kardon AVR4000RDS Service manual

Kenwood KRF-V4530D Service manual

Kenwood

Kenwood KRF-V4530D Service manual

NAD AV716 Service manual

NAD

NAD AV716 Service manual

manuals.online logo
manuals.online logoBrands
  • About & Mission
  • Contact us
  • Privacy Policy
  • Terms and Conditions

Copyright 2025 Manuals.Online. All Rights Reserved.