manuals.online logo
Brands
  1. Home
  2. •
  3. Brands
  4. •
  5. Teleco
  6. •
  7. Receiver
  8. •
  9. Teleco TVLink TVSTRDW ST24 Series User manual

Teleco TVLink TVSTRDW ST24 Series User manual

1
Code Number: Series Model number
TVLink
TVSTRDWxxxST24 T617.01_EN (Temp.) 08/05/14
1 - LED wiring
RADIO RECEIVER CONTROLLING 1-COLOUR LED STRIPS COMMON ANODE
Product codes:
TVSTRDWxxxST24 Master receiver 4A TVRGBD000ST24 Slave receiver 4A
The product has 2 output for the connection of a cool white LED strip and a warm white LED strip.
It allows to adjust the “temperature” of the colour, mixing the output from cool white to warm white.
Bianco caldo
Bianco freddo
Led 1
P1
P2
P3 Led 2
Led 3
Led 4
T2T1
1
2
3
4
5
6
7
9
10
12
13
11
12-24Vdc Power supply IN
12-24Vdc
Power supply OUT
1
2
3
4
5
6
7
+
-
+
-
+
-
T2
T1
230Vac
12-24Vdc
Power supply
12-24Vdc
IN
12-24Vdc
OUT
12-24Vdc
IN
12-24Vdc OUT
SLAVE
OUTPUT
SLAVE
OUTPUT
Bianco
freddo
9
10
12
13
14
11
Bianco
caldo
Bianco
freddo
Bianco
caldo
9
10
12
13
11
1
2
3
4
T2 ON/OFF/Dim
T1 Temperature
Using the wired push-buttons:
Short pulses of T2 (<800ms) =the scene turns ON and OFF.
Longer presses of T2 (>800ms) = dim the light intensity of the scene.
T1 = cyclical temperature adjustment, moving from cool and warm white
(if the output are ON).
Common +
Slave output
Cool white
Warm white
Warm
White Cool
White
Warm
White Cool
White
Attention:
respect the
led polarity
2
Code Number: Series Model number
TVLink
TVSTRDWxxxST24 T617.01_EN (Temp.) 08/05/14
2 - Memorization of 7 channels transmitters
1- Press the push button P2
once and hold it down, the
buzzer will make a beep and
then sound continuously.
2- During the sound press any button of the 7 channels transmitter
which has to be memorized. The memorization is indicated by the
intermittently sound of the buzzer. All the buttons of the transmitter are
automatically memorized.
Function available only
for 7 or 42 channels
transmitters
Once and hold down
P2
SCENE 1
SCENE 2
SCENE 3
SCENE 4
CH1
CH2
CH3
CH4
CH5 > Cool white
CH6 > Warm white
CH7 OFF
Short presses of the buttons CH1..4 command the memorized scenes.
Longer presses allow to dim the light intensity of the selected scene.
Short or long presses of the buttons CH5 and CH6 adjust the “temperature” of the colour in both directions.
Short press of CH7 turns OFF the output, with fade effect.
2.1 - To change the preset scenes of the 7 channels transmitters
CH1
CH2
CH3
CH4
CH5
CH6
CH7
adjust new valuepress the scene to modify press and hold more than 5s
3- Press the button CH7 and hold it
down for 5 sec. Light turns off. After 5
sec. buzzer makes a beep and the light
turns on at the new value.
2- Adjust the new value with
the buttons CH5 and CH6
1- Press the button related to
the scene to modify
3
Code Number: Series Model number
TVLink
TVSTRDWxxxST24 T617.01_EN (Temp.) 08/05/14
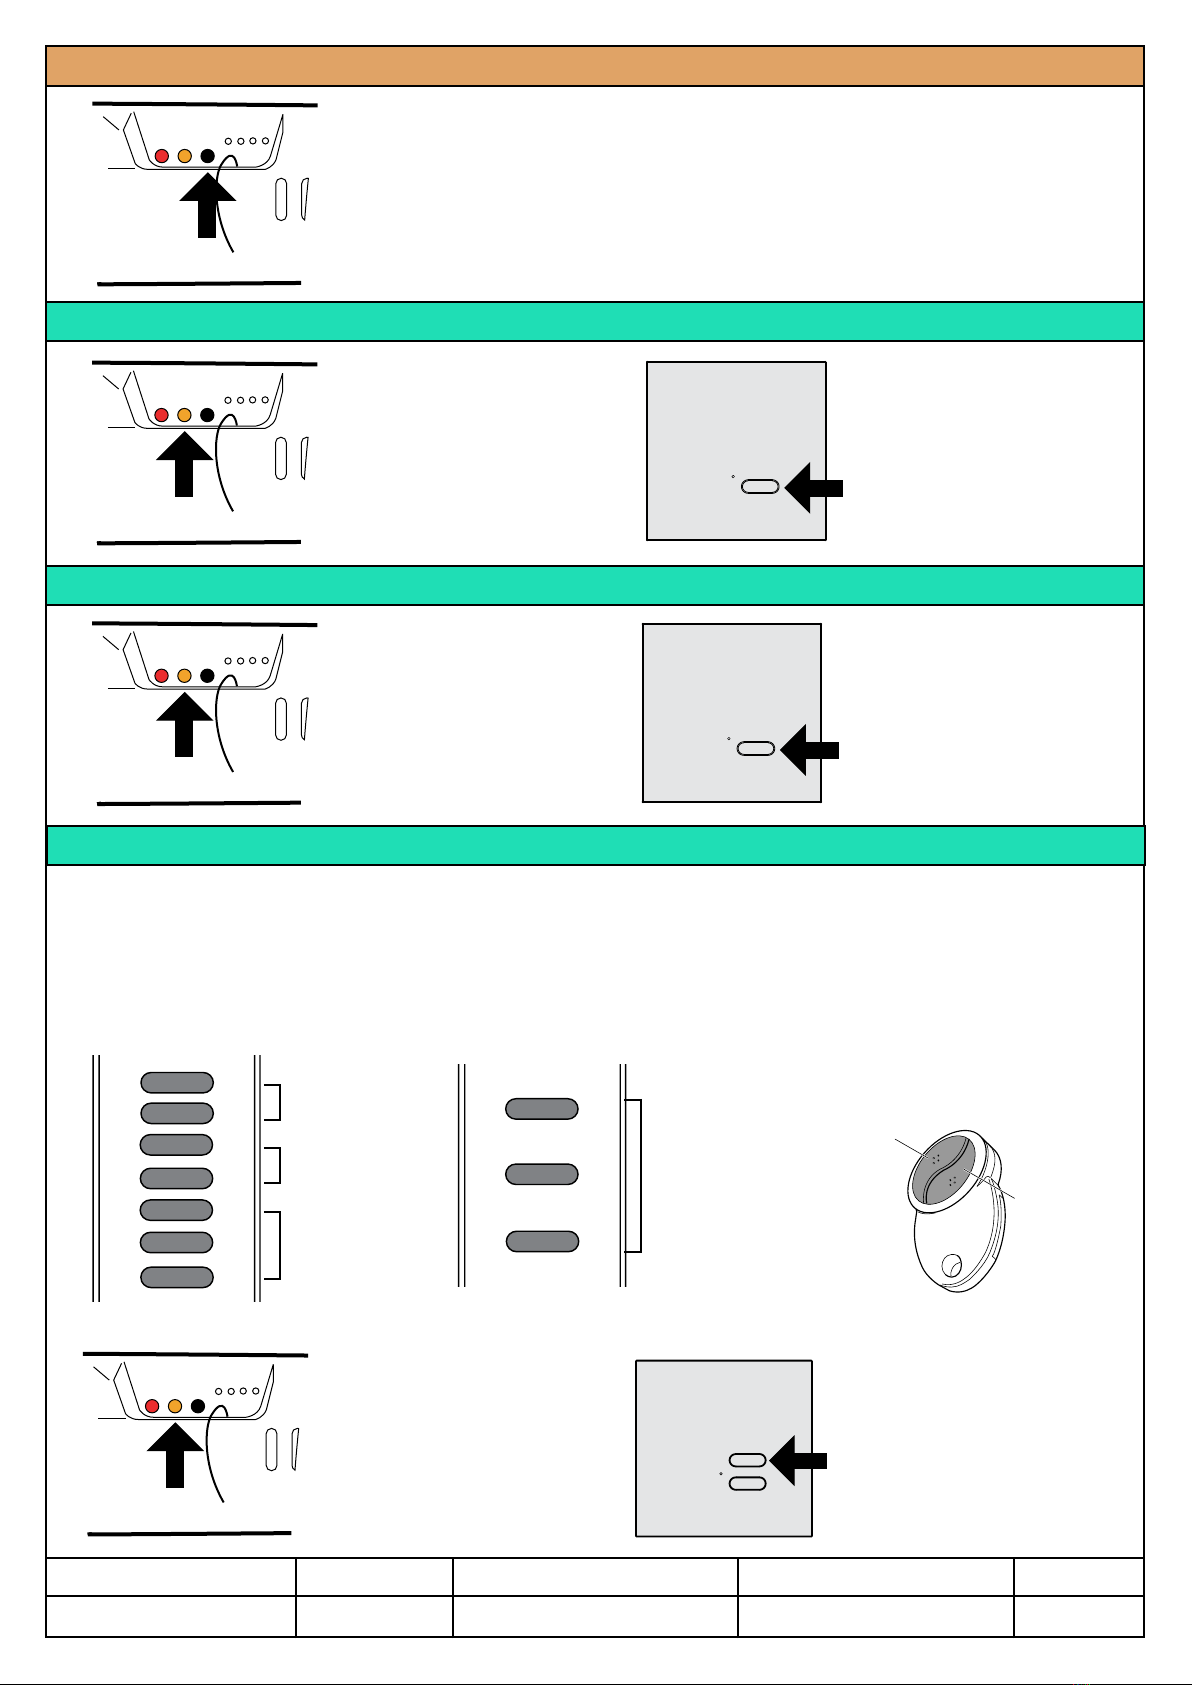
4 - Memorization of any transmitter button with OFF function
3 times and hold down
P2
3 - Memorization of any transmitter button with ON function (ON at the previous scene)
2 times and hold down
P2
2.2 - Reset the scenes to the factory values
3 times and hold down 10s
1 - Turn off the light.
2 - Press three times the button P3 and hold it down for 10 seconds.
3 - After 10 sec. the buzzer makes a beep and the light ashes once.
P3
5 - Memorization of a pair of transmitter buttons
With short pulses (< 800ms) of the rst button of the pair, the scene turns on and off.
With longer presses (> 800ms) it’s possible to dim the light intensity of the scene.
The second button of the pair is used for cyclical temperature adjustment, moving from cool and warm white
(if the output are ON). The new value is automatically memorized at the end of the adjustment.
In case of 3 channels transmitter or CH5, CH6, CH7 buttons of a 7 channels transmitter, temperature is adjusted
in two directions using CH5 and CH6. CH7 has the same function of the rst button of any pair.
CH1
CH2
CH1
CH2
CH4
CH3
CH1
(P3)
Temperature
ON/OFF/Dim
CH1 ON/OFF/Dim
CH2 Temperature
CH3 ON/OFF/Dim
CH4 Temperature
CH5 > Cool White
CH6 > Warm White
CH7 ON/OFF/Dim
7 channels transmitter 3 channels transmitter 2 channels transmitter
CH5 > Cool White
CH6 > Warm White
CH7 ON/OFF/Dim
4 times and hold down
P2
1- Press the push button P2
two times and hold it down,
the buzzer will make a beep
each time and then sound
continuously.
2- During the sound press
the button to memorize;
the memorization
is indicated by the
intermittently sound of the
buzzer.
1- Press the push button
P2 three times and hold it
down, the buzzer will make
a beep each time and then
sound continuously.
2- During the sound press
the button to memorize;
the memorization
is indicated by the
intermittently sound of the
buzzer.
1- Press the push button P2
four times and hold it down,
the buzzer will make a beep
each time and then sound
continuously.
2- During the sound press
the button to memorize;
the memorization
is indicated by the
intermittently sound of the
buzzer.
4
Code Number: Series Model number
TVLink
TVSTRDWxxxST24 T617.01_EN (Temp.) 08/05/14
6.1 - Memorization of any transmitter button with On/Off/Dim function for SCENE 1
Short pulses (<800ms) = scene ON/OFF, longer presses (>800ms) = dim the light intensity.
Once and hold down
P1
6.2 - Memorization of any transmitter button with On/Off/Dim function for SCENE 2
Short pulses (<800ms) = scene ON/OFF, longer presses (>800ms) = dim the light intensity.
2- During the sound press
the button to memorize;
the memorization
is indicated by the
intermittently sound of the
buzzer.
2 times and hold down
P1
6.3 - Memorization of any transmitter button with On/Off/Dim function for SCENE 3
Short pulses (<800ms) = scene ON/OFF, longer presses (>800ms) = dim the light intensity.
1- Press the push button
P1 three times and
hold it down, the buzzer
will make a beep each
time and then sound
continuously.
2- During the sound press
the button to memorize;
the memorization
is indicated by the
intermittently sound of the
buzzer.
3 times and hold down
P1
6.4 - Memorization of any transmitter button with On/Off/Dim function for SCENE 4
Short pulses (<800ms) = scene ON/OFF, longer presses (>800ms) = dim the light intensity.
1- Press the push button
P1 four times and hold
it down, the buzzer
will make a beep each
time and then sound
continuously.
2- During the sound press
the button to memorize;
the memorization
is indicated by the
intermittently sound of the
buzzer.
4 times and hold down
P1
1- Press the push button
P1 once and hold it
down, the buzzer will
make a beep each
time and then sound
continuously.
2- During the sound press
the button to memorize;
the memorization
is indicated by the
intermittently sound of the
buzzer.
1- Press the push button
P1 two times and hold
it down, the buzzer
will make a beep each
time and then sound
continuously.
5
Code Number: Series Model number
TVLink
TVSTRDWxxxST24 T617.01_EN (Temp.) 08/05/14
7 - Copying the function of a transmitter to a new transmitter
1- Press the button P3 of
the already memorized
transmitter. The enabled
receiver sound continuously.
2- Within 5 seconds press a
button of the already memorized
transmitter from which the function
has to be copied. The buzzer will
interrupt the sound for 1 sec., then
starts again for 5 seconds.
3- During the sound press the
button of the new transmitter
which has to be memorized; the
memorization is indicated by
the intermittently sound of the
buzzer.
8 - Deleting a transmitter
Once and hold down
8.2 - Deleting all the transmitters
1- Press the push button
P3 once and hold it
down, the buzzer will
make a beep each time
and then sound slowly
and intermittently.
2- During the sound press
the button which has to
be deleted; the deletion is
indicated by the continuously
sound of the buzzer.
2 times and hold down 10s
1- Press the push button P3 two time and hold it down, the buzzer will
make a beep each time and then sound quickly and intermittently.
2- Hold down the push button for 10 sec., at the end the buzzer will sound
continuously by indicating that the memory has been cancelled.
P3
P3
8.1 - Deleting a transmitter with an already memorized transmitter
2- Within 5 sec. press
the button to delete, the
buzzer emits a continuous
sound to conrm the
deletion.
1- Press the button P3
of the transmitter. The
enabled receiver emits a
slow intermittent sound.
P3
P3
9 - Memory activation/ deactivation of the last value of light intensity
P1 + P3
P3 LED4
P1 ACTIVATION
Press P1+P3
• led 4 turns ON
• the output blink twice
• the buzzer sounds
DEACTIVATION
Press P1+P3
• led 4 turns OFF
• the output blink three times
• the buzzer sounds
6
Code Number: Series Model number
TVLink
TVSTRDWxxxST24 T617.01_EN (Temp.) 08/05/14
Warning
Connect the power supplier and the LED in a correct way to the receiver before
connecting the power supplier to the electricity network.
A faulty connection of the LED diodes (polarity inversion) could damages them,
therefore pay attention during their connection by respecting the polarity. The
general power supply of the device has to be by a power supplier which can supply
the power and tension needed.
At the power-on-reset the condition previous the turning-off will be resumed. The
power supply must be compliant with IEC60950-1 and must be protected against the
short circuit and overvoltage.
The product must not be enclosed or placed with insulating material such as glass wool,
polystyrene or similar materials. Let the housing to be well-ventilated.
Hereby Teleco automation s.r.l. declares that the TVSTRDWxxxST24 complies with the essential
requirements and other relevant provisions, established by the Directive 1999/5/EC.
The declaration of conformity can be consulted inside the web site: www.telecoautomation.com/ce.
Mounting
In the view of a constant development of their products, the manufacturer reserves the right for
changing technical data and features without prior notice.
Flat surface
mounting
Ceiling
mounting
Wall mounting
165 mm
47 mm
h: 40 mm
Hole for xing with screw
(under the cover)
Hole for xing with screw
(under the cover)
TECHNICAL SPECIFICATIONS
-Power supply 12 Vdc to 24 Vdc
-Max. power for each output 2 x 4A
-Cable sections in input 2,5 mm2 with maximum load
The connection cables must have a section suitable to the maximum
load applied to the output, and to the additional devices connected to
the input.
-Reception frequency 868.3 MHz (TVSTRDW868ST24)
916 MHz (TVSTRDW916ST24)
-Operating temperature range -20° - +50°C
- Possibility to memorize up to 42 standard transmitters.

This manual suits for next models

1

Other Teleco Receiver manuals

Teleco TVLink RS868 User manual

Teleco

Teleco TVLink RS868 User manual

Teleco TVSTRD868DI24G User manual

Teleco

Teleco TVSTRD868DI24G User manual

Teleco TVRCL868A02F6 User manual

Teleco

Teleco TVRCL868A02F6 User manual

Teleco TVSPOT868ADI04 User manual

Teleco

Teleco TVSPOT868ADI04 User manual

Teleco Flat Sat Elegance User manual

Teleco

Teleco Flat Sat Elegance User manual

Teleco TVSTICK868NT10 User manual

Teleco

Teleco TVSTICK868NT10 User manual

Teleco ForceHDCL+ User manual

Teleco

Teleco ForceHDCL+ User manual

Teleco TVSTRD868BST24M User manual

Teleco

Teleco TVSTRD868BST24M User manual

Teleco TVSTICK868NT27 User manual

Teleco

Teleco TVSTICK868NT27 User manual

Teleco TVRCL868A02 User manual

Teleco

Teleco TVRCL868A02 User manual

Teleco TVPRS868A24 User manual

Teleco

Teleco TVPRS868A24 User manual

Teleco TVDMM868A06 User manual

Teleco

Teleco TVDMM868A06 User manual

Teleco TVSTRD868NT24 User manual

Teleco

Teleco TVSTRD868NT24 User manual

Teleco GSM700 User manual

Teleco

Teleco GSM700 User manual

Teleco TVDMM868A05 User manual

Teleco

Teleco TVDMM868A05 User manual

Teleco TUBELITE868A10 User manual

Teleco

Teleco TUBELITE868A10 User manual

Teleco TVRGBDU868ST24 User manual

Teleco

Teleco TVRGBDU868ST24 User manual

Teleco TRRCL868W60 User manual

Teleco

Teleco TRRCL868W60 User manual

Teleco TVRGBDU868ST30 User manual

Teleco

Teleco TVRGBDU868ST30 User manual

Teleco TVPLT868C80T0 User manual

Teleco

Teleco TVPLT868C80T0 User manual

Teleco TVSTRD868SI24G User manual

Teleco

Teleco TVSTRD868SI24G User manual

Teleco TVPL4868AC4 User manual

Teleco

Teleco TVPL4868AC4 User manual

Teleco Master TVRCD868A04N User manual

Teleco

Teleco Master TVRCD868A04N User manual

Teleco TVRRL868G03P User manual

Teleco

Teleco TVRRL868G03P User manual

Popular Receiver manuals by other brands

Teac HDB850 user manual

Teac

Teac HDB850 user manual

Kingpin KP100 Installation and operation guide

Kingpin

Kingpin KP100 Installation and operation guide

Gator G4 installation guide

Gator

Gator G4 installation guide

AOR AR5001D operating manual

AOR

AOR AR5001D operating manual

Onkyo TX-SA705 Service manual

Onkyo

Onkyo TX-SA705 Service manual

JBL JSR-400 Service manual

JBL

JBL JSR-400 Service manual

Aventura WRS-ANK-58WP product manual

Aventura

Aventura WRS-ANK-58WP product manual

EnOcean Omnio UPR 230/03 manual

EnOcean

EnOcean Omnio UPR 230/03 manual

Avantree Avera user guide

Avantree

Avantree Avera user guide

Nevir NVR-2503DSUGHD instruction manual

Nevir

Nevir NVR-2503DSUGHD instruction manual

Marantz SR5000/N1B Service manual

Marantz

Marantz SR5000/N1B Service manual

IMV PowerFLAG user manual

IMV

IMV PowerFLAG user manual

Delphi SkyFi SA10000 quick start guide

Delphi

Delphi SkyFi SA10000 quick start guide

Gogen G2 CH30 installation manual

Gogen

Gogen G2 CH30 installation manual

Signet RXti 2 Operation & instruction manual

Signet

Signet RXti 2 Operation & instruction manual

Harman Kardon AVR 75 owner's manual

Harman Kardon

Harman Kardon AVR 75 owner's manual

Pioneer Elite SC-81 operating instructions

Pioneer

Pioneer Elite SC-81 operating instructions

Philips FR-965 user guide

Philips

Philips FR-965 user guide

manuals.online logo
manuals.online logoBrands
  • About & Mission
  • Contact us
  • Privacy Policy
  • Terms and Conditions

Copyright 2025 Manuals.Online. All Rights Reserved.