manuals.online logo
Brands
  1. Home
  2. •
  3. Brands
  4. •
  5. Teleco
  6. •
  7. Receiver
  8. •
  9. Teleco TVPRS868A24 User manual

Teleco TVPRS868A24 User manual

TVPRS868A12 12Vdc (868.3Mhz)
TVPRS868A24 24Vdc (868.3Mhz)
TVPRS916A12 12Vdc (916Mhz)
TVPRS916A24 24Vdc (916Mhz)
IT - RICEVITORE RADIO PER IL CONTROLLO DI UN MOTORE 12VDC (A12) / 24VDC (A24), CON FINECORSA
INTEGRATO E POTENZA MASSIMA 4,5A
EN  RADIO RECEIVER CONTROLLING A 12VDC A12 / 24VDC A24 MOTOR, WITH INTEGRATED LIMIT SWITCH
AND MAXIMUM POWER 4,5A
FR – RÉCEPTEUR RADIO POUR LA COMMANDE D’UN MOTEUR 12VDC (A12) / 24VDC (A24), AVEC FIN DE
COURSE INTÉGRÉE ET PUISSANCE MAXIMALE DE 4,5A
DE  FUNKEMPFÄNGER ZUR STEUERUNG EINES 12VDC A12 / 24VDC A24 MOTORS MIT INTEGRIERTER
ARRETIERUNG UND MAXIMALLEISTUNG VON 4,5A
IT - Codice prodotto
EN - Product code
FR - Code du produit
DE - Artikelnummer
1
2
3-4
6
7
8
9
10
P2
ALIMENTAZIONE +12/24V - POWER SUPPLY +12V/24V - ALIMENTATION +12/24V - STROMVERSORGUNG +12/24V
ALIMENTAZIONE (GND) - POWER SUPPLY (GND) - ALIMENTATION (GND) - STROMVERSORGUNG (GND)
MOTORE 12/24Vdc - 12/24Vdc MOTOR - MOTEUR 12/24Vdc - 12/24Vdc MOTOR
COMANDO DISCESA - DOWN COMMAND - COMMANDE DESCENTE - BEFEHL AB
COMANDO SALITA - UP COMMAND - COMMANDE MONTÉE - BEFEHL AUF
COMUNE PULSANTI - PUSH-BUTTONS COMMON
BOUTONS COMMUNS - GEMEINSAMER ANSCHLUSS TASTEN
RF ANTENNA - AERIAL RF - RF ANTENNE - RF ANTENNE
GND ANTENNA - GND AERIAL - MASSE ANTENNE - GND ANTENNE
TASTO DI PROGRAMMAZIONE - PROGRAMMING BUTTON
BOUTON DE PROGRAMMATION - PROGRAMMIERUNGSTASTE
M
1
2
3
6
7
8
P2
9
4
10
+
-
Alimentazione
Power supply
Alimentation
Stromversorgung
TELECO AUTOMATION SRL
Via dell’Artigianato, 16 - 31014 Colle Umberto (TV) ITALY
TELEPHONE: ++39.0438.388511 FAX: ++39.0438.388536 - www.telecoautomation.com
DOC.: T475.04
TVPRSXXXA12-A24 DATE: 02/08/18
This document is the property of Teleco Automation Srl who reserves all reproduction and copying rights
2
IT - Il prodotto garantisce una protezione IP44 se correttamente assemblato.
EN - The product guarantees IP44 rating if properly assembled.
FR - Le produit garantit un indice de protection IP44 à condition qu’il ait été assemblé correctement.
DE - Das Produkt gewährleistet den Schutzgrad IP44, wenn es korrekt zusammengebaut wurde.
IT - MONTAGGIO E COLLEGAMENTI EN  MOUNTING AND WIRINGS FR - FIXATION ET CONNEXION DE  MONTAGE UND ANSCHLÜSSE
20
37
125
IT - Cavo antenna tipo RG58.
EN - Aerial cable RG58 type.
FR - Câble antenne type RG58
DE - Antennenkabel Typ RG58.
DATE: 31/07/14 REV: 1.0
Via dell'Artigianato, 16 - 31014 Colle Umberto (TV) ITALY
Tel. +39.0438.388511 Fax +39.0438.388536
Web site: www.telecoautomation.com
85mm
CAVO ANTENNA 868MHz
AERIAL CABLE 868MHz
9
10 85mm
IT - Ingressi lari
7-8:Pulsante SALITA (STOP)
6-8:Pulsante DISCESA (STOP)
La pressione del tasto provoca uno STOP se il motore si sta muovendo nella direzione opposta.
EN - Wired input
7-8:UP (STOP) Push-button
6-8:DOWN (STOP) Push-button
Pressing a button the system stops if the motor is moving in the opposite direction.
FR - Entrées laires
7-8:Bouton-poussoir OUVERTURE (STOP)
6-8:Bouton-poussoir FERMETURE (STOP)
L’appui sur la commande opposée au mouvement en cours arrête le moteur.
DE - Verdrahtete Eingänge
7-8:Taster AUF (STOP)
6-8:Taster ZU (STOP)
Das Drücken der Taste stoppt die Bewegung wenn der Motor sich in die entgegengesetzte Richtung bewegt.
3
IT - Trasmettitore 2 canali
EN - 2 channels transmitter
FR - Émetteur à 2 canaux
DE - 2-Kanal Sender
IT - DISPOSITIVI DI COMANDO SENZA FILI EN  WIRELESS COMMAND DEVICES
FR - DISPOSITIFS DE COMMANDE SANS FIL DE  DRAHTLOSE STEUERUNGSGERÄTE
(STOP)(STOP)
STOP
IT - Trasmettitore 3 canali
EN - 3 channels transmitter
FR - Émetteur à 3 canaux
DE - 3-Kanal Sender
(STOP)
(STOP)
(STOP)
(STOP)
STOP
IT - Trasmettitore 7 canali
EN - 7 channels transmitter
FR - Émetteur à 7 canaux
DE - 7-Kanal Sender
IT - Trasmettitore sensori vento/sole/pioggia
EN - Wind/sun/rain sensors transmitter
FR - Émetteur avec capteurs de vent/luminosité/pluie
DE - Sender mit Wind/Sonne/Regen-Sensoren
IT - Trasmettitore crepuscolare
EN - Dusk/dawn transmitter
FR - Émetteur avec capteur
crépusculaire
DE - Dämmerungssender
IT - Trasmettitore con sensore luce integrato
EN - Transmitter with integrated light sensor
FR - Émetteur avec capteur de lumière intégré
DE - Sender mit integriertem Lichtsensor
TVANLUXxxxSWR
Eos
Green Mouse
Screen
IT - Note sulla memorizzazione. La memorizzazione dei dispositivi di comando
wireless può essere effettuata con due distinte procedure:
• 1.1 (p.4) se è possibile accedere al tasto di programmazione P2.
• 2.1 (p.5) se NON è possibile accedere al tasto di programmazione.
EN - Notes about memorization. The memorization of wireless command
devices can be executed by means of two procedures:
• 1.1 (p.4) if it is possible to access to the programming button P2.
• 2.1 (p.5) if it is NOT possible to access to the programming button P2.
FR - Remarque sur la mémorisation. La mémorisation des dispositifs de
commande sans l peut s’effectuer de deux façons différentes:
• 1.1 (p. 4) s’il est possible d’accéder au bouton de programmation P2.
• 2.1 (p. 5) s’il n’est PAS possible d’accéder au bouton de programmation.
DE - Hinweise zum Speicherverfahren. Die Speicherung drahtloser
Steuervorrichtungen kann mit zwei verschiedenen Verfahren durchgeführt werden:
• 1.1 (S. 4), wenn man auf die Programmiertaste P2 zugreifen kann.
• 2.1 (S. 5), wenn es NICHT möglich ist, auf die Programmiertaste P2 zugreifen.
IT - Prodotti correlati EN - Correlated products FR - Produits connexes DE - Ergänzende Produkte
4
IT - CANCELLAZIONE CODICI RADIO CON IL TASTO P2 EN  RADIO CODES DELETION WITH P2 BUTTON
FR - SUPPRESSION DES CODES RADIO AVEC LE BOUTON P2 DE  LÖSCHUNG SENDEKANÄLE MIT P2 TASTE
IT - Premere P2 due volte e tenere premuto. Premere il tasto del trasmettitore relativo al codice da cancellare.
EN - Press P2 twice and keep it pressed. Press the button of the transmitter relative to the code to delete.
FR - Appuyer P2 deux fois et le maintenir appuyé. Appuyer sur le bouton de l’émetteur concernant le code à supprimer.
DE - P2 zwei mal drücken und gedrückt halten. Drücken Sie die Sendertaste die auf den zu löschenden Code bezogen ist.
IT - Premere P2 tre volte e tenere premuto 10s.
EN - Press P2 three times and keep it pressed 10s.
FR - Appuyer P2 trois fois et le maintenir appuyé 10s.
DE - P2 zwei mal drücken und 10S. gedrückt halten.
1.2
IT - CANCELLAZIONE DI TUTTI I CODICI RADIO CON IL TASTO P2 EN  DELETION OF ALL THE RADIO CODES WITH P2 BUTTON
FR - SUPPRESSION DE TOUS LES CODES RADIO AVEC LE BOUTON P2 DE  LÖSCHUNG ALLER SENDEKANÄLE MIT P2 TASTE
1.3
IT - MEMORIZZAZIONE CODICI RADIO CON IL TASTO P2 EN  RADIO CODES MEMORIZATION WITH P2 BUTTON
FR - MÉMORISATION DES CODES RADIO AVEC LE BOUTON P2 DE  EINLERNUNG SENDEKANÄLE MIT P2 TASTE
1.1
IT - Premere P2 e tenere premuto. Premere il tasto del trasmettitore relativo al codice da memorizzare.
EN - Press P2 and keep it pressed. Press the button of the transmitter relative to the code to memorize.
FR - Appuyer P2 et le maintenir appuyé. Appuyer sur le bouton de l’émetteur concernant le code à mémoriser.
DE - P2 drücken und halten Sie gedrückt. Drücken Sie die Sendertaste die auf den zu speichernden Code bezogen ist.
P2
P2
P2
P2 suono continuo
continuous sound
son continu
Dauerton ...
( )
...
P2
( )
P2
< 1 s.
...
P2
( 10 s.)
P2
< 1 s.
P2 P2
< 1 s.
5
IT - ATTENZIONE: procedura possibile solo se la memoria è vuota. Se presenti più ricevitori, alimentarne uno solo per volta.
EN - ATTENTION: the procedure is possible only if the memory is empty. If more receivers are present, supply just one at a time.
FR - ATTENTION: procédé exécutable seulement si la mémoire est vide. S’il y a plusieurs récepteurs, les alimenter un à la fois.
DE - ACHTUNG: Dieses Verfahren ist nur bei leerem Speicher möglich. Fall es mehrere Empfänger gibt, soll nur jeweils einer von diesen versorgt werden.
IT - MEMORIZZAZIONE REMOTA DEL PRIMO CODICE RADIO EN  REMOTE MEMORIZATION OF THE FIRST RADIO CODE
FR - MÉMORISATION À DISTANCE DU PREMIER CODE RADIO DE  FERNSPEICHERUNG DES ERSTEN FUNKCODES
2.1
P3
P3
P3
IT - Il tasto P3 si trova all’interno del trasmettitore.
EN - P3 button is located inside the transmitter.
FR - Le bouton P3 se trouve à l’intérieur de l’émetteur.
DE - Die Taste P3 bendet sich im Inneren des Senders.
IT - Premere il tasto P3 del trasmettitore. Premere il tasto relativo al nuovo
codice. EN - Press the button P3 of the transmitter. Press the button relative
to the new code. FR - Appuyer sur le bouton P3 de l’émetteur. Appuyer sur
le bouton concernant le nouveau code. DE - Drücken Sie die Taste P3 des
Senders. Drücken Sie die auf den neuen Code bezogene Taste.
P3
suono intermittente
intermittent sound
son intermittent
intermittierender Ton
...
< 5 s.
suono continuo
continuous sound
son continu
Dauerton
nuovo
new
nouveau
neu
6
IT - Premere il tasto P3 del trasmettitore memorizzato. Premere il tasto relativo ad un codice memorizzato. Premere il tasto relativo
al nuovo codice. EN - Press the button P3 of the memorized transmitter. Press the button relative to a memorized code. Press
the button relative to the new code. FR - Appuyer sur le bouton P3 de l’émetteur mémorisé. Appuyer sur le bouton concernant un
code mémorisé. Appuyer sur le bouton concernant le nouveau code. DE - Drücken Sie die Taste P3 des gespeicherten Senders.
Drücken Sie die auf den gespeicherten Code bezogene Taste. Drücken Sie die auf den neuen Code bezogene Taste.
IT - MEMORIZZAZIONE REMOTA DI ULTERIORI CODICI RADIO EN  REMOTE MEMORIZATION OF FURTHER RADIO CODES
FR - MÉMORISATION À DISTANCE D’AUTRES CODES RADIO DE  FERN SPEICHERUNG VON WEITEREN SENDEKANÄLEN
2.2
1 s.< 5 s.
suono continuo
continuous sound
son continu
Dauerton
suono intermittente
intermittent sound
son intermittent
intermittierender Ton
...
P3
memorizzato
memorized
mémorisé
gespeichert
memorizzato
memorized
mémorisé
gespeichert
< 5 s.
suono continuo
continuous sound
son continu
Dauerton
nuovo
new
nouveau
neu
IT - Il tasto P3 si trova all’interno del trasmettitore.
Il codice radio aggiunto avrà le stesse funzioni del
codice usato per l’inserimento. La procedura è
compatibile con qualsiasi tipo di trasmettitore.
EN - P3 button is located inside the transmitter. The
added radio code will have the same functions of the
code used for the memorization. This procedure is
compatible with any type of transmitter.
FR - Le bouton P3 se trouve à l’intérieur de l’émetteur.
Le code radio ajouté aura les mêmes fonctions que
le code utilisé pour la mémorisation. La procédure
est compatible avec n’importe quel type d’émetteur.
DE - Die Taste P3 bendet sich im Inneren des
Senders. Der hinzugefügte Sendekanal wird
dieselben Funktionen des Codes haben welcher für
die Einlernung verwendet wurde. Die Prozedur kann
mit allen Arten von Sendern durchgeführt werden.
IT - CANCELLAZIONE REMOTA DI UN CODICE RADIO EN  REMOTE DELETION OF A RADIO CODE
FR - SUPPRESSION À DISTANCE D’UN CODE RADIO DE  FERN LÖSCHUNG EINES SENDEKANALS
2.3
IT - Il tasto P3 si trova all’interno del trasmettitore.
EN - P3 button is located inside the transmitter.
FR - Le bouton P3 se trouve à l’intérieur de
l’émetteur. DE - Die Taste P3 bendet sich im
Inneren des Senders.
IT - Premere tre volte il tasto P3 del trasmettitore memorizzato. Premere il tasto relativo al codice da cancellare.
EN - Press three times the button P3 of the memorized transmitter. Press the button relative to the code to delete.
FR - Appuyer trois fois sur le bouton P3 de l’émetteur mémorisé. Appuyer sur le bouton concernant le code à supprimer.
DE - Drücken Sie drei mal die Taste P3 des gespeicherten Senders. Drücken Sie die auf den zu löschenden Code bezogene Taste.
x 3
1 s.
suono continuo
continuous sound
son continu
Dauerton
suono intermittente
intermittent sound
son intermittent
intermittierender Ton
...
P3
memorizzato
memorized
mémorisé
gespeichert
< 5 s.
7
IT - AVVERTENZE EN  WARNING FR - AVERTISSEMENTS DE  ACHTUNG
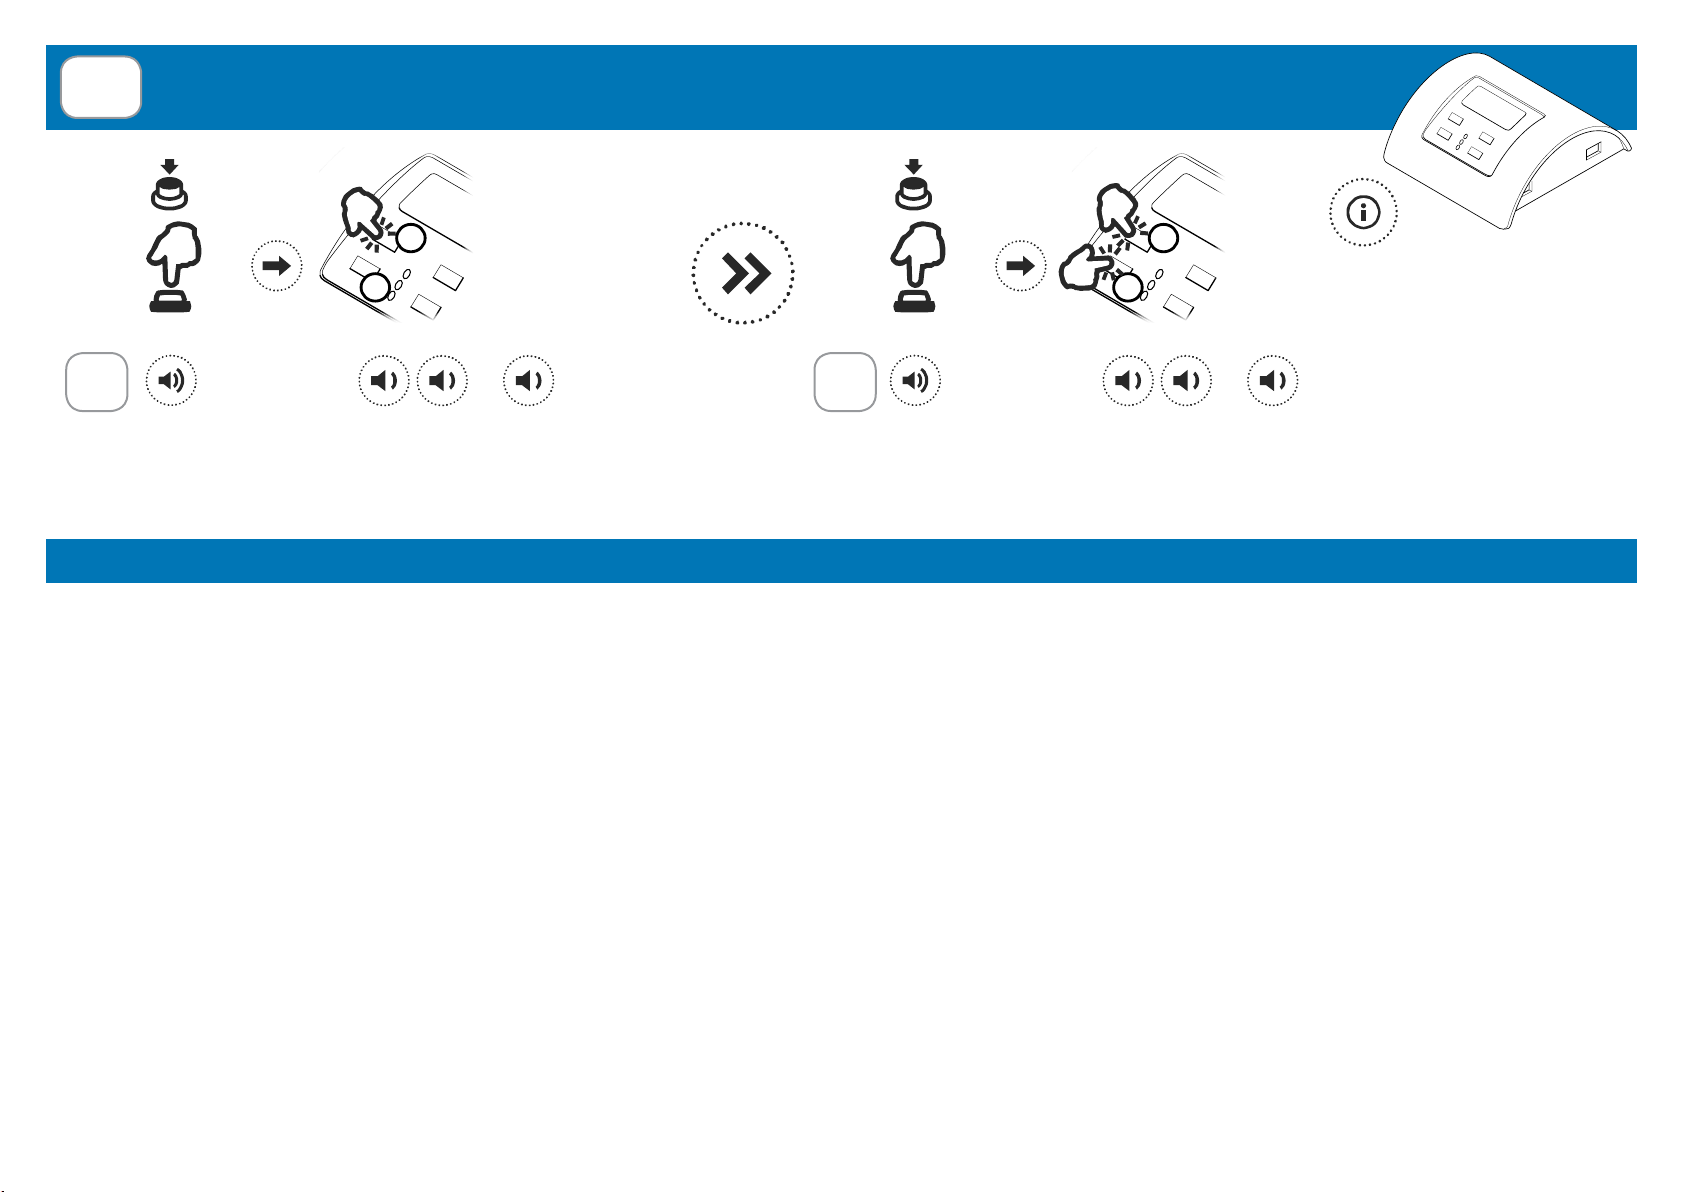
IT - MEMORIZZAZIONE DI GREEN MOUSE SCREEN EN  MEMORIZATION OF GREEN MOUSE SCREEN
FR - MÉMORISATION DU GREEN MOUSE SCREEN DE  EINLERNUNG DER GREEN MOUSE SCREEN
3
IT - Vedere le istruzioni del prodotto
per dettagli; EN - See the product’s
instructions for details; FR - Voir
les notices du produit pour plus
d’informations; DE - Siehe Anleitung
des Produkts für Details.
Premere P2 e tenere premuto; premere contemporaneamente i tasti 2e3di Green Mouse.
Press P2 and keep it pressed; press at the same time the buttons 2 and 3 of Green Mouse.
Appuyer P2 et le maintenir appuyé; appuyer en même temps sur le boutons 2 et 3 du Green Mouse.
Drücken und halten Sie P2 gedrückt; Drücken Sie gleichzeitig die Tasten 2 und 3 der Green Mouse.
IT - Premere P2 e tenere premuto; premere il tasto 2o 3di Green Mouse.
EN - Press P2 and keep it pressed; press the button 2or 3of Green Mouse.
FR - Appuyer P2 et le maintenir appuyé; appuyer sur le bouton 2ou 3du Green Mouse.
DE - Drücken und halten Sie P2 gedrückt; Drücken Sie die Taste 2oder 3der Green Mouse.
1 2
P2 suono continuo
continuous sound
son continu
Dauerton ...
( )
2
3
P2 suono continuo
continuous sound
son continu
Dauerton ...
( )
2
3
IT - Il prodotto in oggetto deve essere installato, messo in servizio e controllato periodicamente solo da personale tecnico qualicato nel rispetto delle normative vigenti riguardanti le coperture automatiche. Il sistema è
alimentato a 24Vdc. Prima di collegare l’alimentazione assicurarsi che i sensori e i motori siano collegati correttamente. Un errato collegamento (polarità discordi) potrebbe danneggiare i motori oltre che gli elementi meccanici
ad essi collegati. L’alimentatore deve fornire la tensione e la corrente richiesta dal dispositivo e dai motori collegati. L’alimentatore deve essere conforme alla norma IEC60950-1 e protetto contro corto-circuiti e sovratensioni.
Si consiglia l’uso di un cavo 2x1.5mm per collegare i motori al dispositivo per una lunghezza no a 6m, mentre è opportuno un cavo 2x2.5mm per tratte superiori. SMALTIMENTO DEL PRODOTTO: alla ne dalla vita utile,
l’apparecchio non deve essere smaltito come riuto domestico, ma conferito in un centro di raccolta riuti elettrici ed elettronici. Il fabbricante, Teleco Automation s.r.l , dichiara che il tipo di Apparecchiatura radio è conforme
alla direttiva 2014/53/UE. Il testo completo della dichiarazione di conformità UE è disponibile al seguente indirizzo Internet: www.telecoautomation.com/ce. Nell’ottica di un continuo sviluppo dei propri prodotti, il produttore
si riserva il diritto di apportare modiche a dati tecnici e prestazioni senza preavviso. EN - The product at issue must be installed, commissioned and maintained only by licensed and authorised people, respecting the laws
concerning the automatic covers. The system is powered by 24Vdc. Before the connection to the power supply make sure that the sensors and motors are correctly connected.Afaulty connection of the motors (polarity inversion)
could damage them together with the connected mechanical elements. The power supply must supply the required voltage and current according to the characteristics of the system. The power supply must be compliant
with IEC60950-1 and must be protected against the short-circuit and over-voltage. Use a 2x1.5mm cable to connect the motors and the control unit for length up to 6m, or 2x2.5mm cable for longer segments. PRODUCT
DISPOSAL: at the end of this product’s useful life, it must not be disposed of as domestic waste, but must be taken to a collection centre for waste electrical and electronic equipment. The manufacturer, Teleco Automation
s.r.l, declares that the type of radio equipment is compliant with Directive 2014/53/EU. The full text of the EU compliance declaration is available at the following Internet address: www.telecoautomation.com/ce. In the view of
a constant development of their products, the manufacturer reserves the right for changing technical data and features without prior notice. FR - Le produit en objet doit être installé, mis en service et vérié périodiquement
seulement par des techniciens qualiés, conformément aux normes en vigueur pour les appareillages électriques. Le système est alimenté en 24Vdc. Avant la mise sous tension, s’assurer que les capteurs ainsi que le
moteur sont raccordés de manière correcte. Un mauvais branchement du ou des moteurs peut entrainer leur endommagement ainsi que celui de la structure. L’alimentation doit pouvoir fournir la puissance nécessaire à
l’ensemble des éléments. En outre, elle doit être conforme à la norme IEC60950-1 ainsi qu’être protégée contre les court-circuits et les surtensions. Pour le raccordement du ou des moteurs à la centrale, utiliser un câble
de 2x1,5mm² jusqu’à 6m, au delà, utiliser un câble 2x2,5mm². ÉLIMINATION DU PRODUIT: à la n de la durée de vie utile de ce produit, il ne doit pas être éliminé comme tout autre déchet domestique. Le fabricant, Teleco
Automation s.r.l, déclare que le type d’équipement radio est conforme avec la directive 2014/53/EU. Le texte intégral de la déclaration de conformité EU est disponible à l’adresse internet suivante: www.telecoautomation.
com/ce. Dans l’optique d’un développement continu de ses produits, le constructeur se réserve le droit d’apporter sans préavis des modications aux données techniques et aux prestations. DE - Das Produkt darf nur von
qualiziertem technischen Personal unter Einhaltung der geltenden Gesetze installiert werden die automatische Abdeckungen betreffen. Das System wird mit 24Vdc betrieben. Vergewissern Sie sich vor dem Anschließen
des Geräts an das Stromnetz, dass die Sensoren und die Motoren korrekt verbunden sind. Bei einer falschen Verbindung (vertauschte Polarität) können die Motoren und die daran angeschlossenen mechanischen Teile
beschädigt werden. Die Stromversorgung des Geräts muss auf die zulässigen Spannungs- und Strombereiche des Geräts und der verbundenen Motoren ausgelegt sein. Die Stromversorgung muss der Norm IEC60950-1
entsprechen und gegen Kurzschluss und Überspannung geschützt sein. Für den Anschluss der Motoren an das Gerät bis zu einer Länge von 6 m wird ein 2x1.5mm Kabel empfohlen, während bei einer größeren Länge
ein 2x2.5 mm Kabel empfohlen wird. ENTSORGUNG DES GERÄTS: nach dem Ablauf der Nutzungszeit des Gerätes darf es nicht ohne Weiteres im Hausmüll entsorgt werden, sondern muss zu einer entsprechenden
Entsorgungsstelle für elektronische Geräte gebracht werden. Der Hersteller, Teleco Automation S.r.l., erklärt hiermit dass die Funk- Produktart der Richtlinie 2014/53/UE entspricht. Die EU Konformitätserklärung kann auf
der folgenden Internetseite abgefragt werden: www.telecoautomation.com/ce. . Im Zuge einer kontinuierlichen Weiterentwicklung der Produkte behält sich der Hersteller das Recht vor technische Daten und Funktionen
ohne vorherige Ankündigung zu ändern.
Alimentazione - Power supply - Alimentation - Stromversorgung 12Vdc (TVPRSxxxA12)
24Vdc (TVPRSxxxA24)
Potenza massima uscita - Max. output power
Puissance maximale de sortie - Max. Ausgänge Leistung max. 4,5 A
Temperatura di funzionamento - Operating temperature range
Température de fonctionnement - Umgebungstemperatur im Betrieb -20° - +50°C
Tempo lavoro - Working time - Temps de travail - Arbeitszeit 90 s
Grado di protezione - Protection rating - Degré de protection - Schutzart IP44
Frequenza ricezione - Reception frequency
Fréquence de réception - Empfangsfrequenz
868.3 MHz (TVPRS868A12-A24)
916 MHz (TVPRS916A12-A24)
Capacità memoria radio (trasmettitori) - Radio memory capability (transmitters)
Capacité mémoire radio (émetteurs) - Speicherbare Sender 32
Dimensioni (mm) - Dimensions (mm) - Dimensions (mm) - Abmessungen (mm) 125 x 38 x 20
Conforme alle Direttive - In compliance with Directives
Conforme aux Directives - Entsprechend der Richtlinien
2006/95/EC, 2004/108/EC,
1999/5/EC
IT - SPECIFICHE TECNICHE EN  TECHNICAL SPECIFICATIONS
FR - SPÉCIFICATIONS TECHNIQUES DE  TECHNISCHE DATEN
TELECO AUTOMATION S.R.L.
ITALY
Tel. +39.0438.388511
info@telecoautomation.com
TELECO AUTOMATION FRANCE
FRANCE
Tel. +33.(0)472.145080
info@telecofrance.com
TELECO AUTOMATION GMBH
GERMANY
Tel. +49.(0)8122.9563024
info.de@telecoautomation.com
TELECO AUTOMATION OCEANIA PTY LTD
AUSTRALIA
Tel. +61.(07)5502.7801
info@telecoautomation.com.au
This document is the property of Teleco Automation Srl who reserves all reproduction and copying rights

This manual suits for next models

3

Other Teleco Receiver manuals

Teleco TVSTRD868BST24M User manual

Teleco

Teleco TVSTRD868BST24M User manual

Teleco TVHET868A01 User manual

Teleco

Teleco TVHET868A01 User manual

Teleco TVRGBDU868ST30 User manual

Teleco

Teleco TVRGBDU868ST30 User manual

Teleco TVSRGBWU868ST25 User manual

Teleco

Teleco TVSRGBWU868ST25 User manual

Teleco TVRGBDU868ST24 User manual

Teleco

Teleco TVRGBDU868ST24 User manual

Teleco TVSTRD868NT24 User manual

Teleco

Teleco TVSTRD868NT24 User manual

Teleco TUBELITE868A10 User manual

Teleco

Teleco TUBELITE868A10 User manual

Teleco Master TVRCD868A04N User manual

Teleco

Teleco Master TVRCD868A04N User manual

Teleco TVLink RS868 User manual

Teleco

Teleco TVLink RS868 User manual

Teleco TRRCL868W60 User manual

Teleco

Teleco TRRCL868W60 User manual

Teleco TVRRL868G02P User manual

Teleco

Teleco TVRRL868G02P User manual

Teleco TVPLT868C80T0 User manual

Teleco

Teleco TVPLT868C80T0 User manual

Teleco TVSPOT868ADI04 User manual

Teleco

Teleco TVSPOT868ADI04 User manual

Teleco GSM700 User manual

Teleco

Teleco GSM700 User manual

Teleco TVPL4868AC4 User manual

Teleco

Teleco TVPL4868AC4 User manual

Teleco TVSTICK868NT10 User manual

Teleco

Teleco TVSTICK868NT10 User manual

Teleco TVRCM868A01 User manual

Teleco

Teleco TVRCM868A01 User manual

Teleco TVSTRD868SI24G User manual

Teleco

Teleco TVSTRD868SI24G User manual

Teleco TVRCL868A02 User manual

Teleco

Teleco TVRCL868A02 User manual

Teleco TVDMM868A05 User manual

Teleco

Teleco TVDMM868A05 User manual

Teleco TVRCL868A02F6 User manual

Teleco

Teleco TVRCL868A02F6 User manual

Teleco TVSTICK868NT27 User manual

Teleco

Teleco TVSTICK868NT27 User manual

Teleco TSDR5000CI User manual

Teleco

Teleco TSDR5000CI User manual

Teleco TVDMM868A06 User manual

Teleco

Teleco TVDMM868A06 User manual

Popular Receiver manuals by other brands

3Built RES12VX manual

3Built

3Built RES12VX manual

Hitachi ACV01U - LCD Direct View TV operating guide

Hitachi

Hitachi ACV01U - LCD Direct View TV operating guide

HAMTRONICS R302 Series Installation operation & maintenance

HAMTRONICS

HAMTRONICS R302 Series Installation operation & maintenance

Rt IDLV-4000P-30x user manual

Rt

Rt IDLV-4000P-30x user manual

HydroLynx Systems 5351R instruction manual

HydroLynx Systems

HydroLynx Systems 5351R instruction manual

Sony SAT-HD300 - High Definition Satellite... operating instructions

Sony

Sony SAT-HD300 - High Definition Satellite... operating instructions

Yamaha RX-V630RDS, DSP-AX630SE owner's manual

Yamaha

Yamaha RX-V630RDS, DSP-AX630SE owner's manual

Kenwood KVT-817DVD - Excelon - DVD Player Service manual

Kenwood

Kenwood KVT-817DVD - Excelon - DVD Player Service manual

SDT Sherlog Kit Master Series Technical and user's instruction manual

SDT

SDT Sherlog Kit Master Series Technical and user's instruction manual

SkylinkHome MD-318 Preliminary manual

SkylinkHome

SkylinkHome MD-318 Preliminary manual

Digital Multimedia Technology DMT6000 CXCI user guide

Digital Multimedia Technology

Digital Multimedia Technology DMT6000 CXCI user guide

Kenwood KMD-71 instruction manual

Kenwood

Kenwood KMD-71 instruction manual

Denver Premium AVR-51 manual

Denver

Denver Premium AVR-51 manual

Promatic RTM1 operating instructions

Promatic

Promatic RTM1 operating instructions

LG LH-T3526X manual

LG

LG LH-T3526X manual

Yamaha RX-V771 Service manual

Yamaha

Yamaha RX-V771 Service manual

Anthem Statement D2v operating manual

Anthem

Anthem Statement D2v operating manual

Jensen J1CA10FL quick start guide

Jensen

Jensen J1CA10FL quick start guide

manuals.online logo
manuals.online logoBrands
  • About & Mission
  • Contact us
  • Privacy Policy
  • Terms and Conditions

Copyright 2025 Manuals.Online. All Rights Reserved.