manuals.online logo
Brands
  1. Home
  2. •
  3. Brands
  4. •
  5. Tennsco
  6. •
  7. Indoor Furnishing
  8. •
  9. Tennsco BK6-121812-1 Instruction Manual

Tennsco BK6-121812-1 Instruction Manual

PK-1110319
ASSEMBLY INSTRUCTIONS & PARTS MANUAL
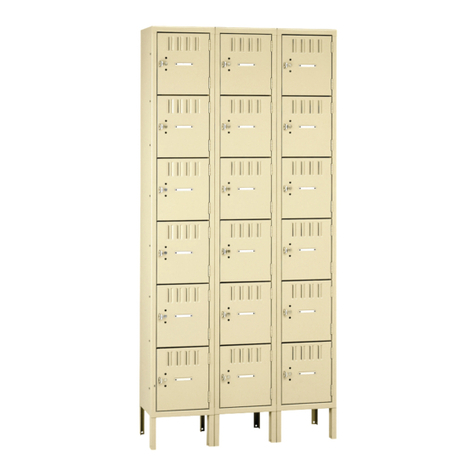
Three Wide Unassembled Five or Six High
Box Locker Units With or Without Legs
RETAIN INSTRUCTIONS FOR FUTURE REFERENCERETAIN INSTRUCTIONS FOR FUTURE REFERENCE
Tennsco LLC., Dickson, TN 37056-1888 • (866) 446-8686
GENERAL SAFETY INFORMATIONGENERAL SAFETY INFORMATION
Some parts may have sharp edges. CARE must be taken when handling various pieces to avoid injury.
For safety, wear a pair of work gloves when assembling or performing any maintenance on units.
LIMITED WARRANTYLIMITED WARRANTY
Tennsco warrants goods purchased hereunder to be free of defects in materials and workmanship for a period of one (1) year from the date of shipment, hereunder. This warranty shall not apply in
the event goods are damaged as a result of misuse, abuse, neglect, accident, improper application, modication or repair by persons not authorized by Seller, where goods are damaged during
shipment, or where the date stamps on the goods have been defaced, modied or removed. UNLESS CONSIDERED UNENFORCEABLE OR UNLAWFUL UNDER APPLICABLE LAW:
a. ALL IMPLIED WARRANTIES, INCLUDING BUT NOT LIMITED TO WARRANTIES OR MERCHANTABILITY AND FITNESS FOR A PARTICULAR PURPOSE ARE HEREBY EXCLUDED:
b. BUYERS REMEDY, IF ANY, FOR ANY DEFECTIVE GOODS SHALL BE LIMITED TO A REFUND BY SELLER OR REPLACEMENT OF THE GOODS AT SELLER’S OPTION, AND SHALL IN NO
EVENT INCLUDE DAMAGES OF ANY KIND, WHETHER INCIDENTAL, CONSEQUENTIAL OR OTHERWISE.
NO GOODS ACCEPTED FOR RETURN WITHOUT PRIOR APPROVAL. Seller shall have the right to inspect any goods claimed to be defective at Buyers place of business or require Buyer to return the
goods to Seller for inspection on Seller’s premises. Transportation charges covering returned goods will be borne by Seller only if such goods are proven to be defective, are covered by this warranty
and are returned within the warranty period stated above.
ASSEMBLY OF THREE WIDE BOX LOCKERS
Tools Needed: A provided 11/32” nut driver (11/32” socket may be substituted).
Two people are recommended for assembly. Approximate assembly time: 40-50 minutes.
5. Next bolt the right side (Ref. No. 6) to the back so that the
side ange ts around the back. Also attach to the top,
bottom and shelves. Use twenty three bolts and nuts (for a
unit without legs) to complete this step.
2. Unpack all the parts then locate the left and right hand sides
and separate them. The top of the sides and back can be
determined by the three holes closest to the end of the part.
1. The reference numbers used throughout this sheet refer to the
illustration on the back cover. This is to help you to identify the
various parts as they are mentioned.
3. Place back (Ref. No. 1) on a protected at surface so that the
anges face upward. Keep all parts level and square during
assembly. Make sure all the parts are aligned properly before
tightening the bolts and nuts (Ref. No. 13). Bolt the left side
(Ref. No. 2) to the back so that the side ange ts around the
back using seven nuts and bolts (nuts to the inside); use nine
bolts and nuts if the locker does not have legs.
6. If the locker has legs, insert the leg into the corner between
the bottom and the side. Bolt the leg to the side using two
bolts and nuts per leg.
If leg version, do not
bolt through bottom
two holes yet.
Top portion

4. Bolt the shelves (Ref. No. 4), top and bottom (Ref. No. 5) to the
back and left side panel using four nuts and bolts each. Next
bolt an intermediate side and back panel to the ange on the
back of the rst locker in seven places (nine if no legs). Next
attach a top, bottom, and shelves to the rst intermediate side
and back. These will share bolts with the parts on either side of
them as shown in detail view. Next attach remaining
intermediate side and back to the ange of the second back.
Attach the remaining top, bottom, and shelves to the
intermediate side.


Intermediate Side
Left Side
Top
Bottom
Shelf
Right Side


9. Stand the unit upright and place in the desired location.
Remove temporary bolts in frames and bolt to adjacent units
together through frames.
10. Anchor units to wall or oor. The units are not intended to
stand free and may topple if not secured. Units standing
back to back should be bolted back to back.
8. If joining a three wide unit beside another unit, temporarily
install only one bolt and nut into the third and sixth holes down
from the top of the outer frame(s) that will be joined to the
adjacent locker frame(s). The center locker frame can be bolted
complete. If the locker is just a stand alone three wide unit,
nish attaching the rames using thirty eight bolts and nuts.
Check and tighten all permanent bolts.
NOTE: If the temporary bolts are not removed
before the frames are joined side by side, the
frames will have a 1/8“ gap between them.
7. Place the frame and door assembly (Ref. Nos. 7 & 8) over the
locker body. Make certain that the body sides are inside the
frames not between the frames. Attach the top to the frame
header and the bottom to the frame sill using one bolt each.
11. If units are not pre-numbered, optional number plates and
plastic covers (Ref. No. 9) may be attached using push plugs
(Ref. No. 10). Tennsco name plate (Ref. No. 18) is installed at
the factory. As an alternative, custom number or name plates
may be ordered from the factory. Your locker is complete.
NOTE: Care must be taken to assure that lockers
are set plumb and level before anchoring.
12. If additional accessories were purchased such as End Bases/
Front Bases (for lockers with legs), Closed Bases (for lockers
without legs), Slopping Tops, and/or Combination Locks or
Grooved Key Locks, please see the instructions that came
along with those parts.
Header Bolt Hole
Frame Header
Frame
Sill


Door & Frame Assembly
REPLACEMENT PARTSREPLACEMENT PARTS


Tennsco Nut DriverTennsco Nut Driver
(Ref No. 12)(Ref No. 12)
BackBack
(Ref No. 1)(Ref No. 1)
Left SideLeft Side
(Ref No. 2)(Ref No. 2)
QTY. 6 TIERQTY. 6 TIER
DESCRIPTIONDESCRIPTION
*These items are included in the hardware pack enclosed (Part No.: HWBK5-3 for 5 tier/ HWBK6-3 for 6 tier).
QTY. 5 TIERQTY. 5 TIER
Door Frame assemblies require a further sufx (x) of either 1 or A. “1” indicates frame with legs; “A” indicates frame without legs. For example: A door frame assembly Door Frame assemblies require a further sufx (x) of either 1 or A. “1” indicates frame with legs; “A” indicates frame without legs. For example: A door frame assembly
for locker BK6-121812-1 (with legs) would be Part No. LBFA-1272-1. The door assembly alone without the frame for the same locker would be Part No. LBD-1212.for locker BK6-121812-1 (with legs) would be Part No. LBFA-1272-1. The door assembly alone without the frame for the same locker would be Part No. LBD-1212.
REF. NO.REF. NO.
Rear LegsRear Legs
(Ref No. 3)(Ref No. 3)
Right SideRight Side
(Ref No. 6)(Ref No. 6)
ShelfShelf
(Ref No. 4)(Ref No. 4)
Door Frame AssemblyDoor Frame Assembly
(Ref No. 7)(Ref No. 7)
Locker DoorLocker Door
(Ref No. 8)(Ref No. 8)
Part No. is composed of prex shown plus combination of opening or unit. Width = ww and Depth = dd.Part No. is composed of prex shown plus combination of opening or unit. Width = ww and Depth = dd.
Finger PullFinger Pull
(Ref No. 11)(Ref No. 11)
TopTop
(Ref No. 5)(Ref No. 5)
Number Plate andNumber Plate and
Clear CoverClear Cover
(Ref No. 9)(Ref No. 9)
Push PlugsPush Plugs
(Ref No. 10)(Ref No. 10)


NOTE: Additional hardware may be included for replacement purposes.NOTE: Additional hardware may be included for replacement purposes.
Tennsco makes every effort to ensure that all units ship complete with all parts and arrive undamaged.Tennsco makes every effort to ensure that all units ship complete with all parts and arrive undamaged.
However, should your unit contain missing or damaged parts, please contact your purchase location.However, should your unit contain missing or damaged parts, please contact your purchase location.
49B11149B111
PART NO.PART NO.
Back
Left Side
Rear Leg (leg version unit only)
Shelf
Top/Bottom
Right Side
Door Frame Assembly
Locker Door
Paper Number Plate and Clear Cover*
Push Plug*
Finger Pull
Tennsco Nut Driver*
Bolts and Nuts #8-32 x ½”(not shown)*
3
2
4
12
6
2
3
15
15
30
15
1
136
3
2
4
15
6
2
3
18
18
36
18
1
144
LSTB-wwhh
LBSL-ddhh
LRL-1
ESL-wwdd
LTB-wwdd
LBSR-ddhh
LBFA-wwhh-x
LB-wwhh
LNP-1
LPP-1
LFP-1
TOOL-2
**
**Available Locally
BottomBottom
(Ref No. 5)(Ref No. 5)
1
2
3
4
5
6
7
8
9
10
11
12
13


Other Tennsco Indoor Furnishing manuals

Tennsco SINGLE TIER Instruction Manual

Tennsco

Tennsco SINGLE TIER Instruction Manual

Tennsco 1870 Instruction Manual

Tennsco

Tennsco 1870 Instruction Manual

Tennsco Jumbo Storage Cabinet J2478SU Instruction Manual

Tennsco

Tennsco Jumbo Storage Cabinet J2478SU Instruction Manual

Tennsco 1436 Instruction Manual

Tennsco

Tennsco 1436 Instruction Manual

Tennsco 1842 User manual

Tennsco

Tennsco 1842 User manual

Tennsco J1878C-N Instruction Manual

Tennsco

Tennsco J1878C-N Instruction Manual

Tennsco Z-Line Steel Shelf Unit Instruction Manual

Tennsco

Tennsco Z-Line Steel Shelf Unit Instruction Manual

Tennsco SRS-601878 Series Instruction Manual

Tennsco

Tennsco SRS-601878 Series Instruction Manual

Tennsco MB-2-2542 Instruction Manual

Tennsco

Tennsco MB-2-2542 Instruction Manual

Tennsco 7818 Instruction Manual

Tennsco

Tennsco 7818 Instruction Manual

Tennsco 1472 Instruction Manual

Tennsco

Tennsco 1472 Instruction Manual

Tennsco B-3000 Instruction Manual

Tennsco

Tennsco B-3000 Instruction Manual

Tennsco ESPC-1236 Instruction Manual

Tennsco

Tennsco ESPC-1236 Instruction Manual

Tennsco J2478A-N Instruction Manual

Tennsco

Tennsco J2478A-N Instruction Manual

Tennsco 1420 Instruction Manual

Tennsco

Tennsco 1420 Instruction Manual

Tennsco LSS-361872 Instruction Manual

Tennsco

Tennsco LSS-361872 Instruction Manual

Tennsco Capstone Shelving Units Instruction Manual

Tennsco

Tennsco Capstone Shelving Units Instruction Manual

Tennsco 1470RH Instruction Manual

Tennsco

Tennsco 1470RH Instruction Manual
Tennsco Z-Line User manual

Tennsco

Tennsco Z-Line User manual

Tennsco RGL-1236S User manual

Tennsco

Tennsco RGL-1236S User manual

Tennsco ZL7 Series Instruction Manual

Tennsco

Tennsco ZL7 Series Instruction Manual

Tennsco FB-12 Instruction Manual

Tennsco

Tennsco FB-12 Instruction Manual
Tennsco Enclosed Foreman’s Desk Instruction Manual

Tennsco

Tennsco Enclosed Foreman’s Desk Instruction Manual

Tennsco MB-1-2542-MGY Instruction Manual

Tennsco

Tennsco MB-1-2542-MGY Instruction Manual

Popular Indoor Furnishing manuals by other brands

Ameriwood HOME 7121335COM Assembly instructions

Ameriwood HOME

Ameriwood HOME 7121335COM Assembly instructions

Enclume PR16a quick guide

Enclume

Enclume PR16a quick guide

Ballard Designs MI442 LRG quick start guide

Ballard Designs

Ballard Designs MI442 LRG quick start guide

Dorel Living WM4508 manual

Dorel Living

Dorel Living WM4508 manual

Haushalt International 60294 Directions for use

Haushalt International

Haushalt International 60294 Directions for use

Belden RUS498X Assembly instructions

Belden

Belden RUS498X Assembly instructions

sconto NBUM01-0001 Assembling Instruction

sconto

sconto NBUM01-0001 Assembling Instruction

Praxisdienst Teqler T1135555 Assembly instructions

Praxisdienst

Praxisdienst Teqler T1135555 Assembly instructions

Mocka Asha Entertainment Unit Assembly instructions

Mocka

Mocka Asha Entertainment Unit Assembly instructions

Courtyard Creations KVS134W Assembly instructions

Courtyard Creations

Courtyard Creations KVS134W Assembly instructions

Cardinal Gates SS30 Assembly instructions

Cardinal Gates

Cardinal Gates SS30 Assembly instructions

Mocka Sonata Assembly instructions

Mocka

Mocka Sonata Assembly instructions

Courtyard Creations TGS37SC Assembly instructions

Courtyard Creations

Courtyard Creations TGS37SC Assembly instructions

Whittier Wood Contemporary Extension Table Assembly instructions

Whittier Wood

Whittier Wood Contemporary Extension Table Assembly instructions

U-Line S-23928 Assembly instructions

U-Line

U-Line S-23928 Assembly instructions

Luxor AVJ422KB4 instruction sheet

Luxor

Luxor AVJ422KB4 instruction sheet

Woodream M Assembly instruction

Woodream

Woodream M Assembly instruction

Performance PLTVALEGMOUNT2430 Assembly instructions

Performance

Performance PLTVALEGMOUNT2430 Assembly instructions

manuals.online logo
manuals.online logoBrands
  • About & Mission
  • Contact us
  • Privacy Policy
  • Terms and Conditions

Copyright 2025 Manuals.Online. All Rights Reserved.