Tesla MultiCook M90 Premium User manual

TESLA MultiCook M90 Premium

Vážený zákazníku,
děkujeme, že jste si vybral TESLA MultiCook M90 Premium.
Před použitím si prosím důkladně pročtěte pravidla bezpečného používání a dodržujte
všechna běžná bezpečnostní pravidla.
DŮLEŽITÉ BEZPEČNOSTNÍ UPOZORNĚNÍ
TENTO VÝROBEK JE URČENÝ POUZE PRO POUŽITÍ V DOMÁCNOSTI.
Přečtěte si a snažte se porozumět všem pokynům. Nedodržení níže uvedených pokynů může mít za
následek úraz elektrickým proudem, požár nebo vážné zranění. Varování, upozornění a instrukce
uvedené v této příručce nemohou zahrnovat všechny možné podmínky a situace, které mohou nastat.
Provozovatel musí pochopit, že zdravý rozum a opatrnost jsou faktorem, který nelze zabudovat do
tohoto produktu, ale musí je mít provozovatel.
Tento přístroj je složité elektromechanické zařízení, věnujte prosím pozornost těmto pokynům:
•Pro používání tohoto spotřebiče musí být nainstalována nádoba na vaření.
•Nepoužívejte poškozenou nebo prasklou nádobu na vaření.
•Nikdy spotřebič nepoužívejte bez jídla nebo tekutiny v nádobách na vaření.
•Neumisťujte spotřebič na okraj stolu během provozu. Ujistěte se, že povrch je rovný, čistý, bez
vody a jiných překážek.
•Nepoužívejte venku ani v příliš teplém, prašném nebo vlhkém prostředí.
•Uchovávejte jej z dosahu hořlavých a těkavých látek.
•Nenechávejte spotřebič pracovat bez dozoru.
•Chraňte spotřebič před zasažením tekutinami a zejména přetečením v průběhu vaření.
Nepřekračujte maximální množství vložených surovin, maximálně 2 cm pod horním okrajem.
•Při vaření potravin, které pění nebo nabývají objemu jako rýže, lusky, fazole, hrách, čočka, sušená
zelenina, nikdy nenaplňujte hrnec více než na 3/4 objemu nádoby na vaření.
•Skleněné víko bylo speciálně upraveno tak, aby bylo trvanlivější a bezpečnější než běžné sklo,
není však nerozbitné, při manipulaci se skleněným víkem buďte proto opatrní.
•Nedovolte vniknutí vody ani jiné kapaliny dovnitř spotřebiče, aby nedošlo k úrazu elektrickým
proudem.
•Připojte spotřebič pouze k uzemněné zásuvce. Vždy se ujistěte, že je zástrčka správně zasunuta
do zásuvky.
•Před čištěním odpojte kabel ze zásuvky a nechte spotřebič vychladnout.
•Spotřebič není určen k provozu pomocí externího časovače nebo samostatného dálkového
ovládání.
•Používejte pouze originální TESLA příslušenství, které je určeno k tomuto modelu.
•Pokud je spotřebič používán nesprávně nebo pro profesionální nebo poloprofesionální účely, nebo
pokud ano se nepoužívá podle pokynů v uživatelském manuálu, stává se záruka neplatnou.
•Výrobce a dovozce do Evropské Unie neodpovídá za škody způsobené provozem spotřebič jako
např. poranění, opaření, požár, zranění, znehodnocení dalších věcí apod.
•UPOZORNĚNÍ: Plastové sáčky používané k zabalení tohoto spotřebiče mohou být nebezpečné.
Abyste předešli riziku udušení, uchovávejte tyto sáčky mimo dosah dětí. Tyto sáčky nejsou
hračky.
CZ

UPOZORNĚNÍ:
NIKDY NEPONOŘUJTE SPOTŘEBIČ DO VODY NEBO JINÉ TEKUTINY.
NIKDY NEVKLÁDEJTE POTRAVINY NEBO NENALÉVEJTE TEKUTINY DO TĚLA SPOTŘEBICE.
NEVAŘTE BEZ NÁDOBY NA VAŘENÍ NEBO GRILOVÁNÍ!
POZOR, HORKÝ POVRCH
•Nepokládejte spotřebič na hořlavý povrch.
•Skleněné víko, nádoba na vaření a grilovací deska jsou velmi horké, buďte opatrní.
•Při vaření může docházet k uvolnění páry, nenaklánějte se nad spotřebič.
•Aby nedošlo k opaření unikající párou při zvednutí skleněné pokličky, opatrně ji zvedněte vždy
směrem od sebe. Odkapávající voda nikdy nesmí natéct do vnitřní části spotřebiče.
•Nepoužívejte spotřebič v blízkosti nebo u povrchů, které jsou citlivé na teplo nebo ty, které mohou
být poškozeny párou.
•Je-li spotřebič v provozu, teplota přístupných povrchů může být vyšší. Nedotýkejte se zahřátého
povrchu, jinak může dojít k popálení.
•S horkým spotřebičem nehýbejte. Můžete se popálit horkým jídlem, olejem nebo kapalinou.
•Před transportem a uskladněním nechte spotřebič zcela vychladnout.
DŮLEŽITÉ INFORMACE O NAPÁJECÍM KABELU
Nepoužívejte toto zařízení s prodlužovacím kabelem. Připojte napájecí kabel přímo pouze do elektrické
zásuvky na 230 V.
PŘÍPRAVA PŘED PRVNÍM POUŽITÍM
•Odstraňte všechny obaly, nálepky a štítky.
•Omyjte teplou mýdlovou vodou nádoby na vaření a skleněnou pokličku. Poté je opláchněte čistou
vodou a důkladně osušte.
•Ujistěte se, že je vnitřek těla spotřebiče čistý a bez nečistot. Během prvního použití spotřebiče se
může objevit mírný kouř a zápach. Jedná se o běžný stav u všech zahřívajících se zařízení, který
po několika použitích vymizí.
•Chcete-li zachovat nepřilnavou vrstvu nádoby na vaření co nejdéle, nepoužívejte ostré nebo
kovové předměty uvnitř nádoby na vaření. Doporučujeme používat silikonové, plastové nebo
dřevěné kuchyňské pomůcky.
•Pro grilování používejte pouze určenou grilovací desku.
•Napařovací nádobu vložte na varnou nádobu. Pravidelně kontrolujte stav vody, aby nedošlo k
jejímu úplnému odpaření.
•Při vaření (mimo program Gril) doporučujeme používat skleněnou pokličku.

POPIS SPOTŘEBIČE
1. Skleněná poklička
4. Ovládací panel
2. Varná nádoba
5. Grilovací deska
3. Základna spotřebiče
6. Napařovací nádoba
OVLÁDACÍ PANEL
PROGRAM
přepínání mezi programy
ČASOVAČ/TEPLOTA
nastavení teploty a délky vaření
START/STOP
spuštění a zastavení vaření
-
snížení teploty a délky vaření
+
zvýšení teploty a délky vaření
zapnutí a vypnutí spotřebiče

GRIL
Vložte na základnu spotřebiče Grilovací desku a umístěte na ni potraviny. Zvolte program Gril a
nastavte požadovanou teplotu a délku vaření. Po spuštění programu a dosažení provozní teploty začne
spotřebič automaticky odpočet nastavené délky vaření.
PÁRA
Vložte na základnu spotřebiče Varnou nádobu, doporučené množství je 1 litr vody. Na Varnou nádobu
položte Napařovací nádobu, umístěte do ní potraviny a zakryjte ji skleněnou pokličkou. Můžete
napařovat například zeleninu, mořské plody a jiné, nebo použít například pro sterilizaci. Zvolte program
Pára a nastavte požadovanou dobu vaření. Po spuštění programu a dosažení provozní teploty začne
spotřebič automaticky odpočet nastavené doby vaření.
RÝŽE
Vložte na základnu spotřebiče Varnou nádobu. Rýži opláchněte ve vodě, osolte ji a zakryjte ji skleněnou
pokličkou. Doporučujeme používat poměr 1:1 až 2:1 (1 až 2 šálky vody na 1 šálek rýže). Přidejte máslo,
pokud chcete vylepšit její chuť, zabráníte také jejímu slepování. U programu rýže není možné nastavení
teploty nebo doby vaření. Odpočítávání doby vaření nezačne, dokud není dosaženo uvaření a vsáknutí
vody rýží. Nepřidávejte více než 9 šálků nevařené rýže - celkový objem vody a rýže v nádobě na vaření
by neměl překročit 3/4 jejího objemu.
SOUS VIDE
Vaření pomocí metody Sous vide je pravé kuchařské umění! I když se jedná v podstatě o velmi
jednoduchý způsob vaření, tak je tento způsob vaření často používán gurmánskými kuchaři k přípravě
komplexních jídel, bohatých předkrmů a zeleniny. Nyní však můžete přinést pětihvězdičkovou kvalitu
vaření do vaší kuchyně.
•Tloušťka masa, drůbeže a ryb určí délku vaření. Po vyjmutí jídla ze sáčku použijte teploměr a
ověřte, že bylo dosaženo bezpečné vnitřní teploty.
•Bezpečnost potravin při manipulaci a vaření je vždy prioritou. Pokud si nejste jisti správným
uvařením, přidejte 30 minut vaření, abyste bezpečně pasterizovali vejce nebo drůbež.
•Osmažení po vaření dává potravinám křupavou strukturu. Po dokončení vaření nalejte olej na
rozpálenou pánev a vařené maso rychle osmahněte po dobu 30 sekund na každé straně.
•Zelenina se bude rychleji vařit, pokud je nakrájená na tenké malé kousky.
•Ovoce lze vařit pomocí Sous vide pro přípravu polev, pyré, sirupy a dalších. Vařte 2 až 2½ hodiny
při 70°C a před použitím nechte vychladnout v plastovém sáčku.
•Utěsněte potraviny vakuově do sáčků vhodné velikosti. Při vaření potravin vždy používejte sáčky
na vakuové balení.
Vložte na základnu spotřebiče Varnou nádobu s vodou a umístěte do nípotraviny tak, aby byl sáček
zcela ponořený. V případě vaření více sáčků je umístěte rovnoměrně po dně nádoby. Zakryjte varnou
nádobu skleněnou pokličkou. Zvolte program Sous vide a nastavte požadovanou teplotu a dobu vaření.
Po spuštění programu začne spotřebič ohřívat na zvolenou teplotu a odpočet nastavené doby vaření.
POMALÉ VAŘENÍ
Vložte na základnu spotřebiče Varnou nádobu a umístěte do ní potraviny. Zvolte program Pomalé
vaření - Nízká teplota (přibližně 85°C) nebo Pomalé vaření - Vysoká teplota (přibližně 94°C) a nastavte
požadovanou délku vaření. Po spuštění programu začne spotřebič automaticky odpočet nastavené
délky vaření.

Tipy pro pomalé vaření
•Během pomalého vaření si maso a zelenina zachovají více šťávy než v případě tradičního vaření.
•Nejlepšího výsledku vaření dosáhnete pokud zaplníte varnou nádobu alespoň z poloviny.
•Připravovat lze i malá množství, ale v takovém případě může být nezbytné upravit dobu vaření.
•Při vaření polévky nebo zeleniny nechejte dostatečný prostor pod pokličkou.
•Při vaření zeleniny a masa, vložte dolů do hrnce nejdříve zeleninu, poté maso a další suroviny.
•Nezapomeňte, že časté zvedání pokličky prodlouží délku vaření.
•Před vařením zmrazených potravin vždy přilejte ještě teplou tekutinu.
•Vzhledem k povaze pomalého vaření maso nezhnědne, jako kdyby se vařilo na pánvi nebo
v troubě. Před pomalým vaření není nutné maso nebo drůbež osmažit, ale můžete to provést,
pokud vám maso takto více chutná.
•Osmažení mletého hovězího masa, slaniny a klobásy před pomalým vařením může být žádoucí,
pokud chcete odstranit přebytečný tuk z masa. Maso by mělo být do vnitřního varného hrnce
vloženo tak, aby se nedotýkalo skleněné poklice.
•Libové maso jako například kuřecí či vepřová panenka se vaří rychleji než vláknité a tučné maso
jako hovězí plecko nebo vepřové ramínko. Vaření masa s kostí prodlouží dobu vaření oproti masu
bez kosti.
•Nakrájejte maso na menší kousky, pokud ho vaříte společně s předvařenými potravinami, jako
jsou fazole, ovoce či zelenina (houby, na kostičky nakrájená cibule, lilek nebo nadrobno nakrájená
zelenina).
•Některé potraviny jako například mrkev, brambory a řepa vyžadují delší vaření než maso, proto je
nakrájejte na menší kousky předtím než je přidáte k masu. Ujistěte se, že jste je položili na spodní
stranu vnitřního varného hrnce a zalejte je kapalinou.
•Nejplnější chuti při pomalém vaření dosáhnete přidáním nedrcených bylinek a koření.
•Fazole musí úplně změknout, než je bude možné kombinovat se sladkými nebo kyselými jídly.
•Při vaření v pomalém hrnci nezapomeňte, že tekutiny se v něm nevytvářejí stejně, jako je obvyklé
při klasickém vaření. Snižte množství tekutiny v receptu, který není určen pro pomalý hrnec.
Výjimkou z tohoto pravidla jsou polévky a rýže.
•Pamatujte, že tekutiny mohou být kdykoli přidány později.
•Čerstvé mléčné výrobky (mléko, kysanou smetanu nebo jogurt) přidávejte až těsně před
servírováním na stůl.
•Rýže, nudle a těstoviny se nedoporučují vařit po dlouhou dobu. Uvařte je samostatně a přidejte je
do pomalého hrnce až na posledních 30 minut.
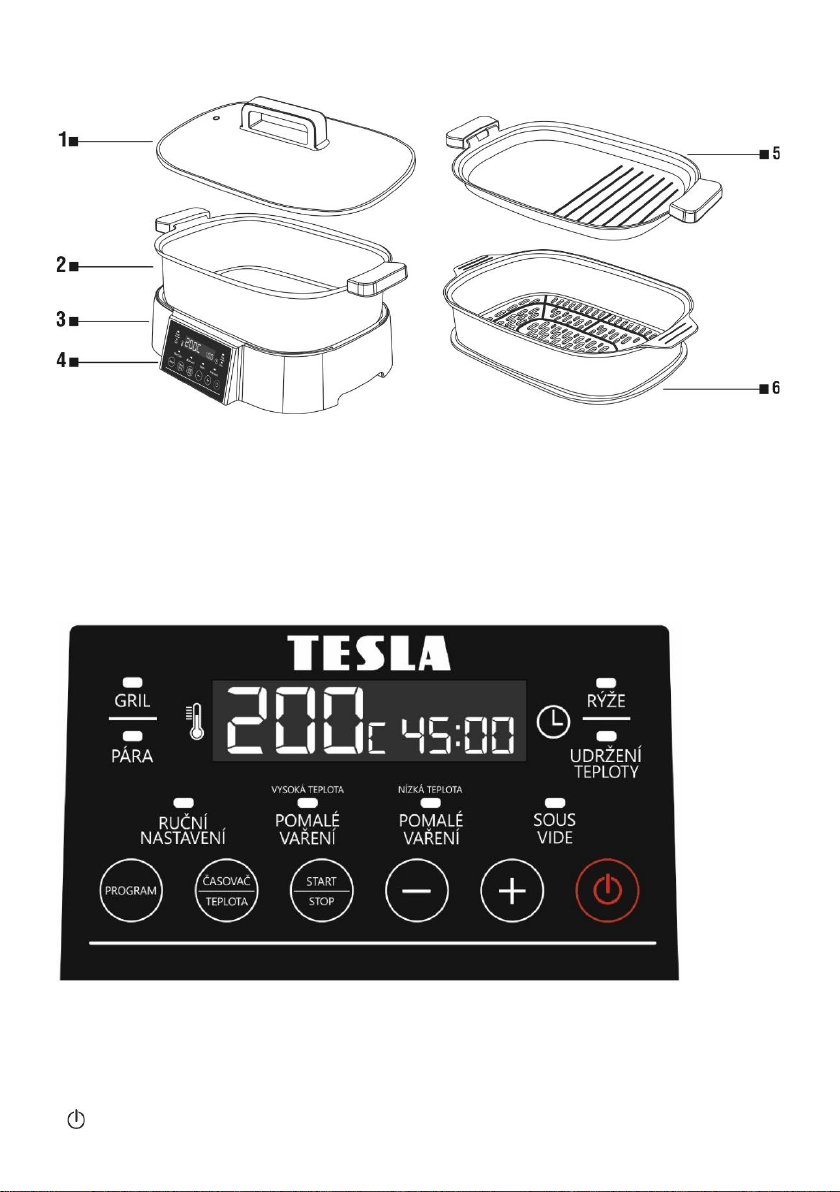
UDRŽENÍ TEPLOTY
Slouží k udržení teploty vašeho jídla po dokončení vaření (pouze u vybraných programů). Pokud je
funkce udržení teploty u vybraného programu aktivní, spustí se po dokončení vaření odpočet času,
abyste věděli, jak dlouho spotřebič udrží vaše jídlo teplé. Pokud chcete jídlo ohřát, zvolte program
Udržení teploty a nastavte požadovanou dobu pro udržení teploty. Po spuštění programu začne
spotřebič automaticky odpočet nastavené doby udržení teploty.
RUČNÍ NASTAVENÍ
Tento program můžete použít pro většinu způsobů přípravy jídel, například smažení, restování, dušení,
výroba lahodného domácího jogurtu, vaření vajec a další. Vložte na základnu spotřebiče Varnou
nádobu a umístěte do ní potraviny. Zvolte program Ruční nastavení a nastavte požadovanou teplotu a
délku vaření. Po spuštění programu začne spotřebič automaticky odpočet nastavené délky vaření.

JOGURT
Pro přípravu lahodného jogurtu můžete vyzkoušet náš ověřený recept.
•Pečlivě omyjte a osušte varnou nádobu a skleněnou pokličku.
•Vložte varnou nádobu na tělo spotřebiče.
•Nalejte do varné nádoby pasterizované mléko promíchané s jogurtem, např. 2 litry a 2 lžíce
jogurtu (nepoužívejte více než 4 litry mléka najednou).
•Zavřete skleněnou pokličku.
•Zvolte program „Ruční nastavení“, nastavte teplotu na 40°C a délku 8 hodin.
•Po dokončení vaření - fermentace ihned vypněte spotřebič, vyjměte varnou nádobu a uložte ji do
chladničky přes noc, aby se chuť plně rozvinula.
•Přidejte např. jahodovou marmeládu a užijte si svůj vlastní domácí jogurt.
Kvalita výsledného jogurtu je přímo úměrná kvalitě použitého mléka a jogurtu. Pokud použijete mléko
méně tučné, může být výsledný jogurt řidší. Doporučení doby vaření je 8 hodin, tuto dobu libovolně
upravte podle požadavku na výslednou hustotu jogurtu.
POKYNY PRO ČIŠTĚNÍ
•Vyčistěte spotřebič po každém použití a před uskladněním. Před čištěním odpojte spotřebič od
napájení nechte jej zcela vychladnout.
•Doporučujeme spotřebič čistit hned po jeho vychladnutí, než dojde k zaschnutí zbytků potravin.
•Varnou nádobu, grilovací desku a skleněnou pokličku je možné umývat v myčce na nádobí. Pro
delší životnost nepřilnavého povrchu varné nádoby a grilovací desky však doporučujeme ruční
mytí pomocí jemného hadříku nebo houbičky namočené v teplé mýdlové vodě. Po umytí nechte
varné nádoby důkladně vyschnout.
•Základnu spotřebiče vyčistěte pomocí jemného vlhkého hadříku.
•Nepoužívejte hrubé mycí hadříky nebo houbičky, čisticí prostředky ani abraziva, protože mohou
poškrábat nepřilnavou vrstvu varné nádoby.
TECHNICKÁ PODPORA
Potřebujete poradit s nastavením a provozem TESLA MultiCook M90 Premium?
Kontaktujte nás: www.tesla-electronics.eu
SPOTŘEBNÍ MATERIÁL A DOPLŇKY
Spotřební materiál můžete zakoupit v oficiálním obchodě značky TESLA eshop.tesla-electronics.eu.
ZÁRUČNÍ OPRAVA
Pro záruční opravu kontaktujte prodejce, u kterého jste TESLA produkt zakoupili.
Záruka se NEVZTAHUJE na:
•použití přístroje k jiným účelům
•běžné opotřebení
•nedodržení „Důležitých bezpečnostních pokynů“ uvedených v uživatelském manuálu
•elektromechanické nebo mechanické poškození způsobeném nevhodným použitím
•škodu způsobenou přírodním živlem jako je voda, oheň, statická elektřina, přepětí, atd.
•škodu způsobenou neoprávněnou opravou
•nečitelné sériové číslo přístroje

PROHLÁŠENÍ O SHODĚ
My, TESLA Electronics LTD, prohlašujeme, že toto zařízení je v souladu se základními požadavky a
dalšími příslušnými ustanoveními norem a předpisů relevantních pro daný typ zařízení.
Tento produkt splňuje požadavky Evropské Unie.
Informujte se prosím o místním systému separovaného sběru elektrických a
elektronických výrobků. Postupujte prosím podle místních předpisů a staré
výrobky nelikvidujte v běžném domácím odpadu. Správná likvidace starého
produktu pomáhá předejít potenciálním negativním důsledkům pro životní
prostředí a lidské zdraví.
Vzhledem k tomu, že se produkt vyvíjí a vylepšuje, vyhrazujeme si právo na úpravu uživatelského
manuálu. Aktuální verzi tohoto uživatelského manálu naleznete vždy na www.tesla-electronics.eu.
Design a specifikace mohou být změněny bez předchozího upozornění, tiskové chyby vyhrazeny.

Dear customer,
Thank you for choosing the TESLA MultiCook M90 Premium.
Please read the safe use rules carefully before use and follow all normal safety rules.
IMPORTANT SAFETY NOTICE
THIS PRODUCT IS FOR DOMESTIC USE ONLY.
Read and try to understand all instructions. Failure to follow the instructions below may result in
electric shock, fire, or serious injury. The warnings, cautions, and instructions in this manual may not
cover all possible conditions and situations that may occur. The operator must understand that
common sense and caution is a factor that cannot be built into this product, but must be possessed by
the operator.
This device is a complex electromechanical device, please pay attention to the following instructions:
•A cooking vessel must be installed to use this appliance.
•Do not use a damaged or cracked cooking vessel.
•Never use the appliance without food or liquid in the cooking containers.
•Do not place the appliance on the edge of a table during operation. Make sure the surface is flat,
clean, free of water and other obstacles.
•Do not use outdoors or in excessively hot, dusty or humid environments.
•Keep it away from flammable and volatile substances.
•Do not leave the appliance unattended.
•Protect the appliance from being hit by liquids and especially from overflowing during cooking. Do
not exceed the maximum amount of ingredients inserted, a maximum of 2 cm below the upper
edge.
•When cooking foods that foam or expand, such as rice, legumes, beans, peas, lentils, dried
vegetables, never fill the pot more than 3/4 of the volume of the cooking container.
•The glass lid has been specially modified to be more durable and safer than normal glass, but it is
not unbreakable, so be careful when handling the glass lid.
•Do not allow water or other liquids to enter the appliance to avoid electric shock.
•Connect the appliance only to a grounded outlet. Always make sure the plug is properly inserted
into the socket.
•Before cleaning, unplug the power cord and let the appliance cool down.
•The appliance is not designed to be operated using an external timer or a separate remote control.
•Use only original TESLA accessories intended for this model.
•If the appliance is used incorrectly or for professional or semi-professional purposes, or if it is not
used according to the instructions in the user manual, the warranty becomes void.
•The manufacturer and importer into the European Union is not responsible for damages caused by
the operation of the appliance, such as injuries, scalds, fires, injuries, impairment of other items,
etc.
•WARNING: Plastic bags used to package this appliance can be hazardous. To avoid the risk of
suffocation, keep these bags out of the reach of children. These bags are not toys.
EN

WARNING:
NEVER SUBMERGE THE APPLIANCE IN WATER OR ANY OTHER LIQUID.
NEVER PUT FOOD OR POUR LIQUIDS INTO THE APPLIANCE. DO NOT COOK WITHOUT
COOKING OR GRILL UTENSILS!
CAUTION HOT SURFACE
•Do not place the appliance on a flammable surface.
•The glass lid, cooking pot and grill plate are very hot, be careful.
•Steam may be released during cooking, do not lean over the appliance.
•To avoid getting scalded by escaping steam when lifting the glass lid, always lift it carefully away
from you. Dripping water never can not flow into the inner parts appliances.
•Do not use appliance nearby or at surfaces which they are sensitive on heat or those which they
can be damaged.
•If the appliance is in operation, the temperature accessible surfaces can be higher. Do not touch
the heated one surface, otherwise can burn.
•With hot appliance don't move You can burn yourself hot food, oil or liquid .
•Before transport and storage leave appliance completely to cool down.
IMPORTANT INFORMATION ABOUT THE POWER CORD
Do not use this device with an extension cord. Connect the power cord directly to a 230 V power outlet
only.
PREPARATION BEFORE FIRST USE
•Remove all packaging, stickers and labels.
•Wash the cooking containers and the glass lid with warm, soapy water. Then rinse them off with
clean water and thoroughly dry.
•Make sure there is an inside bodies appliances clean and free of impurities. During the first use
appliances can discover smoke and smell. This is a common one status for everyone heating
devices, which after several uses disappears.
•If you want to preserve non-stick layer containers on cooking as long as possible, do not use keen
or metallic subjects inside containers on cooking . We recommend use silicone, plastic or wooden
kitchen gadgets.
•For grilling use only determined barbecue plate.
•Steaming for time insert on they cook for time. Regularly check state of water to avoid it complete
evaporation.
•At cooking (outside the Grill program) is recommended use glass lid.

DESCRIPTION
1Glass lid
4 Control panel
2Boiling vessel
5 Grill plate
3Base appliances
6 Steaming container
CONTROL PANEL
PROGRAM
switching between programs
TIMER/TEMPERATURE
temperature and cooking time settings
START/STOP
start and stop cooking
-
reducing the temperature and duration of cooking
+
increasing the temperature and duration of cooking
turning the appliance on and off

GRILL
Place the grill plate on the base of the appliance and place the food on it. Select the Grill program and
set the desired temperature and cooking time. After starting the program and reaching the operating
temperature, the appliance will automatically start counting down the set cooking time.
STEAM
Place a cooking vessel on the base of the appliance, the recommended amount is 1 liter of water. Place
the Steaming Pot on the Cooking Pot, place the food in it and cover it with the glass lid. You can steam,
for example, vegetables, seafood and others, or use it for sterilization, for example. Select the Steam
program and set the desired cooking time. After starting the program and reaching the operating
temperature, the appliance will automatically start counting down the set cooking time.
RICE
Place the cooking pot on the base of the appliance. Rinse the rice in water, salt it and cover it with a
glass lid. We recommend using a ratio of 1:1 to 2:1 (1 to 2 cups of water to 1 cup of rice). Add butter if
you want to improve its taste, it will also prevent it from sticking. It is not possible to set the
temperature or cooking time for the rice program. The cooking time countdown will not start until the
rice is cooked and the water has been absorbed. Do not add more than 9 cups of uncooked rice - the
total volume of water and rice in the cooking pot should not exceed 3/4 of its volume.
SOUS VIDE
Cooking using the Sous vide method is a true culinary art! Although it is essentially a very simple
cooking method, this cooking method is often used by gourmet chefs to prepare complex meals, rich
appetizers and vegetables. But now you can bring five-star cooking quality to your kitchen.
•The thickness of meat, poultry and fish will determine the cooking time. After removing the food
from the bag, use a thermometer to verify that a safe internal temperature has been reached.
•Food safety during handling and cooking is always a priority. If you are unsure of the correct
cooking time, add 30 minutes of cooking time to safely pasteurize your eggs or poultry.
•Frying after cooking gives food a crunchy texture. After cooking, pour oil into a hot pan and
quickly sear the cooked meat for 30 seconds on each side.
•Vegetables will cook faster if they are cut into thin, small pieces.
•Fruit can be cooked using Sous vide to make toppings, purees, syrups and more. Cook for 2 to 2½
hours at 70°C and leave to cool in a plastic bag before use.
•Vacuum seal the food in bags of the appropriate size. Always use vacuum sealer bags when
cooking food.
Place a cooking container with water on the base of the appliance and place the food in it so that the
bag is completely submerged. If cooking several bags, place them evenly on the bottom of the
container. Cover the cooking pot with a glass lid. Select the Sous vide program and set the desired
temperature and cooking time. After starting the program, the appliance will start to heat up to the
selected temperature and count down the set cooking time.
SLOW COOKING
Place the cooking pot on the base of the appliance and place the food in it. Select the program Slow
cooking - Low temperature (approx. 85°C) or Slow cooking - High temperature (approx. 94°C) and set
the desired cooking time. After starting the program, the appliance will automatically start counting
down the set cooking time.

Tips for slow cooking
•During slow cooking, meat and vegetables retain more juice than in the case of traditional cooking.
•You will achieve the best cooking result if you fill the cooking vessel at least half full.
•Small quantities can also be prepared, but in this case it may be necessary to adjust the cooking
time.
•Leave enough space under the lid when cooking soup or vegetables.
•When cooking vegetables and meat, put the vegetables in the pot first, then the meat and other
ingredients.
•Remember that frequently lifting the lid will increase the cooking time.
•Always add warm liquid before cooking frozen food.
•Due to the nature of slow cooking, the meat will not brown like it would if it were cooked in a pan
or oven. It is not necessary to sear the meat or poultry before slow cooking, but you can do so if
you prefer the meat that way.
•Frying ground beef, bacon and sausage before slow cooking may be desirable if you want to
remove excess fat from the meat. The meat should be placed in the inner cooking pot so that it
does not touch the glass lid.
•Lean meat such as chicken or pork tenderloin cooks faster than fibrous and fatty meat such as
beef shoulder or pork shoulder. Cooking bone-in meat will increase the cooking time compared to
boneless meat.
•Cut the meat into smaller pieces if you are cooking it together with pre-cooked foods such as
beans, fruit or vegetables (mushrooms, diced onions, eggplant or finely chopped vegetables).
•Some foods such as carrots, potatoes and beets require longer cooking than meat, so cut them
into smaller pieces before adding them to the meat. Make sure you place them on the underside of
the inner cooking pot and pour the liquid over them.
•You can achieve the fullest flavor during slow cooking by adding uncrushed herbs and spices.
•Beans must be completely tender before they can be combined with sweet or sour foods.
•When cooking in a slow cooker, do not forget that liquids do not form in it in the same way as is
usual in classic cooking. Reduce the amount of liquid in a non-slow cooker recipe. An exception to
this rules they are soups and rice.
•Remember that liquids they can be whenever added later on.
•Freshly milky products (milk, sour cream cream or yogurt) add until tightly before serving on table.
•Rice, noodles and pasta are not recommended cook for a long time time. Cook them separately
and add them to the slow cooker for up to the last 30 minutes.
KEEP WARM
Serves to keep your food warm after cooking is complete (only for selected programs). If the Keep
warm function is active for the selected program, a countdown will start after cooking is complete so
you know how long the appliance will keep your food warm. If you want to reheat the food, select the
Keeping warm program and set the required time for keeping warm. After starting the program, the
appliance will automatically start counting down the set temperature retention time.
MANUAL SETTINGS
You can use this program for most food preparation methods, such as frying, sautéing, stewing,
making delicious homemade yogurt, cooking eggs and more. Place the cooking pot on the base of the
appliance and place the food in it. Select the Manual setting program and set the desired temperature
and cooking time. After starting the program, the appliance will automatically start counting down the
set cooking time.

YOGURT
You can try our proven recipe to prepare delicious yogurt.
•Carefully wash and dry the cooking pot and the glass lid.
•Place the cooking container on the body of the appliance.
•Pour pasteurized milk mixed with yogurt into the cooking pot, e.g. 2 liters and 2 spoons of yogurt
(do not use more than 4 liters of milk at a time).
•Close it glass lid.
•Select the "Manual setting" program, set the temperature to 40°C and the duration to 8 hours.
•After finishing cooking - fermentation, immediately turn off the appliance, remove the cooking
vessel and store it in the refrigerator overnight to fully develop the flavor.
•Add, for example, strawberry jam and enjoy your own homemade yogurt.
The quality of the resulting yogurt is directly proportional to the quality of the milk and yogurt used. If
you use less fat milk, the resulting yogurt may be thinner. The recommended cooking time is 8 hours,
adjust this time arbitrarily according to the requirement for the resulting yogurt density.
CLEANING
•Clean the appliance after each use and before storage. Before cleaning, unplug the appliance and
let it cool down completely.
•We recommend cleaning the appliance immediately after it cools down, before any food residue
dries.
•The cooking pot, grill plate and glass lid can be washed in the dishwasher. However, for a longer
life of the non-stick surface of the cooking pot and grill plate, we recommend hand washing with a
soft cloth or sponge soaked in warm soapy water. After washing leave cooking containers
thoroughly to dry out.
•Base appliances clean up help soft wet cloth.
•Do not use roughly washing cloths or sponges, cleaning means or abrasives because they can
scratch non-stick layer cooking container.
TECHNICAL SUPPORT
Do you need advice on setting up and operating the TESLA MultiCook M90 Premium?
Contact us: www.tesla-electronics.eu
CONSUMABLES AND ACCESSORIES
You can buy consumables in the official store of the TESLA brand eshop.tesla-electronics.eu.
WARRANTY REPAIR
For warranty repair, contact the dealer where you purchased the TESLA product.

The warranty does NOT apply to:
•using the device for other purposes
•normal wear
•failure to observe the "Important Safety Instructions" listed in the user manual
•electromechanical or mechanical damage caused by improper use
•damage caused by natural elements such as water, fire, static electricity, overvoltage, etc.
•damage caused by unauthorized repair
•unreadable device serial number
DECLARATION OF CONFORMITY
We, TESLA Electronics LTD, declare that this equipment is in compliance with the essential
requirements and other relevant provisions of the standards and regulations relevant to the type of
equipment.
This product meets the requirements of the European Union.
Please inquire about your local separate collection system for electrical and
electronic products. Please follow local regulations and do not dispose of old
products in normal household waste. Proper disposal of the old product helps
prevent potential negative consequences for the environment and human health.
As the product is being developed and improved, we reserve the right to modify the user manual. You
can always find the current version of this user manual at www.tesla-electronics.eu.
Design and specifications are subject to change without notice, printing errors reserved.

Sehr geehrter Kunde,
vielen Dank, dass Sie sich für den TESLA MultiCook M90 Premium entschieden haben.
Bitte lesen Sie die Regeln zur sicheren Verwendung vor der Verwendung sorgfältig durch
und befolgen Sie alle normalen Sicherheitsregeln.
WICHTIGER SICHERHEITSHINWEIS:
DIESES PRODUKT IST NUR FÜR DEN HAUSGEBRAUCH BESTIMMT.
Lesen Sie alle Anweisungen und versuchen Sie, sie zu verstehen. Die Nichtbeachtung der folgenden
Anweisungen kann zu Stromschlägen, Bränden oder schweren Verletzungen führen. Die Warnungen,
Vorsichtsmaßnahmen und Anweisungen in diesem Handbuch decken möglicherweise nicht alle
möglichen Bedingungen und Situationen ab, die auftreten können. Der Bediener muss verstehen, dass
gesunder Menschenverstand und Vorsicht ein Faktor sind, der nicht in dieses Produkt eingebaut
werden kann, sondern über den Bediener verfügen muss.
Bei diesem Gerät handelt es sich um ein komplexes elektromechanisches Gerät, bitte beachten Sie
folgende Hinweise:
•Um dieses Gerät verwenden zu können, muss ein Kochgefäß installiert sein.
•Benutzen Sie kein beschädigtes oder gesprungenes Kochgefäß.
•Benutzen Sie das Gerät niemals ohne Lebensmittel oder Flüssigkeiten im Garbehälter.
•Stellen Sie das Gerät während des Betriebs nicht auf die Tischkante. Stellen Sie sicher, dass die
Oberfläche flach, sauber und frei von Wasser und anderen Hindernissen ist.
•Nicht im Freien oder in übermäßig heißen, staubigen oder feuchten Umgebungen verwenden.
•Halten Sie es von brennbaren und flüchtigen Substanzen fern.
•Lassen Sie das Gerät nicht unbeaufsichtigt.
•Schützen Sie das Gerät beim Kochen vor dem Eindringen von Flüssigkeiten und insbesondere vor
dem Überlaufen. Überschreiten Sie nicht die maximale Menge an Zutaten, maximal 2 cm unter der
Oberkante.
•Füllen Sie beim Garen von schäumenden oder sich ausdehnenden Speisen wie Reis,
Hülsenfrüchten, Bohnen, Erbsen, Linsen, Trockengemüse den Topf nie zu mehr als 3/4 des
Volumens des Garbehälters.
•Der Glasdeckel wurde speziell modifiziert, um haltbarer und sicherer als normales Glas zu sein. Er
ist jedoch nicht unzerbrechlich. Seien Sie daher beim Umgang mit dem Glasdeckel vorsichtig.
•Lassen Sie kein Wasser oder andere Flüssigkeiten in das Gerät eindringen, um einen Stromschlag
zu vermeiden.
•Schließen Sie das Gerät nur an eine geerdete Steckdose an. Stellen Sie immer sicher, dass der
Stecker richtig in die Steckdose eingesteckt ist.
•Ziehen Sie vor der Reinigung den Netzstecker und lassen Sie das Gerät abkühlen.
•Das Gerät ist nicht für die Bedienung mit einer externen Zeitschaltuhr oder einer separaten
Fernbedienung ausgelegt.
•Verwenden Sie nur für dieses Modell vorgesehenes Original-TESLA-Zubehör.
•Bei unsachgemäßer Verwendung des Geräts für professionelle oder semiprofessionelle Zwecke
oder wenn es nicht gemäß den Anweisungen in der Bedienungsanleitung verwendet wird, erlischt
die Garantie.
DE

•Der Hersteller und Importeur in die Europäische Union haftet nicht für Schäden, die durch den
Betrieb des Geräts entstehen, wie z. B. Verletzungen, Verbrühungen, Brände, Verletzungen,
Beeinträchtigungen anderer Gegenstände usw.
•WARNUNG: Plastiktüten, die zum Verpacken dieses Geräts verwendet werden, können gefährlich
sein. Um Erstickungsgefahr zu vermeiden, bewahren Sie diese Beutel außerhalb der Reichweite
von Kindern auf. Diese Taschen sind kein Spielzeug.
WARNUNG:
TAUCHEN SIE DAS GERÄT NIEMALS IN WASSER ODER ANDERE FLÜSSIGKEITEN.
NIEMALS LEBENSMITTEL IN DAS GERÄT LEBEN ODER FLÜSSIGKEITEN EINschütten. NICHT
OHNE KOCH- ODER GRILLGERÄTE KOCHEN!
ACHTUNG, HEISSE OBERFLÄCHE
•Stellen Sie das Gerät nicht auf eine brennbare Oberfläche.
•Der Glasdeckel, der Kochtopf und die Grillplatte sind sehr heiß, seien Sie vorsichtig.
•Während des Kochens kann Dampf austreten. Beugen Sie sich nicht über das Gerät.
•Um beim Anheben des Glasdeckels Verbrühungen durch austretenden Dampf zu vermeiden, heben
Sie ihn stets vorsichtig von sich weg. Tropfend Wasser niemals kann nicht ins Innere fließen Teile
Haushaltsgeräte.
•Verwende nicht Gerät in der Nähe oder an Flächen, die sie sind empfindlich An Hitze oder
diejenigen, die Sie können Sei beschädigt ein Paar.
•Wenn das Gerät in Betrieb ist, wird die Temperatur angezeigt zugänglich Oberflächen dürfen Sei
höher. Berühren Sie nicht das erhitzte Gerät Oberfläche, sonst dürfen brennen.
•Mit heiß Gerät beweg dich nicht Du kannst dich verbrennen heiß Essen , Öl oder flüssig.
•Vor Transport und Lagerung verlassen Gerät vollständig abkühlen.
WICHTIGE INFORMATIONEN ZUM NETZKABEL
Benutzen Sie dieses Gerät nicht mit einem Verlängerungskabel. Schließen Sie das Netzkabel nur direkt
an eine 230-V-Steckdose an.
VORBEREITUNG VOR DEM ERSTEN GEBRAUCH
•Entfernen Sie sämtliche Verpackungen, Aufkleber und Etiketten.
•Waschen Sie die Garbehälter und den Glasdeckel mit warmem Seifenwasser. Anschließend
abspülen mit klarem Wasser und gründlich reinigen trocken.
•Stellen Sie sicher, dass es ein Inneres gibt Körper Haushaltsgeräte sauber und frei von
Verunreinigungen. Während der erste verwenden Geräte können _ entdecken sanftmütig Rauch
und Geruch. Das kommt häufig vor Status für alle Heizgeräte, die nach mehreren Verwendet
verschwindet.
•Wenn Sie bewahren möchten Antihaft Schicht Behälter An So lange wie möglich kochen, nicht
verwenden erpicht oder metallisch Fächer innen Behälter An Kochen . Wir empfehlen verwenden
Silikon, Kunststoff oder hölzern Küche Gadgets.
•Zum Grillen verwenden nur bestimmt Grill Platte.
•Dämpfen für die Zeit einfügen An Sie kochen für die Zeit. Regelmäßig überprüfen Zustand Wasser,

um dies zu vermeiden vollständig Verdunstung.
•Bei Garen (außerhalb des Grillprogramms) wird empfohlen verwenden Glas Deckel.
GERÄTEBESCHREIBUNG
1Glas Deckel
4 Bedienfeld
2Sieden Schiff
5 Grillplatte
3Base Haushaltsgeräte
6 Dampfbehälter
BEDIENFELD

PROGRAMM
zwischen Programmen wechseln
TIMER/TEMPERATUR
Temperatur- und Garzeiteinstellungen
START STOP
Beginnen und stoppen Sie das Kochen
-
Reduzierung der Temperatur und Gardauer
+
Erhöhen der Temperatur und der Gardauer
Ein- und Ausschalten des Geräts
GRILL
Stellen Sie die Grillplatte auf den Sockel des Geräts und legen Sie das Grillgut darauf. Wählen Sie das
Grillprogramm und stellen Sie die gewünschte Temperatur und Garzeit ein. Nach dem Start des
Programms und dem Erreichen der Betriebstemperatur beginnt das Gerät automatisch mit dem
Countdown der eingestellten Garzeit.
DAMPF
Stellen Sie ein Kochgefäß auf den Boden des Geräts. Die empfohlene Menge beträgt 1 Liter Wasser.
Stellen Sie den Dampftopf auf den Kochtopf, geben Sie die Speisen hinein und decken Sie ihn mit dem
Glasdeckel ab. Sie können beispielsweise Gemüse, Meeresfrüchte und andere dämpfen oder zum
Beispiel zum Sterilisieren verwenden. Wählen Sie das Dampfprogramm und stellen Sie die gewünschte
Garzeit ein. Nach dem Start des Programms und dem Erreichen der Betriebstemperatur beginnt das
Gerät automatisch mit dem Countdown der eingestellten Garzeit.
REIS
Stellen Sie den Kochtopf auf den Sockel des Geräts. Spülen Sie den Reis in Wasser ab, salzen Sie ihn
und decken Sie ihn mit einem Glasdeckel ab . Wir empfehlen ein Verhältnis von 1:1 bis 2:1 (1 bis 2
Tassen Wasser auf 1 Tasse Reis). Fügen Sie Butter hinzu, wenn Sie den Geschmack verbessern
möchten. Dadurch wird auch ein Ankleben verhindert. Für das Reisprogramm ist es nicht möglich,
Temperatur oder Garzeit einzustellen. Der Countdown der Garzeit beginnt erst, wenn der Reis gar ist
und das Wasser aufgesogen ist. Geben Sie nicht mehr als 9 Tassen ungekochten Reis hinzu –die
Gesamtmenge an Wasser und Reis im Kochtopf sollte 3/4 seines Volumens nicht überschreiten.
SOUS-VIDE
Kochen mit der Sous-Vide-Methode ist eine wahre Kochkunst! Obwohl es sich im Wesentlichen um
eine sehr einfache Kochmethode handelt, wird diese Kochmethode häufig von Gourmetköchen
verwendet, um komplexe Mahlzeiten, reichhaltige Vorspeisen und Gemüse zuzubereiten. Aber jetzt
können Sie Fünf-Sterne-Kochqualität in Ihre Küche bringen.
•Die Dicke von Fleisch, Geflügel und Fisch bestimmt die Garzeit. Nachdem Sie die Lebensmittel aus
dem Beutel genommen haben, überprüfen Sie mit einem Thermometer, ob eine sichere
Innentemperatur erreicht wurde.
•Die Lebensmittelsicherheit beim Umgang und Kochen hat immer Priorität. Wenn Sie sich über die
richtige Garzeit nicht sicher sind, fügen Sie 30 Minuten Garzeit hinzu, um Ihre Eier oder Ihr
Geflügel sicher zu pasteurisieren.
•Das Frittieren nach dem Kochen verleiht den Speisen eine knusprige Konsistenz. Geben Sie nach
dem Garen Öl in eine heiße Pfanne und braten Sie das gegarte Fleisch auf jeder Seite 30 Sekunden
lang scharf an.
•Gemüse gart schneller, wenn es in dünne, kleine Stücke geschnitten wird.
•Obst kann mit Sous Vide gekocht werden, um Toppings, Pürees, Sirupe und mehr herzustellen.
2 bis 2½ Stunden bei 70°C kochen und vor der Verwendung in einer Plastiktüte abkühlen lassen.
•Vakuumieren Sie die Lebensmittel in Beuteln der entsprechenden Größe. Verwenden Sie beim

Garen von Speisen immer Vakuumierbeutel.
Stellen Sie einen Garbehälter mit Wasser auf den Boden des Geräts und legen Sie die Lebensmittel so
hinein, dass der Beutel vollständig eingetaucht ist. Wenn Sie mehrere Beutel kochen, legen Sie diese
gleichmäßig auf den Boden des Behälters. Decken Sie den Kochtopf mit einem Glasdeckel ab. Wählen
Sie das Sous- Vide-Programm und stellen Sie die gewünschte Temperatur und Garzeit ein. Nach dem
Start des Programms beginnt das Gerät mit dem Aufheizen auf die gewählte Temperatur und zählt die
eingestellte Garzeit herunter.
LANGSAMGAREN
Stellen Sie den Kochtopf auf den Boden des Geräts und geben Sie die Speisen hinein. Wählen Sie das
Programm Schongaren - Niedrige Temperatur (ca. 85°C) oder Schongaren - Hohe Temperatur (ca.
94°C) und stellen Sie die gewünschte Garzeit ein. Nach dem Start des Programms beginnt das Gerät
automatisch mit dem Herunterzählen der eingestellten Garzeit.
Tipps zum langsamen Kochen
•Beim langsamen Garen behalten Fleisch und Gemüse mehr Saft als beim herkömmlichen Garen.
•Das beste Kochergebnis erzielen Sie, wenn Sie das Kochgefäß mindestens zur Hälfte füllen.
•Es können auch kleine Mengen zubereitet werden, allerdings kann in diesem Fall eine Anpassung
der Garzeit erforderlich sein.
•Lassen Sie beim Kochen von Suppe oder Gemüse ausreichend Platz unter dem Deckel.
•Wenn Sie Gemüse und Fleisch kochen, geben Sie zuerst das Gemüse in den Topf, dann das Fleisch
und die anderen Zutaten.
•Denken Sie daran, dass häufiges Anheben des Deckels die Garzeit verlängert.
•Geben Sie vor dem Garen von Tiefkühlkost immer warme Flüssigkeit hinzu.
•Aufgrund der Natur des langsamen Garens wird das Fleisch nicht so braun, wie es beim Garen in
der Pfanne oder im Ofen der Fall wäre. Es ist nicht notwendig, das Fleisch oder Geflügel vor dem
langsamen Garen anzubraten, aber Sie können es tun, wenn Sie das Fleisch auf diese Weise
bevorzugen.
•Wenn Sie überschüssiges Fett aus dem Fleisch entfernen möchten, kann es sinnvoll sein,
Rinderhackfleisch, Speck und Wurst vor dem langsamen Garen zu braten. Das Fleisch sollte so in
den inneren Kochtopf gelegt werden, dass es den Glasdeckel nicht berührt.
•Mageres Fleisch wie Hähnchen- oder Schweinefilet gart schneller als faseriges und fettiges
Fleisch wie Rinderschulter oder Schweineschulter. Das Garen von Fleisch mit Knochen verlängert
die Garzeit im Vergleich zu Fleisch ohne Knochen.
•Schneiden Sie das Fleisch in kleinere Stücke, wenn Sie es zusammen mit vorgegarten
Lebensmitteln wie Bohnen, Obst oder Gemüse (Pilze, Zwiebelwürfel, Auberginen oder fein
gehacktes Gemüse) zubereiten.
•Einige Lebensmittel wie Karotten, Kartoffeln und Rüben erfordern eine längere Garzeit als Fleisch.
Schneiden Sie sie daher in kleinere Stücke, bevor Sie sie zum Fleisch geben. Stellen Sie sie
unbedingt auf die Unterseite des inneren Kochtopfs und gießen Sie die Flüssigkeit darüber.
•Den vollsten Geschmack erreichen Sie beim langsamen Garen, indem Sie unzerkleinerte Kräuter
und Gewürze hinzufügen.
•Bohnen müssen vollständig zart sein, bevor sie mit süßen oder sauren Speisen kombiniert werden
können.
•Vergessen Sie beim Garen im Slow Cooker nicht, dass sich darin keine Flüssigkeiten bilden, wie es
beim klassischen Kochen üblich ist. Reduzieren Sie die Flüssigkeitsmenge in einem Rezept ohne
Slow Cooker. Eine Ausnahme hiervon Regeln sie sind Suppen und Reis.
Table of contents
Languages:
Other Tesla Kitchen Appliance manuals

Tesla
Tesla MultiCook M50 User manual

Tesla
Tesla MultiCook M80 Deluxe User manual

Tesla
Tesla SM100W User manual

Tesla
Tesla AirCook & Steam QS550 XL User manual

Tesla
Tesla AirCook Q80 User manual

Tesla
Tesla RW091M User manual

Tesla
Tesla EliteCook K80 Deluxe User manual

Tesla
Tesla AirCook Q10 User manual

Tesla
Tesla MultiCook MC600 Pro User manual

Tesla
Tesla ThermoCook TMX3000 User manual